Welcome to the Sparkles Christmas Buddies Challenge #147 for the month of April. Our host this month, Caz, chose the theme of Christmas Packages. I went back to one of my favorite Christmas DSP (designer series paper) sets from two Christmases ago for my packages.
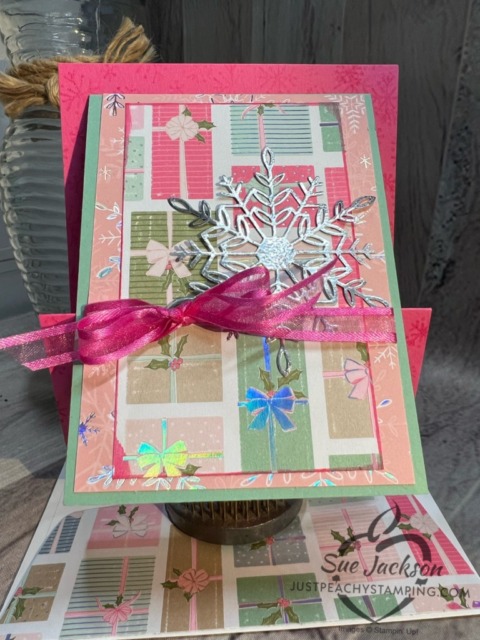
Here’s my card:
This whole post is going to have to be very short. I had some pretty major oral surgery yesterday and I am still pretty loopy. That being said, I was inspired by a Connie Stewart Simply Simple Stamping video to create this card. The best thing about her videos is that the directions are simple and so easy to follow along. You can find her video here. Another fabulous thing about this card is that it starts with a z-fold card. I’ll be creating a number of these cards for Christmas this year!
Thank you for stopping by this very short blog post. I hope you enjoy following along with Connie Stewart’s video. She’s wonderful!
This month, our blog hop theme is Party Time! We hope you will be inspired by all the beautiful creations the Pals made for you! As you hop from blog to blog, we would love for you to leave a comment. You will find the lineup at the end of my post to help you “hop” along from Pal to Pal.
Here’s my party time card:
Since I’ve used the book binding easel fold, this card also qualifies for the Creative Creases Challenge. If you love fun folds, this challenge is for you because that’s the only requirement!
I’ve already posted two of these bookbinding easel fun fold cards. You can see them here and here. The second link has directions and step-by-step pictures for creating this fun fold card.
For today’s card, instead of using a full front panel, I used two diagonal panels.
For today’s card, I used two diagonal panels instead of the whole panel for the front.
To create the diagonal panels, trim a piece of DSP to 1/8 inch less than your width and height of the front part of the card.
Then, trim the DSP in half diagonally from the top right side down to the bottom left side.
If the panels don’t fit the way you want, you can trim down the sides down.
HINT: Don’t trim on the diagonal line because the pattern won’t line back up properly.
For this card, I used the scalloped border die from the Scalloped Contours die set and a piece of an adhesive foam sheet to create the stop for the easel part of the card.
I’m kind of stinking pleased the way the inside Scalloped Contour white cardstock sits under the scalloped stop for the easel.
These cards are super cute and fun to make! I hope you try one out soon!
Back to the Pals’ Blog Hop:
More inspiration awaits, so use the lineup below to visit the rest of the Design Team. The Pals are excited to show you what they’ve created! Then, please mark your calendars for our next blog hop on April 12, 2023, when our theme will be Flowers in the Garden, showcasing cards/projects that use flowers as the focal point of the project.
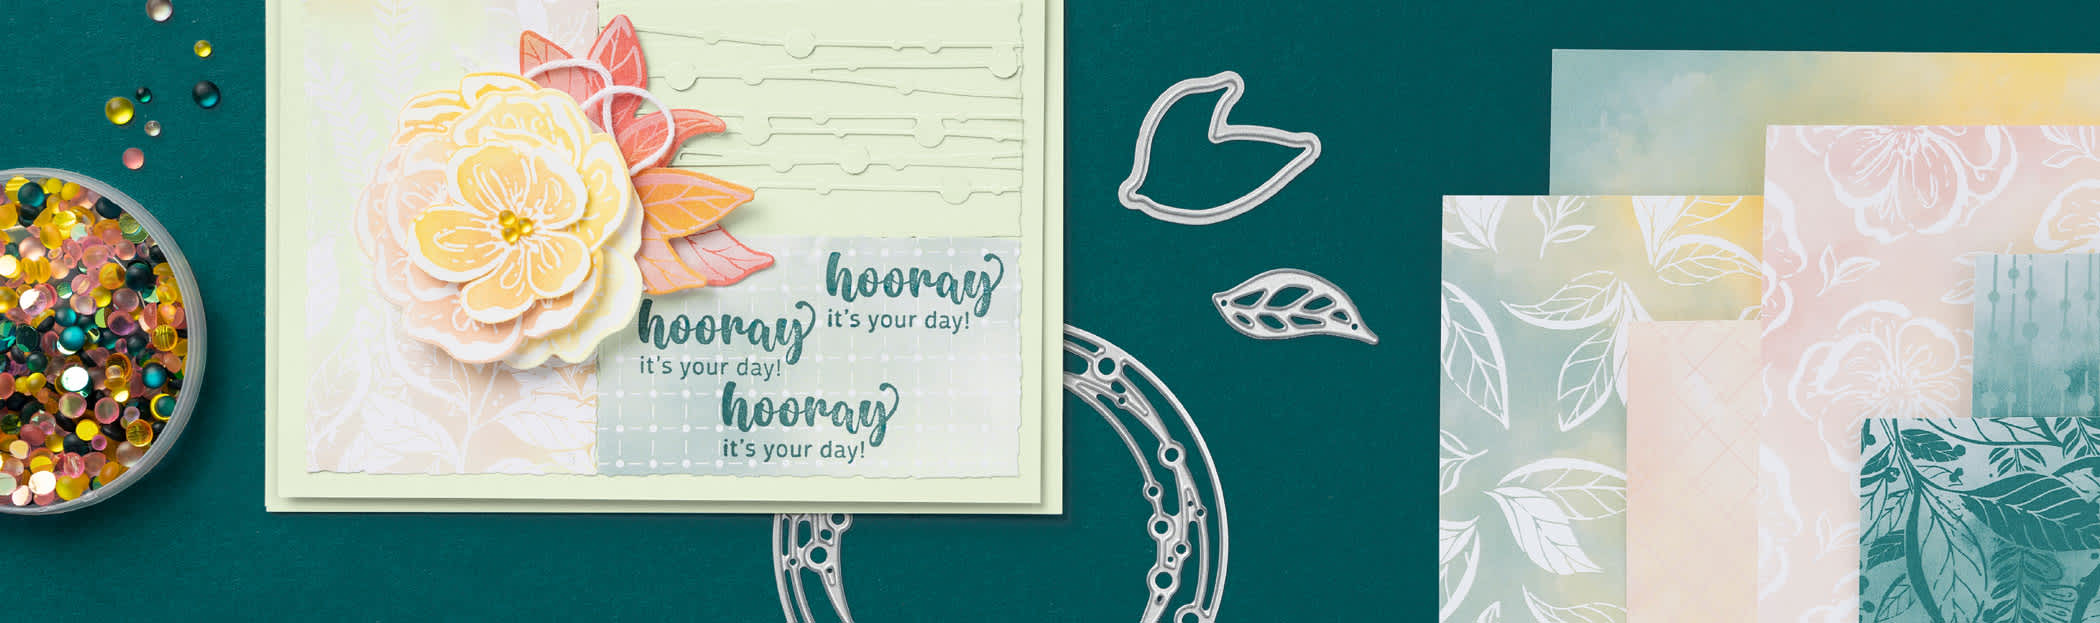
Starting on March 1, 2023, Stampin’ Up! released an ONLINE EXCLUSIVE line of products! I’ve already gotten my Irresistible Blooms bundle, and the DSP will be joining my stash of DSP next week!
Just Look at These Exclusive Products!
Even though the two circle punches are at the end of the following product line, they are well worth getting! I use my circle punches very often and they are worth the investment!
Do you live in the United States? Do you want to place an order? Of course you do!
If you are placing an order under $150, please use the host code below.
If you are placing an order over $150, please contact me first so you can take advantage of the Stampin’ Rewards for your order!
HOST CODE for MARCH, 2023 is N46V3KNP
Again, thank you for stopping by today! Please take another moment and leave a comment.
https://secretstamper.com/2023/01/anything-goes-with-a-fun-fold-for-creative-creases-49/Welcome to the January SU! Demonstrators Fun Fold Blog Hop! I love creating fun folds and watching videos to create a new-to-me fun fold. Each participating demo’s website is listed at the end of my post. We all hope you will hop along from one demo to the next to see what each of us created. I know I’m excited to see everyone’s project!
I took the idea for my card this month from Debbie Mageed, our blog hop coordinator. She also coordinated the Creative Creases Challenge, into which I will be entering this card! One of the things I love about the Creative Creases Challenge is that it’s always anything goes with a fun fold.
If you saw my first post this morning, which you can see here, I used the Sweet Songbirds bundle for both cards. In this card, I used the Sale-a-Bration DSP (designer series paper) Dainty Flowers, which you can earn free with a $50 qualifying purchase. This DSP is stunningly gorgeous! I’ve already created cards with this DSP, which you can see here and here.
Measurements:
I trimmed a piece of 12 x 12 inch Old Olive cardstock to 4-1/4 by 12 inches.
Score the cardstock at 5-1/2, 6, and 6-1/2 inches to create the fold.
I also trimmed a piece of Old Olive to 4-1/4 by 1 inch, then scored that piece of cardstock at 1/2 inch.
I trimmed the first layer of black cardstock to 4-1/8 by 5-3/8 inches. Then, I cropped the deckled rectangle piece from the inside of the mat layer.
The DSP layer measures 4 by 5-1/4 inches.
The DSP for the envelope measures 6 by 2-1/2 inches. I punched a 1 inch circle from coordinating DSP for the envelope seal.
The top white cardstock is trimmed to 4-1/8 by 3-1/8 inches.
I also trimmed a piece of white cardstock to 4 by 5-/4 inches for the sentiment on the back of the card.
Stamping and Assembly:
The only element I did not stamp directly on the white cardstock for the front is the bird. I stamped him using Starry Sky ink on a piece of white scrap of cardstock.
I stamped the eyes in black, and colored his beak using my Crushed Curry marker.
Then, I punched out the bird. Using a scrap piece of the same DSP as the front, I punched out the wing and chest part of the bird.
After adhering the wing and chest pieces using multipurpose liquid glue, I added dimensionals to the underside of the bird.
Next, I stamped the branches on the front and back, the nest, and the music notes using black ink.
I added Old Olive leaves to each branch.
Next, I assembled the front pieces of the card together.
On to the super simple fun fold –
Create a mountain fold on the center of the cardstock at the scored lines. Burnish with a bone folder.
Add each side of the scored 1 inch by 4-1/4 inches cardstock to the front and back of the open top part of the card. This will create the triangle you need for the card to stand upright.
Finally, I attached the front and back cardstock/DSP layers using multipurpose adhesive.
Lastly, I added three black matte enamel dots in the three corners as shown.
Ta-da! With that, I’d finished this fun fold coordinated card, envelope, and envelope seal set.
Back to the SU! Demo Blog Hop!
There’s so much inspiration to be found in the rest of the projects by the participating demos. I hope you will join us on our hop! If you get lost along the way, please use the following line-up as a reference:
Sale-a-Bration is now live until February 28, 2023!
Here are some SU! videos regarding the FREE items you can earn! I have to tell you, the first SAB item I earned was the owls stamp set. So, so, so stinking cute!!! They are so easy to fussy cut as well.
https://youtu.be/isjfrk6LiRY
As always, the joining benefits for joining during Sale-a-Bration are spectacular! As always, there’s no commitment, so taking advantage of this promotion doesn’t mean a long-term commitment. If you live in the U.S., and are interested in joining, please contact me at justpeachystamping@gmail.com
Here’s the joining promotion video:
https://youtu.be/Y3hKlfpXRG0
If you live in the U.S. and do not already have a demonstrator, I would love the opportunity to serve you.
If you want to place an order, please do so using the host code Y6CTX7D3 when prompted. Any order for $50 can not only earn a FREE Sale-a-Bration item, but also a product from me!
If you want to place an order of over $150, (think of the FREE Sale-a-Bration items!) please contact me before placing your order so you can also qualify for STAMPING REWARDS, giving you even more FREE ITEMS!
I learned a number of new-to-me fun folds, and tried many of them out with the Kindest Gnomes bundle and coordinating DSP. While the stamp set and DSP are no longer available, the dies will carry over into the new mini-catalog going live in the beginning of January. There’s a new gnomes set coming out, and it’s wonderful that this stamp set will also coordinate with the Kindest Gnomes dies!
I also found out how easy it is to create dancing gnomes, and an example of that card is included below as well.
I thought the gnome with the lantern would be perfect for this simple z-fold card, for which I also used the Scary Cute bundle. You can find that post here.
I needed to create my own background for this challenge. I accomplished this blue panel with shaving cream. You can see that post here.
The dancing gnomes are so! much! fun! They’re also so! easy! You can find the post for these fun little guys here.
Back to the Year in Review Hop:
I hope you will join the rest of the demos listed below in this hop! The inspiration found with these demonstrators is amazing!
Welcome to the two-week Cardz 4 Guyz challenge # 306. For this challenge, our host, Dawn, chose teddy bears. When you finish here, I hope you will visit the challenge website to be inspired by the absolutely adorable teddy bears! If you are inspired to play along, please enter your creation in our gallery!
The first thing I found out when working on this card is that I don’t have any teddy bear stamps! I have bears, neither of which can remotely be considered a teddy bear! Therefore, I turned to the best place to go for inspiration – Pinterest! There I found inspiration using punches to create a teddy bear overhang. I CASe’d a card from Rubber Obession‘s card and came up with this card:
It looks crooked but that’s just the way it’s sitting in the floral frog.
Measurements:
The Early Espresso base measures 5-1/2 by 8-1/2 inches, scored at 4-1/4 inches.
The Pool Party mat measures 4-1/8 by 5-3/8 inches. I cropped the sentiment mat from the center of the Pool Party mat using a deckled rectangle die.
I already had the Very Vanilla embossed piece of cardstock. The final measurement for that is 4 by 5-1/4 inches.
HINT: when using the 3D embossing folders, trim your cardstock to size after you emboss the cardstock. Since these folders have such a deep emboss, if you cut the paper first, it won’t be the desired size after it’s embossed.
Next, I trimmed the Very Vanilla cardstock for the inside to 4 by 5-1/4 inches.
Then, I cropped the VV cardstock for the sentiment using another deckled rectangle die.
Finally, I trimmed a piece of Early Espresso 6 x 6 inch DSP (designer series paper) to 6 by 2-1/2 inches for the Very Vanilla envelope flap.
What I Did:
I punched the Early Espresso circles for the teddy bear face and ears using the —— and —— punches.
At this this time, I also punched a Very Vanilla circle for the lower part of the face using the —- punch. I lined the top up where I wanted it and trimmed the excess.
Next, I punched the eyes and nose using the —- punch. I realized I didn’t have a white fine line marker, so I had to improvise. I do have a VersaMark pen and drew in the arcs that I wanted. Then I used white embossing powder and heat set the powder. A marker would’ve been better, but this worked.
After dry fitting all the teddy bear pieces using removable tape, I ran the pieces through the (retired) subtles embossing folder.
HINT: Do not use even removable tape when running pieces through an embossing folder. I wanted the texture to line up across all the pieces. However, the pressing in the folder made removing the pieces basically impossible.
I stamped the sentiment using Early Espresso ink and a stamp from ————
After adhering the sentiment on its May, i put dimensionals under the mat.
Then I figured out where I wanted the bear pieces to go, I added dimensionals as needed under the pieces.
After I stamped the sentiment and adhered the inside panel, I’d finished this coordinated card, envelope, and envelope seal.
Thank you very much for stopping by my blog today.
Second: Who doesn’t LOVE free products? For the month of October, 2022, there’s a Stampin” UP! special promotion for joining!
Third: The Birthday Organizer Kit is now available! Item # 161056
I am in the process of making my mother and my aunt each a set of birthday cards which they will be able to use for the year. More information will be forthcoming on the cards, but this organizer will be absolutely perfect for each of them!
Here’s the video that convinced me I had to have these kits to add to the presents I am making:
I hope I convinced you that October 4, 2022 is indeed a special day! Contact me for more information or to join my team!
If you live in the U.S. and don’t already have a demonstrator, I’d be honored to work with you.
Do You Want to Place an Order?
Of course you do, especially since you can earn FREE products with a qualifying purchase!
If you are ordering less than $150.00, please use the host code shown. If you are ordering more than $150.00, please contact me first so you an get your stamping rewards! Any order over $50 will earn a little surprise from me.
The HOST CODE through October 31, 2022 is TYFZJGYE.
Once again, thank you for stopping by my blog today! I hope you will take another minute and leave a comment.
This is my second post for today. You can see the first one for my Cardz 4 Guyz #303 challenge here. I’ve created the same card using different colors for the Stampin’ Up! demonstrator Fun Fold Blog Hop. I’m all about non-traditional Christmas colors, and using shades of blue just makes me so happy!
When you finish here, I hope you will hop along with the rest of the demonstrator’s listed at the bottom of the page. I know I will! I’m excited to see what the rest of the team created!
Here’s my card for the Fun Fold Blog Hop:
Doesn’t this little guy on the front remind you of one of Snow White’s dwarfs? He’s adorable and my favorite from the Kindest Gnomes stamp set!
I found this fun fold on Connie Stewart’s YouTube channel. It’s so much fun, and so incredibly easy! It looks complicated, but truly it isn’t! You can find her video here. In all honesty, it took me longer to color the two gnomes or to create the stencil background than it did to trim all the pieces and put the fun fold together. Please give it a try! I’m pretty sure I will be using this fun fold many, many times!
Finishing Up:
The double stitched Balmy Blue and white ribbon can be a bit stiff right off the roll. I’ve found that running it through my fingers a bunch of times helps to loosen it up. I haven’t been able to tie it in a bow, but the square knot works for this card.
I placed dimensionals under the gnome and sentiment banner on the front.
Because of the thickness of the card, I didn’t want to add more dimensionals under the sentiment square. However, I did need to use something stronger than the liquid glue because of the ribbon. Therefore, I used tear-and-tape to mount the white square onto the Night of Navy square mat.
I used my favorite adhesive, the multipurpose liquid glue for everything else.
After punching a coordinating piece of DSP for the envelope seal, I’d finished this coordinated card, envelope, and envelope seal set.
Back to the Fun Fold Blog Hop:
Thanks so much for visiting my blog today. I hope you will use the following links as a guide to hop along with the rest of the demonstrators participating in this Fun Fold Hop! I just love fun folds and am looking forward to seeing what everyone else created! Amanda Howard with Papercrafting with Amanda is next up on the hop. Enjoy!
Precut pieces (No prep work! Get right to crafting). Including printed die-cut sheets: sticker adhesive sheets & non-adhesive sheets
Makes 12 cards of 1 design
Gold foil accents
Folded card size: 5-1/2″ x 4-1/4″ (14 x 10.8 cm)
12 preprinted envelopes
Enough adhesive to complete projects
Linen thread
A 9-7/8″ x 6-1/2″ x 2-3/4″ (25.1 x 16.5 x 7 cm) printed designer box for storage or crafting on the go
Product colors: Cajun Craze, Early Espresso, Evening Evergreen, Garden Green, Poppy Parade, Pumpkin Pie
Sale-a-Bration is in full swing for SEVEN MORE DAYS!!
Sale-a-Bration runs until August 31, 2022. This means you can earn FREE products for two more weeks! Take a look at these Sale-a-Bration products!!
FREE WITH A QUALIFYING $50 ORDER:
NEW ITEMS HAVE BEEN ADDED TO THE PRODUCTS WHICH ARE FREE WITH A QUALIFYING $100 ORDER:
If you live in the U.S. and don’t already have a demonstrator, I’d be honored to work with you.
Do You Want to Place an Order?
Of course you do, especially since you can earn FREE products with a qualifying purchase!
If you are ordering less than $150.00, please use the host code shown. If you are ordering more than $150.00, please contact me first so you an get your stamping rewards! Any order over $50 will earn a little surprise from me.
The HOST CODE through August 31, 2022 is W4Q23RT4.
Welcome to Just Peachy Stamping by Sue Jackson: an independent Stampin' Up demonstrator.
Through Stampin' Up!, I happily share my love of papercrafting through sales, classes, small stamping group meet-ups and workshops. I think that being a teacher in my "real life", I have a unique approach to sharing my fantastic hobby. I look forward to connecting with you!


/10.22-birthday-card-organizer-kit/olo_prd_img_1_na_1022_bdayorganizer.jpg?sfvrsn=c34b756_12)


