This month, the Pals are showcasing the fresh and fabulous 2026–2028 Stampin’ Up! In Colors! Whether you’re a seasoned stamper or new to the fun, these new hues are sure to spark your creativity. Be sure to click through the links below to “hop” along and see how each Pal brought these gorgeous colors to life. You’re bound to find a few new favorites—and a little inspiration along the way!
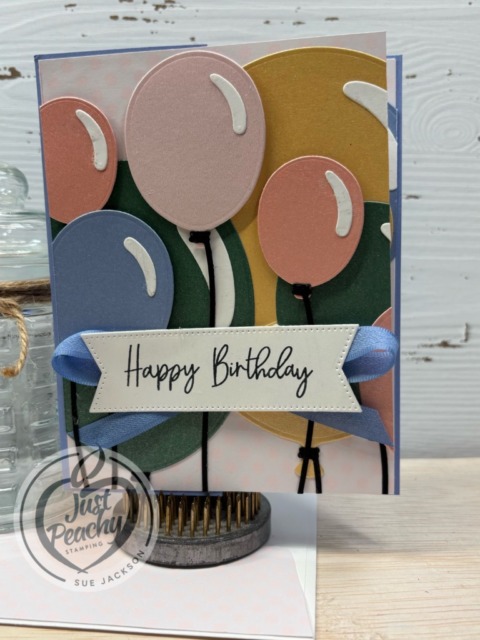
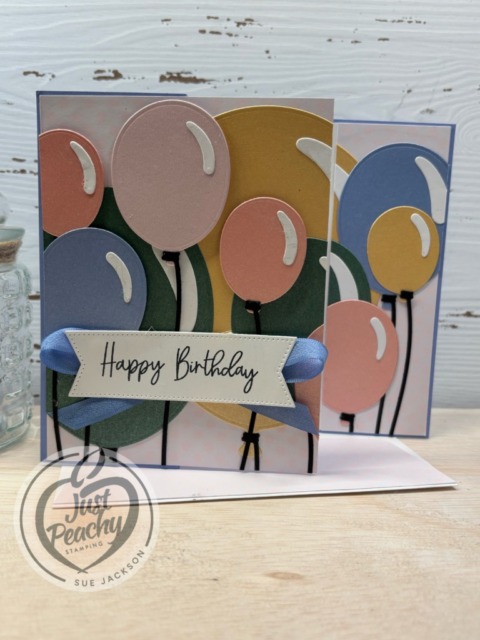
I really wanted to use the Balloon Festoon Bundle for this In Color blog hop. The picture I had in my head mimicked the Happy Birthday balloons that pop up when sending a birthday text. I’m so stinking happy with the way it turned out, and did use all five of the new In Colors.
Here’s my card:
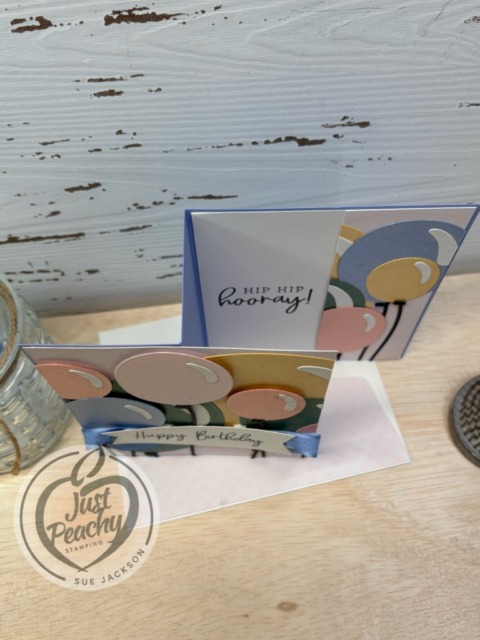
I absolutely love fun fold cards, but I think one of my favorites is a Z-fold card! While it requires a bunch of die cuts, the end result is well worth the effort.
It’s just a given that fun fold cards also post to the Creative Creases Challenge. Debbie Mageed at Secret Stamper coordinates this blog hop and the challenge, for which I’m honored to be on the design team. Hopefully, you will be inspired to upload your own fun fold project to the challenge!
Measurements:
The Hydrangea Hue base measures 8-1/2 by 5-1/2 inches, scored at 2-1/8 and 4-1/4 inches
Trim another piece of Hydrangea Hue to 4-1/4 by 5-1/2 inches for the front flap
Trim a piece of the 12″ by 12″ 2026 – 2028 In Color DSP to 5-3/8 inches for the front and inside panels
Then trim it down to a 4 inch and a 2 inch wide piece, and use a piece of Post-it Note tape to put the two pieces back together
It will be much easier to figure out the placement of the balloons if you have the whole piece
Trim a piece of the In Color DSP to to 6 by 2-1/2 inches for the envelope flap
Trim a piece of white cardstock to 4-1/8 by 5-3/8 inches for the inside of the card
Don’t forget to punch a 1-inch circle from coordinating DSP and run it through the XYRON create-a-sticker for the envelope seal
You will need one of each of the In Color Pearlized Specialty DSP for the balloons
I used scraps of black cardstock to crop the balloon strings and scraps of white to crop the highlights for the balloons
HINT: I found it easier to just crop a bunch of strings, highlights, and balloons before I started putting things together
I figured that I will use the pieces on this card or another one and by having extras the whole process would go smoother
I used all but the middle size balloon die for this card
What I Did:
Unless otherwise noted, I used multipurpose liquid glue to adhere pieces together
Repositionable tape and the craft (oppositional or reverse) tweezers will be your best friends when putting this card together
Adhere all the highlights and the strings to the balloons
Using the repositionable tape, start placing the balloons on the 5-3/8 by 6 inches Blush DSP
I found it easier to start with the largest balloons and work my way forward
Adhere the bottom layers of the balloons to the DSP, making sure you have liquid glue covering the cut line in the DSP
Re-trim the DSP so you can trim the first layer of balloons
Continue placing the balloons, figuring out which balloons will be adhered with dimensionals
Before adding dimensionals, mark and trim the balloons that will be placed on the outside edges of the DSP, and also across the cut line
Start adding the dimensionals and adhere the layers of balloons
Adhere the 4″ by 5-3/8″ DSP to the top flap of the z-fold
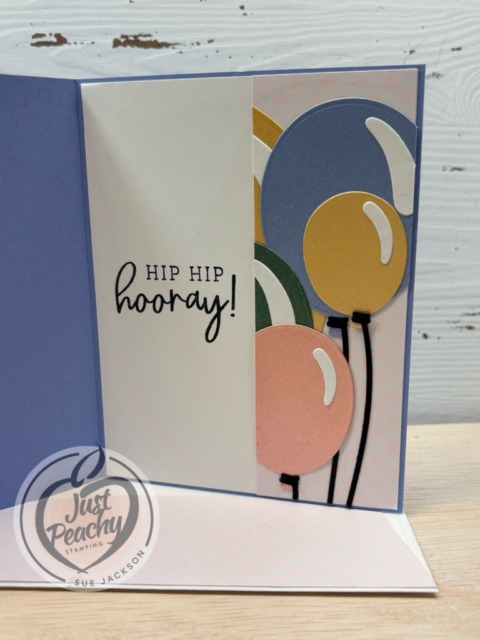
Adhere the white cardstock to the inside of the card, then add the 2 inch piece of DSP with all the balloons
Stamp the sentiments , found in the Balloon Festoon stamp set in black ink
Crop the outside sentiment using a die from the Stylish Shapes die set
Create a loopy loop bow using Hydrangea Hue ribbon and adhere to the back of the sentiment banner using glue dots
Add dimensionals to the back of the sentiment and adhere to the front of the card
With that, I’d finished this coordinated card, envelope, and envelope seal set
Back to the Pals’ Blog Hop:
MORE INSPIRATION AWAITS! There’s a full lineup of creative inspiration waiting for you! Scroll down to hop along and enjoy what the rest of the blog hop team has crafted. Don’t forget to mark your calendar for next month’s theme: My Favorites in the New Catalog—we’ve already picked our must-haves!
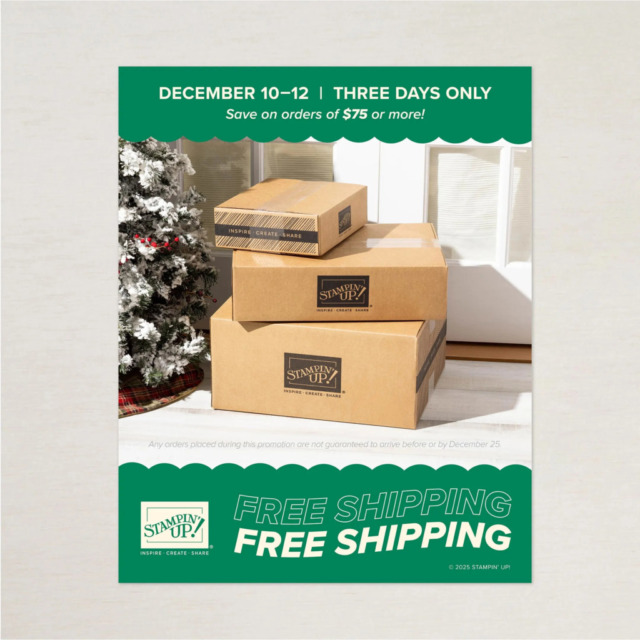
Free shipping automatically applies to the shopper’s cart after the qualifying amount has been met, which is $75 USD | $100 CAD (before tax).
All orders must meet the qualifying amount to be eligible for free shipping. Coupon codes and Stampin’ Rewards will lower the total amount of an order.
Craft Classes do not have shipping charges. Purchasing a Craft Class will increase the total cart amount but will not contribute to the free shipping qualifying amount.
The additional cost for expedited shipping is NOT covered by this promotion.
Prepaid 3-, 6-, and 12-month Paper Pumpkin subscriptions and month-to-month subscriptions do not qualify for free shipping. Refills, past kits, and add-ons do qualify toward free shipping, but you must be a subscriber to purchase. Subscriptions billed and shipped this month will be charged for the normal amount + tax.
June’s Product of the Month is the WILD BUNCH PHOTOPOLYMER STAMP SET!
Send smiles with the Wild Bunch Stamp Set! With hand-drawn animals like a koala, penguin, snail, and highland cow, plus versatile sentiments for birthdays, thank-yous, or just because, this set can help brighten anyone’s day. Add hearts, party hats, presents, or scribbled patterns to make each card or scrapbook page even more fun.
The Wild Bunch Stamp Set is the exclusive Product of the Month for June 2026! Only available until stocks run out—don’t wait to get yours! I ordered mine last night and am so looking forward to getting it next week! Stay tuned for some cuteness!
What’s New?
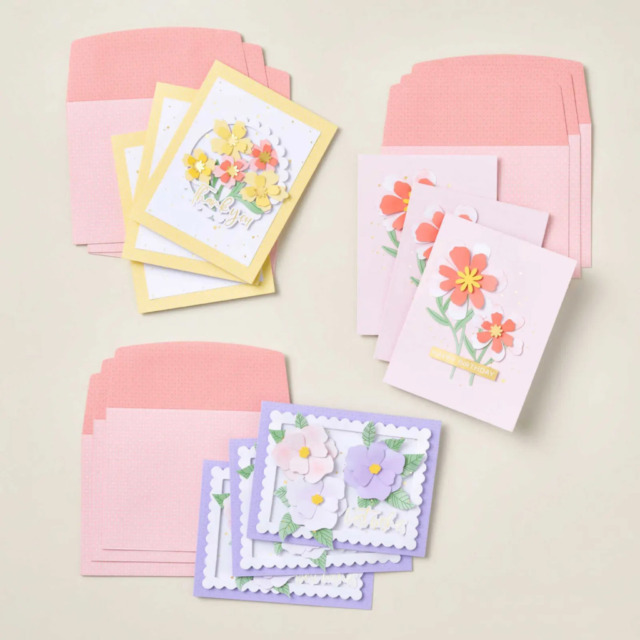
The Shaded Petals Kit, which retails for $26.00
Product detail
Want your floral projects to look effortlessly hand-painted? The Shaded Petals Kit is ready to work its magic! Layer precut petals, add soft shaded color with Sponge Daubers, and finish with coordinating sentiments that pull everything together. From cards to tags to sweet giftables, it turns simple ink blending into petals that look beautifully handcrafted.
DETAILS – Makes 9 cards: 3 each of 3 designs – Folded card size: 4-1/4″ x 5-1/2″ (10.8 x 14 cm) – Colors: Calypso Coral, Daffodil Delight, Garden Green, gold, Highland Heather – Sentiments printed in Dutch, English, French, and German
KITS COLLECTION – Includes designed projects that come in a range of project types. – Is perfect for new crafters, busy crafters, or crafters who want quick and easy projects
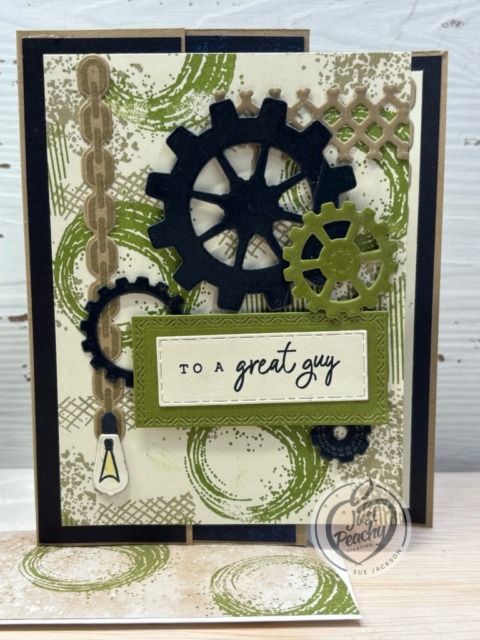
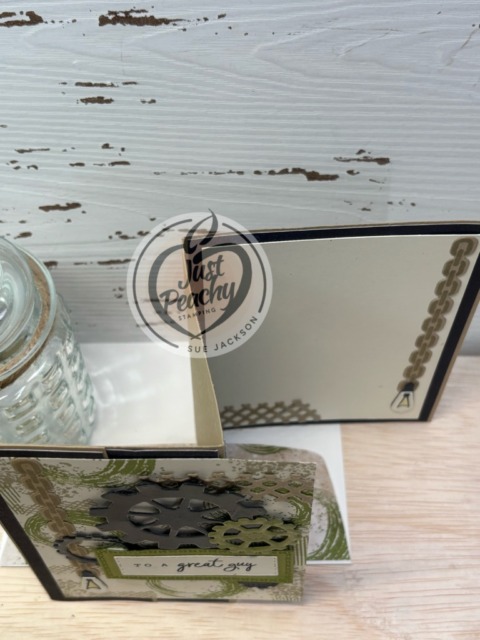
This month’s Stampin’ Pretty Pals Blog Hop is all about the Male Room theme—because the men in our lives deserve handmade cards too! Whether you’re creating for a dad, husband, son, grandson, brother, or friend, this hop is packed with ideas to help you craft something special. Today, the Pals are sharing male-themed card designs using Stampin’ Up! products, from bright and playful styles to classic looks and quick-and-easy layouts. If you’re looking for fresh inspiration (or just a good reason to dive into your craft room), you’re in the perfect place.
Here’s my card:
I’ve already posted two other 4-panel accordion fold cards. You can see those posts here, here and here. I am looking forward to making many more cards using fun fold since it’s quickly become one of my absolute favorite fun folds.
As always with a fun fold card, I will be adding this to the Creative Creases Challenge where the theme is always Anything Goes with a Fun Fold. I know I’ve already posted cards using this fold to Creative Creases, but it’s such an easy fold and it makes very good use of the 12 x 12 inch DSP (designer series paper).
I’ve been introduced to a new-to-me card challenge, the Never-Before-Used-Schtuff challenge. Since this is the first time I am using the Textures & Gears bundle, this card qualifies!
Measurements:
When trimming and scoring the DSP I wanted to use, I completely forgot that I needed to score on the opposite side of the DSP I wanted to use. Therefore, I used a piece of Crumb Cake cardstock and followed the template. Then, I trimmed the DSP to the appropriate measurements.
Here’s the template:
Trim the Secret Sea DSP to the following measurements:
5-3/8 by 1-5/8 inches
2 pieces at 5-3/8 by 2-7/8 inches
5-3/8 by 4-1/8 inches
Trim two pieces of Very Vanilla cardstock to 4 by 5-1/4 inches, one for the front and one for the inside
I used the Textures & Gears stamp set and Crumb Cake and Granny Apple Green ink to create my own DSP
Trim a piece of Crumb Cake 6 x 6 inch DSP to 6 by 2-1/2 inches for the envelope flap
I stamped the Granny Apple Green circles on the Crumb Cake DSP
I love the way that turned out so I will be doing more of that for envelope flaps
Punch a 1-inch circle from the Secret Sea DSP and run it through your XYRON create-a-sticker for the envelope seal
I wanted shiny gears and lattice on the front of the card, so I added packing tape to pieces of cardstock before cropping the shapes
HINT: You will need to run the dies/cardstock through the Cut & Emboss machine two or three times
BIG HINT: Don’t try to crop out the gears through more than one layer of packing tape – trust me on this
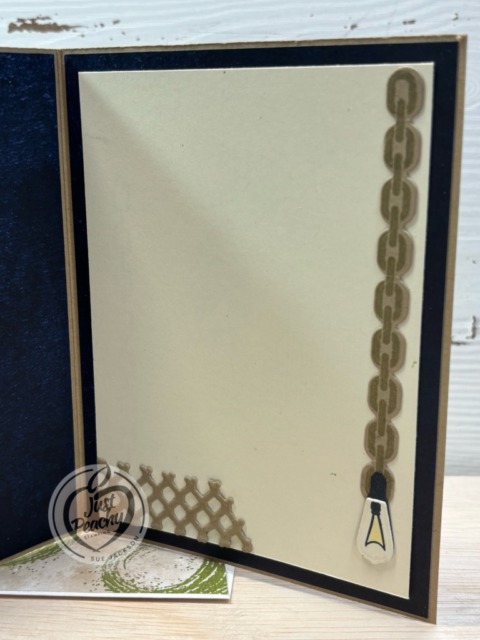
I cropped the chains for the inside and outside from Crumb Cake cardstock after stamping with the same ink
Stamp the Edison light on a scrap of Very Vanilla cardstock and crop using the die
Crop the background for the light from a scrap of Secret Sea cardstock
What I Did:
Unless otherwise noted, I used multipurpose liquid glue to adhere pieces together
Adhere the Secret Sea DSP to the Crumb Cake cardstock
Adhere the first flap of cardstock to the second flap (optional)
Stamp one piece of the Very Vanilla cardstock using Granny Apple Green and Crumb Cake ink
Crop the gears from the packing tape/cardstock layers
Adhere the lattice, chains & Edison lights, and smaller Secret Sea circles to the Very Vanilla cardstock
Add dimensionals to the large Secret Sea and the Granny Apple Green gears and adhere to the front
Stamp the sentiment, from the Nature’s Symphony in Secret Sea ink on Very Vanilla cardstock, and crop
Crop a piece of Granny Apple Green cardstock and adhere it to the sentiment banner
Add dimensionals to the Granny Apple Green layer and adhere to the front of the card
Adhere the completed Very Vanilla front to the base of the card
Adhere the inside Very Vanilla cardstock so that it matches up with the cardstock layer on the front
I didn’t stamp a sentiment on the inside yet since the outside sentiment can be used for many ocassions
With that, I’d finished this coordinated card, envelope, and envelope seal set.
Back to the Pals’ Blog Hop:
Thanks so much for stopping by today! Keep the inspiration going! I hope my project inspired you to create something special for the guys in your life. Be sure to continue along the hop for even more Male Room inspiration from the Stampin’ Pretty Pals. Next month will be Flowers in Bloom, so mark your calendars!
Give your card fronts and crafts a dainty touch with the Eyelet Blooms Die. Create delicate backgrounds with a hand-stitched look or layer pieces for a classic finish that works for any occasion. It’s eyelet magic for every card.
The Eyelet Blooms Die is the exclusive Product of the Month for April 2026! Only available until stock runs out—don’t wait to get yours!
DETAILS – April 2026 Product of the Month – 1 die – Largest die: 4-3/8″ x 6″ (11.1 x 15.2 cm) – Use with a Stampin’ Cut & Emboss Machine (sold separately)
PRODUCT OF THE MONTH – Is a new exclusive product released each month! – Can be unlocked for just $5 with orders over $75 (after discounts and rewards). – Is only available while supplies last—they can sell out quickly! – Is limited to one per customer (including language versions).
Last Chance Products include retiring products from both catalogs and online releases, excluding Paper Pumpkin.
Last Chance Products in this category are available while supplies last and will be discontinued when they sell out. Items will be automatically removed from the category and the online store when they are discontinued.
Discounts vary and are subject to change. Also, depending on inventory, these products may or may not have discounts.
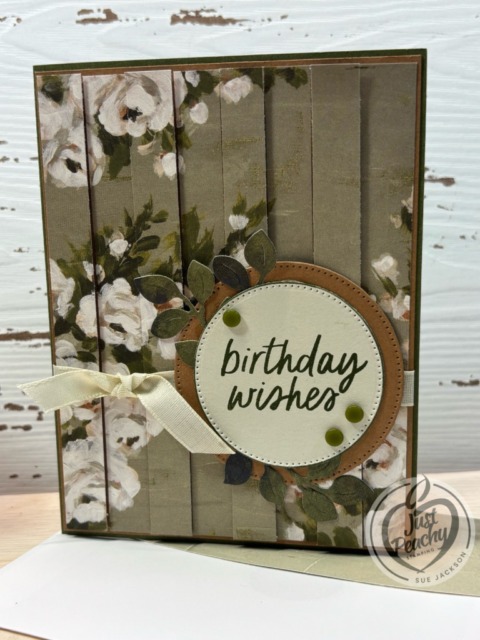
This month’s Stampin’ Pretty Pals Blog Hop is all about Birthday Celebrations. If you’re looking for fresh inspiration—or just a good excuse to pull out those gorgeous craft supplies—you’re in the right place. Today, the Pals are sharing a variety of birthday-themed card ideas using Stampin’ Up! products. Whether you love bright and playful designs, elegant birthday greetings, or quick and simple projects, you’ll find plenty of inspiration along the hop.
I used the Beautiful Gallery DSP (designer series paper) for my birthday card:
I have spent quite a bit of time trying to find the original poster for this card format. I don’t remember where I saw it, or what it is called. I do remember that the link for the card took me to Canva for the tutorial. If the card design belongs to you, or you recognize the design, please let me know so I can update this post. Thank you!
Measurements:
The Mossy Meadow cardstock base measures 8-1/2 by 5-1/2 inches, scored at 4-1/4 inches
Trim a Pecan Pie piece of cardstock measures 4-1/8 by 5-3/8 inches
Next, I trimmed a piece of the Beautiful Gallery DSP to 4 by 5-1/4 inches
Take this trimmed piece of DSP and trim it down to 8 consecutive pieces each measuring 1/2 by 5-1/4 inches
Trim the leftover piece of DSP to 1/2 by 5-1/4 inches for the inside of the card
Trim a piece of coordinating DSP to 6 by 2-1/2 inches for the envelope flap
Punch a 1-inch circle from a leftover scrap of the Beautiful Gallery DSP and run it through your XYRON create-a-sticker for the envelope seal
Trim a piece of Basic Beige to 4 by 5-1/4 inches for the inside of the card
Using scraps of Basic Beige and Pecan Pie, crop circles using the Stylish Shapes dies for the front sentiment
What I Did:
My first steps involved the Beautiful Gallery DSP pieces and the Pecan Pie mat
I started by lining the 1/2 inch DSP strips to make sure I had the strips in the proper order, tops and bottoms even, and had the sides touching
To accomplish this, I used my handy dandy removal tape runner for all 8 strips
Starting on the left, I carefully removed the first strip added dimensionals behind it, and re-adhered it to the Pecan Pie mat
Next, I carefully removed the second strip, added multipurpose liquid glue to the back, and re-adhered it in place
I continued this for the remaining strips
Using Mossy Meadow ink, I stamped the birthday wishes sentiment on the Basic Beige circle
Then I adhered the the Basic Beige circle to the Pecan Pie circle
I cropped three sprays of leaves using the Nature’s Symphony die set from some leftover Mossy Meadow Beautiful Gallery DSP and added them behind the Pecan Pie circle
Next, I wrapped a length of Basic Beige ribbon around the fPecan Pie mat and tied it in a square knot
I adhered the Pecan Pie mat to the Mossy Meadow base using multipurpose glue
I used dimensionals to adhere the sentiment to the front making sure they straddled the ribbon
The Natural Matte dots finished the front of the card
After stamping the inside sentiment using Mossy Meadow ink, I adhered it to the inside of the card
Then, I added the strip of DSP to the right side of the Basic Beige cardstock
You might be asking yourself why there’s a piece of retired Mossy Meadow 6 x 6 inch DSP on the left side of the card. When I first adhered the Basic Beige cardstock to the inside, I put it on the wrong side of the inside. Therefore, the DSP covers a big OOPS! of multipurpose glue. It’s a happy accident.
With that, I’d finished this coordinated card, envelope, and envelope seal set.
Back to the Pals’ Blog Hop:
Keep the inspiration going! Follow the lineup below to hop through each blog and enjoy the great ideas. And next month we’re creating Male Room projects for the guys, young and old, in our lives. You won’t want to miss it!
Spring into stamping with the Notes of Spring Stamp Set! Featuring adorable springtime animals like a deer, bunny, and duck, plus some delicate river plants, this stamp set makes it easy to create layered, watercolor-style images. Includes a few all-occasion sentiments to complete your handmade cards for birthdays, thank-yous, and more.
PRODUCT OF THE MONTH: – Is a new exclusive product released each month! – Can be unlocked for just $5 with orders over $75 (after discounts and rewards). – Is only available while supplies last—they can sell out quickly! – Is limited to one per customer (including language versions).
Two New Kits for March!
RADIANT REMINDERS KIT – $14.00 USD
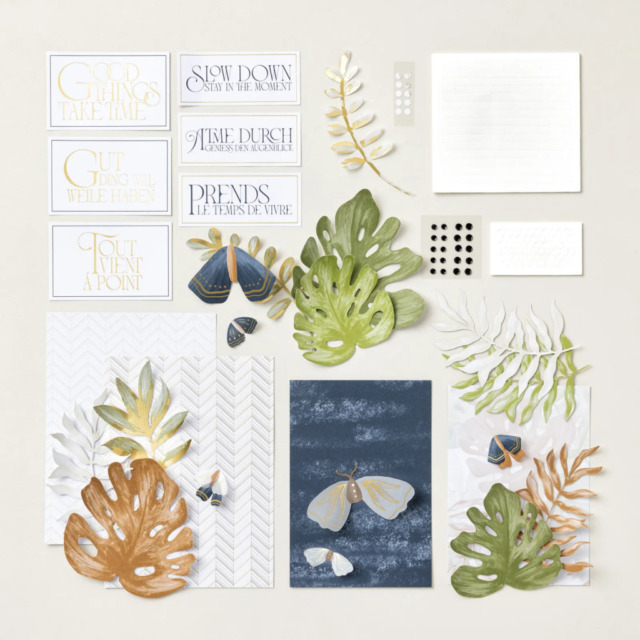
Create three DIY displays with the Radiant Reminders Kit. Featuring monstera leaves, luna moths, and neutral patterns in beige, black, brown, green, and gold, these handmade home decor pieces let your creativity shine while adding natural, organic style to any room.
EVERY LITTLE THING KIT – $21.00 USD
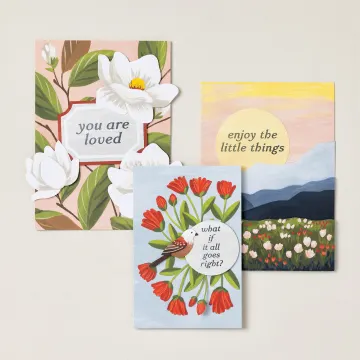
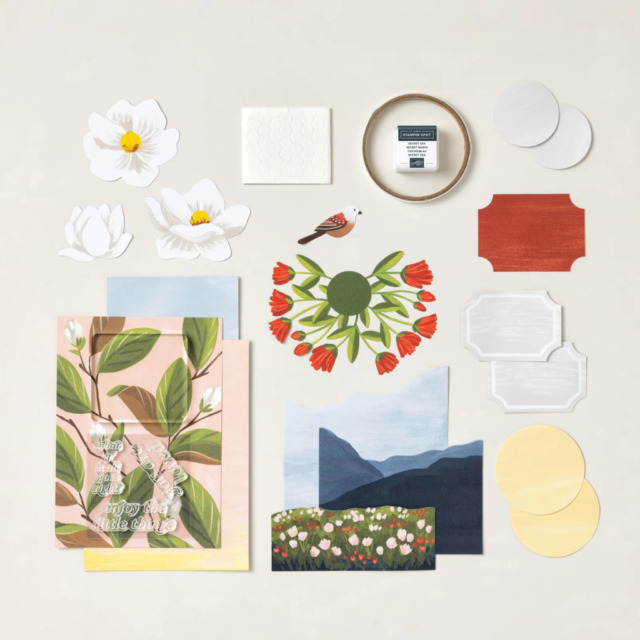
Create three DIY floral and nature-inspired paper artworks with the Every Little Thing Kit. Featuring magnolias, tulips, mountains, and a bird, each piece includes uplifting sentiment stamps to brighten your home.
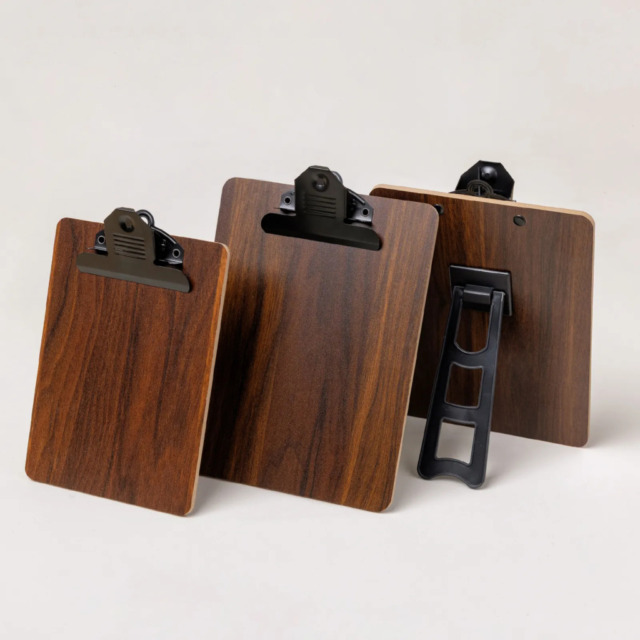
STANDING CLIPBOARD TRIO:
The Standing Clipboard Trio Kit includes three clipboards you can use to showcase creations from the coordinating Radiant Reminders and Every Little Thing Kits (sold separately). These are also great for your handmade cards, photos, stamped art, and favorite quotes. Each clipboard comes assembled and features a sturdy backing and kickstand. They’re perfect for adding a personal touch to your desk, craft room, or office.
If you live in the U.S. and don’t already have a Stampin’ UP! demo from whom you order, I would be honored to work with you.
This month’s theme is “Something New.” If you’re looking for inspiration and a reason to play with your craft supplies, this hop is for you! The Pals hope to inspire you with card ideas and paper craft creations using Stampin’ Up! products. Links to the participant’s blogs can be found at the end of each post to help you “hop” along!
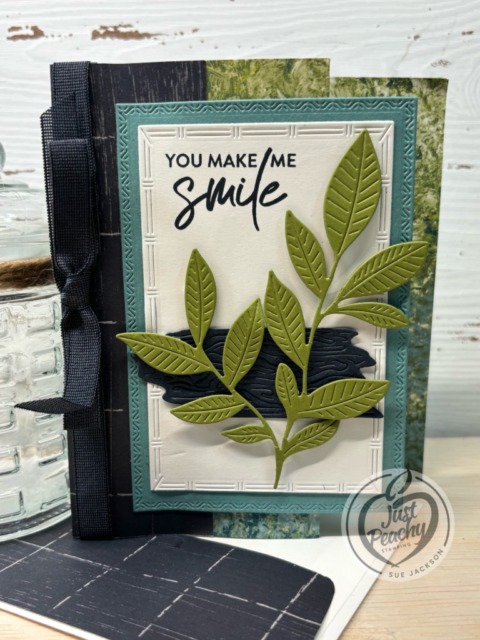
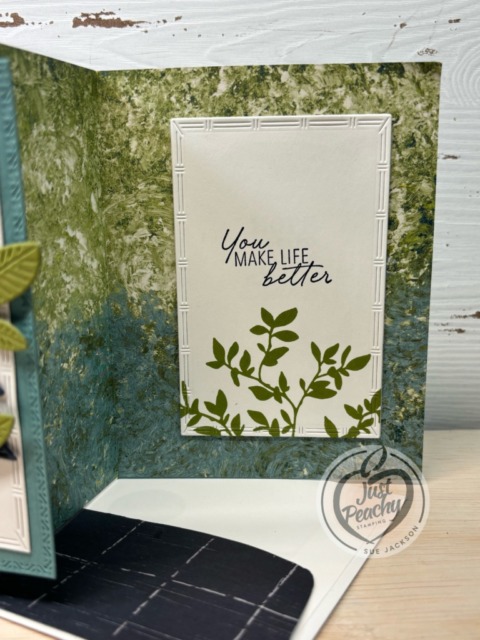
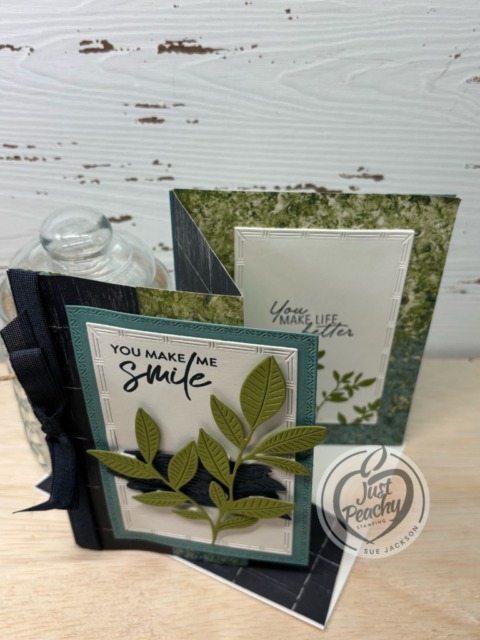
I used the new Nature’s Walk suite for my card. The colors and patterns used in this DSP is stunningly gorgeous! I don’t know if I would’ve used Secret Sea, Old Olive, and Lost Lagoon together, but I just love this color combination.
Here’s my accordion fold card:
I’ve already posted two other 4-panel accordion fold Christmas cards using the Modern Christmas suite of products. You can see those posts here and here. I am looking forward to making many more cards using fun fold since it’s quickly become one of my absolute favorite fun folds.
As always with a fun fold card, I will be adding this to the Creative Creases Challenge where the theme is always Anything Goes with a Fun Fold. I know I’ve already posted cards using this fold to Creative Creases, but it’s such an easy fold and it makes very good use of the 12 x 12 inch DSP (designer series paper).
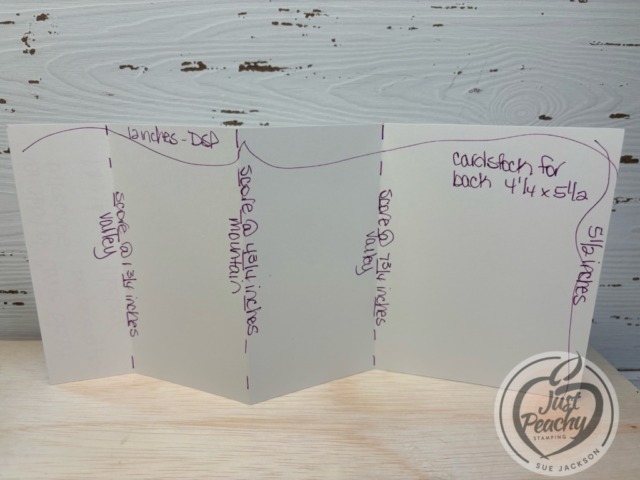
Template with Measurements:
As I have done with most of my other fun fold posts, I’ve followed a template, which follows:
Since I wanted to use Secret Sea ribbon on the front of the card, I need to stabilize the first fold. Therefore, I trimmed two pieces of cardstock trimmed to 1/2 by 5-1/2 inches. Then I adhered them to the either side on the two interior sides of the first fold. In order to hide the cardstock pieces, I adhered the first panel closed. I used a mini-glue dot to adhere the ribbon to the front panel of the card.
What I Did:
Unless otherhwise noted, I used multipurpose liquid glue to adhere the pieces together
I cropped the Lost Lagoon and Very Vanilla panels for the front , inside, and back of the card using the Textured Notes die set
The sentiments are stamped with Secret Sea ink, then I used Old Olive to stamp the foliage on the bottom of the inside panel
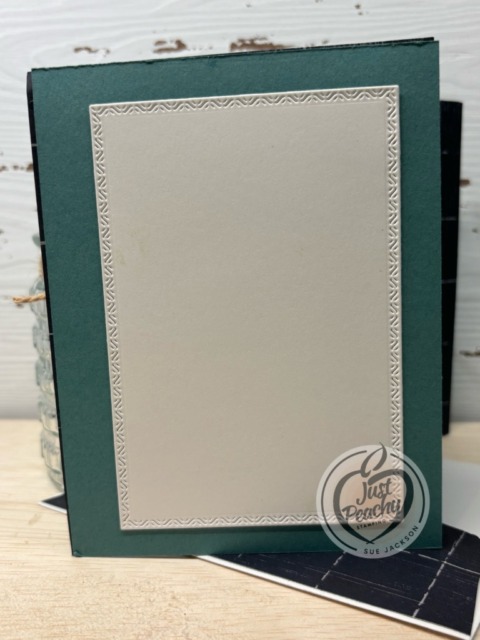
I haven’t stamped anything on the back yet, but will do so when I have a specific recipient
In the meantime, I have used removable adhesive to hold the panel in place
After cropping the Secret Sea & Old Olive pieces using the Nature’s Symphony dies, I adhered the Secret Sea piece to the Very Vanilla panel
The only place I used dimensionals was on the back of the Old Olive foliage since the card is already bulky
Since the 5-1/2 by 12 inch piece of DSP does all the work, there’s no need for additional layering
With that, I’d finished this coordinated card, envelope, and envelope seal set.
Back to the Pals’ Blog Hop:
Keep the inspiration going! Follow the lineup below to hop through each blog and enjoy every beautifully frosty idea. And next month we’re creating for the “Language of Love” theme. You won’t want to miss it!
What better way to earn the January Product of the Month? Bonus Days & Product of the Month – Yes, Please!
Versatility is key! With the Fabulous Sayings Stamp Set, you’ll always have the right words on hand—whether you’re creating birthday cards, thank-you notes, or a cheerful hello.
You can purchase the Product of the Month item for only $5 USD | $5 CAD when you spend $75 USD | $100 CAD or more in a single order. I’ve already ordered this item and am looking forward to adding these sentiments to my other sentiment stamp sets.
This month, the Pals have been busy creating cozy, frosty, whimsical card ideas and paper crafts for our Winter Wonderland theme — using our favorite Stampin’ Up! goodies. Each project brings a different twist, and that’s what makes the hop feel like a stroll through a creative winter village. If you’re looking for inspiration (or maybe a reason to stay inside with your craft supplies), this hop is for you!
Once again, I chose to use the Modern Christmas Suite of products to create two 4-panel accordion cards. I am thoroughly enjoying this fun fold and for this hop I used one 12″ by 12″ piece of DSP for these two cards.
Here are my cards:
I’ve already posted two other 4-panel accordion fold Christmas cards using the same suite of products. You can see those posts here and here. I am looking forward to making many more cards using this suite of products and fun fold.
As always with a fun fold card, I will be adding this to the Creative Creases Challenge where the theme is always Anything Goes with a Fun Fold.
Measurements:
The extra cardstock piece for the back isn’t necessary because the card will stand up without it. However, I just wanted extra stability.
I added two pieces of 1/2 by 5-1/4 inches strips on either side of the first score line at 1-3/4 inches so I could add the baker’s twine without worrying about it tearing the DSP. Since I used the two 1/2 inch strips of DSP left after trimming each half to 5-1/2 inches. When everything was said and done, I only had two little pieces of leftover DSP, each measuring 1/2 inch by 1 inch.
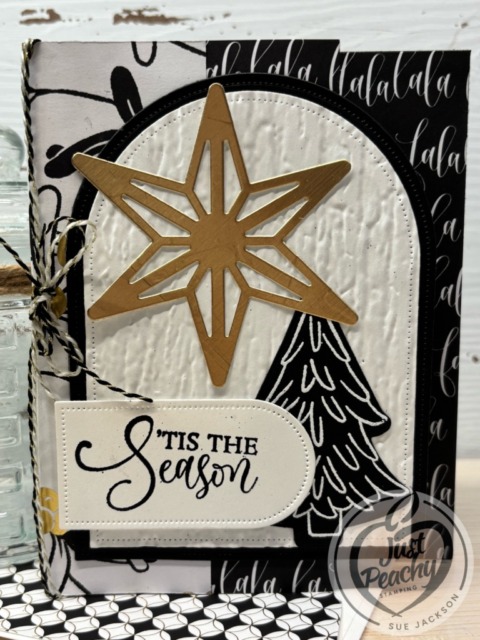
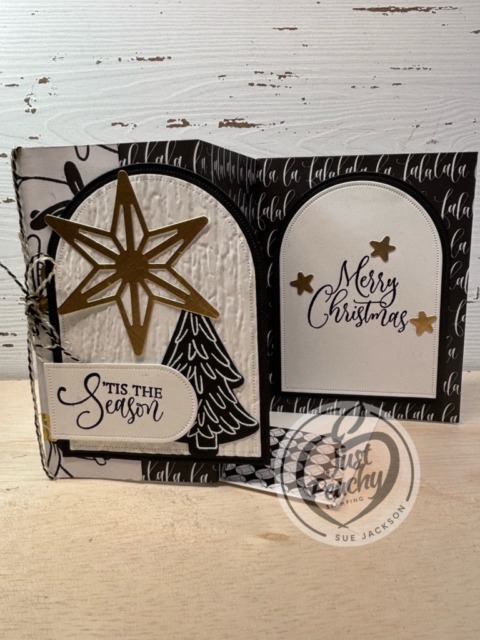
I needed to crop 4 black arches and 4 white arches. I just realized that the arches on the card with the white on black tree are larger than the other card. I think I like the larger arches, but the smaller set shows more of the DSP on the front.
I embossed the white cardstock arches for the fronts of the cards using the Birchwood embossing folder.
I used the smaller arch die for the sentiments.
Don’t forget to trim a piece of coordinating DSP to 6 by 2-1/2 inches for the envelope flap.
I also punched a 1-inch circle from another DSP pattern and ran it through my XYRON create-a-sticker.
I cropped the large star and tiny gold stars using the dies from the suite of products. The star on the back of the card is actually covering a smudge of black ink, but that can just be our secret.
What I Did:
I added dimensionals on the back of the cropped sentiments on the front and glue dost to hold the baker’s twine bow in place
For everything else, I used multipurpose liquid glue to adhere pieces together since this card is already bulky
This will fit in a medium SU! envelope, but it will require additional postage
I adhered the front flap down so the extra pieces of DSP I used for the baker’s twine support are covered
I used embossing white and black embossing powder for the tree and sentiments on the inside and front
For all areas to be embossed, make sure you wipe down the papers using your embossing buddy
Cover the areas with either black or white embossing powder and heat set using your heat tool
Make sure to allow the embossed images to cool before cropping to prevent smudging
Crop the tree using the Ornamental Christmas die included in the suite of products
Adhere both sentiment panels together
Add liquid glue on the left half of the front sentiment panel and adhere it to the front flap
Adhering to just the front flap is especially important if you are not going to glue the flap down
After adhering the front sentiment, open the card and position the inside sentiment arches face down on the back of the front sentiment
This will allow you to make sure you line up both sentiment pieces so the inside doesn’t show when the card is closed
Add liquid glue to the back of the inside sentiment panel, then fold the back of the card over the panel
TA-DA! Perfect placement!
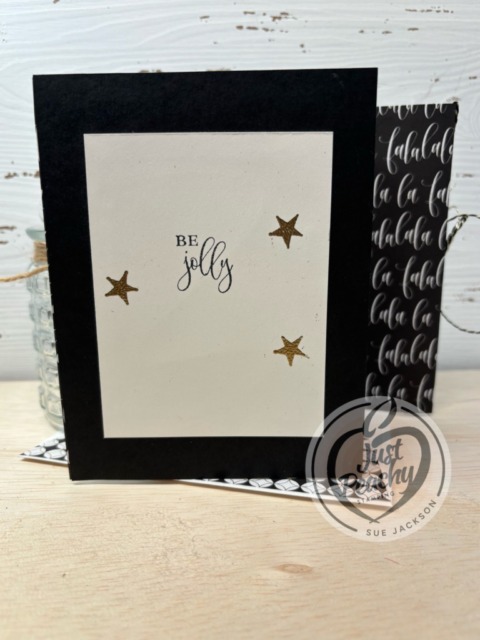
I did add another holiday sentiment on the back of the card, which has room for a personal message as well
With that, I’d completed this coordinated card, envelope, and envelope seal set.
Back to the Stampin’ Pretty Pals’ Blog Hop:
Keep the inspiration going! Follow the lineup below to hop through each blog and enjoy every beautifully frosty idea. And stick around — next month we’re creating for the “Something New” theme, and you won’t want to miss it!
Browse our selection of Last Chance paper crafting products. Additional items are added every other month. These products are available only while supplies last so be sure to buy them before they are discontinued! Discounts vary and are subject to change.
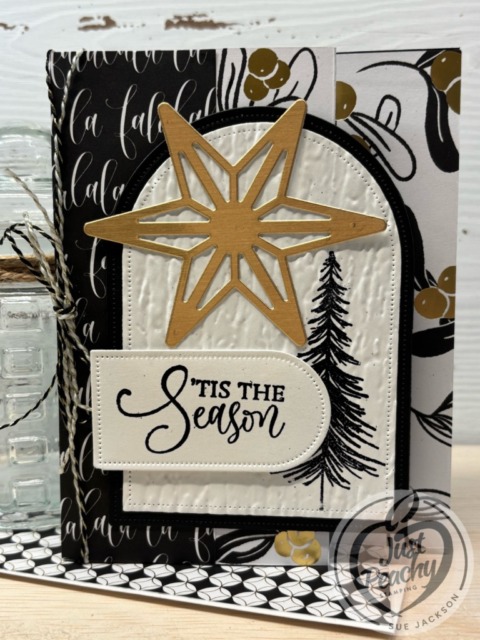
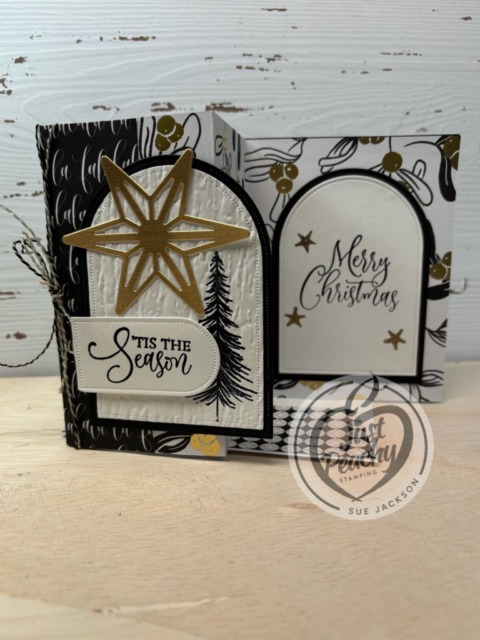
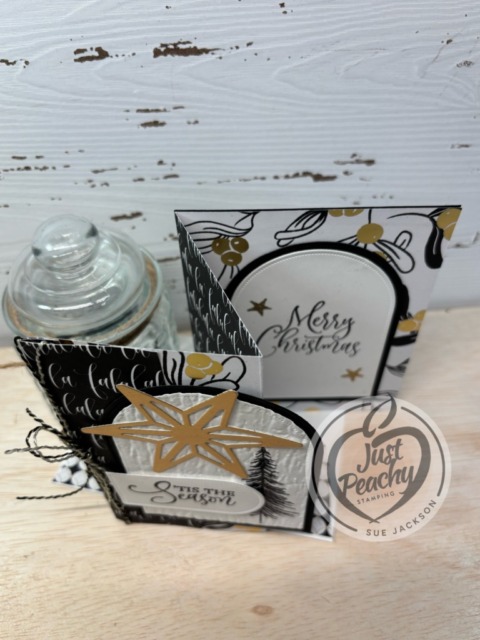
Welcome to the Stampin’ Pretty Pals’ Blog Hop! Ready to sprinkle some holiday magic into your crafting this season?This month’s theme, Season’s Greetings, is all about celebrating the joy of handmade creations. The Stampin’ Pretty Pals have come together to share festive cards and paper craft ideas using our favorite Stampin’ Up! products — each project designed to inspire your creativity and help you capture the spirit of the season.
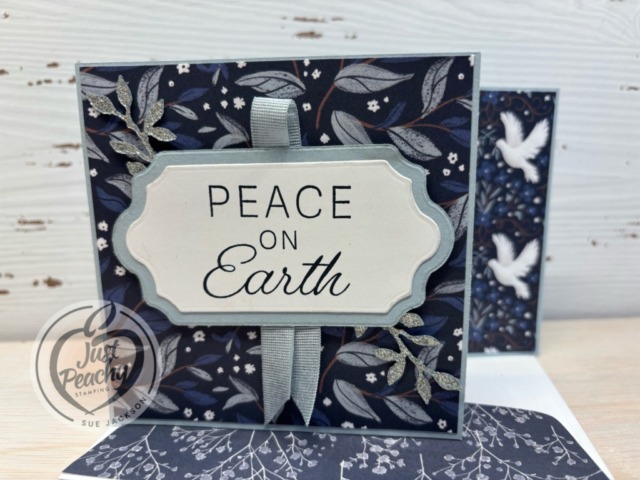
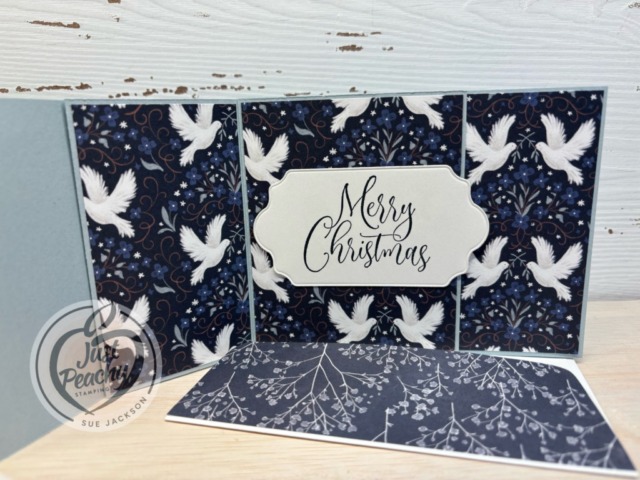
Here’s my double opening fun fold card:
As always, I’ll be uploading this card to the Creative Creases Challenge, where it’s always everything goes with a fun fold.
I found this fun fold on Pinterest from Heidi Collins from On Y Go Stamping for her Double Opening Fun Fold card. Her post includes a link to a YouTube tutorial and a free project sheet. Heidi uses 1/4 inch margins, so I did change that so that all my measurements were 1/8 inch wider and higher. Basically, it’s a regular card base measuring 11 by 4-1/4 inches, scored at 5-1/2 inches. The top fun fold is an adjusted size z-fold card. But them together, and you get a fabulous new-to-me fun fold.
Some Hints:
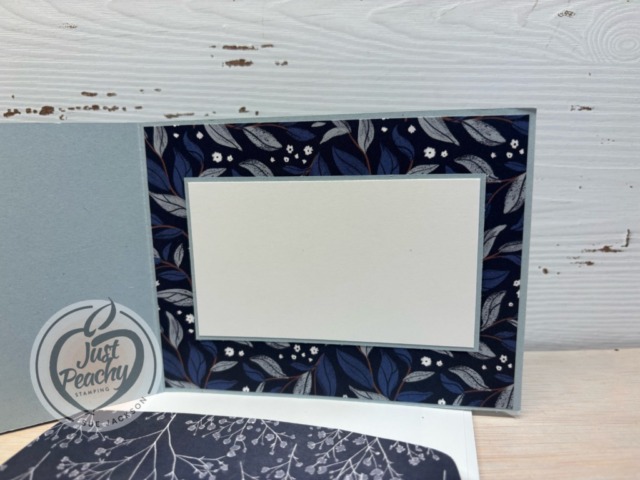
I knew I wanted to use the label dies from the Peace on Earth for my sentiment, so I increased the size of the front piece of cardstock to 4-1/4 by 4-1/4 inches
The DSP for this piece of cardstock measures 4-1/8 by 4-1/8 inches
I used the larger label die and a stamp from the Ornamental Christmas stamp set to add a sentiment to the middle of the card
I cropped two leave sprays from the silver glimmer paper to add behind the front label sentiments
HINT: I’ve found it’s easier to crop the glimmer paper using dies by putting the face size down on the cutting pad
Since I wanted to add a bit more silver sparkle to the card, I used the clear Wink of Stella brush to outline both labels on the front and the one on the inside
This card will require additional postage, but it will still fit into a Stampin’ Up! medium envelope
In addition to the measurements Heidi listed, I trimmed a piece of DSP (designer series paper) to 6 by 2-1/2 inches for the envelope flap
I punched a 1-inch circle from a coordinating piece of DSP and ran it through the XYRON create-a-sticker for the envelope seal
With that, I’d finished this coordinated card, envelope, and envelope seal set
Back to the Pals’ Fun Fold Hop:
I hope today’s project sparked some holiday cheer and crafting inspiration! There’s so much more to see — keep the fun going by following the lineup below to visit the rest of the Pals. And be sure to join us next month when we create our own Winter Wonderland!
Kits Make Crafting Simple, Fun, and Just Simply Fun!
Here’s a look at the two new kits available:
First, it’s the Everyday Beauty Kit, which retails for $25 USD.
Create the perfect card for any occasion using the all-inclusive Everyday Beauty Kit. This kit comes with everything you need to make three unique card designs: printed card bases and coordinating envelopes with lovely botanical patterns, precut paper pieces, timeless faux wax seals, shimmering metallic thread, and a versatile stamp set that you can use on countless other projects.
DETAILS – Makes 9 cards: 3 each of 3 designs – Folded card size: 5-1/2″ x 4-1/4″ (14 x 10.8 cm) – Colors: Basic Beige, gold, Gray Granite, Lost Lagoon, Night of Navy, Petal Pink – Also available in French
Kit includes one of each item listed below. – Everyday Beauty Photopolymer Stamp Set – Clear stamp block – Night of Navy Classic Stampin’ Spot – Step-by-step instructions – 9 printed envelopes – Faux wax seal stickers – Metallic thread – Adhesive
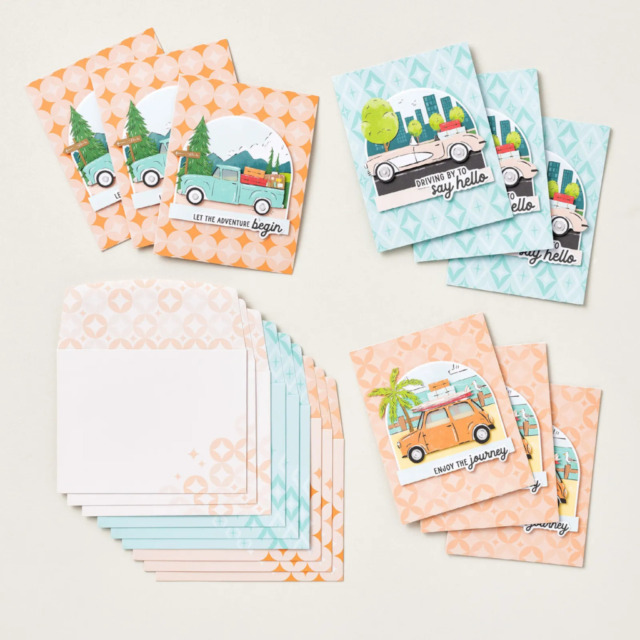
The second kit is the Adventure Awaits kit, which retails for $14 USD.
Let your creativity take the driver’s seat with the Adventure Awaits Kit. Coast in the retro colours and hand-drawn artwork that can be either feminine or masculine. With printed sentiments, precut paper, and vellum details, this kit comes with everything you need to make nine cute cards.
DETAILS – Makes 9 cards: 3 each of 3 designs – Folded card size: 5-1/2″ x 4-1/4″ (14 x 10.8 cm) – Colors: Basic Black, Coastal Cabana, Crushed Curry, Garden Green, Granny Apple Green, Pecan Pie, Petal Pink, Poppy Parade, Pretty Peacock, Timid Tiger – Sentiments printed in English, French, and German
Kit includes one of each item listed below. – Step-by-step instructions – 9 printed envelopes – Vellum – Adhesive
If you have any questions, or need a bit of a creative mojo boost, you can reach me at my [email protected].
If you live in the U.S. and don’t already have a Stampin’ UP! demo from whom you order, I would be honored to work with you.
Welcome to Just Peachy Stamping by Sue Jackson: an independent Stampin' Up demonstrator.
Through Stampin' Up!, I happily share my love of papercrafting through sales, classes, small stamping group meet-ups and workshops. I think that being a teacher in my "real life", I have a unique approach to sharing my fantastic hobby. I look forward to connecting with you!