Happy Birthday Balloons for the AHSC #692

Welcome to the Atlantic Hearts Sketch Challenge #692! It’s Team B’s turn, and we are happy to share our projects using the sketch.
Please check out the challenge’s page for the creations by the other very talented design team members. When you’ve created your own card for our challenge, please don’t forget to upload them to our gallery. We’d love for you to play along.
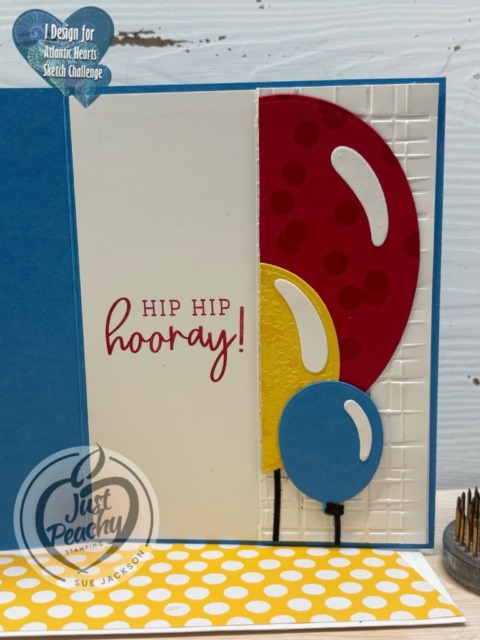
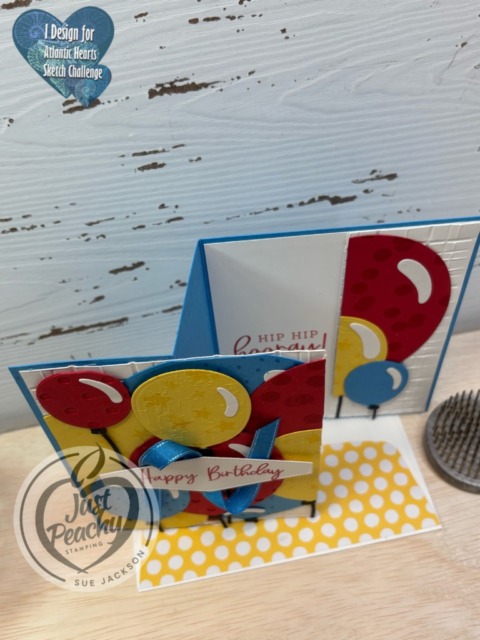
Here’s my card:
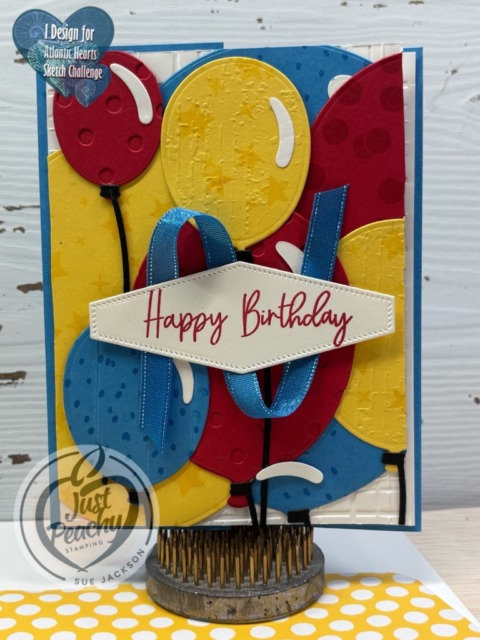
I’ve already posted a card using this Balloon Festoon bundle, which you can see here.
Here’s the Atlantic Hearts Sketch Challenge sketch:
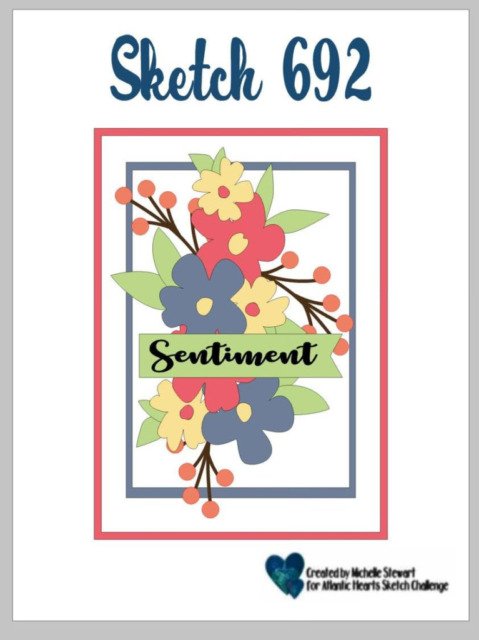
I know the sketch has florals, but as long as the sketch is evident in my card, it’s all good.
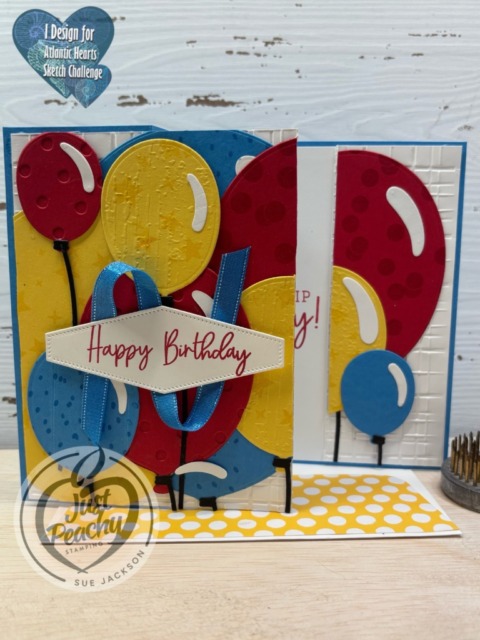
It’s just a given that fun fold cards also post to the Creative Creases Challenge. Debbie Mageed at Secret Stamper coordinates this blog hop and the challenge, for which I’m honored to be on the design team. Hopefully, you will be inspired to upload your own fun fold project to the challenge!

Measurements:
- The Azure Afternoon cardstock base measures 8-1/2 by 5-1/2 inches, scored at 2-1/8 and 4-1/4 inches
- After dry embossing a piece of white cardstock, trim it to 6″ by 5-3/8 inches to use as a base for the balloons
- Then trim the embossed piece of cardstock down to a 4 inch and a 2 inch wide piece, and use a piece of Post-it Note tape to put the two pieces back together
- It will be much easier to figure out the placement of the balloons if you have the whole piece taped together
- HINT: this tape is fabulous for temporarily holding dies in place when using the Cut & Emboss Machine
- Trim a piece of the In Color DSP to to 6 by 2-1/2 inches for the envelope flap
- Trim a piece of white cardstock to 4-1/8 by 5-3/8 inches for the inside of the card
- Don’t forget to punch a 1-inch circle from coordinating DSP and run it through the XYRON create-a-sticker for the envelope seal
- I used Azure Afternoon, Daffodil Delight, and Real Red primary colors for this card
- I didn’t have to cut anything to size because I just used the pieces I already had in each color’s page protector, especially the Daffodil Delight
- I used scraps of black cardstock to crop the balloon strings and scraps of white to crop the highlights for the balloons
- HINT: I found it easier to just crop a bunch of strings, highlights, and balloons before I started putting things together
- I figured that I will use the pieces on this card or another one and by having extras the whole process would go smoother
What I Did:
- Unless otherwise noted, I used multipurpose liquid glue to adhere pieces together
- Repositionable tape and the craft (oppositional or reverse) tweezers will be your best friends when putting this card together
- Adhere all the highlights and the strings to the balloons
- Using the repositionable tape, start placing the balloons on the 5-3/8 by 6 inches cardstock
- I found it easier to start with the largest balloons and work my way forward
- Adhere the bottom layers of the balloons to the DSP, making sure you have liquid glue covering the cut line in the embossed cardstock
- Re-trim the embossed cardstock so you can trim the first layer of balloons
- Continue placing the balloons, figuring out which balloons will be adhered with dimensionals
- Before adding dimensionals, mark and trim the balloons that will be placed on the outside edges of the DSP, and also across the cut line
- Start adding the dimensionals and adhere the layers of balloons
- Adhere the 4″ by 5-3/8″ DSP to the top flap of the z-fold
- Adhere the white cardstock to the inside of the card, then add the 2 inch piece of DSP with all the balloons
- Stamp the sentiments , found in the Balloon Festoon stamp set in black ink
- Crop the outside sentiment using a die from the Nested Essentials die set
- Add a piece of tear & tape to the back of the sentiment to adhere the Azure Afternoon ribbon
- Add dimensionals to the back of the sentiment and adhere to the front of the card
With that, I’d finished this coordinated card, envelope, and envelope seal set
Thank you for stopping by today!
Have a Peachy Day!
Sue
Colors Used:
Supplies Used:

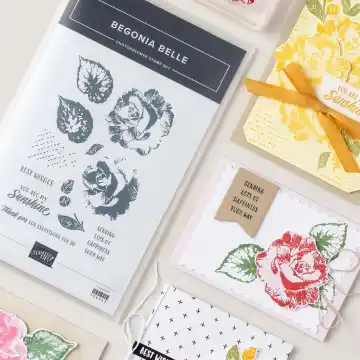
July’s Product of the Month is the Begonia Belle stamp set! Just $5.00 USD with a $75.00 USD purchase.
What’s New?
The Shaded Petals Kit, which retails for $26.00