Welcome to the March Cardz 4 Guyz challenge #387! Our host for this month’s challenge, Dawn, chose Gardens or Gardening for the theme. When you finish here, please visit the challenge site to see what the rest of the talented design team members created. Then, don’t forget to upload your creations to our gallery. We look forward to seeing your creations there!
I didn’t really have anything for gardening, which surprised me and must be remedied quickly. In the meantime, I needed to do some thinking about how to interpret the theme for a masculine card using the materials I have on hand.
Here’s my card:
Measurements:
The Secret Sea base measures 8-1/2 by 5-1/2 inches, scored at 4-1/4 inches
The Very Vanilla base measures 4-1/8 by 5-3/8 inches, from which I cropped the sentiment rectangle
The script DSP, from the Nature Walk DSP (designer series paper) set, measures 4 by 5-1/4 inches
The Secret Sea DSP at the bottom, also from the Nature Walk DSP, measures 4 by 1-1/2 inches
I trimmed a piece of the script DSP to 6 by 2-1/2 inches for the envelope flap
Then I punched a 1-inch circle of the Secret Sea DSP and ran it through my XYRON create-a-sticker for the envelope seal
I punched the Mason Jar from a piece of the Natural Hues Textured Specialty Paper and used a blending brush and Pecan Pie ink to add texture
What I Did:
Unless otherwise noted, I used multipurpose liquid glue to adhere pieces together
I adhered the Secret Sea DSP to the script DSP, then layered that on the Very Vanilla, then adhered it all to the base of the card
I cropped the majority of the leaves from Nature Walk DSP scraps using the Fern & Flora DSP
Using tear & tape to secure the Baker’s Twine, I wrapped it around the top of the Mason Jar
I adhered the leaves to the top of the Mason Jar then added dimensionals underneath all of the pieces
After adhering the Mason Jar, I stamped the sentiment, from the Flowering Meadows stamp set in Secret Sea ink on the rectangle I cropped
Add dimensionals to the back of the sentiment and adhere to the Secret Sea stripe of DSP
I didn’t add a sentiment to the inside because the outside sentiment is so versatile that I can add one on the inside when I decide the purpose of the card
With that, I’d finished this coordinated card, envelope, and envelope seal set.
June’s Product of the Month is the WILD BUNCH PHOTOPOLYMER STAMP SET!
Send smiles with the Wild Bunch Stamp Set! With hand-drawn animals like a koala, penguin, snail, and highland cow, plus versatile sentiments for birthdays, thank-yous, or just because, this set can help brighten anyone’s day. Add hearts, party hats, presents, or scribbled patterns to make each card or scrapbook page even more fun.
The Wild Bunch Stamp Set is the exclusive Product of the Month for June 2026! Only available until stocks run out—don’t wait to get yours! I ordered mine last night and am so looking forward to getting it next week! Stay tuned for some cuteness!
What’s New?
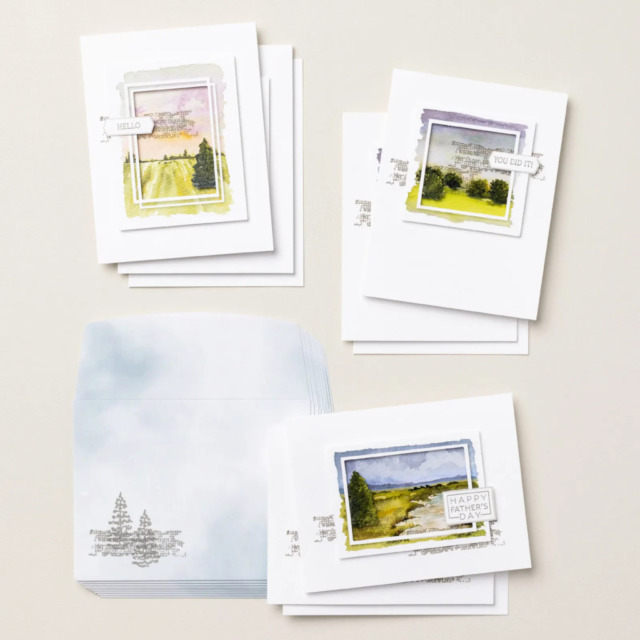
The Serene Scenes Kit, which retails for $25.00
Product detail
Have a card ready when an occasion comes up, whether it’s for Father’s Day, a quick congrats, or a simple thank-you. The Serene Scenes Kit includes coordinating card making materials and a stamp set with sentiments for both the inside and outside, making it easy to pull together something heartfelt. Create clean, simple cards that feature inviting watercolor-feel landscape scenes.
DETAILS – Makes 9 cards: 3 each of 3 designs – Folded card size: 4-1/4″ x 5-1/2″ (10.8 x 14 cm) – Colors: Cloud Cover, Fresh Freesia, Gray Granite, Misty Moonlight, Mossy Meadow, Old Olive, Petal Pink, Secret Sea – Also available in French
Kit includes one of each item listed below. – Serene Scenes Stamp Set – Clear stamp block – Gray Granite Classic Stampin’ Spot – Step-by-step instructions – 9 printed envelopes – Precut paper pieces – Adhesive
KITS COLLECTION – Includes designed projects that come in a range of project types. – Is perfect for new crafters, busy crafters, or crafters who want quick and easy projects.
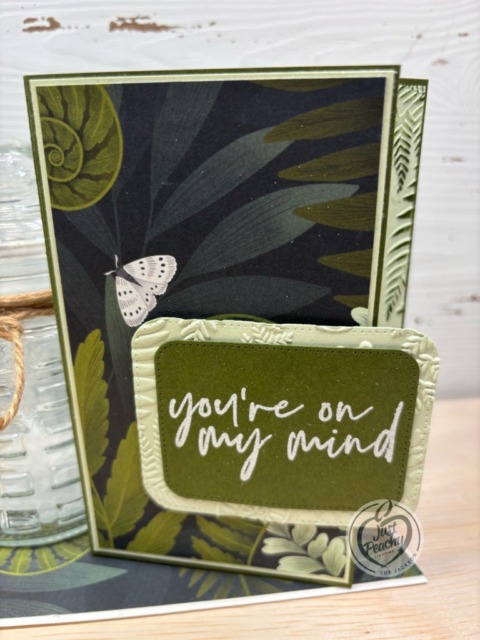
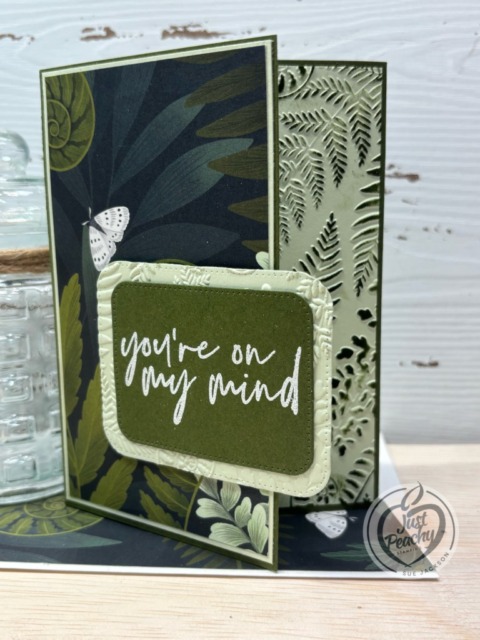
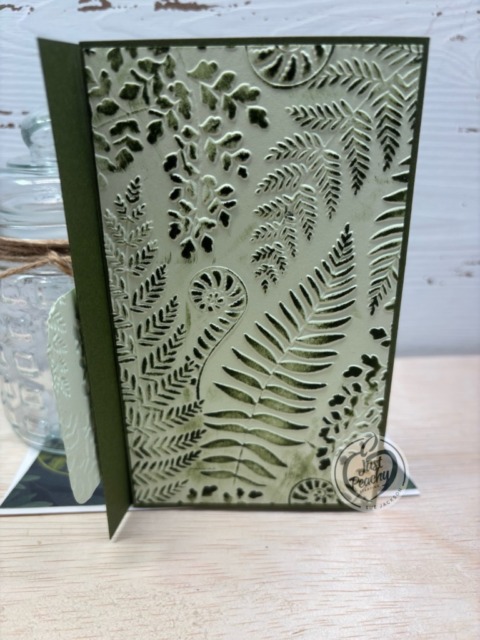
Welcome to the March Cardz 4 Guyz challenge #386! Our host for this month’s challenge, Julie, chose Squash It (with an embossing folder) for the theme. When you finish here, please visit the challenge site to see what the rest of the talented design team members created. Then, don’t forget to upload your creations to our gallery. We look forward to seeing your creations there!
Here’s my card:
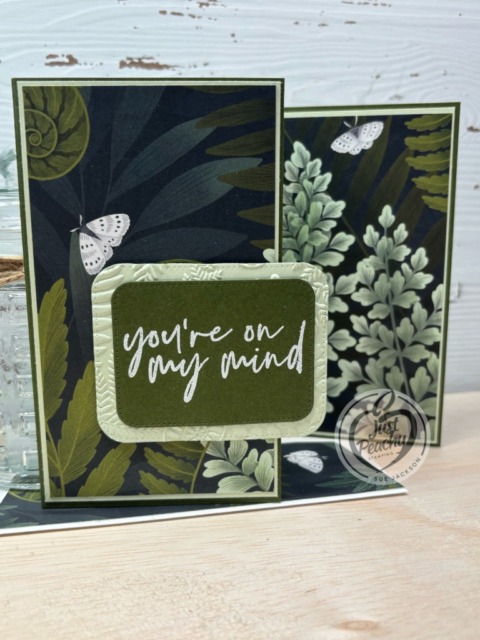
This hidden flap fold card is one of my favorites for showing off gorgeous DSP (designer series paper). In this case, I used the Moonlit Flora DSP with the Fern & Flora embossing folder.
Of course, since this is a fun fold, I will be uploading it in the Creative Creases Challenge gallery as a design team member.
I used Mossy Meadow for the base of the card and the sentiment banner
The Soft Seafoam cardstock mats measure 3-1/8 by 5-3/8 inches
After embossing another piece of Soft Seafoam DSP, trim it to 3-1/8 by 5-3/8 inches
The mat for the sentiment comes from a scrap piece of Soft Seafoam cardstock, which has also been embossed with the Fern & Flora embossing folder
You will also need a piece of DSP trimmed to 6 by 2-1/2 inches for the envelope flap
Punch a 1-inch circle from coordinating DSP and run it through your XYRON create-a-sticker for the envelope seal
What I Did:
Unless otherwise noted, I used multipurpose liquid glue to adhere the pieces together
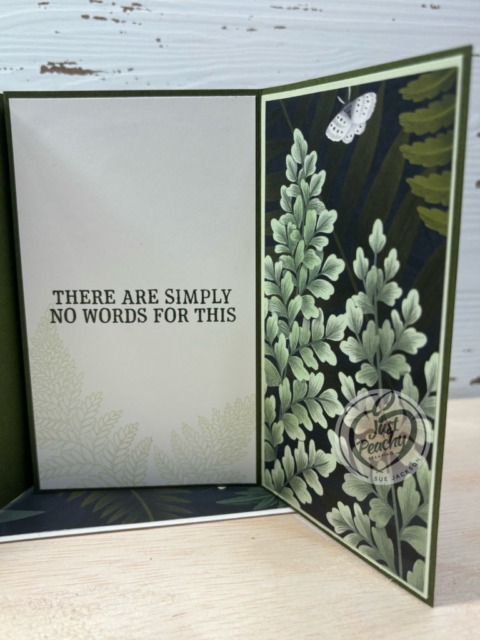
After trimming and scoring the Mossy Meadow cardstock base, I trimmed two pieces of Soft Sea Foam cardstock to 5-3/8 inches by 3-1/8 inches and adhered one to the front flap and one to the inside flap on the right side as shown
Making sure you have the DSP pieces in the proper order (from left to right), adhere them to the Soft Sea Foam cardstock
After dry embossing a piece of Soft Sea Foam cardstock using the 3D Fern and Flora embossing folder, trim the cardstock to 3-1/8 by 5-3/8 inches
Lightly drag the Mossy Meadow ink pad over the embossed cardstock
HINT: Go slow and have a very light hand so you can keep as much ink as possible only on the raised design
I did have to add a few layers of color, making sure that the ink dried completely between layers
Adhere the embossed cardstock to the flap of the base of the card as shown
After wiping down a scrap piece of Mossy Meadow cardstock with an embossing buddy, stamp your sentiment using VeraMark ink
Cover the sentiment with white embossing powder and heat set it with your heat tool
Crop the sentiment using one of the Nested Essentials Dies
Crop the next largest Nested Essentials die from a piece of embossed Soft Sea Foam
Adhere the sentiment to the embossed mat, and add dimensionals to the back of the mat only the left side of the sentiment
Finally, add three of 2026-2028 In Color white butterflies to the front sentiment
With that, I’d finished this coordinated card, envelope and envelope seal set.
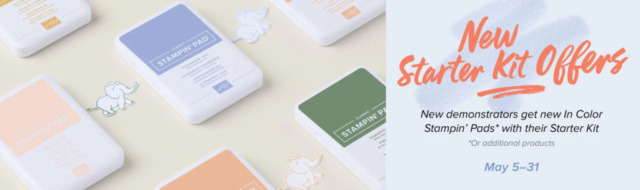
New team members who purchase their Starter Kit from May 5–31 will be able to choose between these two offers:
Free 2026–2028 In Color Stampin’ Pads with Starter Kit
$160 USD | $215 CAD worth of products in their Starter Kit for just $99 USD | $135 CAD (that’s an extra $35 USD | $50 CAD value!)
New demonstrators who submit their Independent Demonstrator Agreement (IDA) before May 5 or after May 31 will not be eligible for these offers.
If you love exclusive products, you’re going to love Product of the Month, a promotion centered around a special product release every month. The Product of the Month items are specially designed to be some of the best items Stampin’ Up! has to offer that aren’t available in any of our catalogs or our Online Exclusives. Every month we’ll release a new item that is only available for purchase once per account. These items will be limited quantity and are likely to sell out quickly—once they’re sold out, they’re gone for good!
May’s Product of the Month: BERRY BOTANICAL VELLUM 12″ X 12″ (30.5 X 30.5 CM) SPECIALTY DESIGNER SERIES PAPER
Product detail
Enhance your paper crafting and card making with Berry Botanical Vellum 12″ x 12″ (30.5 x 30.5 cm) Specialty Designer Series Paper. This paper includes four sheets: two sheets of florals and two versatile designs that coordinate with the florals or stand alone. Use as backgrounds or cut out individual elements to use as accents.
The Berry Botanical Vellum 12″ x 12″ (30.5 x 30.5 cm) Designer Series Paper is the exclusive Product of the Month for May 2026! Only available until stocks run out—don’t wait to get yours!
DETAILS – May 2026 Product of the Month – 12 sheets: 3 each of 4 single-sided designs – 12″ x 12″ (30.5 x 30.5 cm) – Acid and lignin free (this product is photo-safe) – Colors: Bubble Bath, Flirty Flamingo, Fresh Freesia, Golden Glow, Hydrangea Hue, Misty Moonlight, Peaceful Pine, Soft Sea Foam, Strawberry Slush
DESIGNER SERIES PAPER – Can be used for card making, scrapbooking, and other paper crafts! – Features exclusive designs by in-house Stampin’ Up! artists. – Complements other Stampin’ Up! products and colors.
PRODUCT OF THE MONTH – Is a new exclusive product released each month! – Can be unlocked for just $5 with orders over $75 (after discounts and rewards). – Is only available while supplies last—they can sell out quickly! – Is limited to one per customer (including language versions).
Browse our selection of Last Chance paper crafting products. Additional items are added every other month. These products are available only while supplies last so be sure to buy them before they are discontinued! Discounts vary and are subject to change.
Welcome to the March Cardz 4 Guyz challenge #385! Our host for this month’s challenge, Helen, chose Clean & Simple for the theme. When you finish here, please visit the challenge site to see what the rest of the talented design team members created. Then, don’t forget to upload your creations to our gallery. We look forward to seeing your creations there!
I used the birds from the Cutest Crew stamp set for last month’s color challenge, and you can see that post here. This month, I used the puppies.
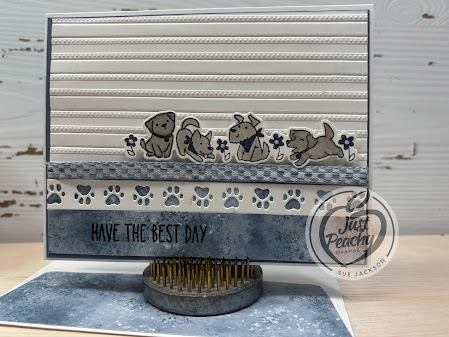
Here’s my card:
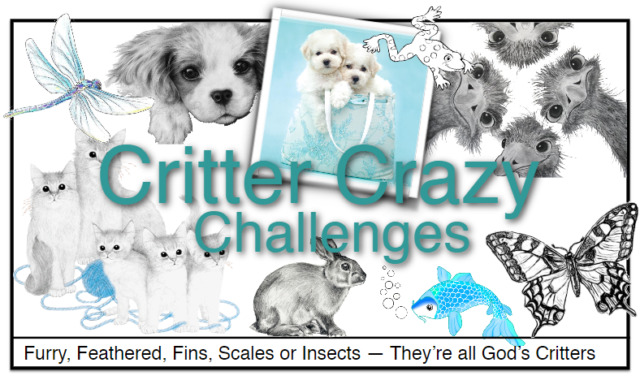
Since my card features these adorable puppies, I am entering adding it to the gallery for the Critter Crazy Challenge # 109.
Measurements:
The Misty Moonlight base measures 8-1/2 by 5-1/2 inches, scored at 4-1/4 inches to create a tent fold card
After dry-embossing the white cardstock, I trimmed it to 4-1/8 by 5-3/8 inches
The Misty Moonlight 6′ by 6″ DSP (designer series paper) for the front of the card measures 2″ by 5-3/8 inches
I also trimmed a piece of the DSP to 6″ by 2-1/2 inches for the envelope flap
After punching a 1-inch circle of the DSP, I ran it through my XYRON create-a-sticker for the envelope seal
The inside white cardstock measures 4 by 5-1/4 inches
I used white cardstock for the cropped paws across the front, then trimmed it down to 5-3/8 inches long
I had a long scrap of white cardstock, on which I stamped the line of puppies
What I Did:
Unless otherwise noted, I used multipurpose glue to adhere pieces together
First, I adhered the Misty Moonlight DSP to the bottom of the dry-embossed white cardstock
Then, I adhered the cropped and trimmed line of paws on the white cardstock
Next, I added the length of Misty Moonlight checked ribbon and used tear & tape to adhere the ends of the ribbon to the back of the white cardstock
After wiping down the Misty Moonlight DSP with my embossing buddy, I stamped the sentiment using VersaMark ink
Then, I covered the ink with black embossing powder and then heat set it with my heat tool
Honestly, I should’ve taken care of the sentiment before adhering the DSP to the front of the cardstock
I adhered the dry-embossed cardstock to the Misty Moonlight base
Using Tuxedo Black ink, I stamped the puppies and colored them using the Smoky Slate and Misty Moonlight blends combos
I cropped the puppies and added dimensionals to the back of the puppies and adhered them to the card
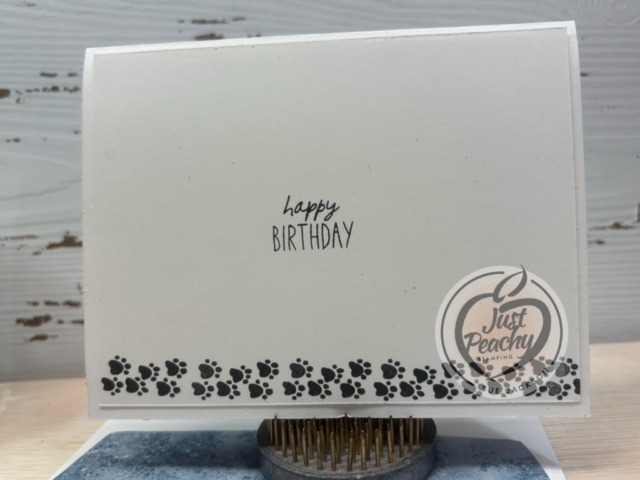
Finally, I stamped the inside sentiment and the line of paws using Tuxedo Black ink
With that, I’d finished this coordinated card, envelope, and envelope seal set.
If you love exclusive products, you’re going to love Product of the Month, a promotion centered around a special product release every month. The Product of the Month items are specially designed to be some of the best items Stampin’ Up! has to offer that aren’t available in any of our catalogs or our Online Exclusives. Every month we’ll release a new item that is only available for purchase once per account. These items will be limited quantity and are likely to sell out quickly—once they’re sold out, they’re gone for good!
Eyelet Blooms Die for April!
The Eyelet Blooms Die is the finishing touch you didn’t know you needed. Whether you’re crafting a card or creating a scrapbook page, it transforms the space with soft texture and refined detail. Its intricate pattern creates a full background that fills large areas beautifully for a polished, handcrafted look in one easy cut.
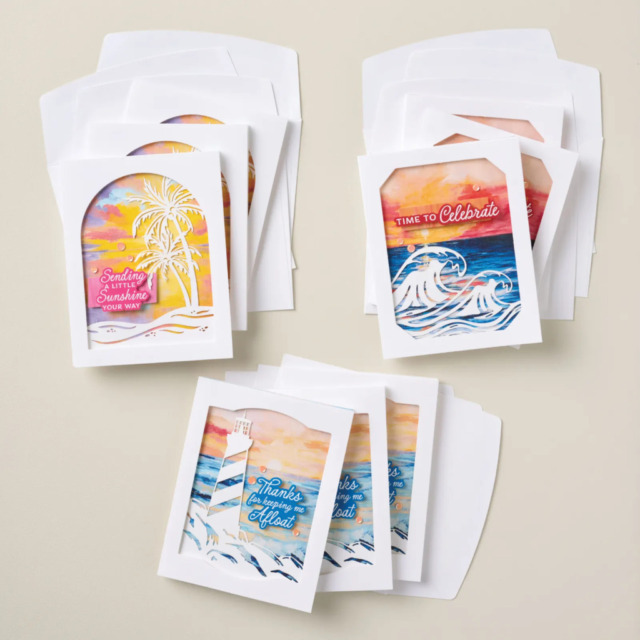
The Painted Skies Kit:
Retails for $18.00 USD
Product detail
If beautiful sunsets are your thing, the Painted Skies Kit is calling your name. Create vibrant, hand-painted–style skies with scenes featuring lighthouses, palm trees, and rolling ocean waves as your artistic focal points. Friendly greetings, gratitude themes, and celebratory sentiments add just the right finishing touch.
DETAILS – Makes 9 cards: 3 each of 3 designs – Folded card size: 4-1/4″ x 5-1/2″ (10.8 x 14 cm) – Colors: Balmy Blue, Blueberry Bushel, Crushed Curry, Flirty Flamingo, Gorgeous Grape, Highland Heather, Hydrangea Hue, Melon Mambo, Night of Navy, Petal Pink, Poppy Parade, Pumpkin Pie, Real Red, Strawberry Slush, white – Sentiments printed in Dutch, English, French, and German
Kit includes the items listed below. – Step-by-step instructions – 9 printed envelopes – Precut paper pieces, printed labels – Sequins – Adhesive
KITS COLLECTION – Includes designed projects that come in a range of project types. – Is perfect for new crafters, busy crafters, or crafters who want quick and easy projects
If you live in the U.S. and don’t already have a Stampin’ UP! demo from whom you order, I would be honored to work with you.
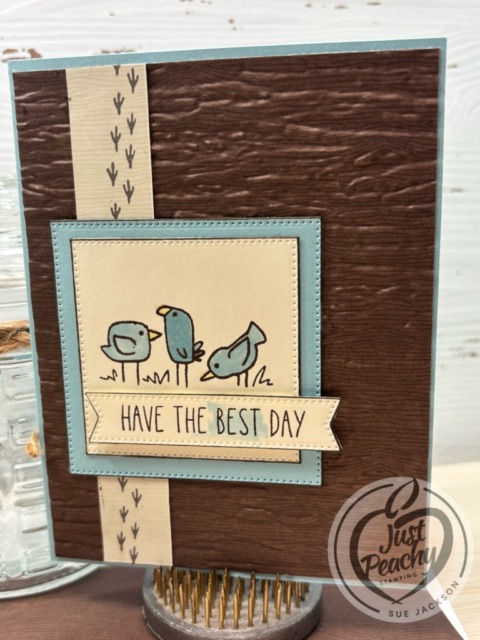
Welcome to the March Cardz 4 Guyz challenge for 2026! Our host for this month’s challenge, Deb H., chose Color Challenge using Light Blue & Brown for the theme. When you finish here, please visit the challenge site to see what the rest of the talented design team members created. Then, don’t forget to upload your creations to our gallery. We look forward to seeing your creations there!
I used the birds from The Cutest Crew stamp set with Balmy Blue, Early Espresso, and Very Vanilla.
Here’s my card:
Easy Peasy Measurements:
The Balmy Blue base measures 8-1/2 by 5-1/2 inches, scored at 4-1/4 inches
After I dry-embossed a piece of the Early Espresso Wood Grain DSP (designer series paper) using the Birch Wood embossing folder, I trimmed it to 4-1/8 by 5-3/8 inches
The strip of DSP (which is the reverse side of the Early Espresso DSP) measures 1 inch by 5-3/8 inches
I trimmed a piece of the Early Espresso DSP to 6 by 2-1/2 inches for the envelope flap
Then, I punched a 1-inch circle from the reverse side and ran it through my XYRON create-a-sticker for the envelope flap
I used scraps of Very Vanilla and Balmy Blue cardstock to crop the two nested squares using the Stylish Shapes dies
The sentiment banner is also from the Stylish Shapes die set
The Very Vanilla cardstock for the inside measures 4 by 5-1/4 inches
What I Did:
Since I wanted all the stamping to be done with Early Espresso ink and then would be coloring the birds with the Balmy Blue blends combo, I needed to stamp them first and allow the image time to dry thoroughly
With the exception of the dimensionals under the sentiment banner, I used multipurpose liquid glue to adhere the pieces together
Adhere the Early Espresso DSP to the base of the card
Using Early Espresso ink, stamp the bird feet on the strip and adhere it to the Early Espresso DSP
Stamp the sentiment on the inside using Early Espresso ink and adhere it to the base of the card
Color the birds using the Balmy Blue blends, and use the Crumb Cake light blend to color the beaks
Using the Early Espresso blend, outline the two cardstock squares and the banner
Layer the squares and adhere to the base of the card
Adhere the sentiment banner to the squares
With that, I’d finished this coordinated card, envelope, and envelope seal set.
Spring into stamping with the Notes of Spring Stamp Set! Featuring adorable springtime animals like a deer, bunny, and duck, plus some delicate river plants, this stamp set makes it easy to create layered, watercolor-style images. Includes a few all-occasion sentiments to complete your handmade cards for birthdays, thank-yous, and more.
PRODUCT OF THE MONTH: – Is a new exclusive product released each month! – Can be unlocked for just $5 with orders over $75 (after discounts and rewards). – Is only available while supplies last—they can sell out quickly! – Is limited to one per customer (including language versions).
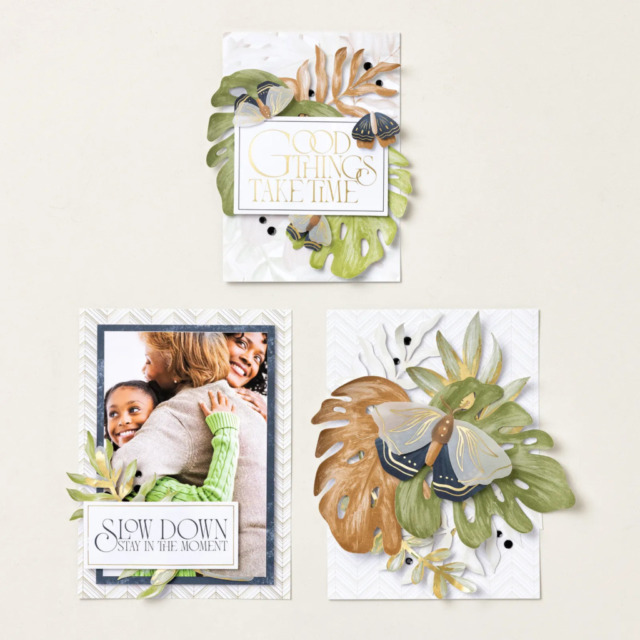
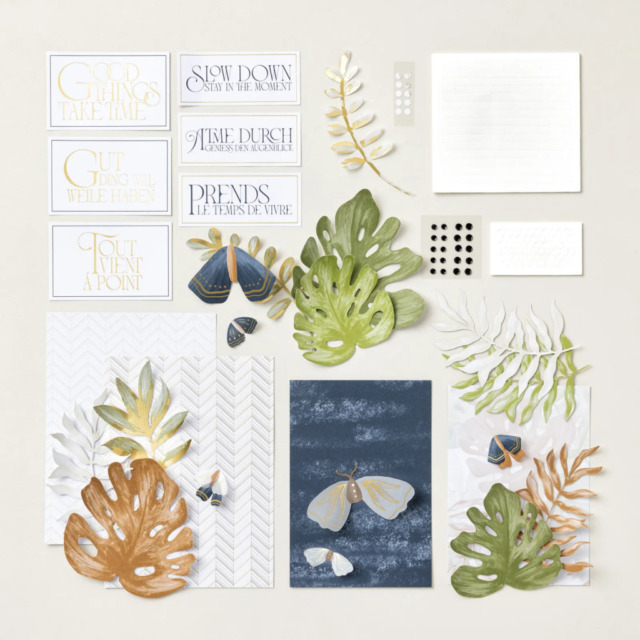
Two New Kits for March!
RADIANT REMINDERS KIT – $14.00 USD
Create three DIY displays with the Radiant Reminders Kit. Featuring monstera leaves, luna moths, and neutral patterns in beige, black, brown, green, and gold, these handmade home decor pieces let your creativity shine while adding natural, organic style to any room.
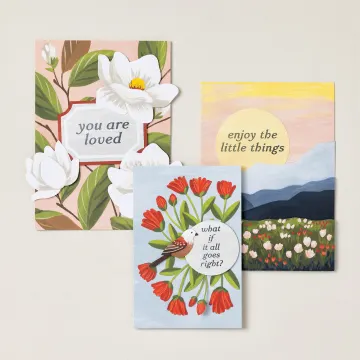
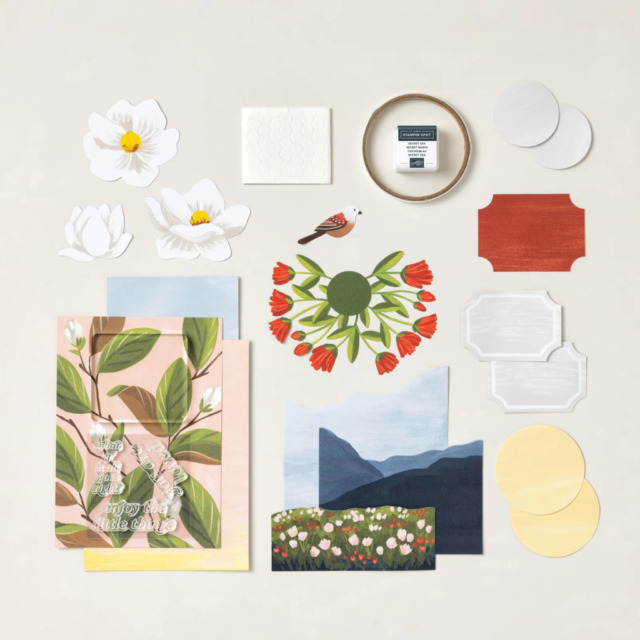
EVERY LITTLE THING KIT – $21.00 USD
Create three DIY floral and nature-inspired paper artworks with the Every Little Thing Kit. Featuring magnolias, tulips, mountains, and a bird, each piece includes uplifting sentiment stamps to brighten your home. This kit coordinates with the Standing Clipboard Trio.
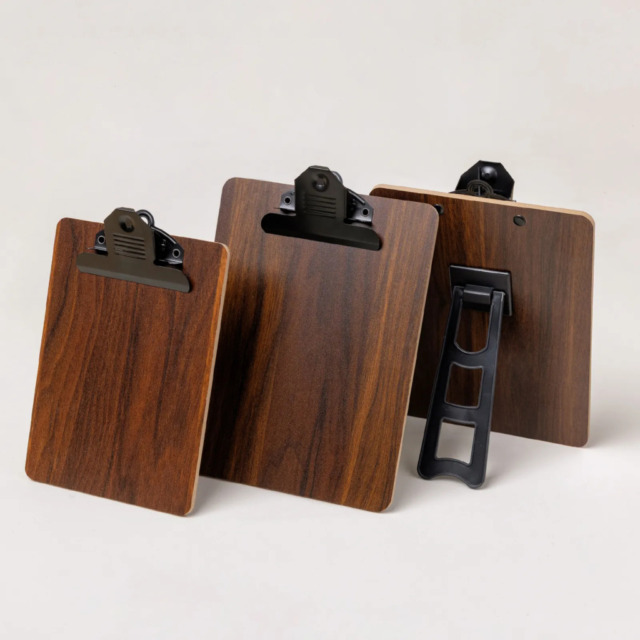
STANDING CLIPBOARD TRIO:
The Standing Clipboard Trio Kit includes three clipboards you can use to showcase creations from the coordinating Radiant Reminders and Every Little Thing Kits (sold separately). These are also great for your handmade cards, photos, stamped art, and favorite quotes. Each clipboard comes assembled and features a sturdy backing and kickstand. They’re perfect for adding a personal touch to your desk, craft room, or office.
If you live in the U.S. and don’t already have a Stampin’ UP! demo from whom you order, I would be honored to work with you.
Welcome to the February Cardz 4 Guyz challenge for 2026! Our host for this month’s challenge, Melanie, chose Monochromatic Color Combination for the theme. When you finish here, please visit the challenge site to see what the rest of the talented design team members created. Then, don’t forget to upload your creations to our gallery. We look forward to seeing your creations there!
Here’s my fun fold card:
It’s just a given that fun fold cards also post to the Creative Creases Challenge. Debbie Mageed at Secret Stamper coordinates the challenge, and it’s one of my favorite challenges. Hopefully, you will be inspired to upload your own fun fold project to the challenge! I love this hidden flap fun fold and have already posted a number of them, some of which you can see here, here, here, and here.
Measurements:
They say that a picture is worth 1,000 words. I have three pictures of the template I use to create this simple but stunning fun fold card:
I used Basic Beige for the base and the flap pieces
Trim a piece of 6 x 6 inch Beautiful Gallery DSP (designer series paper) to 5-1/4 inches from top to bottom
Then trim the DSP in half so you have two pieces of 5-1/4 by 3 inches
The Early Espresso cardstock mats each measure 5-3/8 by 3-1/8 inches
There’s a piece of Basic Beige cardstock in the center of the inside and it measures 3 by 5-3/8 inches
After running a piece of Early Espresso through the Cut & Emboss machine using the Bark embossing folder, I trimmed it to 1-1/2 by 5-3/8 inches
I trimmed a piece of the Beautiful Gallery DSP to 6 by 2-1/2 inches for the envelope flap
Then, i punched a 1-inch circle out of coordinating DSP and ran it through the XYRON create-a-sticker to create the envelope seal
Clean & Simple:
These sentiments from Nature’s Symphony fit this card perfectly
After wiping down the DSP with my embossing buddy, I stamped the sentiment using VersaMark ink
Then, I covered the ink with bronze WOW! embossing powder and heat set it with the heat tool
I stamped the inside sentiment using Early Espresso ink
I have learned that I need to do all my stamping before adhering pieces together
I used multipurpose liquid glue to adhere all the layers together
Staying with the CAS look for the card, I didn’t add any additional embellishments
With that, I’d finished this coordinated card, envelope, and envelope seal set.
It’s time to redeem the coupons you earned in January! Make sure you place your order before time runs out!
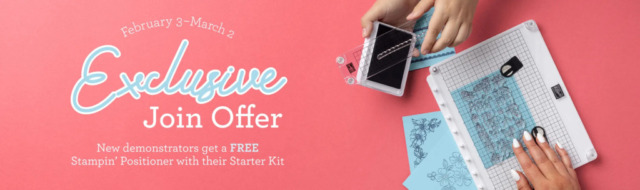
It’s Time for a Joining Bonus!
Crafting is even more fun with community, and there’s never been a better time to join Stampin’ Up! as a demonstrator. There’s no commitment beyond the initial joining quarter and you get to enjoy all the perks that come with that, like a 20–25% product discount, early access to the latest products and catalogs, the opportunity to earn a modest supplemental income, the chance to attend incredible training and crafting events, and so much more. And for a limited time, new demonstrators will receive our new Stampin’ Positioner tool FREE along with their Starter Kit!
It’s Time for the February Product of the Month!
Painted Illusions 12″ x 12″ (30.5 x 30.5 cm) Designer Series Paper
Beautiful watercolors and whimsical patterns make up this one-of-a-kind paper. Make a wide variety of projects with this paper that is sure to dazzle!
Welcome to the first Cardz 4 Guyz challenge for the 2026 year! Our host this monthly challenge, Jolanda, chose Modes of Transportation for the theme. When you finish here, please visit the challenge site to see what the rest of the talented design team members created. Then, don’t forget to upload your creations to our gallery. We look forward to seeing your creations there!
Here’s my card:
It’s just a given that fun fold cards also post to the Creative Creases Challenge. Debbie Mageed at Secret Stamper coordinates the challenge, and it’s one of my favorite challenges. Hopefully, you will be inspired to upload your own fun fold project to the challenge! I love this hidden flap fun fold and have already posted a number of them, some of which you can see here, here, and here.
Measaurements:
They say that a picture is worth 1,000 words. I have three pictures of the template I use to create this simple but stunning fun fold card:
I used Misty Moonlight for the base and the flap pieces
Trim a piece of 6 x 6 inch Thoughtful Journeys DSP (designer series paper) to 5-1/4 inches from top to bottom
Then trim the DSP in half so you have two pieces of 5-1/4 by 3 inches
The white cardstock mats each measure 5-3/8 by 3-1/8 inches
There’s a piece of white cardstock in the center of the inside and it measures 3 by 5-3/8 inches
After running a piece of Misty Moonlight through the Cut & Emboss machine using the Sunrise Sailing embossing folder, I trimmed it to 1-1/2 by 5-3/8 inches
I trimmed a piece of the Thoughtful Journeys DSP to 6 by 2-1/2 inches for the envelope flap
Then, i punched a 1-inch circle out of coordinating DSP and ran it through the XYRON create-a-sticker to create the envelope seal
Crop both boats using the Sunrise Sailing dies from Secret Sea cardstock
Then, crop 6 birds from Secret Seas as well
What I Did:
Unless otherwise noted, I used multipurpose liquid glue to adhere the pieces together, especially since the card is already bulky and will require additional postage
Add dimensionals to the base of the template as shown in the first template photo
Line up the 3-1/2 by 5-1/2 inch flap so that the outside edges are lined up perfectly and adhere using the dimensionals
Adhere the embossed Misty Moonlight cardstock to the inside flap a shown in the first photo of the finished card
Adhere the white cardstock mats, then adhere the two pieces of DSP to the mats
HINT: Before you adhere the DSP/cardstock layers to the base of the card, make sure that you have them in the proper order from left to right
Adhere the larger boat to the front flap of the card, and the smaller one on the inside
Then adhere the birds as shown
Stamp the sentiment using Secret Sea ink and trim it down to 2-1/2 by 2 inches
I cropped a piece of sea using a Smooth Sailing die from a scrap of white cardstock and adhered it to the sentiment panel
Stamp the inside sentiment on the white cardstock panel and adhere to the inside of the card
With that, I’d finished this coordinated card, envelope, and envelope seal set
Mini-Desk Calendars for the Creative Crafters Challenge
Welcome to the January Creative Crafters Challenge #96, where the theme is always Anything Goes. I’ve been wanting to make these mini-desk calendars for a few years and never seem to get them done in a timely manner. This year was finally the time, and I made more than 20 of them for people with whom I teach. Easy-peasy, truly.
When you finish here, please visit both challenge sites to see what the rest of the very talented design team members created. Then, don’t forget to upload your creations to both galleries. We look forward to seeing your creations there!
Here’s a sample of the calendars:
Since our school colors are black and gold, and the mascot is a hornet, I used the retired Honey Bees stamp set, die set, and DSP (designer series paper).
Measurements:
The base measures 4 by 12 inches, scored at 3/4, 1-1/2, and 2-1/4 inches
The DSP measures 3-7/8 by 4-1/2 inches
My calendars are 2 by 3 inches, so the mat for them measure 3-1/4 by 2-1/4
The finished size is 4-7/8 by 4 inches
What I Did:
The first scored line is a mountain fold, the middle is a valley fold, and the last one is a mountain fold
Add two strips of tear-&-tape adhesive the the outside of the first fold and adhere it to the bottom of the back base
Using multipurpose liquid glue, adhere the DSP to the front of the base, then adhere the the cardstock
Adhere the calendar to the mat using liquid glue
Wrap a length of ribbon around the base and tie in a square knot, and adhere using a glue dot
I added a little bee using a dimensional, then added two epoxy dots to the DSP
If you wanted to mail these, they would fit in a medium SU! envelope, but remember to add extra postage
HINT: Since I made 20 of these, I trimmed and scored 20 bases, then trimmed 20 pieces of DSP and cardstock. I cropped all 20 bees and trimmed all the ribbon. When I put the calendars together, I did all the bases, then added the DSP and cardstock, then added all the ribbon, and finished by adding all the bees and dots. For me, this is the way I mass produce projects because it seems to be easier. Let me know if it works for you.
What better way to earn the January Product of the Month? Bonus Days & Product of the Month – Yes, Please!
Versatility is key! With the Fabulous Sayings Stamp Set, you’ll always have the right words on hand—whether you’re creating birthday cards, thank-you notes, or a cheerful hello.
You can purchase the Product of the Month item for only $5 USD | $5 CAD when you spend $75 USD | $100 CAD or more in a single order. I’ve already ordered this item and am looking forward to adding these sentiments to my other sentiment stamp sets.
Welcome to Just Peachy Stamping by Sue Jackson: an independent Stampin' Up demonstrator.
Through Stampin' Up!, I happily share my love of papercrafting through sales, classes, small stamping group meet-ups and workshops. I think that being a teacher in my "real life", I have a unique approach to sharing my fantastic hobby. I look forward to connecting with you!