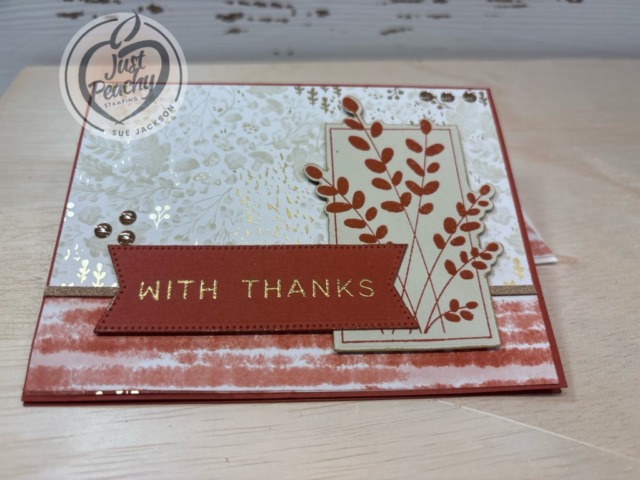
Welcome to the newest Make My Monday bi-weekly challenge #265. Our host, Pamela, chose Gratitude or Thankful for the theme. I used a piece of DSP (designer series paper) from the Gathering Together 12 x 12 inch DSP, which can be found in the online exclusives.
When you finish here, please visit the challenge site to see what the rest of the very talented design team members created. Then, don’t forget to upload your creations to our gallery. We look forward to seeing your creations there!
Here’s my card:
I needed to take the picture with the card almost laying down in order to have the gold embossed sentiment show up in the picture.
I’ve already posted a card using this sketch, which you can find here.
As I was enjoying all the cards entered into the MMM # 264 challenge, I came across Bonnie Lynn’s card and found a new-to-me challenge: Never-Before-Used-Schtuff! Since I’ve never used the Friendly Foliage bundle, I am going to be adding this card to that challenge. How fun!
Measurements:
Trim a piece of Cajun Craze cardstock to 8-1/2 by 5-1/2 inches, and score at 4-1/4 inches to create a tent card
Choose a background DSP and trim it to 4-1/8 by 5-3/8 inches
I used a strip of the Cajun Craze 6 x 6 inch DSP for the bottom, and I trimmed that piece to 1 by 5-3/8 inches
I find it easier to adhere strips like this over the bottom of the background DSP rather than try to fuss with measurements to create the size I need
Trim a piece of coordinating DSP to 1 by 5-3/8 inches for the bottom of the inside of the card
I trimmed a piece of the Cajun Craze DSP to 6 by 2-1/2 inches for the envelope flap
Then I punched a 1-inch circle of the background Gathering Together DSP and ran it through my XYRON create-a-sticker for the envelope seal
Trim a piece of Basic Beige cardstock to 4 by 5-1/4 inches for the inside of the card
I used scraps of Cajun Craze and Basic Beige cardstock for the foliage rectangle & sentiment banner on the front of the card
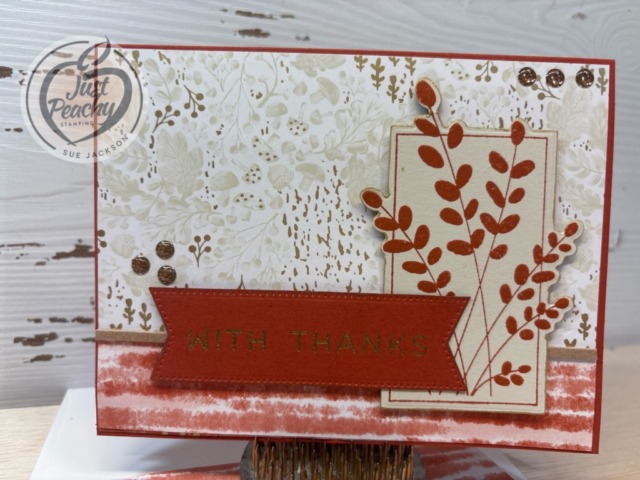
Another Quick Card:
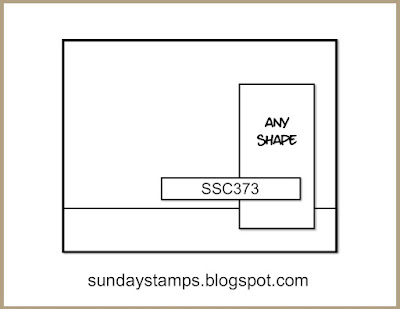
Since I’d already created a card using the Sunday Stamps template, this card fell into place quickly.
I stamped the foliage from the Friendly Foliage stamp set using Cajun Craze ink on the Basic Beige cardstock
After wiping down a scrap of Cajun Craze cardstock with my embossing buddy, I stamped from last year’s September Paper Pumpkin kit in VersaMark ink
Then, I covered the ink with WOW! metallic embossing powder and heat set it with my heat tool
Next, I cropped the sentiment using one of the Stylish Shapes banners and the foliage with the coordinating Friendly Foliage die
Unless otherwise noted, I used multipurpose liquid glue to adhere pieces together
First, I adhered the background DSP, then added the striped Cajun Craze DSP to the bottom
HINT: I just barely missed lining up the striped DSP perfectly with the background DSP, so I used my Cajun Craze marker to add some color to the tiny piece of the background DSP showing on the bottom
I have some of the gold faux leather trim left, so I adhered it to the line where the two DSP patterns meet
In order to add more gold to the two cardstock pieces, I used my (almost dry) gold Wink of Stella brush to outline both the sentiment and the foliage, which created subtle gold edges
I added dimensionals to the back of the foliage box and the sentiment and added them to the front of the card, using liquid glue to adhere the overlapping sentiment banner
Once those pieces were adhered to the front, I finished the car with some (retired) ribboned enamel dots
I stamped the sentiment for the inside in Cajun Craze ink, added the strip of the Cajun Craze DSP to the bottom, and adhere the inside of the card
With that, I’d finished this coordinated card, envelope, and envelope seal set
Kits Make Crafting Simple, Fun, and Just Simply Fun!
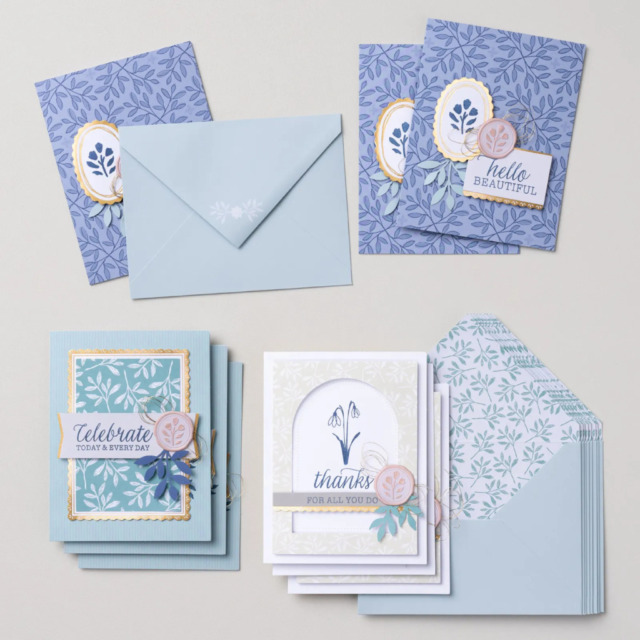
Here’s a look at the two new kits available:
First, it’s the Everyday Beauty Kit, which retails for $25 USD.
Create the perfect card for any occasion using the all-inclusive Everyday Beauty Kit. This kit comes with everything you need to make three unique card designs: printed card bases and coordinating envelopes with lovely botanical patterns, precut paper pieces, timeless faux wax seals, shimmering metallic thread, and a versatile stamp set that you can use on countless other projects.
DETAILS – Makes 9 cards: 3 each of 3 designs – Folded card size: 5-1/2″ x 4-1/4″ (14 x 10.8 cm) – Colors: Basic Beige, gold, Gray Granite, Lost Lagoon, Night of Navy, Petal Pink – Also available in French
Kit includes one of each item listed below. – Everyday Beauty Photopolymer Stamp Set – Clear stamp block – Night of Navy Classic Stampin’ Spot – Step-by-step instructions – 9 printed envelopes – Faux wax seal stickers – Metallic thread – Adhesive
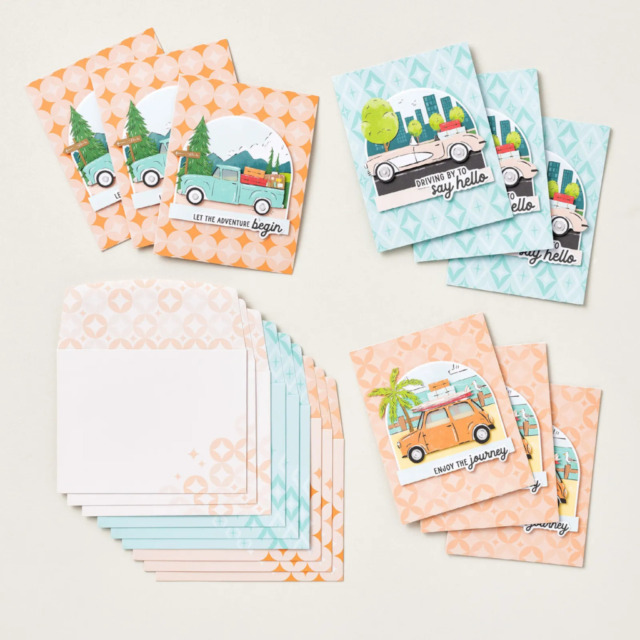
The second kit is the Adventure Awaits kit, which retails for $14 USD.
Let your creativity take the driver’s seat with the Adventure Awaits Kit. Coast in the retro colours and hand-drawn artwork that can be either feminine or masculine. With printed sentiments, precut paper, and vellum details, this kit comes with everything you need to make nine cute cards.
DETAILS – Makes 9 cards: 3 each of 3 designs – Folded card size: 5-1/2″ x 4-1/4″ (14 x 10.8 cm) – Colors: Basic Black, Coastal Cabana, Crushed Curry, Garden Green, Granny Apple Green, Pecan Pie, Petal Pink, Poppy Parade, Pretty Peacock, Timid Tiger – Sentiments printed in English, French, and German
Kit includes one of each item listed below. – Step-by-step instructions – 9 printed envelopes – Vellum – Adhesive
If you have any questions, or need a bit of a creative mojo boost, you can reach me at my justpeachystamping@gmail.com.
If you live in the U.S. and don’t already have a Stampin’ UP! demo from whom you order, I would be honored to work with you.
Welcome to my one card, two challenges post. As always, the theme for The Creative Crafters challenge # 94 is Anything Goes. This month I have a Christmas card made with the Modern Christmas suite collection. I used the SSC373 sketch for my card, so I will upload this card to that gallery. I hope you will visit the design team members’ blogs for some gorgeous inspiration! We can’t wait to see what you create, so please remember to upload your creation to our gallery.
When I purchased the Peace on Earth suite collection I told myself that I could make all the Christmas cards I needed with that suite. Then I saw the Modern Christmas suite and knew I “had” to have it! This is the first card I’ve made with the products, and I can’t wait to keep playing with them, although the DSP (designer series paper) is almost too beautiful to cut up!
Measurements:
Trim a piece of black cardstock to 8-1/2 by 5-1/2 inches, and score at 4-1/4 inches to create a tent card
Choose a background DSP and trim it to 4-1/8 by 5-3/8 inches
You will need a strip of DSP for the bottom, and I trimmed that piece to 1 by 5-3/8 inches
I find it easier to adhere strips like this over the bottom of the background DSP rather than try to fuss with measurements to create the size I need
Trim a piece of coordinating DSP to 1 by 5-3/8 inches for the bottom of the inside of the card
I trimmed a piece of the fa la la DSP to 6 by 2-1/2 inches for the envelope flap
Then I punched a 1-inch circle of the striped DSP and ran it through my XYRON create-a-sticker for the envelope seal
Trim a piece of white cardstock to 4 by 5-1/4 inches for the inside of the card
I used scraps of black and white cardstock for the tree and the sentiment on the front of the card
A Quick Card:
Once I figured out what DSP patterns I was going to use, the rest of the card fell into place. I love that the simple sketch was enhanced by the DSP, which does all the work on this card.
Both the tree and the sentiment on the front are heat embossed
First, make sure you rub your embossing buddy over the cardstock to be stamped and embossed
After cleaning the cardstock with the embossing buddy, stamp your images using VersaMark ink
Cover the ink with WOW! embossing powders, and flick off the extra, or use the brush from the embossing additions kit to remove any excess powder
Heat set with your heat tool
Make sure you allow the embossing images to dry before trying to crop them
Crop the sentiment using one of the rounded rectangles from the Nested Essentials die set
Crop the tree using the Ornamental Christmas tree die
Unless otherwise noted, I adhere the pieces together with multipurpose liquid glue
Adhere the strip on the bottom of the front piece of DSP
At this point, I pulled out my gold Wink of Stella brush and outlined the tree, sentiment, and the DSP background of the front of the card
Using the gold and white baker’s twine from the suite, wrap it around the line where the two pieces of cardstock come together
I used tear-&-tape to adhere the ends on the back of the card
Use another length of baker’s twine to tie a square knot around the wrapped pieces
I wanted to use a bow, but I am completely bow-challenged at the present time
Adhere the DSP to the front of the base of the card
Add dimensionals behind the tree and adhere it to the front of the card
Add dimensionals to the back of the sentiment so that it fits over the tree, then use liquid glue to adhere the corner to the tree
Adhere the tree and sentiment to the front of the card
Crop a star from the gold foil DSP, add a mini-dimensional to the back of it and adhere it to the top of the tree
Stamp the inside sentiment using Momento Tuxedo Black
Add the 1-inch strip along the bottom of the white cardstock and adhere to the inside of the card
With that, I’d finished this coordinated card, envelope, and envelope seal set
Kits Make Crafting Simple, Fun, and Just Simply Fun!
Here’s a look at the two new kits available:
First, it’s the Everyday Beauty Kit, which retails for $25 USD.
Create the perfect card for any occasion using the all-inclusive Everyday Beauty Kit. This kit comes with everything you need to make three unique card designs: printed card bases and coordinating envelopes with lovely botanical patterns, precut paper pieces, timeless faux wax seals, shimmering metallic thread, and a versatile stamp set that you can use on countless other projects.
DETAILS – Makes 9 cards: 3 each of 3 designs – Folded card size: 5-1/2″ x 4-1/4″ (14 x 10.8 cm) – Colors: Basic Beige, gold, Gray Granite, Lost Lagoon, Night of Navy, Petal Pink – Also available in French
Kit includes one of each item listed below. – Everyday Beauty Photopolymer Stamp Set – Clear stamp block – Night of Navy Classic Stampin’ Spot – Step-by-step instructions – 9 printed envelopes – Faux wax seal stickers – Metallic thread – Adhesive
The second kit is the Adventure Awaits kit, which retails for $14 USD.
Let your creativity take the driver’s seat with the Adventure Awaits Kit. Coast in the retro colours and hand-drawn artwork that can be either feminine or masculine. With printed sentiments, precut paper, and vellum details, this kit comes with everything you need to make nine cute cards.
DETAILS – Makes 9 cards: 3 each of 3 designs – Folded card size: 5-1/2″ x 4-1/4″ (14 x 10.8 cm) – Colors: Basic Black, Coastal Cabana, Crushed Curry, Garden Green, Granny Apple Green, Pecan Pie, Petal Pink, Poppy Parade, Pretty Peacock, Timid Tiger – Sentiments printed in English, French, and German
Kit includes one of each item listed below. – Step-by-step instructions – 9 printed envelopes – Vellum – Adhesive
If you have any questions, or need a bit of a creative mojo boost, you can reach me at my justpeachystamping@gmail.com.
If you live in the U.S. and don’t already have a Stampin’ UP! demo from whom you order, I would be honored to work with you.
Welcome to the Cardz 4 Guyz #368 challenge! Pamela, our host this challenge, chose S is for ….. for the theme. When you finish here, please visit the challenge site to see what the rest of the talented design team members created. Then, don’t forget to upload your creations to our gallery. We look forward to seeing your creations there!
I combined this C4G challenge with the SSC356 challenge for my card.
I used Boho Blue & Pebbled Path cardstock and blends combos for this card as my main colors, with a pop of Pumpkin Pie color for the beaks and feet. These adorable Friendly Seagulls are from the Sale-a-Bration promotion which ended at the end of February. As with everyone, life happened, and this is the first time I was able to play with this set.
My daughter is coming home from San Francisco for her school’s Spring Break in two weeks. To say I am thrilled to see her in an understatement!
What I Did:
The Pebbled Path base measures 8-1/2 by 5-1/2 inches, scored at 4-1/4 inches to create a tent fold card
I knew I wanted a piece of ribbon around the front of the card, I needed to trim another piece of Pebbled Path cardstock to 5-3/8 by 4-1/8 inches
you can’t see it because it is covered by Boho Blue cardstock, but it does allow the ribbon ends to be hidden
I dry-embossed a piece of Boho Blue cardstock using the So Swirly embossing folder,
I trimmed it down to two pieces: 5-3/8 by 3-7/8 inches and 5-3/8 by 1-1/4 inches
The gap I created between the two pieces of cardstock allowed me to adhere the ribbon flat between the pieces and helped me follow the sketch
I colored a length of the white diagonal ribbon using the dark Pebbled Path blend
This has become one of my favorite things to do with white ribbon because I can use any dark blend color I need to coordinate with my card colors
I used small pieces of tear-&-tape to adhere the ends of the ribbon behind the front layer
I trimmed a piece of the 2023-2025 6 x 6 inch InColor Boho Blue DSP (designer series paper) to 6 by 2-1/2 inches for the envelope flap
Then, I punched a 1-inch circle of Pebbled Path DSP and ran it through my XYRON create-a-sticker for the envelope seal
Stamp the seagulls using Tuxedo Black ink and crop using circles from the Stylish Shapes die set
I colored the wings using the light and dark Pebbled Path blends for all three seagulls
I colored the beaks using the dark Pumpkin Pie blend
I first colored the french fries using the dark Lemon Lolly blend and added a layer of light Pumpkin Pie blend
The white cardstock on the inside measures 5-1/4 by 4 inches
Since the embossed sentiment will resist the color of the inked shells, I stamped it in VersaMark ink, added the white embossing powder and heat set it
When I stamped the seashells on the cropped sentiment banner, I added some shells on the inside of the card as well
While it may look like a totally followed the circle theme of the sketch for the inside, I didn’t start out to do that
I needed to cover a smudge of black ink, so I cropped a circle using the Stylish Shapes dies, trimmed it to fit, re-stamped and colored the seagull and fries
With the exception of the top seagull circle and the sentiment banner on the front, I used multipurpose liquid glue to adhere all the pieces of the card together
After adding the irregular river stones (from the Otterly Amazing suite) to the front of the card, I’d finished this coordinated card, envelope, and envelope seal set
Welcome to my two-fer card for today! You already know I enjoy combining two or more challenges, and I’ve done it again with this card. I took the colors from Sunday Stamps Challenge 287 and the layout, which I made into a slimline card, from Try Stampin’ on Tuesday #565. I chose the Kindest Gnomes bundle for the card because I want to show the versatility of this set – it’s not just for Christmas.
Here’s my card:
Here are the challenge banners:
I used Night of Navy, Pacific Point, Tahitian Tide, Smoky Slate, Old Olive, Crumb Cake, and Soft Suede.
Measurements:
The Pacific Point base measures 9-1/2 by 7 inches, scored at 3-1/2 inches creating a tent fold card.
I wanted to separate the blue DSP from the base. Therefore, I trimmed a piece of white cardstock to 9-3/8 by 3-3/8 inches and adhered it to the base. The white cardstock for the inside of the card measures 9-1/4 by 3-1/4 inches.
Next, I trimmed a piece of the retired Waves DSP (designer series paper) to 9-1/4 by 3-1/4 inches and adhered that to the white using multipurpose liquid glue.
I trimmed the tree DSP, from the Happy Forest Friends DSP pack, to 2-1/4 inches by 9-1/4 inches. I chose the top part of this DSP because the bottom of it has Calypso Coral mushrooms on it.
The Pacific Point trim pieces came from the original piece of cardstock I used for the base. I ran it through the fern 3D embossing folder twice so I’d get the whole piece embossed. Then, I trimmed it in half and it was ready to be adhered to the back of the Happy Forest Friends DSP. Before I adhered the DSP to the front of the card, I wrapped a length of the Tahitian Tide ribbon around the DSP. Right now, it’s tied in a bow. However, if I wind up using this card for a guy, I can untie the bow and retie it in a square knot.
I picked the typeset vellum from the Layering Designs vellum. Using the 1-7/8 inch square die from the Stylish Shapes die set, I cropped three pieces.
That’s it for the measurements.
Stamping and Coloring:
I stamped all three gnomes for the front on white cardstock using the Momento Black Tuxedo ink, which won’t bleed when using the alcohol blends.. Then, I stamped two on the corners of the white inside cardstock.
After I let the ink thoroughly dry, I used blends to color them. I used the medium natural skin tones to color the 5 gnomes. Then, I dabbed the spot on each nose with the color lifting blend.
Next, I partially colored in all their beards using the light Smoky Slate blend,
I colored all the sleeves and shoes using both the light and dark Crumb Cake and Soft Suede blends.
The hats on each gnome were colored using both blends combos for Night of Navy, Old, Olive, and Tahitian Tide. I colored the pants on each, and the underside of the sitting gnome’s hat using just the light blend. Then, I used the black marker to highlight various parts of the gnomes, including the eyes and mouths.
Finally, I added clear Wink of Stella to the lantern for a bit of sparkle and cropped the three for the front of the card.
I used the front sentiment from the Happier than Happy stamp set. The inside sentiment comes from the Kindest Gnomes set.
After cropping the three gnomes, I added dimensionals to the back of each.
Finishing Up:
Time to add the vellum. Adhesives will show through the vellum, but I needed to get it adhered. My favorite way to adhere vellum includes using multipurpose liquid adhesive, my silicone mat and a make-up sponge. I put enough liquid adhesive on the back to cover the whole piece of vellum. Then, I use the make-up sponge to spread the adhesive on the whole back of the vellum. Since the whole piece is covered, the adhesive won’t show.
Next, I added a gnome to each piece of vellum.
Then, I cropped the sentiment and using the label die in the Stylish Shapes die set. Then, I cropped the same size banner in Pacific point and cut it in half. I added it to the back of the sentiment and added dimensionals.
Finally, I added the colored and stamped white cardstock panel to the inside of the card.
It’s July, 2022 ~ do you know what that means? The new Holiday Mini-Catalog and Sale-a-Bration are in full swing!!
Sale-a-Bration runs from July 1 to August 31, 2022. This means you can earn FREE products for two months! Take a look at these Sale-a-Bration products!!
Here’s a link to the new Holiday Mini-Catalog, which runs through January 4, 2023. Click on the following image to open the catalog:
If you live in the U.S. and don’t already have a demonstrator, I’d be honored to work with you.
Do You Want to Place an Order?
Of course you do, especially since you can earn FREE products with a qualifying purchase!
If you are ordering less than $150.00, please use the host code shown. If you are ordering more than $150.00, please contact me first so you an get your stamping rewards! Any order over $50 will earn a little surprise from me.
The HOST CODE through July 31, 2022 is UKDVYZSG.
Again, thank you for stopping by my blog today! I appreciate your comments and your time.
Welcome to InKing Royalty’s February Blog Hop! This is a great time of year to build your stash of handmade birthday cards, so we are sharing birthday-themed projects with you today. We are excited to share our creations and hope you love them! After you read my post, I hope you’ll hop over to the next person on the list at the base of this post.
Here’s my Artfully Layered birthday card:
This DSP (designer series paper) has quickly become one of my go-to set of papers. The colors are spectacular! Take a look:
I used two of the patterns for my blog hop birthday card.
The landscape layout of the card was inspired by the Sunday Stamps challenge, SSC276, sketch for this week.
Measurements:
The Old Olive base measures 4-1/4 inches by 11 inches, scored at 5-1/2 inches.
In order to stay in line with the sketch while adding texture, I added a layer of Old Olive cardstock. Since the Bark 3D embossing folder will leave such a deep imprint, I didn’t trim the cardstock to 4-1/8 inches by 5-3/8 inches until after I embossed it.
Next, I trimmed two pieces of the DSP for the slanted pieces of the card. Each piece measures ————
While I had the DSP handy, I trimmed a piece to 6 inches by 2-1/2inches for the envelope flap.
The white cardstock panel on the inside measures 4 inches by 5-1/4 inches.
I used a scrap piece of white cardstock for the sentiment tag.
Assembly:
After embossing the Old Olive layer, I popped it up on dimensionals and adhered it to the base.
Next, I placed each layer of DSP on opposite slants and adhered them with multipurpose glue.
Using the Biggest Wish stamp set, I stamped “happy” using Mango Melody and then “birthday” using Just Jade. Mango Melody is part of the background design on the DSP.
Then I cropped out the sentiment using the second largest die from the Tailor-Made die set.
Since there are Evening Evergreen leafy branches in the DSP, I used the Evening Evergreen open weave ribbon for the tag accessory.
The sentiment tag is popped up on dimensionals and then I adhered it to the front of the card.
Now, all I needed to do was stamp the sentiment on the inside and adhere it to the inside of the card using multipurpose glue.
Finally, I trimmed the DSP on the envelope flap, punched the seal and ran it through the XYRON create-a-sticker. With that, I’d finished this coordinated card, envelope, and seal set.
Back to the InKing Royalty Blog Hop:
Thank you for stopping by today. I hope you’ll hop along to the next stop on the blog hop, Jackie Beers from Blue Line Stamping. There’s lots of inspiration to be found in this group – and you don’t want to miss it
Thank you for hopping along with us. If you get stuck during the Blog Hop, please use this line-up as a guide:
While the new mini catalog and the Sale-a-Bration catalog are both packed with great products, here are some of my personal favorites.
Do you live in the U.S. and need a demonstrator? If so, I’d love to talk to you!
Do You Want to Place an Order?
Of course you do!
If you are ordering less than $150.00, please use the host code shown. If you are ordering more than $150.00, please contact me first so you can get your stamping rewards! Any order over $50 will earn a little surprise from me.
The HOST CODE through February 28, 2022 is XPS7HK9N.
Again, thank you for stopping by my blog today! I appreciate your comments and your time.
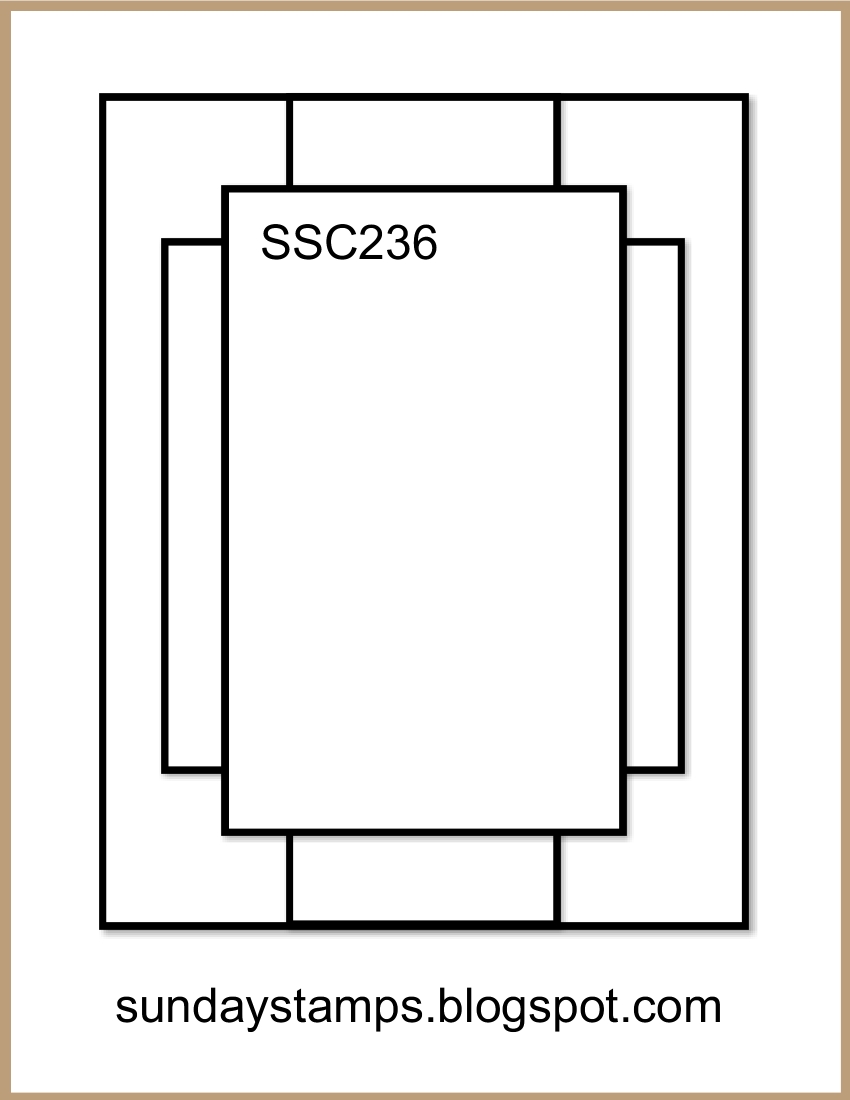
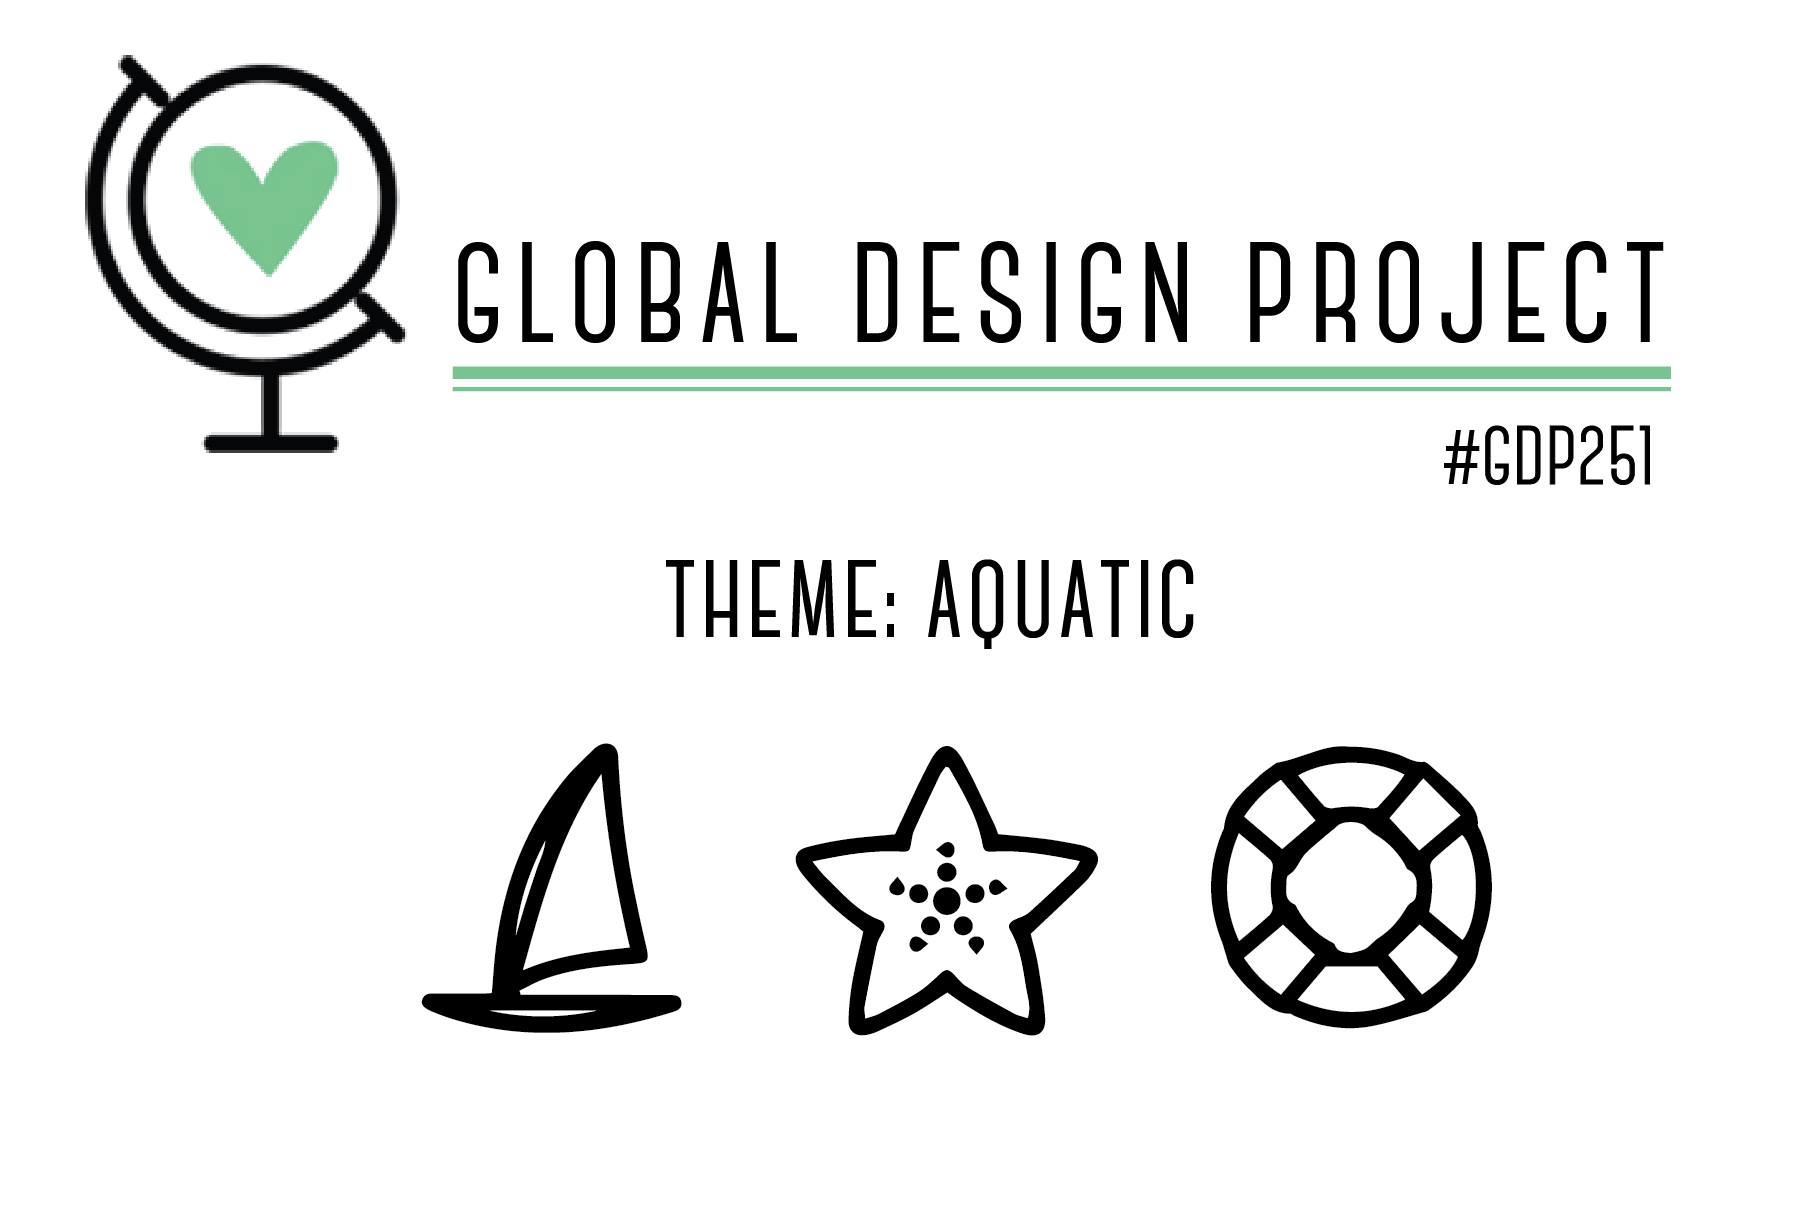
I don’t think I’ve been able to combine three challenges into one card before. However, for this card, I combined the Global Design Project 251, Freshly Made Sketches 446, and Sunday Stamps Challenge 236. Wow! The #GDP251 challenge required an aquatic theme. FMS446 wanted a slimline card, and SSC236 is a sketch challenge.
Here’s my card:
Here are the challenge banners:
Measurements:
The Granny Apple Green base is 7 inches by 8-1/2 inches, scored vertically at 3-1/2 inches.
For the front of the card, I trimmed white cardstock to 3-3/8 inches by 8-3/8 inches. I also trimmed a piece of white cardstock to 3-1/4 inches by 8-1/4 inches for the inside.
Since the Whale of a Time DSP measures 6 inches by 6 inches, I had to very carefully combine two pieces of DSP. I used two of the Pacific Point wave patterns for the front. I left the waves on the bottom, and combined the darker piece to the top. The final measurement for this DSP combination came out to 3-1/4 inches by 8-1/4 inches.
The Bumblebee DSP measures 1-1/4 inches wide by 3 inches long. Since the middle will be covered, I didn’t need to use long strips of this DSP.
After embossing a piece of 4-1/4 inches by 5-1/2 inches piece of white cardstock with the Seabed 3D embossing folder, I trimmed it to 3-7/8 inches by 5-1/4 inches.
I trimmed the turtle DSP to 2-3/8 inches by 6 inches. Dimensionals provide the popped up height.
Assembly:
Once I had all my pieces trimmed, I settled on the sentiment. Using the Momento Tuxedo Black ink, I stamped the sentiment on a scrap piece of white cardstock, then cropped it using a stitched rectangle die.
I used a piece of the Granny Apple Green DSP from the Whale of a Time set and cropped it using the Stitched So Sweetly dies. The sentiment is adhered directly to the DSP using the multipurpose liquid glue, and there are dimensionals under the DSP.
Since I’d already cut all the pieces I needed, I just needed to start at the bottom and put the card together following the Sunday Stamps sketch. It took me longer to measure and cut all the pieces than it did to assemble the card.
The Inside:
I wanted to make this a birthday card, so I used the “Hoping all your birthday fishes come true” on the inside. I guess I didn’t think too much about it, but I decided to stamp turtles on the inside to match the front of the card instead of fish to match the sentiment. In the long run, I don’t think anyone will notice other than you and me.
For some reason, I really struggled with this turtle stamp. When I tried to stamp it fresh off the ink pad, I wound up with blobs. Thankfully, I started my test stamps on my grid paper. I decided to use Just Jade and Pacific Point ink and stamped all of the turtles second generation on the white cardstock.
Finally, I stamped some air bubbles using Pool Party.
Here’s the inside of the card:
With that, I’d finished my slimline, three challenge card. I still have to make an envelope to go with it, but am hoping it will fit in a legal size envelope.
As always, thank you so much for stopping by my blog today. I’d also love to hear what you think, and greatly appreciate every comment.
Just a few more days to take advantage of BONUS DAYS!
Bonus Days! Earn a $5 coupon for every $50 in product through August 3rd.
Focus on Bundles for Bonus Days savings!
There’s a bundle I really, really want and have decided I am going to use my bonus day coupons toward the purchase of this Blossoms in Bloom bundle! It’s so gorgeous, and the cards I’ve seen using it are all stunning. Check this out:
Do You Want to Place an Order?
Of course you do! Even more so because of the products in the NEW catalog. This NEW catalog is FABULOUS!! Wait until you see the new MINI-CATALOG!! Stay tuned for sneak peeks of those items! I’ll be using some new mini-catalog items for the InKing Royalty blog hop on Wednesday!
If you are ordering less than $150.00, please use the host code shown so YOU can take advantage of the STAMPIN REWARDS YOU EARN. If you are ordering more than $150.00, please contact me first so you can get your stamping rewards! I want YOU to get the stamping rewards you earn for your order over $150.00 Any order over $50 will earn a gift from me and an August – December mini-catalog. Just take a look at the gorgeousness of this cover:
I can’t show you the inside pages until August 4th, unless you decide you just can’t wait! Contact me if you’d like to join my team, with no commitment past the initial kit. The kit is $99 for $125 worth of product, which would easily get you supplies to make your own holiday cards.
The HOST CODE for JULY is K6NND3UU.
Again, thank you for stopping by my blog today! I appreciate your time, and enjoy reading, and responding to, comments.
Welcome to Just Peachy Stamping by Sue Jackson: an independent Stampin' Up demonstrator.
Through Stampin' Up!, I happily share my love of papercrafting through sales, classes, small stamping group meet-ups and workshops. I think that being a teacher in my "real life", I have a unique approach to sharing my fantastic hobby. I look forward to connecting with you!