Welcome back to the bi-weekly Cardz 4 Galz challenge #271. Our host for this edition of our bi-weekly challenge, Debbie, chose Dry or Heat Embossing for the theme. When you finish here, please visit the challenge site to see what the rest of the design team members created. Then, don’t forget to upload your creations to our gallery. We look forward to seeing your creations there!
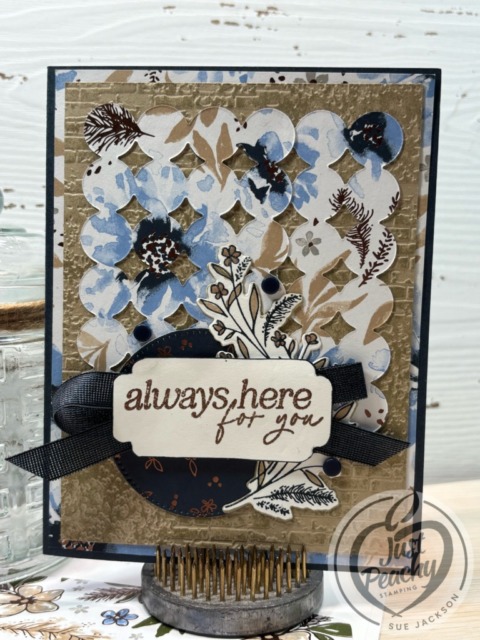
I used the new Delicate Wishes product suite, including the Delicate Dreams DSP, along with items from the Lovely Arrangements die set.
Here’s my card:
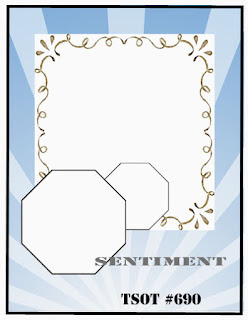
I combined the Cardz 4 Galz theme with the current Try a Sketch on Tuesday challenge. I thoroughly enjoy playing along with this challenge and have been honored to have been chosen as a Top Pick multiple times. I’ve forgotten to upload multiple projects before the deadline, but I am determined to do so today!
Here’s the TSOT #690 sketch:
Measurements:
The Secret Sea base measures 8-1/2 by 5-1/2 inches, scored at 4-1/4 inches
I trimmed a piece of Delicate Dreams DSP to 4-1/8 by 5-3/8 inches for the front of the card
The coordinating piece of DSP for the envelope flap measures 6 by 2-1/2 inches
Then, I punched a 1-inch circle from a scrap of DSP and ran it through my create-a-sticker for the envelope seal
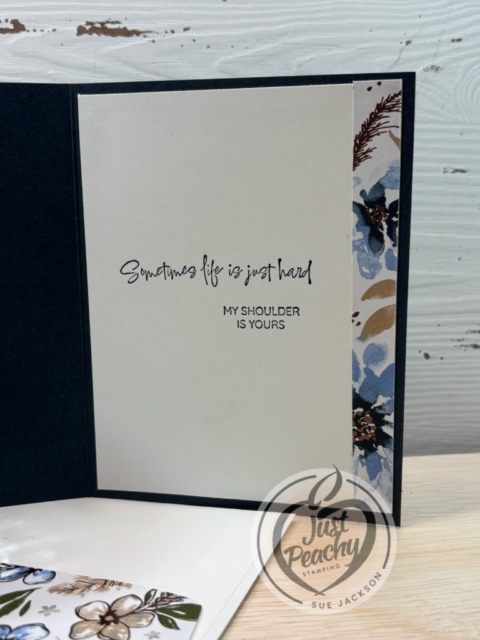
I also trimmed a piece of DSP to 1/2 by 5-1/4 inches for the inside of the card
After dry embossing a piece of Crumb Cake cardstock using the distressed brick embossing folder, I trimmed it to 3-7/8 by 5-1/8 inches
Crop two pieces of the Delicate Dreams DSP (designer series paper) using the bubble die from the Lovely Arrangements die set
I overlapped these dies and adhered them with liquid glue so they’d fit on the trimmed DSP
Crop one Stylish Shapes circle from the Secret Sea/Bronze DSP
Trim a piece of white cardstock to 4 by 5-1/4 inches for the inside of the card
I used scrap of white cardstock for the floral swag and outside sentiment
Using a Brayer:
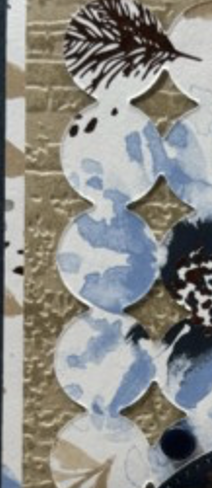
I’ve been unlucky enough to catch the pretty nasty germs going around and have had too much time to “doom scroll”, but with a purpose. While scrolling through Instagram, I came across a reel posted by Heidi Collins from On Y Go Stamping using a brayer on a dry embossed piece of cardstock. You can see that video here. I had to try it asap, and used it for the front of this card. After dry embossing a piece of Crumb Cake cardstock using the distressed brick embossing folder, I used Crumb Cake ink and a applied it with a brayer.
Here’s a close-up:
What I Did:
Unless otherwise noted, I used multipurpose liquid glue to adhere layers or pieces together
Since the ugly won’t show, I used a Textured Notes die to crop the inside of the background DSP so I can use it on a different project
Then, I adhere the cardstock to the DSP, then adhered those layers to the card base
After overlapping the bubble die cuts, I adhered them to the embossed cardstock
I stamped the floral spray using the Delicate Wishes stamp set in Secret Sea ink
Then I colored the flowers using the bronze blend and added a layer of clear Wink of Stella
I used the dark Crumb Cake blend to color the leaves
Then, I cropped it using the coordinating die
I adhered the floral spray to the die-cut DSP circle and adhered to the front of the card
After rubbing down a scrap piece of white cardstock using my embossing buddy, I stamped the sentiment from Lovely Arrangements stamp set in VersaMark ink
Using Secret Sea ribbon, I created a loopy-loop bow, which you can see here, and adhered it together and to the card front using mini-glue dots
Next, I covered the ink using copper embossing powder (close enough to bronze) and heat set it
After scouring my label dies, I came across a die from the retired Cheerful Daises die set
The die was just a bit to small, so I traced the outline of it around the sentiment and fussy-cut it
I added dimensionals to the back of the sentiment label making sure to straddle the ribbon and adhered it
I finished the front by adding three Secret Sea Natural Matte Dots
After adhering the strip of DSP to the inside of the card, I used two sentiments from the Prairie Grass stamp set using Secret Sea ink and adhered it to the inside of the card
With that, I’d finished this coordinated card, envelope, and envelope seal set.
Create an adorable card with this stamp set and send it to some-bunny you love! Or use it to craft a scrapbook spread of a moment you hold deer. Whatever you choose to create, this stamp set with woodland friends and useful sentiments is sure to add some springtime joy!
New March OnLine Exclusives:
In addition to the Delicate Dreams product suite I used for this card, there are so many new Online Exclusives which became available on Tuesday, 03/03/2026. Here’s a sampling of my favorites:
If you live in the U.S. and don’t already have a Stampin’ UP! demo from whom you order, I would be honored to work with you.
This month is my first time posting as a design team member for The Creative Crafters! I am thrilled to be able join this monthly challenge, and encourage you all to play along with us where anything goes is always the theme. We’d love to see your creations and look forward to seeing them in our gallery.
Thing 1’s challenge includes a 3-2-1- Recipe “My Guy” including 3 layers (not including the card base, 2 different patterned papers, and 1 kraft or similar to kraft color. In order to play along, you need to meet the minimum recipe requirements. I have 4 layers, 3 different DSP (designer series paper) patterns, and 1 piece of Crumb Cake (kraft colored) cardstock.
Thing 2’s challenge includes a layout from Try a Sketch on a Tuesday Challenge # 672. I have been honored to be included in the top 3 a number of times for this challenge.
Measurements:
The Early Espresso base measures 8-1/2 by 5-1/2 inches, scored at 4-1/4 inches
I used Weekend Adventures DSP for the three patterned papers
Trim a piece of the plaid DSP to 5-3/8 by 4-1/8 inches
The Old Olive tree DSP measures 2-3/4 by 4-1/8 inches
The top piece of DSP measures 2-1/4 by 4-7/8 inches
Trim a piece of DSP to 6 by 2-1/2 inches for the envelope flap
Punch a 1-inch circle from a different piece of the DSP and run it through the XYRON create-a-sticker for the envelope seal
After dry embossing the Crumb Cake piece of cardstock using the Birchwood folder, I trimmed it to 3-1/2 by 4 inches
Trim a piece of white cardstock to 4 by 5-1/4 inches for the inside of the card
Optional: trim a piece of DSP to 3/4 by 4 inches for the bottom of the inside of the card
Scrap white cardstock for the outside sentiment
Putting the Card Together:
Unless otherwise noted, I used multipurpose liquid glue to adhere pieces together
The DSP patterns and embossing on the Crumb Cake cardstock made me want to keep the rest of the card simple
I used the retired Charming Sentiments stamp set for both the outside and inside sentiments since I wanted this to be a more all-occasion card
Stamp both sentiments using Early Espresso ink
Crop the front sentiment using a last chance Countryside Corners die
The Old Olive ribbon is actually white ribbon that I colored with the dark Old Olive blend
HINT: The white diagonal ribbon is part of a Petal Pink and White Diagonal ribbon, also on last chance
BIG HINT: Make sure you let the ribbon dry completely before touching it or using it on your card – I made that mistake once and never again – what a mess!
Adhere the layers of the card together following the TSOT sketch
Use mini-glue dots to adhere the ribbon to the back of the sentiment panel
Add dimensionals to the back of the sentiment and adhere to the card
Adhere the stamped white cardstock and DSP strip to the inside of the card
With that, I’d finished this coordinated card, envelope, and envelope seal set
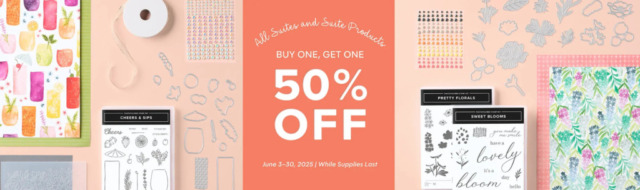
Our suite collections are known (and loved!) for their coordination, quality, and style. With stamps, tools, patterned paper, and embellishments in stunning colors and unique designs, suites make creativity simple and fun. Shop the individual products or buy as a full collection!
I have two orders making their way to me and I couldn’t be more excited! Some of the products are pre-orders for the upcoming additions to the Online Exclusives!
Promotion Details
Sales Period: June 3–30, 2025
Ordering Deadlines
Phone: June 30, 2025, at 6:59 p.m. (MT)
Online: June 30, 2025, at 11:59 p.m. (MT)
All available suites and suite products from the 2025–2026 Annual Catalog and Online Exclusives are buy one, get one 50% off.
When you shop the sale, the 50% off discount will apply to the lower-priced item (for example, if you buy a suite collection and a stamp set from a suite, the suite would be full price, and the stamp set would be 50% off).
Suite collections are available if all items are in stock; if all items are not in stock, you can still shop the available suite products.
You don’t have to buy a suite and suite products all from the same suite collection for the discount to apply. You can buy any suite products from any suite.
The discount will appear in your cart once you’ve added two items within the sale parameters to your cart.
Products are available only while supplies last.
If you live in the U.S. and don’t already have a Stampin’ UP! demo from whom you order, I would be honored to work with you.
Welcome to the newest Make My Monday bi-weekly challenge #247. Our host for this challenge, Pamela, chose Die Cuts or Punches for the theme. When you finish here, please visit the challenge site to see what the rest of the very talented design team members created. Then, don’t forget to upload your creations to our gallery. We look forward to seeing your creations there!
Here’s my card:
I’m also going to be entering this card in the gallery for the Try a Sketch on Tuesday #665 (#TSOT665). Here’s the challenge sketch:
Due to family circumstances this weekend, this post is going to be short and (hopefully) sweet!
Mediterranean Blooms Product Suite:
All the DSP (designer series paper) comes from the Mediterranean Blooms DSP
Thankfully, the die cut orange blooms can be cropped directly from the DSP, so no coloring is involved
The Daffodil Delight spray on the side is also from the coordinating die set
I cropped the Cajun Craze background rectangle using a deckled rectangle die
The sentiment banner comes from the Greetings of the Season die set, which I absolutely love and will not be parting with it any time soon
Both the inside and outside sentiments come from the Charming Sentiments stamp set, and I stamped both in Cajun Craze
The background of the front of the card was embossed using the Distressed Tile 3D embossing folder
I used dimensionals to adhere the orange blossom spray and the front sentiment to the card
My favorite adhesive, the Tombow multipurpose liquid glue, was used to adhere all the other pieces
I added the opals dot from the product suite to cover the tiny hole in the front sentiment banner
I added two more opals on the Cajun Craze brackground to form a triangle, which is the most pleasing for balance and movement
While it may look complicated, since I didn’t have to color anything, it really wasn’t, but we won’t tell anyone that
Welcome to the February, 2025 edition of the Sparkles Christmas Challenge! The theme for this month, chosen by Melissa, is A Christmas Cup of Tea. When you get finished here, I hope you will visit the challenge site to view the creations from the very talented members of our design team. After you’ve created your own themed card, please don’t forget to upload it to our gallery.
I am not a tea drinker, and didn’t have anything tea related, so I am using coffee for my card. Here’s my card:
3 images: the coffee cup, and 2 different foam images
2 patterned papersin Cherry Cobbler and Basic Beige
1 sentiment that makes me smile – a cozy day certainly meets that requirement
Measurements:
I outlined all the pieces using a gold Wink of Stella brush
The Cherry Cobbler base measures 8-1/2 by 5-1/2 inches
The Cherry Cobbler and gold flecked DSP (designer series paper) measures 4-1/8 by 5-3/8 inches
I trimmed another piece of DSP to 6 by 2-/2 inches for the envelope flap
Then, I punched a 1-inch circle from the Basic Beige and ran it through my XYRON create-a-sticker for the envelope seal
Trim a piece of Basic Beige to 4 by 5-1/4 inches for the inside of the card
The Basic Beige vertical strip measures 1 inch by 5-3/8 inches
The Basic Beige square in the middle measures 2-1/2 inches square, for which I then rounded the corners
I used scraps of the Cherry Cobbler and Basic Beige DSP for the cups, foam images, and sentiment
Stamping, Cropping, and Assembly:
I stamped all the images from the Latte Love stamp set and sentiment from the Frozen Edges stamp setin VersaMark ink and covered them all with gold embossing powder, which needed to be heat set
Crop the coffee cup and foam images using dies from Latte Love
Crop the sentiment using a tag die from the Greetings of the Season die set
Add gold thread to the hole in the sentiment tag
I used multipurpose glue to adhere pieces unless otherwise noted
Adhere the Basic Beige strip, square, and foam pieces to the Cherry Cobbler DSP
Add dimensionals to the back of the gold and Cherry Cobbler DSP, the sentiment, and the coffee cup and adhere
After stamping the inside sentiment, adhere to the inside of the base of the card
With that, I’d finished this coordinated card, envelope, and envelope seal set.
Welcome back to the bi-weekly Cardz 4 Galz challenge # 225. Our host and fearless leader, Caz, picked National Bee Day for the theme. When you finish here, please visit the challenge site to see what the rest of the very talented design team members created. Then, don’t forget to upload your creations to our gallery. We look forward to seeing your creations there!
Here’s my National Bee Day card:
I’m so glad this Bee My Valentine stamp set and punch carried over. While it is a Valentine’s Day set, it’s also versatile.
I also posted a Cardz 4 Guyz design team card using this layout. You can see that post here.
Measurements:
Trim a piece of Basic Black cardstock to 5-1/2 by 8-1/2 inches, score at 4-1/4 inches.
Trim a piece of Crushed Curry 6 x 6 inch DSP (designer series paper) to 4-1/8 by 5-3/8 inches.
Next, trim a piece of the same DSP to 6 by 2-1/2 inches for the envelope flap.
While I could just leave this card for my husband on the counter or coffee bar, I want to mail it. Everyone loves getting mail, right? Therefore, I punched a Crushed Curry heart from scrap DSP for the envelope flap.
Trim a piece of black and white DSP to 3 by 1-1/2 inches. Then cut the piece in half diagonally to get the two triangles.
After running a piece of black cardstock through the Cut & Emboss machine using an embossing folder of your choice, crop it using a deckled rectangle die.
Trim a piece of white cardstock to 5-1/4 by 4 inches for the inside panel of the card.
Use a piece of scrap white cardstock for the sentiment, wings, and antenna stamp.
You will also need a scrap piece(s) of Crushed Curry cardstock for the bees.
Stamping, Punching, Assembly:
Stamp the stripes and face on Crushed Curry cardstock using Momento Tuxedo Black ink three times.
HINT: You will make better use of your scraps if you stamp a bee on either end of the scrap and punch them out. Make sure to leave enough room in the center of the scrap to stamp and punch out the third bee.
Stamp two sets of wings and antennae on scrap white cardstock and punch out.
I also punched a set of wings from vellum cardstock just as an added touch. It’s optional, though.
Unless otherwise noted, I used multipurpose liquid glue to adhere pieces together.
Adhere the wings, vellum, and antenna pieces using glue dots.
Add dimensionals under one bee for the outside. The bee on the inside was adhered using multipurpose liquid glue..
After stamping your sentiment, crop it out with a deckled rectangle die and add dimensionals on the back so it will straddle the baker’s twine.
Wrap some baker’s twine around the black embossed cardstock and adhere the ends in the back with tape.
Next, I tied a bow on the front with another piece of twine and cut the ends to size.
Add dimensionals to the back to the embossed black cardstock to accommodate the twine.
Adhere the Crushed Curry cardstock to the base of the card.
Adhere the black and white DSP triangles to opposite corners.
Stamp your sentiment on the inside and adhere to the base of the card.
Using the dotted stamp from the Bee My Valentine stamp set, stamp it across the bottom of the envelope using Tuxedo Black ink.
Stamp the wings and antennae on the front of the envelope.
Adhere the body of the bee in place.
With that, I’d finished this coordinated card, envelope, and envelope seal set.
While I like so much of the new format of the Stampin” UP! annual catalog, I really miss having the DSP all in one place at the back of the catalog. In addition, I find that I need to know what DSP is currently available in the online exclusives. Therefore, I created a spreadsheet for all the current DSP. I broke it up into sections for the 6 x 6 inch, 12 x 12 inch, and the online exclusive DSP and I got it all on one page. The font is small, but I left the doc as a Excel doc so you can download it and change the size if you want.
What’s just as exciting as the new 2024 – 2025 Annual Catalog? That would be the new kits now available. They are fabulous, but I must get the one with the adorable dogs ASAP after it comes back in stock!
Take a look at these all-inclusive kits! All you need to add is a pair of snips/scissors and an acrylic block for stamping.
.
If you live in the U.S. and don’t already have a Stampin’ UP! demo from whom you order, I would be honored to work with you.
When prompted, please enter the following HOST CODE:
Welcome to the newest Cardz 4 Guyz challenge! Our host for challenge #347, Dawn, chose Stars &/or Stripes for the theme. When you finish here, please visit the challenge site to see what the rest of the very talented design team members created. Then, don’t forget to upload your creations to our gallery. We look forward to seeing your creations there!
Thing #1’s challenge requirement on the Double Trouble Challenge #166 is to use things that are unmatched or from my “stash or trash”. I chose “stash”. Since I need to resupply my “stash” of thank you cards at work, that’s what I created for these challenges.
This DSP (designer series paper) retired on May 1, 2023, and the Starry Sky color retired on May 1, 2024. I still love this DSP and the Starry Sky/Gray Granite color combination. Sadly, I don’t have much of the DSP left. The Gray Granite ribbon is also retired. The last time I used this paper, I stamped and cropped the leaf sprays and had them stashed in the same envelope as the Nature’s Prints dies. This stamp set and coordinating die set also retired on May 1, 2024. Since everything is retired, or stamped and cropped already, I think I’ve really used stuff from my stash.
I thought I would be able to enter this card into the Tuesday Morning Sketches to go along with the Double Trouble Challenge, but I missed a layer of angled paper. However, out of the four cards, this is my favorite.
Here’s the sketch for TSOT 646:
Things to Know:
I used multipurpose liquid glue to adhere the DSP pieces of paper, and to the cardstock.
I added dimensionals under the sentiment banners and the Starry Sky cropped leaf sprays.
In addition to using DSP for each envelope flap, I stamped a partial leaf spray on the bottom, right-hand corner of the front of the envelopes.
I also punched four 1-inch circles of DSP for the envelope seals. After running them through my XYRON create-a-sticker, I put one seal in each envelope.
After running white cardstock through my Cut & Emboss machine using the Ferns 3D embossing folder, I trimmed each to size.
While I like so much of the new format of the Stampin” UP! annual catalog, I really miss having the DSP all in one place at the back of the catalog. In addition, I find that I need to know what DSP is currently available in the online exclusives. Therefore, I created a spreadsheet for all the current DSP. I broke it up into sections for the 6 x 6 inch, 12 x 12 inch, and the online exclusive DSP and I got it all on one page. The font is small, but I left the doc as a Excel doc so you can download it and change the size if you want.
What’s just as exciting as the new 2024 – 2025 Annual Catalog? That would be the new kits now available. They are fabulous, but I must get the one with the adorable dogs ASAP after it comes back in stock!
Take a look at these all-inclusive kits! All you need to add is a pair of snips/scissors and an acrylic block for stamping.
.
If you live in the U.S. and don’t already have a Stampin’ UP! demo from whom you order, I would be honored to work with you.
When prompted, please enter the following HOST CODE:
Welcome to Just Peachy Stamping by Sue Jackson: an independent Stampin' Up demonstrator.
Through Stampin' Up!, I happily share my love of papercrafting through sales, classes, small stamping group meet-ups and workshops. I think that being a teacher in my "real life", I have a unique approach to sharing my fantastic hobby. I look forward to connecting with you!