Welcome to the newest Make My Monday bi-weekly challenge #225. I’m hosting this challenge, and I chose Florals as the theme. When you finish here, please visit the challenge site to see what the rest of the very talented design team members created. Then, don’t forget to upload your creations to our gallery. We look forward to seeing your creations there!
I used the Lovely & Sweet stamp, die, and DSP (designer series paper) for this challenge:
Here’s my card:
I combined the Florals Make My Monday challenge with the current Freshly Made Sketches challenge. Here’s the challenge sketch:
I did turn the direction so I had a portrait orientation, mainly because I knew I wanted to use the floral spray from the Lovely & Sweet stamp and die set.
Measurements:
The Pecan Pie base measures 8-1/2 by 5-1/2 inches, scored at 4-1/4 inches.
After stamping and cropping the floral spray from the bottom of a piece of Pecan Pie cardstock, I ran it through the Cut & Emboss machine using one of the basics embossing folders.
Trim the embossed cardstock to 5-3/8 by 4-1/8 inches.
Trim a piece of the Lovely & Sweet DSP to 5 by 4-1/4 inches.
I angled my DSP so that the high side is 5 inches high and the low side is 2-7/8 inches high.
Trim a piece of DSP to 6 by 2-1/2 inches for the envelope flap.
Punch a 1-inch circle of coordinating DSP and run it through your XYRON create-a-sticker to make the envelope seal.
Trim a piece of white cardstock to 5-1/4 by 4 inches for the inside of the card.
I used a piece of leftover white cardstock for the sentiment banner.
Assembly:
Unless otherwise noted, I used multipurpose liquid glue to adhere the pieces of the card together.
I stamped the floral spray using VersaMark ink and then covered it in white embossing powder, which I heat set with my heat tool.
Add dimensionals to the back of the floral spray.
Next, I stamped the sentiment using the happy birthday stamp from the Sweetly Scripted stamp set using Pecan Pie ink.
Add dimensionals to the end of the sentiment banner.
Next, adhere the angled DSP to the embossed cardstock.
Then adhere the floral spray using the dimensionals.
Add liquid glue to the middle of the back of the sentiment and add it to the front of the spray.
Trim the ends of the sentiment banner so they line up with the base of the card.
Adhere the embossed Pecan Pie cardstock to the base.
I stamped another birthday sentiment on the inside piece of cardstock.
Then, I stamped just a corner of the floral spray stamp on the white cardstock, and adhered it to the inside of the card.
Finally, I stamped the front of the envelope using the same partial floral spray stamp.
With that, I’d finished this coordinated card, envelope, and envelope seal set.
Everyone loves new products, and there are some very special new products in the 2024 – 2025 catalog!
I already have some of these products since demonstrators were able to pre-order, especially all of the new InColor 2024 – 2026 products. However, here are some of my must-haves on my wish list:
If you live in the U.S. and don’t already have a Stampin’ UP! demo from whom you order, I would be honored to work with you.
When prompted, please enter the following HOST CODE:
If you’ve read my blog before, you know I love combining challenges! The card I created today meets both the Global Design Project #349 and the Freshly Made Sketches #542 challenges. The adorable Sweet Songbird stamp set paired so well with the GDP colors of Tahitian Tide, Parakeet Party, and Daffodil Delight, along with the neutral Basic Black.
Without further ado, here’s my card:
Here are the challenge banners:
Measurements:
The Parakeet Party base measures 5-1/2 by 8-1/2 inches, scored at 4-1/4 inches to create a tent fold.
I trimmed the white cardstock background after running it through my cut and emboss machine using the Timber 3D embossing folder. The final measurement is 4 inches by 5-1/4 inches.
Next, I embossed a piece of Tahitian Tide cardstock using the Timber 3D embossing folder. Then, I trimmed it to 2-1/2 by 5-1/4 inches. Once I had it trimmed, I lined up the Tahitian Tide embossing with the embossing on the white cardstock and adhered the pieces together.
The white cardstock for the inside of the card also measures 5-1/4 by 4 inches.
The last measurement belongs to the Parakeet Party 2-1/2 by 6 inch piece of In Color 6 x 6 inch DSP for the envelope flap.
Putting it Together:
I used the largest circle in the Stylish Shapes die set to crop the white cardstock mat under the bird. Then, I used my Daffodil Delight Stamping Write Marker to outline the circle.
The adorable songbird is stamped in Tahitian Tide ink.
Next, I punched out the bird. Then, I used scraps of the Tahitian Tide 6 x 6 DSP (designer series paper) and of Daffodil Delight 6 x 6 inch DSP to punch the beak and wing.
I stamped the sentiment, the next, notes, and the bird’s eyes using Momento Tuxedo Black ink.
At first, I stamped the branch in Soft Suede. However, after reading the GDP guidelines, I needed to go back and color the branch using my Basic Gray marker.
I stamped the leaves using Parakeet Party ink, and the flowers using Daffodil Delight ink. Then, I added three small Tahitian Tide in color dots to the center of each flower.
I used two of the banner dies from the Stylish Shapes die set for the sentiment. The bottom banner is cropped from the same Daffodil Delight cardstock as the beak. I outlined the white cardstock sentiment using the Tahitian Tide Stamping Write Marker, then added dimensionals under it. The Daffodil Delight banner is adhered directly to the blue cardstock and fits under the white circle.
Next, I added dimensionals under the bird and nest and adhered them to the circle.
I used a thank you sentiment from the Best Year stamp set on the inside of the card. I also stamped the smaller bird and song notes on the inside.
Finally, I punched a 1 inch circle out of Daffodil Delight DSP and ran it through my XYRON create-a-sticker for the envelope seal. With that, I’d finished this coordinated card, envelope, and envelope seal set.
It’s July, 2022 ~ do you know what that means? The new Holiday Mini-Catalog and Sale-a-Bration are in full swing!!
Sale-a-Bration runs from July 1 to August 31, 2022. This means you can earn FREE products for two months! Take a look at these Sale-a-Bration products!!
Here’s a link to the new Holiday Mini-Catalog, which runs through January 4, 2023. Click on the following image to open the catalog:
Do You Want to Place an Order?
Of course you do, especially since you can earn FREE products with a qualifying purchase!
If you are ordering less than $150.00, please use the host code shown. If you are ordering more than $150.00, please contact me first so you an get your stamping rewards! Any order over $50 will earn a little surprise from me.
The HOST CODE through July 31, 2022 is UKDVYZSG.
Again, thank you for stopping by my blog today! I appreciate your comments and your time.
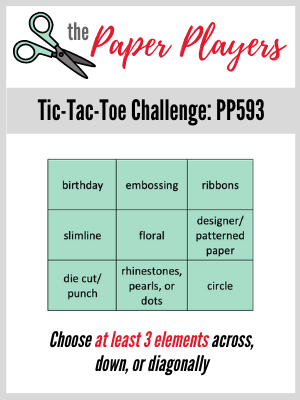
Welcome back to what has become bee-central. I promise, I’ve made other cards, but this one fit the bill for a three-fer card. I used three card challenges for this card, The Paper Players # 593, Freshly Made Sketches # 537, and Color Throwdown # 694.
Here’s my card:
Here are the challenge banners that inspired the layout, color combination, and elements:
I used the bottom row with a punch, matte black dots, and the flower for a circle.
.
Measurements:
The Basic Black base measures 4-1/4 by 11 inches, scored at 5-1/2 inches to create a tent-fold card.
The Pool Party mat measures 4-1/8 by 5-3/8 inches.
This woodgrain DSP comes from the Flowering Fields DSP (designer series paper). It measures 4 x 5-1/4 inches. I outlined it using a black Stamping Write Marker to make it really stand out from the Pool Party cardstock.
AFTER I embossed the Poppy Parade cardstock using the Painter Texture 3D embossing folder, I trimmed it to 4 inches wide. I measured up from the bottom 2-1/2 inches on each side and marked it with a tick. Then, I just eyeballed it to make the point off-center, following the FMS537 layout.
I used multipurpose glue to adhere all these layers together.
While I had my trimmer out, I trimmed a coordinating piece of DSP to 6 inches by 2-1/2 inches for the envelope flap.
The white cardstock inside panel measures 4 by 5-1/4 inches.
The Front Elements:
I punched the black cardstock “bee” using my ladybug punch. Then, I punched two sets of wings from vellum cardstock.
I used some leftover Harvest Meadow DSP to trim the bee’s stripes to 1/8 inch. I trimmed them after adhering them using multipurpose glue.
The stinger comes from a corner of the same DSP cut down to size.
To create the top set of wings, I cut one of the vellum sets in half and adhered them with multipurpose glue. Then,, I added the bottom set of wings and adhered them with multipurpose glue as well. I covered the dots of glue using three matte black dots.
Both the inside and the outside sentiments come from the Happy and Heartfelt stamp set and stamped them with Tuxedo Black ink.
Next, I trimmed the front sentiment white cardstock to 3/4 inches and punched the chevron using the Banners Pick A Punch. Then, I trimmed a piece of the same DSP that I used for the bee’s stripes to 3/4 inch wide and punched the end using the banner punch. I added dimensionals under the sentiment banner.
Putting the Pool Party daisy layers together was easy because I already had the pieces punched from Pool Party 6 x 6 inch DSP. I used dimensionals and liquid glue to adhere the flower to the banner.
In order to be able to accomodate the dimensionals on the banner and flower, I needed to use a double layer of dimmensionals under the bee. Multipurpose liquid glue adhere the part of the bee that overlapped the flower and banner.
After adding a single matte black dot to the corner of the sentiment banner, I’d finished the front.
Finishing Up:
The inside sentiment is also stamped in Momento Tuxedo Black ink.
Then, I used the daisy stamp from the Daisy Lane stamp set. I used Pool Party ink and stamped them off the bottom of the inside panel. I also stamped one of the daisies on the bottom left-hand corner of the envelope.
Next, I punched a 1 inch circle from the DSP I used for the bee and sentiment mat to make the envelope seal. Finally, I ran the circle through my XYRON create-a-sticker to finish off the envelope seal.
With that, I’d finished this coordinated card, envelope, and seal set.
Thank you very much for stopping by my blog today!
Here are just a few of my favorite new things. I can not wait for this order to arrive!
But wait, there’s more, and this bonus ends May 31st!
Along with the new catalog, there’s a really fabulous joining bonus! As always, your starter kit is just $99 for $125 of your choice of products. The bonus? Over $66 of the new 2022 – 2024 In Color supplies! You get the following at no extra cost to you:
In Color Ink Pad Collection
and In Color Grid Paper
plus In Color Cardstock Collection
and the 6 x 6 inch In Color Designer Series Paper Assortments
Do You Want to Place an Order?
Of course you do!
If you are ordering less than $150.00, please use the host code shown. If you are ordering more than $150.00, please contact me first so you can get your stamping rewards! Any order over $50 will earn a little surprise from me.
The HOST CODE through May 31, 2022 is E3W722BD.
Again, thank you for stopping by my blog today! I appreciate your comments and your time.
In order to keep with the FMS style, I just used a banner of the DSP and the large flower and leaves from the stamp set. Using the white cardstock for the background creates a great deal of openness. I did emboss the white cardstock with the Subtles 3D embossing folder, but it is barely noticeable.
Measurements:
I started with a Magenta Madness based trimmed to 4-1/4 inches by 11 inches, scored at 5-1/2 inches to create a tent-fold card.
The bright pink just seemed too bright to me, so I used Basic Black to offset the brightness. The Basic Black background mat measures 4-1/4 inhes by 5-3/8 inches. I used a scrap piece of black cardstock for the sentiment panel. The black mat for the DSP measures 1-3/8 inches by 5 inches.
The DSP measures 1-1/4 inches by 4-7/8 inches. While I had the DSP out, I trimmed a piece to 2-1/2 inches by 6 inches for the envelope flap. Then I punched a 1 inch circle of coordinating DSPfor the envelope seal. I ran the circle through my XYRON create-a-sticker and then placed it inside the envelope.
I trimmed the white cardstock to 4-1/4 inches by 5-1/2 inches. Then, I ran it through the Big Shot using the Subtles embossing folder. Finally, I trimmed the white cardstock to 4 inches by 5-1/4 inches.
TIP: if you emboss your cardstock before trimming to the desired measurements you will be able to get a more precise panel.
The white inside panel measures my normal 4 inches by 5-1/4 inches.
I used scraps of white cardstock for the flower, leaves, and sentiment.
Stamping and Such
First, I stamped the floral image on scrap white cardstock using the Magenta Madness ink pad. Since this is a distinctive stamp, you automatically get the variations in color saturation.
Then, I used the center stamp and also stamped it with Magenta Madness. I thought there didn’t seem to be enough distinction between the flower and the center, so I used the Stampin’ write marker to outline the center. Finally, I stamped the center in some Delicata gold ink. It’s very light, but there is a bit of a shine in person.
I wanted to mimic the openness of the gold on the flowers in the DSP for the stamped leaves. The double leaf stamp is a distinctive stamp, so there are already variations in the stamping. After stamping the leaves in Versmark, I covered it with gold stamping emboss powder. Then, I used a very small, thin, angled make-up brush to pull some of the powder off. Finally, heat set the leaves.
I used the die set from the bundle to crop out the flower and leaves.
The white sentiment was cropped using a stitched rectangle die.
I used multipurpose glue to adhere most of the pieces together. There are dimensionals under the flower, leaves, and sentiment.
Finally, I added three gilded gems to the card in a triangle shape.
With that, I’d finished this card/envelope/seal coordinated set.
I’d love to hear what you think, and greatly appreciate every comment.
What’s New? Since you asked, it’s The Kits Collection!
Take a look at this video explaining what you get with your kit! Remember, the kits are all inclusive! Just add some of your own crafting basic tools, and you are good to go!
Do you live in the U.S. and need a demonstrator? If so, I’d love to talk to you!
Do You Want to Place an Order?
Of course you do!
If you are ordering less than $150.00, please use the host code shown. If you are ordering more than $150.00, please contact me first so you can get your stamping rewards! Any order over $50 will earn a little surprise from me.
The HOST CODE through June 30, 2021 is 26AD7SA3.
Again, thank you for stopping by my blog today! I appreciate your comments and your time.
While I have been playing along with a variety of challenges, I haven’t been meeting deadlines. Today is different. Today I can meet three (!!) deadlines with one card. The inspiration for this card came from Ann Murray at Murray Stamps Ink. She’s been making some fabulous cards using the Whale of a Time Suite of products, so I followed her lead. Now I have two other cards in the works using the same suite.
Here’s my card:
Here are the three challenge banners:
Measurements
The layout for this card meets the Freshly Made Sketches #477 challenge. Using a lot of white space and animals meets The Paper Players challenge. Finally, the fish and turtles meet the Paper Craft Crew challenge.
After deciding what DSP pattern I wanted to use for the focal point, I cropped the paper down using the largest square die from the Stitched Shapes die set. Then I trimmed down a piece of Calypso Coral cardstock to 2-7/8 inches square for the mat.
Then, I went back to the basics, starting with the card base. I used Granny Apple Green for the base. It measures 4-1/4 inches by 8-1/2 inches, scored at 4-1/4 inches forming a square card.
Next, I trimmed a Calypso Coral piece of DSP from the Whale of a Time 6 x 6 inch DSP for the bottom mat. This mat measures 4-1/8 inches by 4-1/8 inches.
I needed to have a bunch of white space, so I ran white cardstock through the Big Shot with the Seabed embossing folder. Then, I trimmed the paper down to 3-7/8 inches square, the cut it diagonally in half.
While I had the white cardstock handy, I trimmed a piece to 4 inches square for the inside sentiment panel.
The Evolution
When I started this card, I really thought I would just stamp the greeting on a piece of Bumblebee cardstock and trim it with a Stitched So Sweetly Die, and that would be that. Things didn’t wind up working quite the way I envisioned. Enter a shaker card, which I haven’t done since Christmas.
The clear medium envelopes are essential when making shaker cards. However, making a very small shaker turned out stickier than I thought. Here are a few tips I learned along the way:
Trim the clear envelope down to a manageable size before trying to use the tear and tape on the back of the cardstock.
Don’t pull the tear and tape strip covers off until you have your cardstock piece in the corner.
While it is necessary to fold the ends of the clear envelope back, make sure you have some give in the front so the shaker part works easily.
Using my opposable tweezer to add the fish to the front of the shaker works very well.
Using the fish die from the Shark dies, I cropped Calypso Coral and Bumblebee fish. Both are inside the shaker.
Then, I used glue dots to adhere the greeting to the center of the outside of the clear envelope.
I stamped some Calypso Coral fish all along the bottom of the inside sentiment panel. The inside “happy birthday” comes from the Woodland Wonder stamp set.
Finishing Up
Since the USPS charges extra postage for square cards, I used a standard medium card envelope. Therefore, I adhered and trimmed a piece of the Whale of a Time DSP to the envelope flap. Then, I punched out a circle of Granny Apple Green DSP for the seal. I have not been using anything wet to seal envelopes and have been writing “no saliva has been used to seal this envelope” on the backs. A few months ago, I realized I could create coordinating circle seals for the envelopes. I ran the seal through my little Xyron create a sticker 150. After running the circle seal through the Xyron, I just slip it into the envelope so I have everything together when I am ready to use the card.
With that, I’d completed this card/envelope/seal set.
Thank you so much for stopping by today.
I’d love to hear what you think, and greatly appreciate every comment.
Just look at all that gorgeousness! The butterfly stamp is all one piece, as is the coordinating die. The die will also perfectly crop out butterflies on the coordinating DSP! No coloring needed, unless you want to do so.
Do you live in the U.S. and need a demonstrator? If so, I’d love to talk to you!
Do You Want to Place an Order?
Of course you do!
If you are ordering less than $150.00, please use the host code shown. If you are ordering more than $150.00, please contact me first so you can get your stamping rewards! Any order over $50 will earn a little surprise from me.
The HOST CODE for MARCH is 7EUAPNKA.
Again, thank you for stopping by my blog today! I appreciate your comments and your time.
Welcome back to another MMM challenge. This two-week challenge asks you to create a project using something new to you. I chose the new Stampin’ Up! Paper Blooms DSP available starting on Tuesday, January 5th. Best part: This DSP can be earned FREE with a qualifying $50 purchase. FREE? Yes! It’s gorgeous paper with fresh color combinations and infinite possibilities for projects. Since it’s 12 x 12 DSP, it can also be very easily used for scrapbooking.
Without further ado, here’s my card:
Here’s a beginner version of the same card, and it’s still beautiful!
No dies, ribbon, or faceted dots were used. Still gorgeous!
Here’s the inspiration sketch from Freshly Made Sketches #466:
Freshly Made Choices
I used Night of Navy for the card base, trimmed to 5-1/2 inches by 8-1/2 inches, scored at 4-1/4 inches forming a landscape tent card.
The background mat paper is from the In Good Taste DSP. It coordinates perfectly with the Pretty Blooms DSP! I trimmed this mat to 5-3/8 inches by 4-1/8 inches.
The Old Olive mat comes from the Regals 6 x 6 inch DSP stack. I trimmed it to 3 inches by 4-1/2 inches.
The new Paper Blooms DSP is trimmed to 4 inches by 3-3/4 inches. I also adhered this using the multipurpose liquid adhesive. While I had that paper in the trimmer, I trimmed a piece to 2-1/2 inches by 6 inches for the envelope flap.
Ribbon and Finishing
Next, I used a piece of the Old Olive ribbon, from the June – December holiday catalog, which ends at midnight tonight. I wrapped it around the two top layers and actually was able to tie it in a bow. Granted, it took me a few tries, and I had to use the bunny ear method, also new to me. I usually have to tie the bow and then remove the ribbon and turn it upside down to actually have the bow face the right direction. This extra step is necessary mainly because I am left-handed. Tie a bow on sneakers? Not a problem at all. Tie a bow in ribbon on a card? I struggle. However, I’m pretty stinking happy with this bow!
I cropped the Rococo Rose sentiment mat using the stitched rectangle dies. I slipped it under the ribbon and adhered it directly to the DSP using, you guessed it, my fave – multipurpose liquid adhesive.
The sentiment is also from a new to me stamp set, Here’s a Card. I stamped it on white using Night of Navy ink. Then, I popped it up on dimensionals over the ribbon.
I could’ve very easily stopped there. However, I had some of the 2019 – 2021 In Color faceted dots, so I used three of them for the centers of flowers.
After I adhered and trimmed the DSP on the envelope flap, I’d completed this card/envelope coordinated set.
I’d love to hear what you think, and greatly appreciate and respond to comments.
Do you live in the U.S. and need a demonstrator? If so, I’d love to talk to you!
Do You Want to Place an Order?
Of course you do!
If you are ordering less than $150.00, please use the host code shown. If you are ordering more than $150.00, please contact me first so you can get your stamping rewards! Any order over $50 will earn a little surprise from me.
The HOST CODE for DECEMBER is 7Y27249U.
It’s Time to Order the January Paper Pumpkin Kit!
January? Paper Pumpkin? Order the January kit now?
YES! The order window is from now until January 10th, 2021. Here’s a small sneak peek:
Again, thank you for stopping by my blog today! I appreciate your time.
Welcome to Just Peachy Stamping by Sue Jackson: an independent Stampin' Up demonstrator.
Through Stampin' Up!, I happily share my love of papercrafting through sales, classes, small stamping group meet-ups and workshops. I think that being a teacher in my "real life", I have a unique approach to sharing my fantastic hobby. I look forward to connecting with you!