Welcome to InKing Royalty’s October Blog Hop! Don’t you just love this time of year when all the leaves begin to change and fall?! We do, and we are excited to share our creations. Hope you love them! After you read my post, I hope you’ll hop over to the next person on the list at the base of this post.
My latest order was delivered and, of course, I just had to dive into my new products! I used Try Stampin’ on Tuesday challenge # 628 for inspiration for the layout, but I really changed it up.
Here’s my card:
Here’s the challenge banner:
Can you see the basic layout in my card? I used this layout for a Halloween card yesterday. You can see that card here.
Measurements:
The Misty Moonlight base measures 11 by 4-1/4 inches, scored at 5-1/2 inches.
The absolutely gorgeous Winter Meadow DSP (designer series paper) measures 4-1/8 by 5-3/8 inches.
I trimmed another piece of Winter Meadow DSP to 6 by 2-1/2 inches for the envelope flap. Then, I punched a 1-inch circle for the envelope seal.
I trimmed a piece of white cardstock to 4 by 5-1/4 inches for the inside of the card.
I was able to get the leaf spray, the pine trees stamp, and the sentiment from one piece of 5-1/2 by 4-1/4 inch white cardstock.
That’s it for the measurements.
Stamping and Assembly:
I stamped both the sentiment and the pine trees using Misty Moonlight ink on white cardstock.
Then, I completely impressed myself when I colored and stamped the single spray of leaves using Stamping Write markers.
First, I used the brush end of the Moody Mauve Stamping Write marker and just colored the stem down the middle of the stamp.
Next, I colored the leaves using the Garden Green marker.
Finally, I just dabbed some dots of Shaded Spruce marker on the tips of some leaves.
Then, it was time to stamp. Joy of joys! It matched the leaf sprays at the top of the card!
I cropped both the leaf spray and the pine trees using the Magical Meadow die set.
The sentiment was cropped using the banner from Stylish Shapes.
I wrapped a length of the Moody Mauve ribbon around the card and adhered it in the back using tear & tape.
Then, I adhered the DSP and the pine tree die cut using multipurpose liquid glue.
I added dimensionals to the back of the sentiment and leaf spray.
Finally, I added three of the faceted gems from the Winter Meadow suite.
I haven’t decided on an inside sentiment yet, but I will stamp it in Misty Moonlight when I do.
I have to be honest, I really didn’t think I would use the Moody Mauve color. I was wrong. The color in this suite of products is just as gorgeous as all the other colors!
With that, I’d finished this coordinated card, envelope, and envelope seal set.
Back to the InKing Royalty Blog Hop:
Thank you for stopping by today. I hope you’ll hop along to the next stop on the blog hop, Pam Morris at Tap, Tap, Stamp. There’s lots of inspiration to be found in this group – and you don’t want to miss it!
Thank you for hopping along with us. If you get stuck during the Blog Hop, please use this line-up as a guide:
The current online exclusives will be updated with new products available to customers on November 6, 2023. Demonstrators are able to pre-order and one of the products I already purchased is the Fluffiest Friends bundle. I can not begin to tell you how stinking cute these critters are!!! I’ll be playing with these this coming weekend and will share as soon as I get it done. Oh! My! Glory! So, so, so cute!!!
Of course, you can see for yourself if you join now! Especially since there’s currently a joining bonus promotion!
Welcome to InKing Royalty’s September Blog Hop! The leaves are changing, Halloween is around the corner, and we are playing with orange tones that are sure to get you in the mood for Fall. We are excited to share our creations and hope you love them! After you read my post, I hope you’ll hop over to the next person on the list at the base of this post.
When we were kids, we loved the knock, knock joke with the punchline “Orange you glad I didn’t say banana?” The title of this post is a throwback to my childhood, corny as it may be. The orange colors I chose for this card are Pumpkin Pie and Cajun Craze.
I’ve been seeing fractured cards a lot lately, which look much more complicated than they are to create. While it would’ve been possible to figure out the math for all the pieces, I really didn’t want to do that. Then, I came across a faux fractured card and I realized how easy it is to create this card without all kinds of measurements and shaped cuts. By using the black cardstock strips to surround the focal image, the result looks like you cut the DSP (designer series paper) into pieces. I need a card in which a “bunch” of people could write well wishes, and I thought this would bring a bit of sunshine to the recipient’s day.
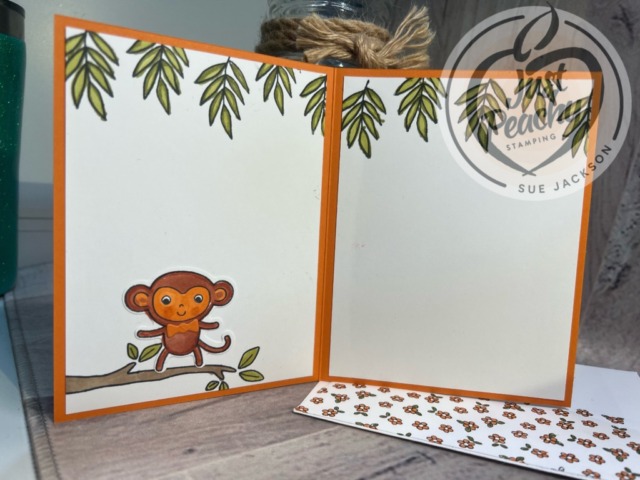
Here’s my Little Monkey faux fractured card:
Little Monkey Card Measurements:
The Pumpkin Pie base measures 5-1/2 by 8-1/2 inches, scored at 4-1/4 inches.
The flower DSP measures 4-1/8 by 5-3/8 inches.
I also trimmed a piece of the DSP to 6 inches by 2 and 1/2 inches for the envelope flap. Then, I punched a 1-inch circle of Pumpkin Pie 6 x 6-inch DSP for the envelope seal. After I ran the circle through my XYRON create-a-sticker, I was set for the seal.
After I ran a piece of Pumpkin Pie cardstock through the Cut & Emboss machine, I cropped it using the largest square die from the Stylish Shapes set.
I used the next smaller square die for the white inside the Pumpkin Pie square.
The black cardstock strips were trimmed to 3/16 x 6 inches.
As an afterthought, I cropped two Pumpkin Pie bowties using the Playing in the Rain die. I added one to each monkey.
Finally, I trimmed two pieces of white cardstock to 4 by 5-1/4 inches for the inside of the card..
Stamping, Coloring, and Cutting:
The flowered DSP actually started out as black-outlined flowers on a white background. I use my Pumpkin Pie Stamping Write Marker to color the petals. Then, I used Old Olive to color the leaves.
The centers of the flowers are colored with the clear Wink of Stella pen.
Then, I repeated the whole process for the envelope flap DSP piece.
Stamp the two monkeys on scraps of white cardstock using Tuxedo Black ink.
Color the monkeys using Pumpkin Pie and Cajun Craze blends combos in keeping with the orange theme.
Punch the inside monkey and fussy cut the monkey for the front. Add dimensionals to the back of the monkey on the front.
Stamp the branches and leaves on the white cardstock square for the front and the white cardstock pieces on the inside.
Color the branches using the dark Crumb Cake blend. Add texture to the branches using the Crumb Cake Stamping Write Marker.
Color the leaves using the Old Olive blends combo.
Adhere the white cardstock pieces to the inside of the card.
Adhere the monkeys to the branches using dimensionals for the front monkey and liquid glue for the inside.
Creating the Faux Fractured Card Front:
Adhere the Pumpkin Pie square to the center of the front of the card so it creates a diamond.
After coloring the stamps on the white square, use multipurpose liquid glue to adhere it to the Pumpkin Pie square.
Add the black strips to the front of the card, making sure to align them directly against the Pumpkin Pie square.
Trim the excess black strips from the ends of the DSP.
Adhere the DSP to the base of the card using multipurpose liquid glue.
With that, I’d finished this faux fractured card, coordinated envelope, and envelope seal.
Back to the InKing Royalty Blog Hop:
Thank you for stopping by today. I hope you’ll hop along to the next stop on the blog hop, Brian King at Stamp with Brian There’s lots of inspiration to be found in this group – and you don’t want to miss it!
InKing Royalty Blog Hop:
Thank you for hopping along with us. If you get stuck during the Blog Hop, please use this line-up as a guide:
You can download the following catalog, or find the link on the Stampin’ UP! website. Not surprisingly, some items have already gone on backorder. Now is the time to order your Halloween and some of your Autumn supplies.
Don’t Forget Online Exclusive DSP!
If you live in the U.S. and don’t already have a Stampin’ UP! demo from whom you order, I would be honored to work with you.
When prompted, please enter September’s HOST CODE:
FZTABBN
Again, thank you for stopping by! I’d love to hear your comments or thoughts. Sue
Welcome to InKing Royalty’s August Blog Hop! This month’s hop projects center around a SUNSHINE theme, so I hope you are ready for some sunshine fun! We are excited to share our creations and hope you love them! After you read my post, I hope you’ll hop over to the next person on the list at the base of this post.
I combined the Rays of Light stamp and the Hey Chuck bundle and used the Atlantic Hearts Sketch Challenge # 537 for my card.
I know the sketch uses different DSP (designer series paper) patterns, but I looked at it and saw my card.
Basic Measurements and Such:
The Crushed Curry base measures 5-12 by 8-1/2 inches, scored at 4-1/4 inches.
The black mat dimensions started measuring 4=1/8 by 5-3/8 inches. After I finished adhering the blocks, I trimmed the mat to get it as even as possible.
The white cardstock for the front started at 5-1/2 by 4-1/4.
Trim another piece of white cardstock to 4 by 5-1/4 inches for the inside of the card.
I used white scraps for the sentiment and chicken on the front.
Stamping, Coloring, and Other Fun Stuff
Stamp the Rays of Light background stamp in Crushed Curry.
HINT: The easiest way to stamp a background stamp (for me at least) is to lay the stamp face up on your work space and stamp the ink on the stamp.
Carefully place your white cardstock on the stamped image.
Very carefully, rub the whole piece of cardstock to transfer the ink onto the cardstock.
I am making 6 more of these cards, and I used this process for all of the fronts I needed. Worked like a charm.
Stamp the Rays of Light on the envelope flap. Punch a 1-inch circle of coordinating DSP for the envelope seal.
I added a 1/2 inch by 4 inch piece of the Rays of Light stamped image to the bottom on the inside. This came from a piece I’d trimmed and didn’t need.
Stamp the chick on the inside panel as well so it looks like she is standing on the strip of sun rays.
I colored the chickens using the Daffodil Delight blends combo and the Pecan Pie Stamping Write Marker.
Using a new Wink of Stella pen, I dropped one drop of the ink onto my grid paper.
Then, I used an empty Wink of Stella pen to pick up the ink and color it on the Daffodil Delight parts of the chicken. Using an empty pen to “paint” the clear Wink of Stella has kept me from getting blobs on my coloring.
Crop the chicken using the Hey Chuck dies and the sentiment using the Stylish Shapes dies.
Outline the sentiment banner using a black Stamping Write Marker.
Add dimensionals to the sentiment and the chicken to adhere.
I adhered all the rest of the card pieces using multipurpose liquid glue.
Creating the Blocks:
I knew what I wanted to achieve, and just winged it with the dimensions. You don’t have to do that in order to recreate this card, no matter what paper patterns you use.
If you are using different DSP patterns, you need the following pieces:
2 of 2-1/2 by 2-5/8 inches
1 of 3-3/4 by 3/4 inches
1 of 3 x 1 inch
1 of 2-1/4 by 1-3/8 inches
1 of 1 by 1-3/8 inches
1 of 1/2 by 4 inches (bottom of inside)
If you are using all one pattern, I have some pictures for you. The pieces will be the same sizes, just cut differently for the one pattern.
My Sweet Sorbet cardstock cut into the above sizes.
The stamped Rays of Light in Crushed Curry.
AdTech removable tape is my favorite and can be purchased at Amazon. I can’t create cards without it, especially for dry-fitting card pieces together.
Use the removable tape to temporarily attach the Sweet Sorbet pieces over the stamped Rays of Light.
Next, I very, very carefully trimmed the cardstock along the pretrimmed lines in the Sweet Sorbet.
Next, I used a piece of black cardstock measuring 4-1/4 by 5-1/2 inches to adhere the Rays of Light stamp pieces back together. Here’s picture of this step in progress.
Once I had all my pieces adhered, I was able to trim the black cardstock down for the front of the card.
One step at a time, and you can do this as well.
Back to the InKing Royalty Blog Hop:
Thank you for stopping by today. I hope you’ll hop along to the next stop on the blog hop, Renae Novak at Blessed by Cards. There’s lots of inspiration to be found in this group – and you don’t want to miss it!
Time to sign up for the September Paper Pumpkin all-inclusive kit! If the beautiful box is any indication, this kit is simply gorgeous!
INSPIRED BY SHELLI AND ALL THINGS AUTUMN!
The With Love & Gratitude Paper Pumpkin Kit offers the perfect way to give thanks to the special people in your life. The kit design is an elegant representation of the blessings of autumn and the gratitude that comes along with the season. The combination of graceful pumpkin designs and elegant colors, plus specialty gold foil embellishments make this kit a stand-out offering with Shelli written all over it! Subscribe by 10 September to get your kit full of iconic autumn images, love, and gratitude!
CUSTOM, MATCHING BOX!
What’s better than a box full of crafts you can use to express your love and gratitude? How about the kit packaged in a custom, matching box that’s just as beautiful? The With Love & Gratitude comes with a custom box you can use to store all kinds of things: your finished treat packages and cards, crafting supplies, or you can fill it individual notes with all the reasons you have to be grateful—write each one down and fill up the box, then pull out a note of inspiration whenever you it!
ADD-ON JOURNAL WITH GOLD-FOIL STICKERS
Why save gratitude for special days when you can savor it every day by writing it down in an inspiring journal? The Thoughts of Thanks Journal is an add-on option featuring the same colors and elegant designs as the With Love & Gratitude Paper Pumpkin Kit. It also comes with two specialty gold foil sticker sheets to accent the journal pages and help remind us of all the reasons to be grateful. If you’re excited about this beautiful add-on journal, don’t wait to get yours! It’s only available while supplies last.
PROMOTION DETAILS
ABOUT THE KIT
Kit Name: With Love & Gratitude
This kit includes:
8 treat packages
8 note cards
8 coordinating envelopes
1 photopolymer stamp set
1 Lost Lagoon Ink Spot
Specialty gold foil, precut embellishments
Adhesives
Finished treat packaging: 3-1/2″ x 5″ x 2″ (8.9 x 12.7 x 5.1 cm)
Welcome to InKing Royalty’s July Blog Hop! We are embracing some (or all) of Stampin’ Up!’s beautiful blues for today’s hop – there are so many great ways to showcase the blues in the current color families! We are excited to share our creations and hope you love them! After you read my post, I hope you’ll hop over to the next person on the list at the base of this post.
Before I do anything else, I need to thank Try Stampin’ – or not – on Tuesday challenge # 614! My card was chosen as one of the Top 3 for # 614. Thank you! Thank you! Thank you! You can see that card here.
While my newest favorite color combination is Boho Blue and Copper Clay, and I actually made a card using this color combination. Then I decided to do something else.
Here’s my SU! Blue card:
I wound up using Let’s Go Fishing DSP, and that’s what really inspired the whole card. Therefore, I combined the Let’s Go Fishing DSP, with the Countryside Corners die, and the Cheerful Daisies dies.
I’m still so tickled “peach” with my updated logo. Thanks again, Henry Bacon!!
Measurements:
Trim a piece of Night of Navy cardstock to 5-1/2 by 8-1/2 inches, and score it at 4-1/4 inches.
Trim a piece of white cardstock to 5-1/4 by 4 inches for the inside of the card.
Trim a piece of the Let’s Go Fishing DSP to 4-1/8 by 5-3/8 inches for the front of the card.
You also need a piece of the DSP trimmed to 6 by 2-1/2 inches for the envelope flap. I punched a 1-inch circle of Night of Navy for the envelope seal.
Stamp your sentiment on a piece of leftover white cardstock. I use.d a sentiment from Cheerful Daisies and stamped it in Night of Navy. I did have to mask each half using a Post-it Note.
Put a Post-it Note on “MY DAY”.
Add Night of Navy ink to the stamp.
IMPORTANT: Remove the Post-it Note before stamping!
Stamp the first half of the sentiment.
IMPORTANT: Clean your stamp. Don’t ask me how I know.
Use the same Post-it-Note and cover “YOU MADE”.
Add ink to the stamp.
IMPORTANT: Remove the Post-it Note before stamping!
This set is photopolymer so adding the rest of the sentiment was pretty basic.
Crop the sentiment, and set of daisies and a leaf from white cardstock.
Crop another set of daisies and the leaf, as well as the branches, from Boho Blue.
Crop the Countryside Corner die from Night of Navy cardstock. Adhere to the DSP using multipurpose liquid glue.
Finishing Up:
After cropping the label, I used the Night of Navy marker to accent the stitches on the label.
Next, I used a clear Wink of Stella to cover all of the Boho Blue branches.
Then, I used the Wink of Stella to outline all of the edges of the white daisies and leaf.
Using multipurpose liquid glue, slightly offset your white daisies on top of the Boho Blue daisies.
Add dimensionals under the blue daisies and adhere to the card.
Using glue, adhere the branches so that they slide under the daisies but will also go under the sentiment label.
I added a couple of strips of tear-&-tape to the back of the sentiment label.
Then, I had to play around with the silver thread (a lot!) to find an arrangement that wouldn’t overpower the card. Having the tear-&-tape on the back helps that process.
Add dimensionals to the sentiment label and adhere to the card.
With that, I’d finished this coordinated card, envelope, and envelope seal set.
Back to the InKing Royalty Blog Hop:
Thank you for stopping by today. I hope you’ll hop along to the next stop on the blog hop, Robin Myren at Songbird Designs by Robin. There’s lots of inspiration to be found in this group – and you don’t want to miss it!
Thank you for hopping along with us. If you get stuck during the Blog Hop, please use this line-up as a guide:
Welcome to InKing Royalty’s June Blog Hop! We are inspired by circles for this month’s hop and are excited to share our creations with you. We hope you love them! After you read my post, I hope you’ll hop over to the next person on the list at the base of this post.
I combined the Bright & Beautiful DSP (designer series paper) with the Zoo Crew DSP and dies.
Here’s my circles themed card:
Cuteness overload! I love the Zoo Crew suite, and the Bright and Beautiful 6 x 6 inch DSP fit the picture in my head.
Measurements:
Trim a piece of Berry Burst cardstock to 5-1/2 by 8-1/2 inches. Score at 4-1/4 inches.
Trim a piece of black cardstock to 4-1/8 by 5-3/8 inches.
I cropped both the black circle and the sentiment banner mat from the above piece of black cardstock. No one will see the ugly underneath and I value my cardstock.
Trim a piece of the Bright and Beautiful DSP to 4 by 5-1/4 inches.
Trim a coordinating piece of Bright and Beautiful DSP to 1/2 by 5-1/4 inches to line the white cardstock on the inside.
Trim a piece of coordinating cardstock to 6 by 2-1/2 inches for the envelope flap.
Punch a 1 inch circle from a piece of coordinating cardstock for the envelope seal. I use the XYRON create-a-sticker to do this. You can find the link on Amazon here for the sticker maker. The link for the permanent adhesive refills can be found here.
Using the largest circle die from the Stylish Shapes die set, crop a black cardstock circle.
I used the DSP pattern with the music notes and the animals. Crop a circle, which includes the singing turtle, using the second largest circle die.
Using the Zany Zoo die set, crop another turtle. Please dimensionals under this cropped turtle.
Stamp the sentiment using VersaMark on a piece of the ombre Bright and Beautiful DSP.
Cover the VersaMark ink using black embossing powder and heat set.
Crop the sentiment label and the black cardstock mat using the banner dies from Stylish Shapes die set.
Assembly:
Adhere the circle DSP to the black cardstock using multipurpose liquid glue.
Wrap a length of the ribbon duo combo pack around the black cardstock and tie in a square knot.
HINT: I found it easier to get the square knot tied first, even if the ribbon was loose. Then, I cut the ribbon on the back and adhered it in place with tear & tape. This allowed me to place my square knot where I wanted it without having to worry about getting the ribbon tight or on straight.
Attach the black cardstock to the Berry Burst cardstock using liquid glue. You might find it easier to adhere if you use dimensionals instead.
Adhere the circle of DSP to the black circle and adhere it on the circle DSP.
Using liquid glue, adhere the sentiment banner to the black mat banner.
Add dimensionals under the sentiment banner using the DSP and black cardstock circles as guides.
Adhere your sentiment banner due to the front of the card. I place the sentiment banner so that the turtle on dimensionals would look like it’s standing on the banner. This matches where the turtle is in the center of the notes on the DSP.
Stamp your inside sentiment on the white cardstock using Tuxedo Black Momento ink. I used a sentiment from the Color and Contour stamp set.
Adhere the strip of coordinating DSP to the right side of the white cardstock using liquid glue.
Finally, adhere the white cardstock to the inside of the Berry Burst base using liquid glue.
With that, I’d finished this coordinated card, envelope, and envelope seal.
Back to the InKing Royalty Blog Hop:
Thank you for stopping by today. I hope you’ll hop along to the next stop on the blog hop, Jackie Beers at Blue Line Stamping. There’s lots of inspiration to be found in this group – and you don’t want to miss it!
Thank you for hopping along with us. If you get stuck during the Blog Hop, please use this line-up as a guide:
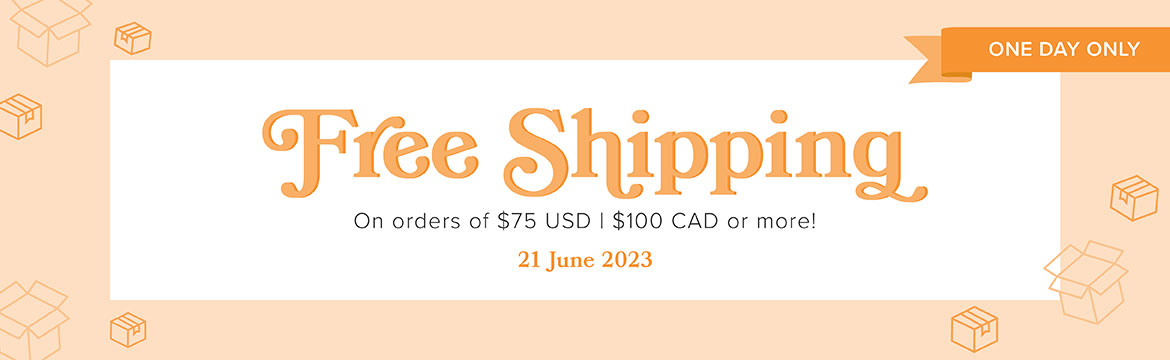
BIG NEWS!!! HUGE NEWS!!! FREE SHIPPING TODAY ONLY – 06/21/2023!!
It’s time to sign up for the July Fun in the Sun Paper Pumpkin kit!
My family’s annual beach week is taking place this week. We’ve been doing this for about 45 years, with the exception of the COVID summer. It’s a wonderful time for all of us to get together and enjoy a week at the beach, especially since my great-nieces and nephew are so much fun! This kit goes right along with our Fun in the Sun! Just look at the cuteness in this banner:
Step-by-step instructions are included, as with any kit.
Click on the link HERE to order your Paper Pumpkin Kit!
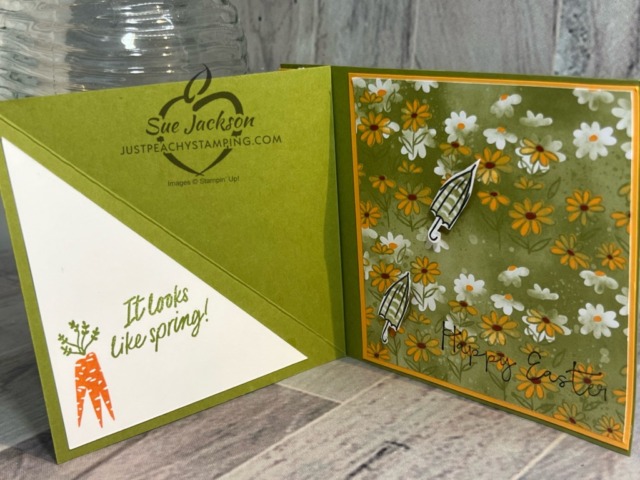
Welcome to InKing Royalty’s April Blog Hop! Just in time for Spring, we are embracing some (or all) of Stampin’ Up!’s gorgeous greens for today’s hop. We are excited to share our creations and hope you love them! After you read my post, I hope you’ll hop over to the next person on the list at the base of this post.
My three cards were made for Spring and include loads of Old Olive cardstock, embellishments, and in the DSP (designer series paper). I made each one with a specific great-niece (a 6 year old and almost 5 year old) and my three year-old great nephew for Easter. The cards are in order of the kids’ ages.
FREE SHIPPING!!!
Before I get to my cards, I have wonderful news! Today ONLY, Stampin’ Up! is offering FREE SHIPPING on any order over $75.00!! It is so easy to get to $75.00, especially with the LAST CHANCE items!
Here are my cards:
I might have I’ve already made and posted cards using all of these fun folds with directions.
The directions for the first and second triangle easel cards can be found here.
Finally, the directions for the traditional fun fold can be found here.
Adding Greens:
In addition to the Old Olive cardstock, I added green colors in a variety of ways:
All the grass pieces were cropped from Old Olive 6 x 6 inch DSP
The kite in the first card was cropped from another pattern of the 6 x 6 inch DSP in Old Olive.
I fussy cut two of the Old Olive closed umbrellas for the stoppers on the first card.
I also used Old Olive as the stopper for the third card.
All the loose daisy embellishments have a tiny green leaf. Wherever you see a tiny daisy, just know there’s a green leaf there as well.
Finally, the greenery tops for all the carrots were stamped in Old Olive.
Back to the InKing Royalty Blog Hop:
Thank you for stopping by today. I hope you’ll hop along to the next stop on the blog hop, Jan Dufour at Stamp Me Silly. There’s lots of inspiration to be found in this group – and you don’t want to miss it!
Thank you for hopping along with us. If you get stuck during the Blog Hop, please use this line-up as a guide:
Just in case you forgot ~ there’s FREE SHIPPING today! Why not get some of the items on the clearance rack, listed below, to add to your order? Sounds good to me!
The HOST CODE for April is 7DX93FFA!
If you are placing an order under $150, please use the host code above.
If you are placing an order over $150, please contact me so you can get credit for your STAMPIN’ REWARDS, which are good for additional products on your order.
Any order over $50 gets a special something from me.
In Colors 2023-2025:
It seems so strange to be writing 2025 as the ending year of the new In Colors!
One of the things I love about new colors is the NEW IN COLOR PAPER PUMPKIN KIT! It always comes out the month of the new In Color rollout, and this year is no different.
Just the photo of the box is wonderful! I can’t imagine what the inside kit will look like!
Again, thank you for stopping by today. I would love to hear from you, so if you have a couple of minutes to leave a comment, that would be wonderful.
Welcome to Just Peachy Stamping by Sue Jackson: an independent Stampin' Up demonstrator.
Through Stampin' Up!, I happily share my love of papercrafting through sales, classes, small stamping group meet-ups and workshops. I think that being a teacher in my "real life", I have a unique approach to sharing my fantastic hobby. I look forward to connecting with you!