Welcome to the newest Make My Monday bi-weekly challenge #230. Our host for this challenge, Tee, chose Let’s Celebrate as the theme. When you finish here, please visit the challenge site to see what the rest of the very talented design team members created. Then, don’t forget to upload your creations to our gallery. We look forward to seeing your creations there!
Here’s my Let’s Celebrate card:
I needed a wedding card, and thought this flap fun fold would be gorgeous with this DSP (designer series paper). I love this whole suite of products, but I really think the DSP is my favorite part. The colors are gold foil, Pebbled Path, Pecan Pie, and Smoky Slate. Take a look at all this gorgeousness:
While I made the card for Make My Monday challenge, I am going to be entering it to the Creative Creases Challenge as well. This challenge is all about the anything goes with a fun fold, and I encourage you to enter your fun folds to the gallery using the link.
I found this fun fold latch card on Pinterest, of course, created by Stamp with Susie. Please click on her link because she’s got two cards using this fun fold. Don’t tell the recipients that the card wasn’t as complicated as it looks. At least that’s my story, and I’m sticking to it.
Measurements:
Pebbled Path cardstock – 5 1/2 x 11″- score at 1-11/16″; 3-3/8″; 7-5/8″ & 9-5/16″ & fold for card base
HINT: The Stampin’ Up! trimmer has 16 tick lines per inch. Therefore, for the 16ths of an inch, just count the tick lines. Another way to measure out the 16ths is as follows: the 1-11/16 of an inch is one tick line before 1-3/4, and 9-5/16 is one tick line past 9-1/4.
I added another piece of Pebbled Path cardstock for the front panel of the card. Susie only used DSP for the front. I added my white and gold DSP to this panel and adhered it to the front scored and folded cardstock. I used a piece of cardstock measuring 4-1/4 by 5-1/2 and just trimmed down 1/16th of an inch on the long side. This made the front sturdier for the latch
The Pebbled Path and gold script DSP piece measures 1-1/2 by 5-3/8 inches.
Trim another piece of DSP to 6 by 2-1/2 inches for the envelope flap.
Don’t forget to punch a 1-inch circle of DSP and run it through the XYRON create-a-sticker for the envelope seal
The mat layer of DSP on the inside of the card measures 4 by 5-1/4 inches
The white cardstock on the inside measures 3-7/8 by 5-1/8 inches.
You will need a 2 inch and a 2-1/2 inch punched circles for the sentiment on the front of the card.
Thankfully, the Lovely & Sweet dies line up perfectly with the DSP so I was able to crop two of the floral sprays for this card.
Stamping & Assembly:
The sentiments on the inside and the outside are gold powder set with a heat tool.
Rub down your cardstock using the powder pal (formerly the embossing buddy). This will allow the embossing powder to just stick to the VersaMark ink instead of oils or dust from your handling of the cardstock.
Stamp the sentiments using VersaMark ink
Cover with gold embossing powder. Make sure you flick the back of the cardstock to remove excess powder
Heat set the powder with your heat tool.
Use multipurpose liquid glue to adhere all the pieces, except for the sentiment circles.
Add dimensionals to 2/3 of the circle on the left side only. Leave room for the flap to fit under the circle to create the latch
I finished the card by adding three brass butterflies to the front for interest
With that, I’d finished this coordinated card, envelope, and envelope seal. I hope you try the card fun fold! I had so much fun with it that I made a thank you card with loads of layers since I am hand-delivering it. I’ll be posting that card, with a how-to video, for the Stampin’ Up! Demos Fun Fold Blog Hop on going live at 05:30 on July 23, 2024. Come back to see that card, please.
Welcome back to the bi-weekly Cardz 4 Galz challenge # 224. Our host, Pamela picked Celebrations (baby, graduation, Mother’s Day, etc) for the theme. When you finish here, please visit the challenge site to see what the rest of the very talented design team members created. Then, don’t forget to upload your creations to our gallery. We look forward to seeing your creations there!
Here’s my celebrations fun fold anniversary card:
The layout for the front of this card meets the Try a Sketch on Tuesday (TSOT) challenge # 645.
Since it evolved into a fun fold, I will also be adding it to the gallery for the Creative Creases challenge.
Basically, this card started out as a regular fold anniversary card. However, the person who ordered the card wanted to emphasize that it’s his parents’ 40th anniversary. Therefore, I added the inside flap. Truly, if you can create a regular fold card, you can do this added flap card.
Measurements:
The Pebbled Path base measures 8-1/2 by 5-1/2 inches, scored at 4-1/4 inches.
The Pebbled Path flap part measures 4-1./2 by 4 inches, scored at 1/2 inch.
I used the Nature’s Sweetness 12 x 12 DSP (designer series paper) for all parts of the card.
The script background measures 4-1/8 by 5-3/8 inches.
Next, I cut a piece of the splattered DSP to 4 by 4 inches. Then I traced out a partial circle from the corner of the DSP and trimmed it down.
HINT: If you don’t have a handy dandy tool, you can use trace a bowl for the size you need, then trim it down.
The splatter DSP for the inside flap measures 3-3/4 inches square.
I trimmed a piece of white cardstock to the same 3-3/4 inches square for the inside sentiment part of the card.
The gold and white DSP on the inside of the card measures 4-1/8 by 5-3/8 inches.
Finally, I trimmed a piece of the DSP to 6 by 2-1/2 inches for the envelope flap. Then, I punched a 1-inch circle from the splatter DSP for my envelope seal and ran it through my XYRON create-a-sticker.
That’s it for the measurements.
Stamping, Heat Embossing, & Assembly:
After wiping down a scrap of white cardstock for the front sentiment, the floral spray and the piece for the inside sentiment using my embossing buddy, I stamped the all the pieces using VersaMark ink.
Then, I covered each with gold embossing powder and heat set it using my heat tool.
Next, I cropped the floral spray using the Lovely & Sweet coordinating die set.
Then, I trimmed the front sentiment down and cut it so it formed the banner end.
I added dimensionals to the sentiment banner and the floral spray to adhere them to the front of the card.
The “40” was cropped using the retired, but still well used, die set for the large numbers.
I used multipurpose liquid glue to adhere all the DSP and cardstock pieces.
Make sure that you add the inside flap to the inside of the card before you adhere the gold and white DSP to the inside.
I wanted the very inside to be covered by the flap, which explains why that white cardstock is off-center.
I stamped another floral spray from the Lovely & Sweet stamp set on the inside white cardstock.
Finally, I added three gold pearls to the top, right-hand corner of the card.
With that, I’d finished this coordinated card, envelope, and envelope seal set.
Everyone loves new products, and there are some very special new products in the 2024 – 2025 catalog!
I already have some of these products since demonstrators were able to pre-order, especially all of the new InColor 2-24 – 2026 products. However, here are some of my must-haves on my wish list:
If you live in the U.S. and don’t already have a Stampin’ UP! demo from whom you order, I would be honored to work with you.
When prompted, please enter the following HOST CODE:
Welcome to the newest Cardz 4 Guyz challenge! Our host for challenge #345, Helen., chose Clean & Simple for the theme. When you finish here, please visit the challenge site to see what the rest of the very talented design team members created. Then, don’t forget to upload your creations to our gallery. We look forward to seeing your creations there!
Here’s my (somewhat) CAS Playing in the Rain card:
If this layout looks familiar, I just posted a card to the Try Stampin’ on Tuesday challenge using the same layout. You can see that card here.
As with the other card, this Playing in the Rain card is combined with other challenges. Since it’s a fun fold, I will be entering it in the Creative Creases gallery.. I’ve also been introduced to a new-to-me challenge, but it’s completely up my alley, and that’s the Snippets Playground challenge. Since I use snippets, aka scraps or leftovers, frequently, I think this challenge will be incorporated quite regularly. The main idea of the challenge is to use scraps and identify them in the card or with a picture. Therefore, here’s my trio of snippets:
Here are the Creative Creases and Snippets Playground challenge logos:
Still Working on My Video Skills:
Instead of listing out the measurements and assembly instructions, I am including a video for this card. I appreciate your patience as I learn the best way to film videos. My nephew wants to help me edit the videos but I am not there yet. He’s great at it, as evidenced by the videos on his YouTube channel, Florida Railfan. If you, or someone you know, is into trains, please share his channel with them. However, he doesn’t know I am giving him a plug, so we can keep it our secret.
PLEASE NOTE: During the video I said that the card base needs to be scored at 4-1/4 and 2-1/4. That’s a mistake! It’s scored at 4-1/4 and 2-1/8 inches.
The Garden Green base measures 8-1/2 by 5-1/2 inches, scored at 2-1/8 and 4-1/4 inches.
After dry-embossing a piece of Garden Green cardstock using the Timeworn Type 3D embossing folder, trim it to 4-1/8 by 5-3/8 inches. Burnish the fold lines using a bone folder.
HINT: Before you adhere this piece of embossed cardstock down, make sure the lettering is right-side up. It’s faint, but will be noticeable if you get it upside down. Trust me.
The pink and white daisy DSP (designer series paper) from the Fresh as a Daisy DSP is part of a 4 x 12 inch strip of one of the DSP pages. When trimmed, it measures 4 by 3-1/4 inches.
The Crushed Curry DSP for the front measures 5-3/8 by 2 inches. Trim another piece of this DSP to 6 by 2-1/2 inches for the envelope flap.
Punch a 1-inch circle using a scrap of the Garden Green 6 x 6 inch DSP for the envelope seal and run it through your XYRON create-a-sticker machine.
Trim a piece of white cardstock to 4 by 5-1/4 inches for the inside of the card.
Cropping, & Stamping, & Assembly:
Amazingly, I didn’t use any dimensionals on this card. Therefore, all the pieces are adhered using multipurpose liquid glue.
When you burnish your Garden Green cardstock base, do so to create a mountain fold. In other words, burnish so that the fold turns inward towards the inside.
Adhere the dry-embossed cardstock to the center of the front of the base.
Adhere the Crushed Curry DSP following the TSOT #644 challenge banner as a guide.
Next, adhere the Bubble Bath daisy DSP to the front layers.
I used leftover pieces of Garden Green and white cardstock to crop out the two layers of daisies and the sentiment banner.
Crop the two layers of the daisy from the Cheerful Daisy die set. I outlined both pieces using a Crushed Curry marker just to give the layers a bit of dimension.
I used the Crushed Curry inkpad and a blending brush to very lightly blend a center on each daisy piece. This is optional since the majority of it will be covered by the sentiment.
Using your embossing buddy from the embossing additions tool kit, rub down your leftover piece of Garden Green cardstock.
Stamp the sentiment from the Happy & Heartfelt stamp set using VersaMark ink.
Add white embossing powder and heat set using your heat tool.
Crop the sentiment using the second smallest Countryside Corners die set.
I outlined the sentiment piece using a Garden Green marker. It’s barely noticeable, but it finishes off the banner.
Stamp the inside sentiment in Garden Green ink.
Adhere the white cardstock to the inside of the card.
With that, you’ve created this coordinated card, envelope, and envelope seal set.
This month, the theme is See How My Garden Grows. We hope to inspire you with our creations today! You will find the lineup at the end of my post to help you “hop” along from Pal to Pal.
Here’s my never-ending card using the Fresh as a Daisy 12 x 12 inch DSP (designer series paper). This paper will be retiring soon and I hope it’s on your next order. The paper is stunning! You can see other posts using this paper here, and here, and this post has 3 cards showcasing this DSP.
Here’s my card:
Here’s a video for making this super-simple card. Truly, if you can score and trim paper, you can make this card.
I’ve made never-ending cards before, but needed directions for one larger than 4-1/4 by 5-1/2 inches for the finished product. I found this video by Karen Titus for a 6 x 6 inch version. In the past 4 or 5 days, I’ve made three of these cards. They are so much fun, much easier than they look, and the recipients will be amazed. Granted, a 6 x 6 inch card requires extra postage, but I think it’s well-worth the extra stamp.
If you are using a DSP pattern with a direction, you need a total of 6 horizontal and 6 vertical pieces. Each piece measures 1-3/8 by 2-7/8 inches.
Four of my DSP pieces are from a coordinating DSP, 2 are horizontal and 2 are vertical. pieces.
There are 6 pieces of 2-7/8 by 2-7/8 inches. Four of these are cows, 2 of these are flowers. I used the large square die from the Stylish Shapes die set for my center pieces.
If you use DSP for the corner pieces, you need 8 measuring 1-3/8 x 1-3/8 inches. I used the smallest Stylish Shapes square die for my corner pieces.
Stamping, Trimming, and Assembly:
Trying to explain how to put this card together in writing would be incredibly long. Please see Karen Titus’ video tutorial or the video I uploaded to YouTube. .
Back to the Pals’ Blog Hop:
More inspiration awaits, so use the lineup below to visit the rest of the Design Team. Please mark your calendars for our next blog hop next month, when our theme will be Fun Family Occasions.
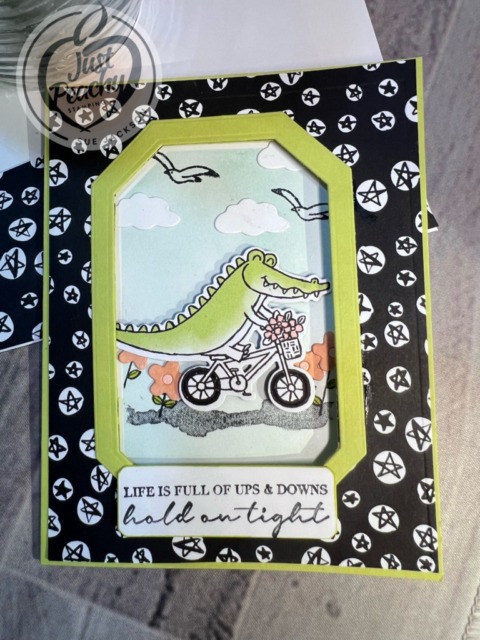
Welcome to the newest Make My Monday bi-weekly challenge #222. Our host for this challenge, Dawn, chose Transport as the theme. When you finish here, please visit the challenge site to see what the rest of the very talented design team members created. Then, don’t forget to upload your creations to our gallery. We look forward to seeing your creations there!
Let me start by saying that one night last week, I went down the rabbit hole of the internet by clicking, then clicking again, and again. Then, I had no way back to the video tutorial for this card, but thankfully I wrote down the dimensions of the inside, smaller card. Therefore, I am dividing the measurements and directions into Part 1 for the outside card, and Part 2 for the inside card.
Part 1 – the basic card
The Lemon Lime Twist base measures 8-1/2 by 5-1/2, scored at 4-1/4 inches.
The Zoo Crew DSP (designer series paper measures 4-1/8 by 5-3/8 inches. I also trimmed a piece to 6 by 2-1/2 inches for the envelope flap. Then, I punched a 1-inch circle from the DSP and ran it through my XYRON create-a-sticker backside up for the envelope seal.
Use multipurpose liquid glue to adhere all the front cardstock and DSP pieces together.
Stamp the sentiment on the front using Momento Tuxedo Black ink.
Crop the sentiment using the second smallest Countryside Corners die. Outline the sentiment in Lemon Lime Twist ink.
Using a Countryside Corner die, crop out an opening in the middle (or as close as possible) of the front of the card. Crop another cut using the same die out of scrap cardstock to use in Part 2.
Next, use the same size die and the next larger die to cut out a frame, as pictured below.
Adhere the frame and sentiment to the front of the card.
That’s it for the basic card front.
Part 2 – Masking and coloring the “inside” card:
Trim a piece of white cardstock to 7-3/4 by 5-1/8, scored at 3-7/8.
Use removable tape to temporarily adhere the inner card in place making sure that the fold side is on the right hand side of the card.
Use a pencil and a very light touch to add tick marks showing where the cropped center of the front of the card appears on the inner card.
Remove the inner card so you can work on it without making a mess on the outer card.
Use the negative of the extra cropped die from part 1 as a mask on the inner card by lining up the sides of the mask with the tick marks you lightly drew.
I used Post-It note tape to adhere the mask to the front of the inner card.
Using a blending brush, add layers of color to the front of the inner card using Pool Party ink. When you get the color intensity you want, remove the mask and decorate
Part 2 continued: Decorating
Unless otherwise noted, I used liquid glue to adhere the pieces together when decorating.
The bike riding alligator was cropped from the Zoo Crew DSP using the coordinating dies. I love when the DSP images match up with the coordinating dies.
Add dimensionals to the back of the alligator.
Using the cropped mask again, I stamped the ground in Tuxedo Black ink. This stamp came from the Wildlife Wonder stamp set.
Using the flower stamp and coordinating dies from Fluffiest Friends, I stamped and cropped flowers from a scrap of Petal Pink cardstock.
The bird stamp comes from the Beach Day Bundle.
The cloud die cuts were made using the cloud die from the Zany Zoo dies.
Then, I stamped the sentiment on the inside of the card and added the trio of flowers from Fluffiest Friends stamp set.
Finally, line up your blended ink-masked area so it lines up with the cropped middle of the Lemon Lime Twist/DSP card front. Then adhere the inside card to the back of the base of the card.
With that, I’d finished this Zany Zoo fun fold coordinated card, envelope, and envelope seal set.
Welcome to Just Peachy Stamping by Sue Jackson: an independent Stampin' Up demonstrator.
Through Stampin' Up!, I happily share my love of papercrafting through sales, classes, small stamping group meet-ups and workshops. I think that being a teacher in my "real life", I have a unique approach to sharing my fantastic hobby. I look forward to connecting with you!