Welcome back to the bi-weekly Cardz 4 Galz challenge # 220. Our host, Billie A, picked Use Some Green for the theme. When you finish here, please visit the challenge site to see what the rest of the very talented design team members created. Then, don’t forget to upload your creations to our gallery. We look forward to seeing your creations there!
This week another coworker asked if I could make her daughter a stadium wave Fluffiest Friends birthday card. Turns out, her daughter’s favorite color is green. Perfect timing! You can see my previous wave card here.
Here’s my Fluffiest Friends stadium wave card:
Truly, if you can trim and score cardstock, you can create this card!
Once again, I used a video by Stamp with Tami for the directions. I followed her measurements and scoring lines to a T. This card is pretty darn easy and I could do the majority of this card without help, including scoring the base. I also knew the size of the cardstock for the wave mechanism is 8 by 7-3/4 inches and just used her scoring measurements. Then it’s just a matter of trimming on the 8-inch side in 1-inch increments. Tami’s video is easy to follow and she’s very open about this being a new-to-her fold. I am still amazed that she worked out the measurements and directions after watching a video by a Dutch card maker, and she did it without the help of translations.
Minor Changes to Tami’s Video:
While making and adjusting this version of the Stadium Wave Fluffiest Friends birthday card, there are a few changes I made or will make next time.
After coloring and adhering all these adorable Friends, I attached them to the wave mechanism. Then, I realized how ugly the backs of the critters looked. That’s when I cropped another set of critters using the die set. Next, I had to carefully trim as necessary to adhere the white cardstock to the back of the colored critters.
Before and After:
It is necessary to adhere the white cardstock on the inside before adhering the wave mechanism. Thankfully, I remembered this detail in time.
Once again, I used ribbon instead of a belly band to keep the card closed. I have an idea for the next card, and if it works, I’ll update this post with a link to the new card.
This time, I adhered the ribbon before I adhered the white cardstock on the inside. I only had the end of the roll of this faux suede ribbon, so I trimmed it in half and used tear & tape to adhere the ends under the white cardstock.
I used more of the tabs than just the first two critters. The tabs measure 1/4 by 1 inch and raise the critters above the next wave.
This wave card definitely has more of an impact when opened from the backside of the card. Next time, I will make the card so that it opens down, if that makes sense. I’ll be sure to update this post with a link to the new version of the card.
Tami didn’t use dimensionals, and I didn’t either. Even though both of my stadium wave cards will be hand-delivered, there’s already enough bulk. Dimensionals might make it difficult to fit inside a medium white envelope.
I hope you watch Tami’s video and create your own stadium wave card. It’s so much fun to create and looks amazing!
I’ve already ordered some of these products and have more on the way. I can’t wait to start playing with them! Take a look at just some of the new products available!
I love the script used for these sentiments. I’ve used the birthday one, and it fits so well on a landscape 5-1/2 by 4-1/4 inch card!
The stamps for these adorable critters are two sided stamps: the outline image is on one side and the animal is on the other. The sample card uses the animal stamp.
Personally, I think this background stamp is gorgeous! Don’t delay in ordering as it just came back in stock. I’ve got an order on its way to me, but this stamp might just be worth paying shipping for just this item.
I had previously ordered the natural polka dot ribbon, and now have the rest of the suite of products on the way. This suite would be suitable to masculine or feminine cards, and I can’t wait to get my hands on it!
Shopping in the current mini-catalog is a wonderful way to shop!
Click on the image/link below to browse and download the mini-catalog!
Welcome to my second post for March 1, 2024. In case you missed it, my design team member card for the monthly Sparkles Christmas Challenge went live at 04:00 ET and you can find that card here.
For this post, I am honored to be the guest designer for the Creative Creases Challenge #77. As always, the theme of this challenge is Anything Goes with a Fun Fold. I needed a birthday card and decided to make a stadium wave card using the Fluffiest Friends stamp set and coordinating dies. All the critters in this set are so, so, so cute, but I absolutely fell in love with the little bird and now have this cute little guy stuck in my head and he will be featured on a card in the near future.
Here’s my Fluffiest Friends stadium wave card:
The magic of this card happens when it is first opened because it looks like it would take so much time and work. However, it took me much longer to stamp, color, and crop then it did to create the inside mechanism. So absolutely stinking cute!
I used a video by Stamp with Tami for the directions. I followed her measurements and scoring lines to a T. Her video is easy to follow and she’s very open about this being a new-to-her fold. I’m amazed that she worked out the measurements and directions after watching a video by a Dutch card maker, and she did it without the help of translations.
A Few Tips:
After making my first wave mechanism in white cardstock, I found that there’s a reason Tami used the same color cardstock as the card base. The mechanism attaches to the base, not the white cardstock inside pieces. This looks much better when the colors are the same.
I found that after scoring the 8 by 7-3/4 inch cardstock for the mechanism, it seemed easier to use my bone folder to burnish all the score lines before trimming down to 1-inch strips.
Tami used a belly-band to keep the card closed. I wanted to have the front decorations on the card and not a belly-band. However, deciding to do so before adhering the white cardstock and the mechanism to the inside of the card. However, I think I solved the problem using tear & tape to secure the ribbon on the back and then added this cute little bunny and cardstock piece.
Tami trimmed little tabs to help the first two critters (for me, daisies for her). Next time, I am going to make them just a bit longer than 1/2 inch. I’ll probably use them on the bottom two as well.
The possibilities for this card are endless, and I am adding it to my favorite fun fold rotation. As with most new-to-me fun folds, you’ll probably be seeing a few of these stadium cards in the coming months.
Please visit Tami’s YouTube video and create a stadium wave card for one of your loved ones. Don’t forget to upload it to the gallery at the Creative Creases Challenge! As a challenge top winner, you could get to be a guest designer as well!
Welcome to the February Stampin” UP! Demo Blog Hop. Each month, this group of SU! Demos create fun fold cards to share with you. As always, fun fold cards can also be uploaded to the Creative Creases Challlenge!
Here’s my birthday accordion fun fold card:
When I saw the pictures accompanying this video from Stamp With Tami, I knew I had to create it for this hop. At the beginning of her video, Tami said it was a pretty easy fun fold since it’s created with 4 score lines, and I was hooked. You can find the link to her video here
For this card I used a number of the current Sale-a-Bration FREE items with a qualifying purchase. Here’s the Sale-a-Bration items I used:
I did make a three small changes to Tami’s directions. First, I’d rather have a smaller border, so I used a 1/8 inch border instead of a 1/4 border. In addition, I didn’t want the sentiment on the last fold to show when closed, so I made an adjustment to the piece of white cardstock for that flap. Finally, I didn’t want plain white cardstock showing on the back of the flaps. Therefore, I used one of the Basics Embossing Folders from the Online Exclusives. Only 1/8 inch shows around each piece of DSP, but it’s enough to have the DSP pop off the Poppy Parade cardstock.
Measurements I used combining Tami’s directions with my 1/8 inch borders:
The Poppy Parade base measures 11 by 4-1/4 inches, scored at 2-1/2, 3-3/4, 6-3/4, and 8-1/4 inches.
After embossing white cardstock using the basics embossing folder, trim white cardstock mats to 4 by 4 inches, 4 by 3-1/2 inches, and 4 – 2-1/4 inches.
The three DSP pieces measure 3-7/8 by 3-7/8 inches, 3-7/8 by 3-1/8 inches, and 3-7/8 by 2-1/8 inches.
I also trimmed a piece of the DSP to 6 by 2-1/2 inches for the envelope flap. Then, I punched a 1-inch circle from the same DSP and used the reverse side for the envelope seal.
Assembly:
I used Tami’s directions for assembly – easy peasy.
I did add the Pool Party crinkled ribbon on the front panel and used the ribbon saver technique for it.
Cut a piece of ribbon to approximately 6 inches, and another piece to two inches.
Add the ribbon to the front of the card and adhere in the back as shown below.
Using the shorter length of ribbon, tie a knot around the ribbon on the front of the card.
The finishing touch was to add some Sale-a-Bration Pool Party opaque faceted dots.
Back to the Fun Fold Blog Hop:
We hope you will hop along with us! I always learn a new-to-me fun fold. When you create your own fun fold, please remember to upload it to the Creative Creases Challenge.
It’s Still Time to Sale-a-Brate until February 29,2024!
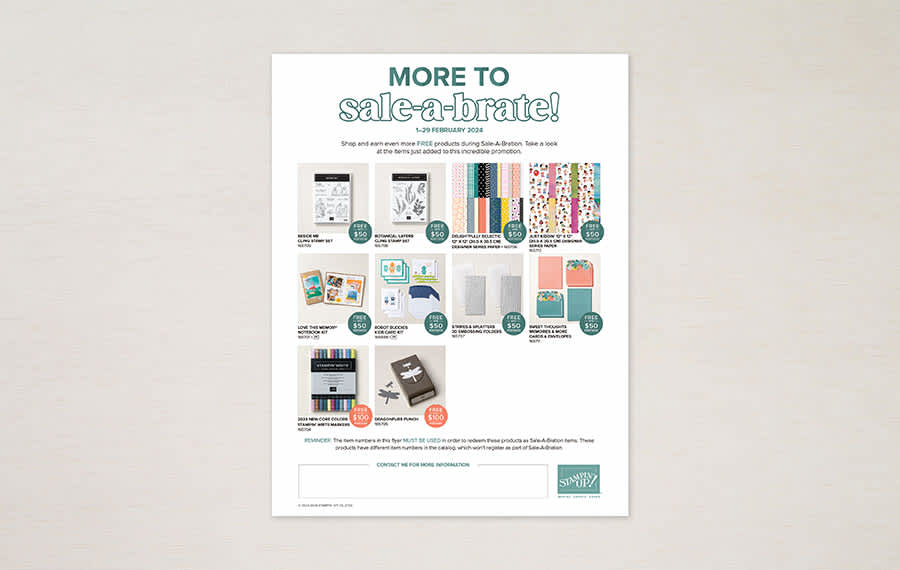
Now there’s more to Sale-a-Brate!
The dragonfly punch is in the current catalog, but I thoroughly enjoyed getting it for free!
My next Sale-a-Bration item will be the set of the new colors markers. I already have that set of markers but I want an extra set of them. Getting them for FREE with a qualifying purchase is a WIN-WIN!
The Sale-a-Bration Jungle Pals dies and stamp set are fabulous! I’ve already posted cards for which I’ve used those items and you can see them here and here. Of course, there are other fabulous items as well!
Shopping in the current mini-catalog is a wonderful way to earn FREE products!
Click on the image/link below to browse and download the mini-catalog!
In addition, there’s a great promotion going on during Sale-a-Bration for joining the Stampin’ UP! community!
Customers who join our fun crafting community as a new demonstrator can get $125 USD | $165 CAD worth of product PLUS our Stampin’ Glass Mat Studio* (a $60 USD | $82 CAD value) for just $99 USD | $135 CAD!
STAMPIN’ GLASS MAT STUDIO:
The Stampin’ Glass Mat Studio is a paper crafter’s dream! The heavy-duty glass mat comes printed with a ruler and grid lines for easy measuring, while the large surface space gives ample room for spreading out while paper crafting. The safety-tempered glass has a heat and scratch resistant surface that wipes clean with the included cloth and water—no chemicals needed. The reusable cloth also cleans ink off your stamps! The nonslip, heat resistant, waterproof silicone mat features four palette squares for mixing custom ink colors or for holding small ink spots in place while crafting. Each component can be used separately or you can use all three items together for a multipurpose paper crafting studio that’s both functional and elegant.
The Stampin’ Glass Mat Studio includes:
GLASS MAT * 5 mm thick * 17″ x 14″ (43.2 x 35.6 cm) * Safety-tempered * Heat and scratch resistant * Wipes clean with water or alcohol
SILICONE MAT * 8-3/8″ x 6″ (21.3 x 15.2 cm) * Multiuse, nonslip * Waterproof, heat resistant * 4 palette squares for custom-color mixing or holding Stampin’ Spots * Product color: white
CLEANING CLOTH * 8-1/4″ x 8-1/4″ (21 x 21 cm) * Durable, reusable * Lint free * Cleans stamps and other surfaces with only water * Product color: dark gray
If you live in the U.S. and don’t already have a Stampin’ UP! demo from whom you order, I would be honored to work with you.
When prompted, please enter the following HOST CODE:
Welcome to the newest Make My Monday bi-weekly challenge #220. Our host for this challenge, Johanna, chose Any Theme Fun Fold as the theme. When you finish here, please visit the challenge site to see what the rest of the very talented design team members created. Then, don’t forget to upload your creations to our gallery. We look forward to seeing your creations there!
Here’s my fishing fun fold card:
I’ve posted one of these flap fun folds before and you can find that here. Connie Stewart’s videos are fabulous and I used this video for both flap cards. All of the measurements and directions are on the video and are much easier to follow than my step-by-step. Connie always makes cards so easy to recreate.
I used the Let’s Go Fishing 12 x 12 inch DSP (designer series paper) and Countryside Corners die set. The sentiments come from the Sentiments Silhouettes stamp and die set.
Thank you for stopping by today!
Have a Peachy Day!
Sue
Supplies Used:
It’s Still Time to Sale-a-Brate until February 29,2024!
Now there’s more to Sale-a-Brate!
The dragonfly punch is in the current catalog, but I thoroughly enjoyed getting it for free!
My next Sale-a-Bration item will be the set of the new colors markers. I already have that set of markers but I want an extra set of them. Getting them for FREE with a qualifying purchase is a WIN-WIN!
The Sale-a-Bration Jungle Pals dies and stamp set are fabulous! I’ve already posted cards for which I’ve used those items and you can see them here and here. Of course, there are other fabulous items as well!
Shopping in the current mini-catalog is a wonderful way to earn FREE products!
Click on the image/link below to browse and download the mini-catalog!
In addition, there’s a great promotion going on during Sale-a-Bration for joining the Stampin’ UP! community!
Customers who join our fun crafting community as a new demonstrator can get $125 USD | $165 CAD worth of product PLUS our Stampin’ Glass Mat Studio* (a $60 USD | $82 CAD value) for just $99 USD | $135 CAD!
STAMPIN’ GLASS MAT STUDIO:
The Stampin’ Glass Mat Studio is a paper crafter’s dream! The heavy-duty glass mat comes printed with a ruler and grid lines for easy measuring, while the large surface space gives ample room for spreading out while paper crafting. The safety-tempered glass has a heat and scratch resistant surface that wipes clean with the included cloth and water—no chemicals needed. The reusable cloth also cleans ink off your stamps! The nonslip, heat resistant, waterproof silicone mat features four palette squares for mixing custom ink colors or for holding small ink spots in place while crafting. Each component can be used separately or you can use all three items together for a multipurpose paper crafting studio that’s both functional and elegant.
The Stampin’ Glass Mat Studio includes:
GLASS MAT * 5 mm thick * 17″ x 14″ (43.2 x 35.6 cm) * Safety-tempered * Heat and scratch resistant * Wipes clean with water or alcohol
SILICONE MAT * 8-3/8″ x 6″ (21.3 x 15.2 cm) * Multiuse, nonslip * Waterproof, heat resistant * 4 palette squares for custom-color mixing or holding Stampin’ Spots * Product color: white
CLEANING CLOTH * 8-1/4″ x 8-1/4″ (21 x 21 cm) * Durable, reusable * Lint free * Cleans stamps and other surfaces with only water * Product color: dark gray
If you live in the U.S. and don’t already have a Stampin’ UP! demo from whom you order, I would be honored to work with you.
When prompted, please enter the following HOST CODE:
Welcome to the newest Cardz 4 Guyz challenge! I’m the host for challenge #341, and I chose fun folds for the theme. When you finish here, please visit the challenge site to see what the rest of the very talented design team members created. Then, don’t forget to upload your creations to our gallery. We look forward to seeing your creations there!
Here’s my Hey Chuck fun fold:
A colleague needs a birthday card for his father using the New York Mets colors of blue and orange. I added Crumb Cake to Starry Sky cardstock and Pumpkin Pie 6 x 6″ DSP (designer series paper) for this side-step fun fold. Connie Stewart’s tutorial videos are wonderful and easy to follow. I used her video for this side-step card, and you can find her video here. Just one of the wonderful things about her videos is that she includes measurements and scoring directions. When I trimmed the Pumpkin Pie DSP for the card layers, I also trimmed a piece to 6 by 2-1/2 inches for the envelope flap. Then, I punched a 1-inch circle from Starry Sky DSP and ran it through my XYRON create-a-sticker for the envelope seal. Follow those, and you can create your own fabulous side-step fun fold!
Creative Creases:
Since this is a fun-fold, I will be uploading this card to the Creative Creases challenge. It’s the third anniversary for this challenge, and I am so happy for the challenge coordinator, Debbie Mageed, and the rest of the design team members! I love that it’s always anything goes with a fun fold theme.
What I Did:
I stamped everything I needed using my Momento Tuxedo Black ink pad.
Unless noted, I used multipurpose liquid glue for adhering the pieces together.
Stamp the two roosters and birthday cake on white cardstock.
Stamp the fence piece on Crumb Cake cardstock.
Next, I colored the roosters using the blends combos for Pumpkin Pie, Cajun Craze, and Crumb Cake.
Then, I added a bit of sparkle to the flame parts of the cake using a clear Wink of Stella glitter pen.
Crop the fence, roosters, and birthday cake using the coordinating die set.
At the same time, I cropped the weather vane from Starry Sky cardstock and then used clear Wink of Stella to the whole vane.
Stamp the two sentiments on Pumpkin Pie cardstock. In hindsight, I probably should’ve stamped it in VersaMark and used black embossing powder for this part.
Crop the Pumpkin Pie and Starry Sky cardstock pieces using deckled rectangle dies.
Trim a piece of white cardstock to fit between both deckled rectangle layers.
Adhere all the sentiment layers.
I already had the brick-embossed Crumb Cake cardstock, and it really works on this card.
After trimming it to size, I adhered it and added the weather vane.
Add dimensionals to the rooster and adhere to the Crumb Cake cardstock.
Adhere the fence piece.
After stamped the birthday sentiment on the white cardstock, adhere it to the back panel.
Adhere the smaller rooster and birthday cake to the white cardstock.
With that, I’d finished this coordinated card, envelope, and envelope seal set.
The following items are FREE with a qualifying $50 purchase (before tax and shipping). The top row are some new additions to the Sale-a-Brate FREE items.
The following items are FREE with a qualifying $100 purchase (before tax and shipping.
The Jungle Pals dies and stamp set are fabulous! I’ve already posted cards for which I’ve used those items and you can see them here and here. Of course, there are other fabulous items as well!
Shopping in the current mini-catalog is a wonderful way to earn FREE products!
Click on the image/link below to browse and download the mini-catalog!
In addition, there’s a great promotion going on during Sale-a-Bration for joining the Stampin’ UP! community!
In addition, there’s a great promotion going on during Sale-a-Bration for joining the Stampin’ UP! community!
Customers who join our fun crafting community as a new demonstrator can get $125 USD | $165 CAD worth of product PLUS our Stampin’ Glass Mat Studio* (a $60 USD | $82 CAD value) for just $99 USD | $135 CAD!
STAMPIN’ GLASS MAT STUDIO:
The Stampin’ Glass Mat Studio is a paper crafter’s dream! The heavy-duty glass mat comes printed with a ruler and grid lines for easy measuring, while the large surface space gives ample room for spreading out while paper crafting. The safety-tempered glass has a heat and scratch resistant surface that wipes clean with the included cloth and water—no chemicals needed. The reusable cloth also cleans ink off your stamps! The nonslip, heat resistant, waterproof silicone mat features four palette squares for mixing custom ink colors or for holding small ink spots in place while crafting. Each component can be used separately or you can use all three items together for a multipurpose paper crafting studio that’s both functional and elegant.
The Stampin’ Glass Mat Studio includes:
GLASS MAT * 5 mm thick * 17″ x 14″ (43.2 x 35.6 cm) * Safety-tempered * Heat and scratch resistant * Wipes clean with water or alcohol
SILICONE MAT * 8-3/8″ x 6″ (21.3 x 15.2 cm) * Multiuse, nonslip * Waterproof, heat resistant * 4 palette squares for custom-color mixing or holding Stampin’ Spots * Product color: white
CLEANING CLOTH * 8-1/4″ x 8-1/4″ (21 x 21 cm) * Durable, reusable * Lint free * Cleans stamps and other surfaces with only water * Product color: dark gray
If you live in the U.S. and don’t already have a Stampin’ UP! demo from whom you order, I would be honored to work with you.
When prompted, please enter the following HOST CODE:
Welcome to the January Stampin’ UP! Demo Fun Fold Blog Hop! As you probably already know, I love fun folds and am always looking for something new. This blog hop always provides me with new folds to try. When you finish here, I hope you will hop along using the lineup below my post. There’s always loads of inspiration here, and don’t forget to upload your own fun folds to the Creative Creases challenge, which is always anything goes with a fun fold.
I have two versions of a vertical freestanding fun fold card. The second version is an extended version. Please keep in mind that, while these cards will fit in a medium envelope (I promise!) they will require extra postage.
Here are my cards:
Here’s the extended version:
I found my fun fold on Susan Campfield’s YouTube channel. You can find her video tutorial here. Her video includes examples of both the vertical and horizontal layouts. I’m going to have to try the horizontal .layout next!
Jungle Pals:
This Sale-a-Bration stamp set and coordinating dies are available for FREE with qualifying purchases. The stamp set is FREE with a $50 purchase (US) and the die set is FREE with a $100 purchase (US).
I stamped all the animals using Momento Tuxedo Black ink.
The stamping blends combos made coloring these cuties easy:
The Smoky Slate blends combos were used for all the sloths and the lemurs.
I used the Cajun Craze and Pumpkin Pie blends for the tiger.
I colored the toucans using the Daffodil Delight, Pumpkin Pie, and Smoky Slate dark of Basic Black light blends. One toucan is colored with the light Daffodil Delight, Pumpkin Pie, and dark Smoky Slate blends. I colored the other one using the dark Daffodil Delight, Pumpkin Pie, and light Basic Black blends.
I cropped the tree trunks from Pecan Pie cardstock.
All the vines and leaves were cropped from Garden Green and Granny Apple Green cardstock.
I used embossing folders for the Garden Green outside strips.
I stamped all the sentiments in Momento Tuxedo Black ink using the Charming Sentiments stamp set and cropped using the coordinating dies.
I didn’t use dimensionals on the extended card version. For that card, I only used multipurpose liquid glue because the extra cardstock added more thickness.
Back to the Blog Hop:
Each month I am completely inspired by the rest of the members of this hop! I hope you will visit each of the demos linked below. Don’t forget to upload your own fun folds to the Creative Creases Challenge! See you in the gallery!
In addition, there’s a great promotion going on during Sale-a-Bration for joining the Stampin’ UP! community!
In addition, there’s a great promotion going on during Sale-a-Bration for joining the Stampin’ UP! community!
Customers who join our fun crafting community as a new demonstrator can get $125 USD | $165 CAD worth of product PLUS our Stampin’ Glass Mat Studio* (a $60 USD | $82 CAD value) for just $99 USD | $135 CAD!
STAMPIN’ GLASS MAT STUDIO:
The Stampin’ Glass Mat Studio is a paper crafter’s dream! The heavy-duty glass mat comes printed with a ruler and grid lines for easy measuring, while the large surface space gives ample room for spreading out while paper crafting. The safety-tempered glass has a heat and scratch resistant surface that wipes clean with the included cloth and water—no chemicals needed. The reusable cloth also cleans ink off your stamps! The nonslip, heat resistant, waterproof silicone mat features four palette squares for mixing custom ink colors or for holding small ink spots in place while crafting. Each component can be used separately or you can use all three items together for a multipurpose paper crafting studio that’s both functional and elegant.
The Stampin’ Glass Mat Studio includes:
GLASS MAT * 5 mm thick * 17″ x 14″ (43.2 x 35.6 cm) * Safety-tempered * Heat and scratch resistant * Wipes clean with water or alcohol
SILICONE MAT * 8-3/8″ x 6″ (21.3 x 15.2 cm) * Multiuse, nonslip * Waterproof, heat resistant * 4 palette squares for custom-color mixing or holding Stampin’ Spots * Product color: white
CLEANING CLOTH * 8-1/4″ x 8-1/4″ (21 x 21 cm) * Durable, reusable * Lint free * Cleans stamps and other surfaces with only water * Product color: dark gray
If you live in the U.S. and don’t already have a Stampin’ UP! demo from whom you order, I would be honored to work with you.
When prompted, please enter the following HOST CODE:
Welcome to Just Peachy Stamping by Sue Jackson: an independent Stampin' Up demonstrator.
Through Stampin' Up!, I happily share my love of papercrafting through sales, classes, small stamping group meet-ups and workshops. I think that being a teacher in my "real life", I have a unique approach to sharing my fantastic hobby. I look forward to connecting with you!