Happy Holidays! This month, the theme is Winter Wonderland. We hope that you will be inspired by all the amazing creations the Pals are sharing with you! Then, you will find the lineup at the end of my post to help you “hop” along from Pal to Pal.
Here’s my Winter Meadow fun fold card:
This fun fold simply requires you to be able to trim and score paper. That’s it. Trim, score, stamp, embellish, done. I’ve posted another card using this fold and you can find that here
I added embossing to the three parts of this challenge, as well as creating a fun fold card, thanks to the tutorial by Susan Campfield. The possibilities are endless for the way this card can be created, and you can find Susan’s video here. I followed Susan’s measurements and directions for creating this card,
Measurements:
I used Garden Green cardstock with Winter Meadow DSP and white cardstock.
The Garden Green cardstock pieces each measure 5-1/2 by 2-1/8 inches, and I used two of them.
The white cardstock for the inside measures 11 by 4-1/2 inches, scored in half at 5-1/2 inches .Score again at 2-3/4 inches from either end.
The two Winter Meadow DSP pieces for the front and back measure 5-1/2 by 3-1/4 inches.
Each DSP piece for the inside folds measures 2-5/8 inches by 4-5/8 inches.
Trim a piece of coordinating DSP to 2-1/2 by 6 inches for the envelope flap.
Punch a 1-inch circle of DSP for the envelope seal. Run it through the XYRON create-a-sticker to finish the seal.
I cropped a square of vellum cardstock using the largest Stylish Shapes square die.
That’s it for the measurements. Next, let’s put the card together.
Stamping, Embossing, Stenciling, and Assembly:
After running my Garden Green cardstock through the Ferns 3D embossing folder, I trimmed each piece to 5-1/2 by 2-1/8 inches
Adhere the piece of the DSP you cut for the front to the embossed Garden Green cardstock. There will be a small overlap of the papers.
Outline the two pieces of DSP for the inside using the Blueberry Bushel Stamping Write Marker.
Stamp your chosen sentiments on two panels of the inside “squeeze box” piece of white cardstock. I stamped my sentiments on the front an inside using Pebbled Path ink since it’s one of the colors in this DSP.
Adhere your outlined DSP pieces to two of the “squeeze box” panels.
Add Garden Green ribbon where the cardstock and DSP overlap for the front. Tie it in a bow or a square knot.
Line up the inside white cardstock panels with each of the two pieces of the front and back pieces using multipurpose liquid glue.
Finishing Up:
After stamping the front sentiment using the Winter Meadow stamp set, I cropped it using the label die from the Brightest Glow die set.
Then, I used the Blueberry Bushel Stamping Write Marker to outline the label.
I used Stamping Write Markers in Garden Green, Blueberry Bushel, Lost Lagoon, and Pebbled Path to color the stamps. For the leaf sprays, I first colored the stems using Pebbled Path. Then I colored the leaves in Garden Green and stamped them down.
I followed the same procedure for the blueberry trio and the center spray.
After dry-fitting the pieces on the front, I figured out where I could put liquid glue on the back of the vellum so it wouldn’t show.
I used liquid glue for the three back sprays.
I added dimensionals to the sentiment banner and adhered it to the front.
Then, I added dimensionals to the blueberry trio and adhered it behind the sentiment.
I decided that the inside DSP panels needed something, so I cropped the leaf sprays from Garden Green cardstock using the Winter Meadow die set.
The Blueberry Bushel berries come from another die in the Winter Meadow die set. Those things are tiny! I found the easiest way for me to adhere them was to add tiny dots of liquid glue to each of the berry pieces on the leaf sprays. Don’t try to pick up those tiny berries with your fingers. I used my reverse craft tweezers to pick them up and place them on the leaf sprays.
With that, I’d finished this coordinated card, envelope, and envelope seal.
Now it’s your turn:
I really hope you watch Susan Campfield’s video or just use my measurements and directions to create your own squeeze box fun fold card. Don’t forget to upload your project to the Creative Creases challenge site.
Back to the Pals’ Blog Hop:
More inspiration awaits, so use the lineup below to visit the rest of the Design Team. Then, please mark your calendars for our next blog hop next month, when our theme will be “Sale-A-Bration,” where the projects will showcase all of the great products available with orders over $50.
Welcome back to the monthly Stampin’ UP! Demonstrators Fun Fold Blog Hop. If you love fun folds, you’ve come to a hop filled with really great projects by some very talented fellow demonstrators. When you finish here, I hope you will hop along with the rest of the demos using the links below.
It’s just a given that fun fold cards also post to the Creative Creases challenge. Debbie Mageed at Secret Stamper coordinates both this hop and the challenge. Hopefully, you will be inspired to upload your own fun fold project to the challenge!
Here’s my pop-up polar bear card:
MayMay, from MayMay Made It, has two videos for this fun fold. You can find the links for the step-by-step tutorial videos here and here. The first one explains the mechanism made with one sheet of cardstock and some scoring. The second one explains how to create the snowman. She even included a pattern for the mittens which can be printed from her blog post..
Please note that the snowman card will fit inside a medium envelope and can be mailed with additional postage. However, both the snowman and polar bear cards will be hand-delivered to my great-nieces. Now, I just need to create one for my great-nephew. I’m trying to figure out how to make a Santa card next, so stay tuned.
Measurements:
Inside:
Please refer to MayMay’s videos for the full set of measurements for the pop-and-twist inside of the card. Here’s a picture of the prototype that I kept so I have them handy when I create these cards:
Outside:
The Night of Navy base measures 11 by 4-1/4 inches, scored at 5-1/2 inches to create a tent fold.
The Real Red cardstock mat for the front measures 4-1/8 by 5-3/8 inches.
The DSP pieces on the front of the card come from the Beary Christmas DSP, which is retiring soon. You can find the links to this set below in the supplies used section.
The pawprint piece of DSP measure 5-1/4 by 2-3/8 inches.
The two polar bear pieces of DSP measure 1-1/4 by 1-1/2 inches.
The gift piece of DSP measures 1-1/2 by 2-5/8 inches.
I trimmed a coordinating piece of DSP to 6 by 2-1/2 inches for the envelope flap.
Punch a 1-inch circle from coordinating DSP for the envelope seal, which will need to be run through your XYRON create-a-sticker.
I used a piece of scrap Real Red cardstock for the sentiment panel.
Assembly:
Dimensionals were used under the sentiment. Since I am hand-delivering this card, I can make it thicker than if it needed to be mailed.
I used multipurpose liquid glue to adhere all the paper pieces.
There’s a glue dot under the bow to hold it in place.
Adhere the DSP pieces to the Real Red mat.
Wrap a length of Real Red ribbon around the card so that it covers the space between the pawprint DSP and the other pieces. Secure with a mini glue dot.
Then, adhere the mat to the front of the card base.
After rubbing down a scrap piece of Real Red DSP with an embossing buddy, stamp the sentiment using VersaMark ink. The sentiment comes from the Stars at Night stamp set.
Cover the VersaMark ink with white embossing powder and heat set with a heat tool.
Crop the sentiment using the Stars at Night label die and adhere to the front of the card so it straddles the ribbon.
This card isn’t a quick and simple card by any means. However, MayMay’s tutorials prove that if you can trim and score cardstock, the twist-&-pop card is very doable! I hope you will give it a try!
Back to the Blog Hop:
We all hope you will follow the links below and hop along with us. There’s so much inspiration to be found here. We’d love to see what inspires you to create a fun fold as well. Don’t forget to upload it to the Creative Creases challenge!
Welcome back to another bi-weekly Make My Monday challenge! Our host for #214, Debbie, chose wreaths for the theme this week. When you finish here, I hope you will visit the challenge site to see the projects by each of the other design team members. We’d love to see your wreath creations in our gallery!
Here’s my fun fold wreath card:
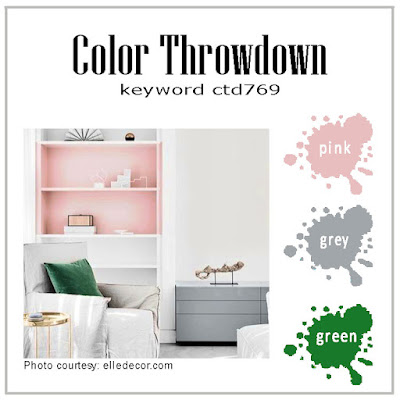
I realized that I don’t really have any stamp sets with Christmas wreaths, so I had to make my own. Once I knew this card was going to be a labor of love, I thought I needed to make it a fun fold to go all out. Full credit for this fun fold goes to Connie Stewart of Simply Simple Stamping. You can find her video here. I used the colors from the Color Throwdown 769 challenge, as shown below. I’m also entering it in the Creative Creases #70 challenge. The DSP, colors, and ribbon I used are retired, but I love the set and haven’t been able to bring myself to sell it.
Can I just say that I’m pretty stinking pleased that I “almost” figured out how to use columns in my post?
Measurements:
Follow the directions in Connie Stewart’s video (link above) to create the base of the card. I used Mint Macaron for the base.
The pink snowflake DSP (designer series paper) on the front measures 4-1/8 by 5-3/8 inches.
I also trimmed a piece of this DSP to 6 by 2-1/2 inches for the envelope flap. Then, I punched a 1-inch circle of coordinating DSP for the envelope seal, which I ran through my XYRON create-a-sticker.
The two pieces of white cardstock on the inside flaps each measure 4 by 5-1/4 inches.
Stamping, Coloring, & Cropping:
Front:
Thankfully, I used many scraps for all the holly & berry pieces, along with the trees on the inside.
First, I stamped more than 20 holly & berry pieces using Smoky Slate ink.
Then, I added clear Wink of Stella to all the flourish pieces.
Next, I colored them using the Mint Macaron blends combo and a Blushing Bride Stamping Write Marker.
Before cropping them all out, I outlined the berries and holly using a Smoky Slate marker.
For the base of the wreath, I used two of the Stylish Shapes circles and Mossy Meadow cardstock to create a ring.
Next, I wiped down a piece of white cardstock using my embossing buddy.
Stamp the sentiment using VersaMark ink and cover with silver embossing powder.
Heat set with your heat tool and crop using the inner Stylish Shapes circle.
Use some tear & tape to adhere the sentiment circle to the back of the Mossy Meadow ring.
Adhere the first layer of holly & berry pieces to the Mossy Meadow ring using multipurpose liquid glue.
Add the second layer of holly & berry pieces using mini-dimensionals.
Adhere the ring to the front of the card using liquid glue.
Create a bow using Mint Macaron ribbon and adhere with a mini glue dot.
Inside Panels:
Stamp the ornaments and inside sentiments using Smoky Slate ink.
I colored the ornaments with the Mint Macaron blends combo and Wink of Stella clear.
I stamped the last inside sentiment using Smoky Slate ink,
I cropped the trees from white cardstock. Then, I used a blending brush and Blushing Bride ink to lightly color the trees.
I had an “oops” when I stamped the sentiment, so I simply stamped it again and cropped it with a Stylish Shape circle.
I used liquid glue to adhere the trees, sentiment, and lone holly & berry piece on the inside panels.
Stamp the three lower trees using Mint Macaron ink. Add dots of Blushing Bride using a Stamping Write marker.
With that, I’d finished this labor of love coordinated card, envelope, and envelope seal set.
Welcome to the Creative Creases challenge # 70. I am so honored to be a guest designer for this challenge for being the top pick When you finish here, I hope you will visit the challenge site for more inspiration. I love fun folds, and playing along with this challenge always brings so much creative fun!
Here’s my Magical Meadow Fun Fold:
Full credit for this fun fold goes to Connie Stewart of Simply Simple Stamping. You can find her video here.
Measurements:
Start with an 8-1/2 by 11 inch of cardstock for your base. I used Misty Moonlight.
Score at 4-1/4 and 5-1/2 inches. You will have 4 sections, each measuring 4-1/4 by 5-1/2 inches.
Follow Connie’s directions for trimming away the top left-hand cardstock rectangle. It’s much easier to see her do it than to have me explaining it.
Trim two pieces of coordinating Magical Meadow DSP to 4-1/8 by 5-13/8 inches, one for the outside and one for the inside of the flap.
Trim a piece of DSP to 6 by 2-1/2 inches for the envelope flap.
Punch a 1-inch hole from DSP to create the envelope seal. Run the circle through your XYRON create a sticker to finish off the seal.
Trim a piece of white cardstock to 4 by 5-1/4inches for the inside of the card.
You will need scrap Misty Moonlight cardstock and vellum cardstock for the die cut branches.
Putting It Together:
Connie used just cardstock for her card and stamped the floral images on it. I used DSP for the front and inside flaps.
I didn’t use any dimensionals at all. I adhered all the paper pieces using multipurpose liquid glue. The bow is attached with a mini glue dot.
Adhere one piece of the DSP to the front of the cardstock.
Crop the center circle flourish using the die from the Irresistible Blooms die set. You will need to run it back and forth in your Cut and Emboss machine in order to go through both layers.
Adhere the second piece of the DSP to the inside front of the card so it’s showing through your die cut circle.
Align your sentiment so that it will show through the circle. I actually used a very light pencil mark because this sentiment from the Brightest Glow stamp set is a cling stamp.
After you know where you are going to stamp, wipe down the whole front of the DSP using your embossing buddy from the embossing additions tool kit.
Stamp your sentiment using VersaMark ink and cover with white embossing powder. Heat set with your heat tool.
Stamp the inside sentiment, also from Brightest Glow, using Misty Moonlight ink on the white cardstock panel.
Adhere the cardstock to the inside of the card.
Embellishing:
I cropped the branch spray using a die from the Magical Meadow die set and Misty Moonlight ink.
Next, I used Misty Moonlight ink and a blending brush to lightly add color to a piece of vellum cardstock.
Then, I cropped the vellum branch spray.
I added the cardstock spray to the left of the circle window on the front.
Tie a bow using the silver and white ribbon from the suite, and adhere it to the cardstock spray with a glue dot.
Add some clear faceted gems from the suite to 4 of the large circles in the wreath.
Add one gem underneath the sentiment on the inside.
Attach the vellum cardstock branch by carefully spreading liquid glue on the whole back of the branch and adhere.
I wanted to inside of the top flap to have some sort of bling on the wreath cut outs. Therefore, I used my clear Wink of Stella pen to the back of the circle. You can see that in the following picture:
With that, I’d finished this coordinated card, envelope, and envelope seal fun fold card!
This month, the theme is The Color Purple. We really hope that you will be inspired by all the amazing creations the Pals are sharing with you! Then, you will find the lineup at the end of my post to help you “hop” along from Pal to Pal.
My daughter absolutely loves all things Halloween! I need to get a card, and other things, in the mail to her asap since she lives on the other side of the country. She actually started decorating in September because that’s almost October…you get the picture. Since this is a fun fold card, that means I will also be uploading this to the current Creative Creases Challenge. If you love fun folds as much as I do, this anything goes fun fold challenge is perfect for you!
Here’s my card:
This year, I only need Halloween cards for my daughter, two great-nieces and one great-nephew. Therefore, the only current Halloween supplies I have is this Pumpkin Pie DSP from a paper share I purchased from Brian King, of Stamp with Brian.
Do you notice anything about the DSP I used for the left, inside panel? The “BOO” sentiment goes in one direction and EEEK! goes in the opposite direction. Love it!
Here’s a close-up:
Measurements:
The Gorgeous Grape base measures 5-1/2 by 8-1/2 inches. It’s scored at 2-1/8 and 4-1/4 inches.
The inside piece of Them Bones DSP (designer series paper) measures 4-1/8 by 5-3/8 inches.
The DSP for the flaps measures 2-5/8 by 5-3/8 inches. I used a piece of Them Bones DSP (shown above) and a piece of Gorgeous Grape 6 x 6 inch DSP.
Trim a piece of the Gorgeous Grape DSP to 6 by 2-1/2 inches for the envelope flap.
Punch a 1-inch circle of Them Bones DSP and run it through the XYRON create-a-sticker for the envelope seal.
I used the Trick or Treat panel trimmed from the DSP. You can see that whole 12 x 12 sheet below.
I trimmed a piece of black cardstock to 1/8 inch larger than the Trick or Treat DSP because the back of the DSP didn’t really go with the colors I used.
I used cardstock scraps for the white inside panel and the Gorgeous Grape letters.
My No-Stamping Assembly:
Tie a piece of the gingham ribbon around the Gorgeous Grape DSP.
Add dimensionals to the back of that piece of DSP and adhere to the front panel of the card. Since the card is bulky and with the addition of dimensionals, it will require additional postage.
Adhere the Halloween DSP to the inside panels of the Gorgeous Grape DSP.
Emboss a piece of white cardstock using the dots folder from the Basics Embossing Folders set available as an online exclusive.
Using the Alphabet a la Mode die set, I cropped three sets of letters and the exclamation mark, including those little, tiny, tiny dots.
Next, I using multipurpose liquid glue to stack the sets of letters on top of each other. I wanted some dimensional, but I didn’t want to have to use dimensionals to accomplish that.
Use multipurpose liquid glue to attach the letters to the white cardstock, which gets adhered to the white panel.
When placing the white panel on the inside of the card, make sure that it is covered by the Trick or Treat panel. You don’t want that sticking out.
With that, I’d completed this coordinated card, envelope, and envelope seal set.
Back to the Pals’ Blog Hop:
More inspiration awaits, so use the lineup below to visit the rest of the Design Team. Then, please mark your calendars for our next blog hop next month (second Wednesday), when our theme will be Home for the Holidays.
Welcome to the Stampin’ UP! Demos’ September Fun Fold Blog Hop! That’s a mouthful, isn’t it? This group of demonstrators loves to create fun folds, and I can always find inspiration from the projects on this hop! This month I chose one of my favorite, and relatively simple, fun folds: an easel card.
After you finish here, I hope you will hop along with us by following the links down below. When you’ve created your own fun fold card, please upload it to the gallery at Creative Creases Challenge!
Since I need about 25 Thanksgiving cards, I’ve already made and posted a couple of them. You can find that blog post here.
Measurements:
The Pretty Peacock base measures 11 by 4-1/4 inches, scored at 2-3/4 and 5-1/2 inches.
After embossing a piece of Very Vanilla cardstock using one of the Basics Embossing folder, I trimmed it to 4-1/8 by 5-3/8 inches.
TIP: If you loved and deeply miss the Subtle 3D embossing folder, this crosshatch folder is for you!
The Very Vanilla cardstock piece for the inside measures 4 by 5-1/4 inches.
I started with a piece of DSP measuring 3-3/4 by 4-1/2 inches.
Then, I trimmed it in half vertically so I had two pieces measuring 4-1/2 by 1-7/8 inches.
Next, I trimmed the right hand side in half horizontally so I had two pieces measuring 2-1/4 by 1-7/8 inches. In order to have these pieces match the challenge layout, I trimmed 1/16 from what would be the center of the DSP image.
I trimmed a piece of the Pretty Peacock and Copper Foil coordinating 12 x 12 inch specialty DSP to 6 by 2-1/2 inches for the envelope flap.
Finally, I punched a 1-inch circle from the Autumn DSP to make the envelope seal.
What I Did to Create this Easel Card:
Adhere the DSP to the embossed cardstock using multipurpose liquid glue.
Then, adhere the bottom half of the embossed cardstock to the bottom half of the card base using liquid glue.
After wiping down a piece of vellum with an embossing buddy, stamp the sentiment, from the Autumn Leaf stamp set, in Pretty Peacock ink.
Since the ink take a little bit of time to dry, you have enough time to cover the ink with clear embossing powder. Then heat set it using your heat tool.
HINT: Make sure you warm up your heat tool before trying to set the embossing powder on the vellum. If you are not careful, you will burn the vellum instead of heat setting the powder.
Crop the leaf using the Autumn Leaf dies from the coordinating 12x 12 inch specialty DSP.
I cropped two of the thin banner pieces from the same DSP to use as the stop for the easel.
Crop the veins for the leaf from Pretty Peacock cardstock and adhere to the leaf.
Add dimensionals to the back of the leaf and adhere to the front of the card.
Adhering vellum can be tricky because you don’t want whatever you use to show. For this card, I cut mini-dimensionals in half and placed one-half in each of the three outside corners. Since the top left-hand corner sits on top of the leaf, I just added a dot of liquid glue to adhere it down.
I slid a small length of copper ribbon under the vellum and adhered it with a glue dot.
The last step for the front of the easel was to add speckled dots to each corner to hide the adhesives used.
Finishing Up:
I stamped the sentiment and image on the inside piece of Very Vanilla cardstock, which is adhered to the base using liquid glue.
Finally, add your easel stops using dimensionals. If you want the card to sit steeply (like mine), adhere the stops closer to the top of the inside cardstock. The further down you place the easel stops, the more the angle of the easel will decrease.
With that, I’d finished this coordinated card, envelope, and envelope seal.
Back to the Demos’ Fun Fold Blog Hop:
Thank you for joining us today as we hop through a series of fun fold cards! I know you will find loads of inspiration from the rest of these very talented demos! When you finish here, please hop over to Tara Carpenter at Tara Beth Stamps. If you get lost along the way, the following list will help get you back on track.
Welcome to Just Peachy Stamping by Sue Jackson: an independent Stampin' Up demonstrator.
Through Stampin' Up!, I happily share my love of papercrafting through sales, classes, small stamping group meet-ups and workshops. I think that being a teacher in my "real life", I have a unique approach to sharing my fantastic hobby. I look forward to connecting with you!


