Welcome to the newest Make My Monday bi-weekly challenge #248. Our host for this challenge, Heather, chose Make it Green for the theme. When you finish here, please visit the challenge site to see what the rest of the very talented design team members created. Then, don’t forget to upload your creations to our gallery. We look forward to seeing your creations there!
I have 3 balloons, 2 flowers, and one dinosaur. Here’s their challenge banner:
As I have done many times in the pas with fun folds, the fourth challenge is Creative Creases # 101
Isn’t it fabulous when the challenges all work together? Love it!
Measurements for This Z-Fold Card:
The Garden Green base measures 8-1/2 by 5-1/2 inches, scored at 2-1/8 and 4-1/4 inches
Trim a piece of Balmy Blue 6 x 6 inch DSP (designer series paper) to 5-3/8 by 2 inches for the front flap
Trim another piece of Balmy Blue DSP to 6 by 2-1/2 inches for the envelope flap
At this point, I try to remember to punch a 1-inch circle of coordinating DSP for the envelope seal, then run it through my XYRON create-a-sticker
Trim a piece of Balmy Blue cardstock for the inside to 5-3/8 by 4-1/8 inches
You will need two pieces of Garden Green cardstock, each measuring 3-1/2 by 4-3/4 inches to use one on the outside and one on the inside
Next, trim two pieces of white cardstock to 3-3/8 inches by 4 inches
With careful planning, I was able to stamp all the pieces from the Darling Dino stamp set using one piece of white cardstock measuring 4-1/4 by 5-1/2 inches
I had scraps of Garden Green to use for the grass and Balmy Blue for the sentiment banner on the front
Stamping, Coloring, and Die-Cutting:
Using the cloud stamp from the Playing in the Rain stamp set, I added Balmy Blue clouds to the white cardstock for both the inside and outside of the card
Then, I used a blending brush and lightly added Balmy Blue ink to both pieces of white cardstock
The color is very subtle, but the result turned out much better than just using white
After stamping all the Darling Dino pieces using Momento Tuxedo Black ink, I cropped them with the coordinating dies
Do you recognize the Garden Green grass on the front of the card? If you guessed it’s from the Frozen Edges die set, good for you!
Using the grass stamp from the Dinos set, I stamped it using Garden Green ink on the front of the die cut grass piece
I used the splotchy stamp from the Dinos set and stamped it using Garden Green ink on white cardstock, then cropped the two pieces of the egg
I outlined the egg using a black Stamping Write maker so it would pop off the background
Next, I used black ink to stamp both the outside and inside sentiments
The sentiment I used for the inside is actually two stamps: Roar means/in dinosaur is the first stamp and You’re the Best is the second
You can see how I used these sentiments using other combinations here and here
I colored all the Darling Dino pieces using the Balmy Blue, Granny Apple Green, and Garden Green blends combos
Assembly:
Unless otherwise noted, I used multipurpose liquid glue to adhere the pieces of the card together
After adhering the white cardstock pieces to each Garden Green piece of cardstock, I started layering all the other pieces
I started with the grass, then tucked the flowers in behind it
I did need to dry-fit the rest of the card pieces together before adhering them down
Once I figured out where the balloons would live, I drew black lines for the string down to the dino going down into the where the egg would be
The Garden Green balloon and the Granny Apple green balloon were adhered directly to the cardstock
Add a dimensional to the Balmy Blue balloon and adhere to the white cardstock
Adhere the splotched egg to the dinosaur, then add dimensionals to the combined pieces and adhere to the white cardstock
Add dimensionals to the cropped sentiment banner and add to the top of the white cardstock
I had the rock stamp already cropped out and decided to add another flower and the top of the egg to the inside corner of the white cardstock
With that, I’d finished this coordinated card, envelope, and envelope seal set.
If you like the idea of quick and easy cards but don’t know where to start, try our KITS COLLECTION!
Here are three examples of the all-inclusive kits available now!
First, this PAINTED WISHES KIT retails for $14.00 (USD) and contains enough supplies to create NINE cards!
The second kit I’m showcasing is the ALPINE AIR KIT which retails for $22.00 (USD) and it also contains enough supplies for NINE cards! I’ve already posted some cards I’ve made using this kit, which you can see here.
Finally, this BY YOUR SIDE KIT retails for $22.00 (USD) and contains enough supplies for EIGHT cards. I love this kit and have posted cards using it which you can see here, here and here.
If you live in the U.S. and don’t already have a Stampin’ UP! demo from whom you order, I would be honored to work with you.
When ordering, please enter the following HOST CODE when prompted:
The Garden Green base measures 8-1/2 by 5-1/2 inches, scored at 2-1/8 and 4-1/4 inches.
After dry-embossing a piece of Garden Green cardstock using the Timeworn Type 3D embossing folder, trim it to 4-1/8 by 5-3/8 inches. Burnish the fold lines using a bone folder.
HINT: Before you adhere this piece of embossed cardstock down, make sure the lettering is right-side up. It’s faint, but will be noticeable if you get it upside down. Trust me.
The pink and white daisy DSP (designer series paper) from the Fresh as a Daisy DSP is part of a 4 x 12 inch strip of one of the DSP pages. When trimmed, it measures 4 by 3-1/4 inches.
The Crushed Curry DSP for the front measures 5-3/8 by 2 inches. Trim another piece of this DSP to 6 by 2-1/2 inches for the envelope flap.
Punch a 1-inch circle using a scrap of the Garden Green 6 x 6 inch DSP for the envelope seal and run it through your XYRON create-a-sticker machine.
Trim a piece of white cardstock to 4 by 5-1/4 inches for the inside of the card.
Cropping, & Stamping, & Assembly:
Amazingly, I didn’t use any dimensionals on this card. Therefore, all the pieces are adhered using multipurpose liquid glue.
When you burnish your Garden Green cardstock base, do so to create a mountain fold. In other words, burnish so that the fold turns inward towards the inside.
Adhere the dry-embossed cardstock to the center of the front of the base.
Adhere the Crushed Curry DSP following the TSOT #644 challenge banner as a guide.
Next, adhere the Bubble Bath daisy DSP to the front layers.
I used leftover pieces of Garden Green and white cardstock to crop out the two layers of daisies and the sentiment banner.
Crop the two layers of the daisy from the Cheerful Daisy die set. I outlined both pieces using a Crushed Curry marker just to give the layers a bit of dimension.
I used the Crushed Curry inkpad and a blending brush to very lightly blend a center on each daisy piece. This is optional since the majority of it will be covered by the sentiment.
Using your embossing buddy from the embossing additions tool kit, rub down your leftover piece of Garden Green cardstock.
Stamp the sentiment from the Happy & Heartfelt stamp set using VersaMark ink.
Add white embossing powder and heat set using your heat tool.
Crop the sentiment using the second smallest Countryside Corners die set.
I outlined the sentiment piece using a Garden Green marker. It’s barely noticeable, but it finishes off the banner.
Stamp the inside sentiment in Garden Green ink.
Adhere the white cardstock to the inside of the card.
With that, you’ve created this coordinated card, envelope, and envelope seal set.
Welcome back to another bi-weekly Make My Monday challenge! Our host for #214, Debbie, chose wreaths for the theme this week. When you finish here, I hope you will visit the challenge site to see the projects by each of the other design team members. We’d love to see your wreath creations in our gallery!
Here’s my fun fold wreath card:
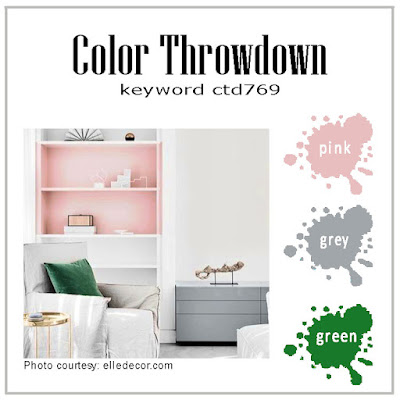
I realized that I don’t really have any stamp sets with Christmas wreaths, so I had to make my own. Once I knew this card was going to be a labor of love, I thought I needed to make it a fun fold to go all out. Full credit for this fun fold goes to Connie Stewart of Simply Simple Stamping. You can find her video here. I used the colors from the Color Throwdown 769 challenge, as shown below. I’m also entering it in the Creative Creases #70 challenge. The DSP, colors, and ribbon I used are retired, but I love the set and haven’t been able to bring myself to sell it.
Can I just say that I’m pretty stinking pleased that I “almost” figured out how to use columns in my post?
Measurements:
Follow the directions in Connie Stewart’s video (link above) to create the base of the card. I used Mint Macaron for the base.
The pink snowflake DSP (designer series paper) on the front measures 4-1/8 by 5-3/8 inches.
I also trimmed a piece of this DSP to 6 by 2-1/2 inches for the envelope flap. Then, I punched a 1-inch circle of coordinating DSP for the envelope seal, which I ran through my XYRON create-a-sticker.
The two pieces of white cardstock on the inside flaps each measure 4 by 5-1/4 inches.
Stamping, Coloring, & Cropping:
Front:
Thankfully, I used many scraps for all the holly & berry pieces, along with the trees on the inside.
First, I stamped more than 20 holly & berry pieces using Smoky Slate ink.
Then, I added clear Wink of Stella to all the flourish pieces.
Next, I colored them using the Mint Macaron blends combo and a Blushing Bride Stamping Write Marker.
Before cropping them all out, I outlined the berries and holly using a Smoky Slate marker.
For the base of the wreath, I used two of the Stylish Shapes circles and Mossy Meadow cardstock to create a ring.
Next, I wiped down a piece of white cardstock using my embossing buddy.
Stamp the sentiment using VersaMark ink and cover with silver embossing powder.
Heat set with your heat tool and crop using the inner Stylish Shapes circle.
Use some tear & tape to adhere the sentiment circle to the back of the Mossy Meadow ring.
Adhere the first layer of holly & berry pieces to the Mossy Meadow ring using multipurpose liquid glue.
Add the second layer of holly & berry pieces using mini-dimensionals.
Adhere the ring to the front of the card using liquid glue.
Create a bow using Mint Macaron ribbon and adhere with a mini glue dot.
Inside Panels:
Stamp the ornaments and inside sentiments using Smoky Slate ink.
I colored the ornaments with the Mint Macaron blends combo and Wink of Stella clear.
I stamped the last inside sentiment using Smoky Slate ink,
I cropped the trees from white cardstock. Then, I used a blending brush and Blushing Bride ink to lightly color the trees.
I had an “oops” when I stamped the sentiment, so I simply stamped it again and cropped it with a Stylish Shape circle.
I used liquid glue to adhere the trees, sentiment, and lone holly & berry piece on the inside panels.
Stamp the three lower trees using Mint Macaron ink. Add dots of Blushing Bride using a Stamping Write marker.
With that, I’d finished this labor of love coordinated card, envelope, and envelope seal set.
Welcome to my post for the cutest little monkey just swinging by to say hi. i must admit, while not difficult, this card did evolve. Connie Stewart’s video showed me how to create the card and how to mask off the Countryside Corners stamp. You can find her video here. I’ve already created a card using this fun fold for my husband, and you can find the link here. When my husband got this card in the mail, he thought it was an easel card and it looks create standing that way. Therefore, I decided to purposely do that for this monkey card.
I used Berry Burst, Granny Apple Green, and Flirty Flamingo to meet the generic colors of this challenge. In addition, I added Early Espresso and Crumb Cake for the neutrals.
Measurements:
Connie’s video has all the necessary measurements for the flap part of the card.
I needed some Flirty Flamingo on the front of the card, so I trimmed a piece of the 6 x 6 DSP to 3/4 by 5-3/8 inches.
After I finished the Gone Fishing card for my husband, I found that the card would lay flatter if I trimmed less than 1/8 of an inch off the front flap. It’s not even noticeable, but it does help with the bulk of the card.
The plain Berry Burst cardstock on the front looked too blah. So, I ran a piece of Berry Burst cardstock through my Cut & Emboss machine using one of the Basics embossing folders. Then, I trimmed the embossed piece to 4-1/4 by 5-3/8 inches.
These folders are online exclusives, and the link will be below with the rest of the products used on this project.
I trimmed another piece of 6 x 6 Flirty Flamingo DSP to 4-1/4 by 5-3/8 inches for the top of the inside flap.
I cropped three pieces of Basic White cardstock using the largest Countryside die. Since I used blends combos to color the front flap, I needed to add another piece of cardstock to the back to cover the ugly back. To cut down on bulk, I trimmed the back die cut to a length of 4 inches.
Stamping, Coloring, and Gluing:
This adorable monkey can be fussy cut, but I decided to try cutting it out using my Scan & Cut. I wasn’t sure how much I would actually use it so I got it for a steal on Facebook Marketplace. I am still a novice and learning as I go. There are a couple of things I found out with this monkey:
After stamping the monkey using Early Espresso ink, I needed to outline it with an Early Espresso Stamping Write Marker. There are parts that just don’t get recognized at all for some strange and unknown (to me) reason.
Stamp, outline, and cut twice as many as you think you will need, at least if you are a novice.
Don’t be surprised if you have to go back and outline the monkey again.
Thankfully, the curly tail cuts fairly well if it’s outlined enough.
I used Early Espresso to stamp all the leaves, branches, sentiments, and the Countryside borders.
Then, I colored the leaves with the Granny Apple Green blends combos.
The monkey is a combination of the dark and light Crumb Cake blends.
Finally, I added pink to the cheeks and ears using SU1000 pink-ish blend.
I didn’t add any dimensions because there was already so many layers. This card will definitely need extra postage. In the U.S., two Forever stamps will cover it.
I used the multipurpose liquid glue to adhere everything together.
Finally, I added a small Velcro dot to the flap to help hold it down. When the card is open to it’s easel form, the Velcro dot won’t even show.
It sounds much more complicated than it actually was to create this card. Connie Stewart’s video explains how to do everything. I love her videos because they are meant for quickly created cards.
Welcome to Just Peachy Stamping! I feel like it’s been forever since I’ve participated in a challenge for which I am not on the design team. I just got this truly funny stamp and die bundle the other day and HAD to start playing with it right away! I am so stinking thrilled that I was able to combine these two challenges and come up with one card.
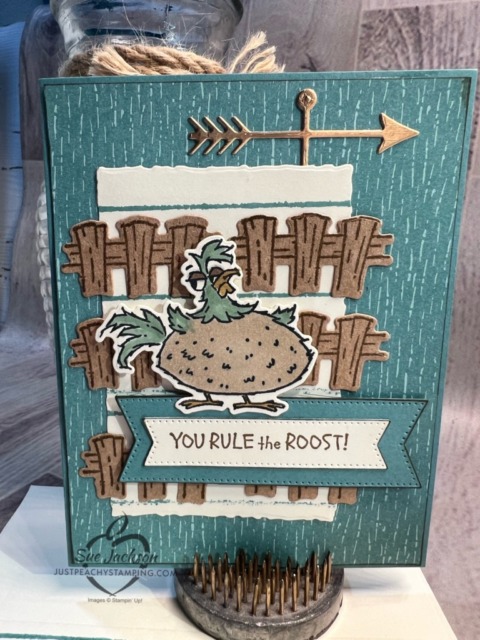
Here’s my Hey Chuck card:
Here are the two challenge banners:
Measurements:
Trim a piece of Lost Lagoon cardstock to 5-1/2 by 8-1/2 inches. Score it at 4-1/4 inches.
The background DSP comes from the Inked Botanicals 6 x 6″ DSP pack. Trim it to 4-1/8 by 5-3/8 inches.
Trim another piece to 1/2 by 4 inches for the inside of the card.
Punch a 1-inch circle for the envelope seal and run it through your XYRON createasticker.
Trim a piece of Very Vanilla to 4 by 5-1/4 inches for the inside of the card.
I cropped the two sentiment banners from Very Vanilla and Lost Lagoon leftovers (read: scraps).
Crop a piece of Very Vanilla cardstock using one of the Deckled Rectangle dies. Mine measures 3-7/8 by 2-1/2 inches.
Stamping and Assembly:
Stamp Chuck onto Very Vanilla cardstock using Momento Tuxedo Black ink. This ink will allow you to color using the blends marker combos.
Stamp the fence piece 6 times onto Crumb Cake cardstock using Sort Suede ink.
Outline the background DSP using a Soft Suede marker.
Stamp the sentiment onto a piece of leftover Very Vanilla cardstock using Soft Suede ink.
Using the same ink, stamp the inside sentiment on the inside piece of Very Vanilla cardstock.
The ink for Chuck should be completely dry by now, so he can be colored. I used the Crumb Cake and Lost Lagoon blends combo sets.
Chuck needed his eyelids to stand out, so I used a Soft Suede marker to color them.
Next, I used a gold Wink of Stella pen to color Chuck’s beak and feet.
I cropped all the pieces at the same time, including the gold foil weather vane.
Outline both banners for the sentiment using the Soft Suede marker.
For the Lost Lagoon lines, I used the long edge of the “H” acrylic block. I stamped the edge in the Lost Lagoon ink and then stamped the double lines in rows on the cropped Very Vanilla. Jackie Beers of Blue Line Stamping first posted a card using this technique and I just fell in love with the idea. Thank you, Jackie! Please visit her site because she is an amazingly inspiring artist!
I added dimensionals under Chuck and the Lost Lagoon piece of the sentiment banner. Everything else was adhered using multipurpose liquid glue.
Add the 1/2 by 4-1/8 inch strip of DSP to the bottom of the inside card panel.
Adhere the inside panel using liquid glue.
Instead of using DSP on the envelope flap, I repeated the double lines using the “H” acrylic block.
With that, I’d finished this coordinated card, envelope, and envelope seal set.
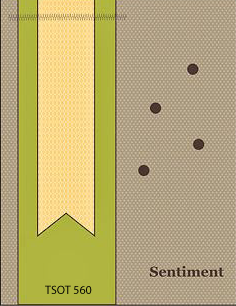
Hello, and welcome to my card for the Color Throwdown Challenge # 698. I missed the deadline for the layout, CASe’d from the Try Stampin on Tuesday #560 challenge while I was at our annual family beach week.
Here’s my all-occasion card:
Here are the challenge banners from which I drew my inspiration:
I used Poppy Parade, Petal Pink, Crushed Curry, and Old Olive to play along with the #ctd698 challenge.
What I Did:
For this short and sweet blog post, here’s how I put it together:
The Poppy Parade base measures 8-1/2 by 5-1/2 inches, scored at 4-1/4 inches.
I already had an embossed piece of white cardstock. All I had to do was trim it down to 4-1/8 by 5-3/8 inches.
All three DSP patterns come from the Flowering Fields DSP, which retires on June 30,2022 at midnight. It’s a gorgeous DSP pack and well worth looking at it in the January – June mini-catalog on page 15. It’s actually on sale for $8.05. Here’s a look at this gorgeous paper:
The background DSP measures 4 by 5-1/4 inches. In order to have this DSP pop off the white embossed background, I used the Poppy Parade Stamping Write Marker to outline it.
The Old Olive checked DSP strip measures 5-1/4 by 1-3/4 inches.
The tulip banner measures 1-5/8 inches wide.
The sentiment comes from the Special Moments stamp set. I stamped it in black and quickly added clear embossing powder to the wet ink. Then, I heat embossed it using my heat tool. I didn’t want to cover any of the DSP and I thought the heat embossing would help the sentiment stand out.
I used multipurpose liquid glue to adhere the layers, except for the banner. That’s popped up on dimensionals.
Finally, I added five Crushed Curry dots to the front surrounding the sentiment.
That’s it. Actually, working out the measurements took longer than putting the card together.
Without further ado, I need to get this post closed out and published so I make the ctd#698 deadline. Come back tomorrow morning to check out my four-fer card using the Sale-a-Bration Hippest Hippos stamps and dies!
Welcome to Just Peachy Stamping by Sue Jackson: an independent Stampin' Up demonstrator.
Through Stampin' Up!, I happily share my love of papercrafting through sales, classes, small stamping group meet-ups and workshops. I think that being a teacher in my "real life", I have a unique approach to sharing my fantastic hobby. I look forward to connecting with you!