Welcome to InKing Royalty’s February Blog Hop! This is a great time of year to build your stash of handmade birthday cards, so we are sharing birthday-themed projects with you today. We are excited to share our creations and hope you love them! After you read my post, I hope you’ll hop over to the next person on the list at the base of this post.
Here’s my Artfully Layered birthday card:
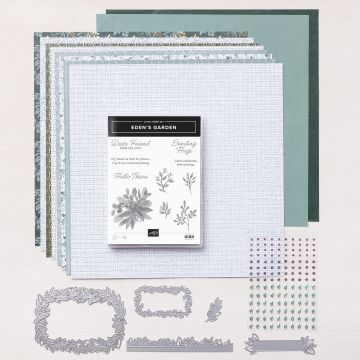
This DSP (designer series paper) has quickly become one of my go-to set of papers. The colors are spectacular! Take a look:
I used two of the patterns for my blog hop birthday card.
The landscape layout of the card was inspired by the Sunday Stamps challenge, SSC276, sketch for this week.
Measurements:
The Old Olive base measures 4-1/4 inches by 11 inches, scored at 5-1/2 inches.
In order to stay in line with the sketch while adding texture, I added a layer of Old Olive cardstock. Since the Bark 3D embossing folder will leave such a deep imprint, I didn’t trim the cardstock to 4-1/8 inches by 5-3/8 inches until after I embossed it.
Next, I trimmed two pieces of the DSP for the slanted pieces of the card. Each piece measures ————
While I had the DSP handy, I trimmed a piece to 6 inches by 2-1/2inches for the envelope flap.
The white cardstock panel on the inside measures 4 inches by 5-1/4 inches.
I used a scrap piece of white cardstock for the sentiment tag.
Assembly:
After embossing the Old Olive layer, I popped it up on dimensionals and adhered it to the base.
Next, I placed each layer of DSP on opposite slants and adhered them with multipurpose glue.
Using the Biggest Wish stamp set, I stamped “happy” using Mango Melody and then “birthday” using Just Jade. Mango Melody is part of the background design on the DSP.
Then I cropped out the sentiment using the second largest die from the Tailor-Made die set.
Since there are Evening Evergreen leafy branches in the DSP, I used the Evening Evergreen open weave ribbon for the tag accessory.
The sentiment tag is popped up on dimensionals and then I adhered it to the front of the card.
Now, all I needed to do was stamp the sentiment on the inside and adhere it to the inside of the card using multipurpose glue.
Finally, I trimmed the DSP on the envelope flap, punched the seal and ran it through the XYRON create-a-sticker. With that, I’d finished this coordinated card, envelope, and seal set.
Back to the InKing Royalty Blog Hop:
Thank you for stopping by today. I hope you’ll hop along to the next stop on the blog hop, Jackie Beers from Blue Line Stamping. There’s lots of inspiration to be found in this group – and you don’t want to miss it
Thank you for hopping along with us. If you get stuck during the Blog Hop, please use this line-up as a guide:
While the new mini catalog and the Sale-a-Bration catalog are both packed with great products, here are some of my personal favorites.
Do you live in the U.S. and need a demonstrator? If so, I’d love to talk to you!
Do You Want to Place an Order?
Of course you do!
If you are ordering less than $150.00, please use the host code shown. If you are ordering more than $150.00, please contact me first so you can get your stamping rewards! Any order over $50 will earn a little surprise from me.
The HOST CODE through February 28, 2022 is XPS7HK9N.
Again, thank you for stopping by my blog today! I appreciate your comments and your time.
Welcome to InKing Royalty’s January Blog Hop! We are having so much fun with our new Sale-a-Bration products and are excited to share some of that fun with you today. This month’s projects feature papers or stamp sets (or both!) from Stampin’ Up!’s January – February 2022 Sale-a-Bration (SAB) brochure!
Here’s my card, which features both a SAB stamp set and a 6 x 6 inch DSP pack:
Measurements:
I used Balmy Blue for the base, which measures 4-1/4 inches by 11 inches, scored at 5-1/2 inches to create a tent card.
The black mat for the front of the card measures 4-1/8 inches by 5-3/8 inches.
The Simply Marbleous DSP (designer series paper) measured 4 inches by 5-1/8 inches. Then, I cut it in half, which left the blackcardstock showing in the middle. I also trimmed a piece of the DSP to 6 inches by 2-1/2 inches for the envelope flap, which I adhered and trimmed right away.
I used the stitched rectangle measuring 2-7/8 inches by 3-1/8 inches. However, I stamped and colored the adorable otter before cropping it out.
The black mat under the otter/sentiment rectangle measures 3 inches by 3-1/4 inches.
The white cardstock panel for the inside measures 4 inches by 5-1/4 inches.
I decided to use the reverse side of the DSP for a strip along the bottom of the inside. It measures 4 inches by 1/2 inch.
Both birthday hats were stamped onto scraps of the same DSP as the front of the card.
What I Did:
The Awesome Otters SAB stamp set is just that – awesome! There are three otters in the stamp set and each one is so stinking cute! I’ve already made a card using this DSP and stamp set and you can find that card here
I used the Momento Tuxedo Black ink pad to stamp all the images and sentiments. This ink allowed me to use blends to color in the images.
Both otters’ bellies have been colored with the light and dark Crumb Cake blends.
Then, I used the light and dark Soft Suede to color the rest of the otters.
The water, balloon on the inside, and the cute birthday hats were colored using the light and dark Balmy Blue blends.
Creating the Inside:
I can’t begin to tell you how stinking pleased I am with the way the inside of the card came together. The balloon comes from the Mischievous Mice stamp set found in the January-June mini catalog. Since both stamp sets are cling stamps, there’s no easy way I could’ve gotten the balloon and the otter’s hand to line up without the Stamparatus.
I used both plates for the Stamparatus; the balloon stamp was on one plate and the otter on the second plate.
I was able to practice the placement of the stamps on a piece of the Stamparatus sized grid paper.
Once I had both stamps lined up correctly, I stamped the otter and then the balloon. Instead of trying to mask off the rest of the balloon stamp, I used the black Stampin’ Write Marker to color just the parts of the balloon I wanted to use.
After coloring the otter and the balloon, I used the tuxedo black ink pad to stamp the sentiment.
Then, I fussy cut both balloons and adhered one to the otter on the front and the second one on the otter on the inside of the card.
Finally, I adhered the DSP strip on the bottom of the cardstock.
After I’d finished the inside and outside of the card, I punched a 1 inch circle for the seal. As always, I ran it through the XYRON create-a-sticker.
With that, I’d finished this coordinated card, envelope, and seal set.
Back to the InKing Royalty Blog Hop:
We are Thank you for stopping by today. I hope you’ll hop along to the next stop on the blog hop, Renae Novak at Blessed by Cards There’s lots of inspiration to be found in this group – and you don’t want to miss it!
Welcome to InKing Royalty’s December Blog Hop! During this year’s blog hops, we are having fun with our stamping favorites – our favorite themes for seasonal cards and projects. This month’s projects are all about party fun – festive gatherings like New Year’s, birthdays and other fun times. How fun! We are excited to share our creations with you today! After you read my post, I hope you’ll hop over to the next person on the list at the base of this post.
First and foremost – a great big HAPPY BIRTHDAY to our fearless leader, Brian King! My party card for this blog hop just happens to be for a very special birthday!
Here’s my card:
I’ve already posted cards made with the layering diorama dies and you can see one of those posts here. For that post, I created a faux shaker card, but did include multiple pictures of hos I layered the diorama die cuts. The Party Puffin card has three layers: white is adhered directly to the DSP, the Granny Apple Green is popped up on dimensionals, as is the Misty Moonlight layer. The double layer of dimensionals for the layering dies also means I need to use a double layer of dimensionals on the foremost puffin on the right and behind the cake.
Measurements:
While it probably would’ve been easier to create a tent fold card, I went with a side fold. Therefore, the Granny Apple Green base measures 11 inches by 4-1/4 inches, scored at 5-1/2 inches.
The piece of white cardstock for the back layering diorama mat measured 4 inches by 5-1/4 inches. I trimmed another piece of white cardstock to the same measurements for the inside of the card.
The Granny Apple Green cardstock measures 4 inches by 5-1/4 inches. The Misty Moonlight top layer measures 4-1/8 inches by 5-3/8 inches. Originally, I thought about using an embossing folder to give the Misty Moonlight cardstock some texture. Then, I decided I’d just randomly stamp the trio of candles on it instead. I did stamp off each time I stamped so the candles wouldn’t be too dark.
This Pattern Party Host 12 x 12″ DSP (designer series paper) stack is full of fun colors and patterns. Not into so much color? The reverse side of each of the 48 (yes, 48!!) sheets is black and white. All of those patterns are fabulous as well. Anyway, I trimmed the piece for the front of the card to 4-1/8 inches to 5-3/8 inches. I used a piece trimmed to 6 inches by 2-1/2 inches for the envelope flap.
What Else I Did:
I used quite a number of dimensionals on this card. Not as many as on the shaker card for which I included the link above, but dimensionals definitely hold this card together.
After stamping the puffins and the cake in Momento Tuxedo black, I fussy cut each piece. I’m getting better and a bit faster at fussy cutting. If you are left-handed, you understand why this is a big deal.
Since Pale Papaya is a color in the DSP, I decided to use the blends combo for the beak and feet of the puffins. I used the light Smoky Slate blend for the beak as well. I decided to color the candle flames in Pale Papaya as well
Then, I used the bullet end of the Granny Apple Green and Misty Moonlight blends for the cake and the party hat.
I stamped the sentiments for both the inside and the outside in Misty Moonlight. The outside sentiment is cropped using the rectangle stitched dies.
Since I thought some additional color was needed on the inside, I stamped 3 fishes around the sentiment. Even though the fish have a bow, somehow I thought it would be creepy to have the fish for a present for the birthday puffin.
Finishing Up:
After I had everything together and adhered, I wanted something else, but knew I needed something subtle. So, I used the fine tip glue pen to color the Misty Moonlight semi-circles and the Granny Apple Green part of the birthday hat. I couldn’t just stop and leave the cake alone and naked, so I all use the glue pen on the colored parts of the cake.
HINT: Make sure you allow the glue to completely dry before you try to move the card. I’ve been impatient with that before and it didn’t work well. Here’s a close-up of the DIY epoxy dots I created (thanks to Brian King’s fabulous idea!).
Finally, I trimmed the DSP on the envelope flap and punched a 1 inch circle to run through the XYRON create-a-sticker for the envelope seal. With that, I’d finished this very layered card, envelope, and seal coordinated set.
Thank you for stopping by today. I hope you’ll hop along to the next stop on the blog hop, Jackie Beers at Blue Line Stamping There’s lots of inspiration to be found in this group – and you don’t want to miss it!
Thank you for hopping along with us. If you get stuck during the Blog Hop, please use this line-up as a guide:
This suite is gorgeous and #1 on my next order! However, you can purchase it now! Look at all the wonderful products in the suite collection!
Do you live in the U.S. and need a demonstrator? If so, I’d love to talk to you!
Do You Want to Place an Order?
Of course you do!
If you are ordering less than $150.00, please use the host code shown. If you are ordering more than $150.00, please contact me first so you can get your stamping rewards! Any order over $50 will earn a little surprise from me.
The HOST CODE through December 31, 2021 is K4HSXP94.
Again, thank you for stopping by my blog today! I appreciate your comments and your time.
Welcome to InKing Royalty’s November Blog Hop! During this year’s blog hops, we are having fun with our stamping favorites – our favorite themes for seasonal cards and projects. This month’s projects feature pretty packages and beautiful tags to inspire your holiday gift-giving. We are excited to share our creations with you today! After you read my post, I hope you’ll hop over to the next person on the list at the base of this post.
I wound up making a couple of cards and a tag with the Whimsy and Wonder DSP (designer series paper). The patterns I picked either have gorgeous presents or beautiful holly leaves. Since I am all about non-traditional Christmas colors, this DSP is perfect for me. I actually think I am going to have to order another pack at the rate that I am using it.
Here are my projects:
The inspiration for the fun fold card below came from Jackie Beers’ post, which you can see here..
The inspiration for the following card came from the Try Stamping on Tuesday challenge. Even though I went a little bit overboard, you can see the sketch in my card.
Measurements:
Fun Fold Card:
Fun Fold:
If you hop over to Jackie’s post for the fun fold. you will see her absolutely wonderful card AND get the measurements. Really, you want to see her card!
HINT: The first time I made one of these cards I put all the DSP strips on mats. Don’t do that. Trust me. The card will be too thick and will be very difficult to keep it closed when needed.
Tag:
Both the top and bottom tag pieces measure 4-1/4 inches by 1-7/8 inches. Thankfully, I have the tag topper punch, which made creating these tag pieces super easy.
I stamped the sentiment using Misty Moonlight on a piece of scrap white cardstock, then cropped it with a Stitched So Sweetly die.
I just cut a length of Blushing Bride ribbon to what I thought would be a good size and threaded it through both tags. Then, instead of tying a knot, I wrapped a piece of linen thread around the ribbon to tie it off. The linen thread picks up the color from the Crumb Cake presents.
The top and bottom layers of the tag are offset because I wanted to have both beautiful pieces showing. I adhered them in place with a dot of glue and the dimensionals under the sentiment die cut.
That’s it. Beautiful, but oh, so easy.
My Mistake:
I made a mistake right at the start because I adhered the embossed piece of Blushing Bride cardstock to the base with dimensionals first. I should’ve done that after I had the rest of the front put together. The popped up layer of cardstock made it a tad more concerning because I didn’t want to crush the embossing.
Try Stampin’ on Tuesday #532 card:
The Blushing Bride base measures 5-1/2 inches by 8-1/2 inches, scored at 4-1/2 inches.
I trimmed another piece of Blushing Bride to 4-1/4 by 5-1/2 so I could run it through the Wintry 3D embossing folder. Since the snowflakes folder is also good for the mini cut and emboss machine, I did have to run it through the machine twice to get the whole piece embossed. Then, I trimmed it down to 5-1/4 by 4 inches.
HINT: When using the 3D embossing folders, remember to start with a piece of cardstock that’s bigger than what you need. If you trim it first, then emboss it, the cardstock will be too small because of the depth of the embossing details.
The pretty presents DSP pattern measures 3-1/8 inches by 4-1/2 inches. I also trimmed a piece to 6 inches by 2-1/2 inches for the envelope flap. The Misty Moonlight mat measures 3-1/4 by 4-5/8 inches.
The snowflake DSP measures 1-7/8 by 4-3/8 inches and the mat measures 2inches by 4-1/2 inches
Again, I just cut off a length of ribbon and folded it in half to go behind the sentiment panel. I used my favorite Christmas stamp from Perfectly Plaid in Misty Moonlight. Then, I cropped it with the same Stitched So Sweetly die as the tag.
Time to put everything together.
The challenge sketch called for a tab between the two pieces of DSP. Instead, I chose to use one of the Wonderful Snowflakes from the Whimsy and Wonder Suite Collection. I am extremely thankful that I bought the whole collection since I got 10% off the bundle. The best part about these snowflakes is that they have a mat finish on the reverse side so you can color them with the Stampin’ Blends. Score!
Putting It Together:
I put dimensionals under the top, embossed layer of Blushing Bride cardstock.
The two DSP panels and the snowflake are adhered with multipurpose glue.
After folding the ribbon in half and tying it off with a piece of linen thread, I adhered the piece that would be behind the sentiment with tear-and-tape.
The sentiment has dimensionals under it.
HINT: Be careful of the placement of the dimensionals because you don’t want them to sit on top of the ribbon. The sentiment panel wouldn’t lay correctly if the dimensionals are on top of the ribbon.
Here’s a look at the inside of the card:
I used a sentiment from Whimsical Trees and a snowflake stamp from Merry Snowflakes.
Finally, I punched a 1 inch circle out of the snowflakes DSP and rang it through the XYRON create-a-sticker.
With that, I had completed this coordinated card/envelope/seal card set.
I hope you try it. The card looks complicated, but the looks are deceiving. You don’t have to tell anyone how it all came together in much less time than it took me to type out the directions. That will be our secret!
Thanks for stopping by my blog today!
Thank you for stopping by today. I hope you’ll hop along to the next stop on the blog hop, Robin Myren at Songbird Designs by Robin. There’s lots of inspiration to be found in this group – and you don’t want to miss it!
PPSSTTTTT….. Did you notice that the cardstock and Stitched So Sweetly dies are on sale? For the SEASONAL SALE, cardstock is 10% off, die sets are 20% off, and ink pads are 15% off!! Winner-winner!
Basic Crafting Supplies:
Do you live in the U.S. and need a demonstrator? If so, I’d love to talk to you!
Do You Want to Place an Order?
Of course you do!
If you are ordering less than $150.00, please use the host code shown. If you are ordering more than $150.00, please contact me first so you can get your stamping rewards! Any order over $50 will earn a little surprise from me.
BUT WAIT ——– There’s more!!!
Check out the JOINING INCENTIVE for November!!
You chose up to $125 worth of ANY current crafting products that you want to come in your starter kit… for only $99$75 in November! Plus shipping is FREE!
Welcome to InKing Royalty’s September Blog Hop! During this year’s blog hops, we are having fun with our stamping favorites – our favorite themes for seasonal cards and projects. This month’s projects feature candy and treats, so prepare your sweet tooth for some wonderful inspiration. We are excited to share our creations with you today! After you read my post, I hope you’ll hop over to the next person on the list at the base of this post.
When I think of candy and treats in the fall, my mind automatically goes to “trick or treat”, so that’s what I did for this blog hop. Then, I decided to make a fun fold card for this blog hop. But then I kept going and adding things and couldn’t stop. Therefore, I made a much, much simpler version of the card. First, the quick card, then the fun fold. I can’t go back and change the title of this post because of the blog hop, but I forgot to include the challenges for which these cards qualify. The first one will be entered into Try Stamping on Tuesday.
Here are the challenge banners for the Double Trouble and Creative Creases challenges:
Like I said, I just couldn’t stop!
Measurements:
Both cards:
The Basic Black card base for each card measures 5-1/2 inches by 8-1/2 inches. I scored the regular card at 4-1/4 inches, creating a tent fold.
The Old Olive mat for the front of each card measures 4-1/8 inches by 5-3/8 inches.
For me, it seemed easier to use a full size sheet of the dotted DSP over the Old Olive mat. These dotted DSP pieces each measure 4 inches by 5-1/4 inches.
The bottom half of the front of each card is actually another piece of DSP from the Halloween 6 x 6 inch DSP. Each of the black DSP pieces measures 4 inches by 2-1/4 inches.
Using the punch from the Cutest Halloween bundle, I punched out two each of the cat, ghost, and pumpkin.
The front sentiment for each card comes from the Cutest Halloween stamp set. I cropped it using a die from the Seasonal Labels die set.
In order to make the sentiment panel stand out from the dotted DSP, I outlined each with the Highland Heather Stamping Write marker.
The black hats were cropped from the Frightfully Cute die set. I used the gold Wink of Stella pen to highlight the band and little embossed pieces.
I used scraps of Old Olive, Flirty Flamingo and Highland Heather to crop two circles of each color using the layering circles die set. Then, I ran them all through my (new) Cut and Emboss Machine in the bark 3D embossing folder. The cute little trio of the cat, ghost, and pumpkin have dimensionals under them..
I used the black and white gingham ribbon on both cards.
I trimmed two pieces of coordinating DSP to 6 inches by 2-1/2 inches for the envelope flaps.
Regular card:
For the regular card, the white inside panel measures 4 inches by 5-1/4 inches.
I stamped the two sentiments, again from Cutest Halloween, using the Momento Tuxedo Black ink..
Then, I stamped those adorable spiders in the bottom corners. Finally, I added three of the Cute Stars adhesive backed sequins to the inside surrounding the sentiments. Easy peasy.
Fun Fold Card:
This card is an example of what happens when I just can’t stop adding elements.
In addition to the scored fold at 4-1/4 inches, I scored the black base again at 2-1/8 inches to create the easel.
The Old Olive mat on the front of the card only gets adhered only to the bottom half of the easel fold.
I did add another piece of the polka dot DSP measuring 2 inches by 5-3/8 inches to the back of the easel
The Old Olive mat for the inside measures 4-1/8 inches by 5-3/8 inches.
I used scraps of black to crop the fence and trees using the Frightfully Cute bundle dies.
cropping them the owls from white cardstock, I used the blending brushes and Smoky Slate ink to color them. Next, I colored the tiny specks of white for the eyes using the gold Wink of Stella.. In order to make the eyes really pop, I added clear epoxy shapes to each eye.
I adhered the fence pieces and the trees using multipurpose liquid glue. The owls have dimensionals under them. The owls are out of proportion from the fence and trees, but they are so stinking cute that I had to use them anyway.
The white sentiment panel on the inside measures 2-1/4 inches by 2-3/4 inches. I cropped it using a stitched square die. This panel needs to be popped up using a layer of dimensionals.
HINT: Since you will be adding a comment and signature, make sure you use a bunch of dimensionals.
I used the same sentiments and spider stamp as the regular card. As an afterthought, I just added a Pumpkin Pie cute star to each of the other three corners.
That’s it for the fun fold.
Final Thoughts:
While these cards look like they took a lot of time, they really didn’t. I had all my cutting, cropping, punching, and stamping done before I started. Once I figured out the elements, the rest fell into place.
HINT: When creating more than one of any card, it is much, much easier to do all the prep work before you start actually creating the card. Trust me, I know this from experience.
Back to the InKing Royalty Blog Hop:
Thank you for stopping by today. I hope you’ll hop along to the next stop on the blog hop,
What’s better than getting a delivery from Stampin’ Up!? Getting a delivery with FREE products inside the box! When I joined Stampin’ Up! as a demo, I joined as a hobbyist. It’s been 5+ years, and I am actually a demo with a great hobby. I love the time I spend in my “blue room” (it’s actually grey and aqua) and it’s definitely my happy space. I’m thrilled that I am branching out and growing my own team.
So, if it’s always a good time to join, why is joining during the final two weeks of Sale-a-Bration an extra special deal? Because not only can you pick $125 worth of product for $99, you get free shipping and business supplies to start your new hobby/business.
On top of all the regular reasons to join Stampin’ Up!, if you join during Sale-a-Bration, which lasts two more weeks, you get to pick ANY bundle from the July – December mini-catalog. That means you can add a bundle up to the most expensive bundle for $60.25! Altogether, that’s potentially $85 in FREE PRODUCT!!! There’s no obligation to buy another product! However, the demo discount and product pre-orders are another big bonus!
Take a look at the bundles from the July – December mini-catalog!
Do you live in the U.S. and need a demonstrator? If so, I’d love to talk to you!
Do You Want to Place an Order?
Of course you do!
If you are ordering less than $150.00, please use the host code shown. If you are ordering more than $150.00, please contact me first so you can get your stamping rewards! Any order over $50 will earn a little surprise from me.
The HOST CODE through September 30, 2021 is W3N4C22K.
Again, thank you for stopping by my blog today! I appreciate your comments and your time.
Welcome to InKing Royalty’s August Blog Hop! During this year’s blog hops, we are having fun with our stamping favorites – our favorite themes for seasonal cards and projects. This month’s projects feature leaves and trees, so you are likely to find lots of inspiration for Autumn. We are excited to share our creations with you today! After you read my post, I hope you’ll hop over to the next person on the list at the base of this post.
While flipping through the catalog looking for inspiration, I came across the three cards on page 71 for simplifying or stepping up the intricacy of cards. My layout is different than the catalog, as is the stamp set I used. However, the stepped up card inspired the background on my card.
I knew I wanted to use the Beauty of the Meadow DSP (designer series paper). Florida doesn’t really have an autumn season, and I miss that dearly. So, I thought I would use one of these gorgeous prints.
Here’s the first card I created:
Here’s the second card:
Measurements for the “GRATEFUL” card:
The Merry Merlot base measures 4-1/4 inches by 11 inches, scored at 5-1/2 inches to create a tent card.
The white cardstock for the inside panel measures 5-1/4 inches by 4 inches.
I started with a 4-1/4 inches by 5-1/2 inches white panel for the front of the card. After I ran it through the Brick and Mortar 3D embossing folder, I trimmed it to 4 inches by 5-1/4 inches.
The Beauty of the Earth DSP measures 2-7/8 inches by 3-7/8 inches on the front of the card. While I had the DSP out, I trimmed a piece to 6 inches by 2-1/2 inches for the envelope flap.
I trimmed the vellum cardstock to 2-3/4 inches by 3-3/4 inches.
All my stamping and cropping using the Forever Fern stamp set and the Forever Flourishing dies was done on white cardstock. I used the “GRATEFUL” sentiment from the Sparkle of the Season stamp set.
What I Did:
TIP: Any time you are using a 3D embossing folder for a background design, you will have much more success if you use the embossing folder before trimming the cardstock down to size. The 3D folders get such a deep emboss that your final measurements will be off if you trim it first.
There are three cropped flourishes adhered with multipurpose glue on top of the embossed background. I really liked the background double layer used in the cards on page 71 of the annual catalog and wanted to use it on these cards.
I used the piece of vellum over the DSP so the colors would be muted, allowing the cropped images to stand out. Dimensionals also helped them stand out from the DSP background.
I used three of the colors in the DSP for the stamping: Bumblebee, Cinnamon Cider, and Merry Merlot.
After stamping the greeting in Merry Merlot, I cropped it using a label die from the Harvest Die set. Then I used the Merry Merlot Stamping Write Marker to outline the label. A double layer of dimensionals under the sentiment were necessary since I had to take the raised stems/leaves into consideration.
I folded a length of the linen thread in half and tied a bunny ears bow. I used a glue dot to secure it to the Cinnamon Cider leaves.
Finally, I added three Bumblebee Decorative Matte Dots to the vellum. The double dots on the bottom right corner help to balance the weight of the leaves at the top. That triangle of dots keeps the viewer’s eyes traveling across the card.
Back to the InKing Royalty Blog Hop
Thank you for stopping by today. I hope you’ll hop along to the next stop on the blog hop, Robin Myren at Songbird Designs. There’s lots of inspiration to be found in this group – and you don’t want to miss it!
Thank you for hopping along with us. If you get stuck during the Blog Hop, please use this line-up as a guide:
What’s better than getting a delivery from Stampin’ Up!? Getting a delivery with FREE products inside the box! I have a box en route right now and am hoping it’s here this afternoon when I get home from work! Check out the FREE items from the Sale-a-Bration catalog!
Sale-a-Bration FREE items with a $50 purchase:
Sale-a-Bration FREE items with a $100 purchase:
Do you live in the U.S. and need a demonstrator? If so, I’d love to talk to you!
Do You Want to Place an Order?
Of course you do!
If you are ordering less than $150.00, please use the host code shown. If you are ordering more than $150.00, please contact me first so you can get your stamping rewards! Any order over $50 will earn a little surprise from me.
The HOST CODE through August 31, 2021 is CJQW69XN.
Again, thank you for stopping by my blog today! I appreciate your comments and your time.
Welcome to Just Peachy Stamping by Sue Jackson: an independent Stampin' Up demonstrator.
Through Stampin' Up!, I happily share my love of papercrafting through sales, classes, small stamping group meet-ups and workshops. I think that being a teacher in my "real life", I have a unique approach to sharing my fantastic hobby. I look forward to connecting with you!