Welcome to InKing Royalty’s July Blog Hop! During this year’s blog hops, we are having fun with our stamping favorites – our favorite themes for seasonal cards and projects. This month’s projects feature Christmas! I hope you are in a Holiday mood because there is a lot of Christmas fun headed your way. We are excited to share our creations with you today! After you read my post, I hope you’ll hop over to the next person on the list at the base of this post.
For this blog hop, I’ve created three cards, all using the same DSP (designer series paper). The DSP and sequins used come from the new MINI-CATALOG going live on August 3, 2021. If you don’t already have a SU! demonstrator with whom you are creating, please let me know and I can help you get both the new mini-catalog and the Sale-a-Bration catalog also going live on August 3rd.
Here are my three cards:
For the beginning stamper
For the casual stamper
A shaker card for the avid stamper
Close-up of the shaker card contents.
Measurements:
My detailed directions for this hop will be for the shaker card. Believe me, it is not as difficult as it looks. Truly.
Measurements for the Beginner and Casual Stamper Cards:
The base of each measures 8-1/2 by 5-1/2, scored at 4-1/4. I used Cherry Cobbler for the beginner card and Misty Moonlight for the casual card.
The DSP, from the upcoming mini-catalog, measures 4-1/8 inches by 5-3/8 inches for each card.
The inside white cardstock panel measures 4 inches by 5-1/4 inches for all three cards.
I also trimmed a piece of the coordinating DSP for all three envelope flaps. Those pieces measure 6 inches by 2-1/2 inches.
I stamped the greeting directly on the DSP for the beginner card. For the casual card, I used the Stamparatus to ensure that I could stamp multiple times and always be in the same place. First, I stamped the sentiment in Misty Moonlight. Then, I cleaned the stamp and stamped it again using VersaMark. Next, I put some clear embossing powder on the wet VersaMark. Finally, I heat-set the embossing powder using my heat tool. I then cropped the sentiment using the stitched rectangle die set.
Next, I tied some Misty Moonlight ribbon around the card and then tied it in a bow. I wasn’t bow-challenged on the day I made the casual stamper bow.
For the casual stamper card, I attached some of the new sequins (also in the upcoming mini-catalog) using glue dots.
Measurements for the Shaker Card:
The Evening Evergreen base measures 8-1/2 inches by 5-1/2 inches, scored at 4-1/4 inches.
The DSP measures 4 inches by 5-1/4 inches.
Using the clear medium envelopes (item #102619) help you make the easiest shaker card ever!
The first thing I did was to insert the DSP into the clear envelope. I made sure that I centered the DSP in the middle of the envelope going from side to side. You also want to make sure that the DSP lines up with the bottom of the envelope so your contents stay in the front of the DSP.
Next, I turned the DSP over and folded the sides of the envelope to the back of the DSP. I did burnish the folds using my bone folder so I would get crisp edges. Tear and tape will hold the turned back sides in place.
Now for the easy-peasy fun part! Believe it or not, the crystals inside the shaker are actually …………drum roll please……….Kosher Salt. Yes, you read that correctly. Kosher Salt.
Then, I added some of the new sequins from the upcoming mini-catalog.
In order to get a strong seal on the back of the clear envelope, pull down the flap of the envelope so that it is snug, but not tight on the DSP. You do want to have a small amount of give to the clear envelope so the shaker part will work its magic. Again, I used tear and tape to seal the envelope flap to the back of the DSP.
Finishing Up:
I created the sentiment the same way I did for the Misty Moonlight card using Evening Evergreen.
Next, I tied a piece of the Evening Evergreen ribbon around the shaker part of the card and tied a bow. I didn’t have as much luck with this bow as I did with the blue one, but it still works.
Then, I popped the sentiment up on dimensionals so it would straddle the ribbon.
I also used dimensionals to attach the shaker part of the card to the front of the base of the card. Since I folded the sides and top down, I wouldn’t have been able to use my favorite multipurpose adhesive.
After adhering and trimming the DSP on the envelope flap, I punched three circles to use for envelope seals. Then, I ran them through the XYRON create-a-sticker and placed one seal in each of the three envelopes.
With that, I’d finished this trio of cards, coordinating envelopes, and envelope seals.
Back to the InKing Royalty Blog Hop
Thank you for stopping by today. I hope you’ll hop along to the next stop on the blog hop, Lynn Kolcun at Avery’s Owlery. There’s lots of inspiration to be found in this group – and you don’t want to miss it!
Thank you for hopping along with us. If you get stuck during the Blog Hop, please use this line-up as a guide:
Thank you for hopping along with us. If you get stuck during the Blog Hop, please use this line-up as a guide:
I’d love to hear what you think, and greatly appreciate every comment.
If you create your own shaker card, please post a picture of it in the comment section. It truly is much easier than it looks. Furthermore, the recipients will be astounded by your genius and creative cardmaking skills.
Peaceful Place 12 x 12 inch designer series specialty paper, item # 156394 Colors: Smoky Slate, Basic Gray, Black, Silver, White
Basic Craft Supplies:
What’s New? Since you asked, it’s the DSP SALE!
ITEM
PAGE
DESCRIPTION
PRICE
155841
130
BEAUTY OF THE EARTH 12″ X 12″ (30.5 X 30.5 CM) DESIGNER SERIES PAPER
$11.50 USD | 15.75 $ CAD $9.78 USD | 13.39 $ CAD
155696
131
BLOOM WHERE YOU’RE PLANTED 12″ X 12″ (30.5 X 30.5 CM) DESIGNER SERIES PAPER
$11.50 USD | 15.75 $ CAD $9.78 USD | 13.39 $ CAD
155499
131
HAND-PENNED 12″ X 12″ (30.5 X 30.5 CM) DESIGNER SERIES PAPER
$11.50 USD | 15.75 $ CAD $9.78 USD | 13.39 $ CAD
152494
132
IN GOOD TASTE 12″ X 12″ (30.5 X 30.5 CM) DESIGNER SERIES PAPER
$21.00 USD | 29.00 $ CAD $17.85 USD | 24.65 $ CAD
155817
132
IN THE WILD 12″ X 12″ (30.5 X 30.5 CM) DESIGNER SERIES PAPER
$11.50 USD | 15.75 $ CAD $9.78 USD | 13.39 $ CAD
155807
132
PANSY PETALS 12″ X 12″ (30.5 X 30.5 CM) DESIGNER SERIES PAPER
$11.50 USD | 15.75 $ CAD $9.78 USD | 13.39 $ CAD
155605
133
SWEET SYMMETRY 12″ X 12″ (30.5 X 30.5 CM) DESIGNER SERIES PAPER
$11.50 USD | 15.75 $ CAD $9.78 USD | 13.39 $ CAD
155718
133
TIDINGS OF CHRISTMAS 6″ X 6″ (15.2 X 15.2 CM) DESIGNER SERIES PAPER
$11.50 USD | 15.75 $ CAD $9.78 USD | 13.39 $ CAD
155686
134
YOU’RE A PEACH 12″ X 12″ (30.5 X 30.5 CM) DESIGNER SERIES PAPER
$11.50 USD | 15.75 $ CAD $9.78 USD | 13.39 $ CAD
What’s Your Favorite DSP?
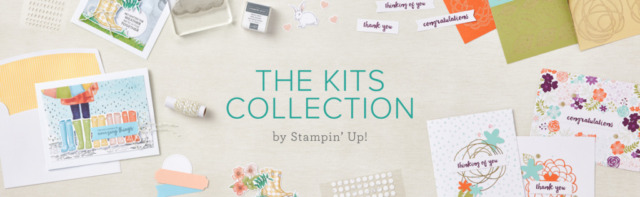
The KITS COLLECTION is available as well!
Take a look at this video explaining what you get with your kit! Remember, the kits are all inclusive! Just add some of your own crafting basic tools, and you are good to go!
Do you live in the U.S. and need a demonstrator? If so, I’d love to talk to you!
Do You Want to Place an Order?
Of course you do!
If you are ordering less than $150.00, please use the host code shown. If you are ordering more than $150.00, please contact me first so you can get your stamping rewards! Any order over $50 will earn a little surprise from me.
The HOST CODE through July 30, 2021 is 2TJSU2RQ.
Again, thank you for stopping by my blog today! I appreciate your comments and your time.
Welcome to InKing Royalty’s June Blog Hop! During this year’s blog hops, we are having fun with our stamping favorites – our favorite themes for seasonal cards and projects. This month’s projects feature stars. We are excited to share our creations with you today! After you read my post, I hope you’ll hop over to the next person on the list at the base of this post.
Here’s my card:
I can already hear you wondering if I didn’t understand the theme of the hop. I did, I just didn’t have stars on any other product except for the Nothing’s Better Than photopolymer stamp set. This is the first time I’ve used the stamp set and dies, and it was so much fun to do so! Since I don’t have any other stars, you know what that means – – time to place an order!
The Pool Party card base measures 8-1/2 inches by 5-1/2 inches. Then I scored it at 4-1/4 inches and 2-1/8 inches (2 tick marks after 2 inches on the SU! paper trimmer).
Pool Party Z strip measures 8-1/2 inches by 1-1/2 inches. I also scored it at 2-1/8 inches and 4-1/4 inches.
Next, I usedIn Good Taste DSP for each of the three panels. You need two measuring 5-3/8 inches by 2 inches. The third piece (under the white) measures 5-3/8 inches by 4 inches.
I also punched an envelope seal from the In Good Taste DSP. Then I ran the seal through my XYRON create a sticker and placed the resulting seal in the envelope.
You need three Early Espresso pieces for the Z-fold piece. Two pieces measure 1-3/8 inches by 2 inches. The third piece measures 1-3/8 inches by 4-1/8 inches (2 tick marks after the 4 inches on the SU! paper trimmer).
I also used some 6 x 6 inch Pool Party DSP for the Z-fold piece. You need 3 pieces, two of which get trimmed to 1-1/4 inches by 1-7/8 inches. The third piece measures 1-1/4 inches by 4 inches.
Next I trimmed the piece of Pool Party DSP for the envelope flap measures 6 inches by 2-1/2 inches. Since I tend to put the envelope flap cuts away, I have started adhering them to the envelope right after I trim them.
I used a very thin piece of the same DSP to fill the white space on the back panel below the Z-fold piece. However, it is completely optional.
I used white scraps for all the stamping. The back panel piece of white measures 5-1/4 by 4 inches.
Creating the Fun Fold
Quite possibly one of the easier fun folds, creating a Z-fold card doesn’t really have any complicated directions.
The most important part to remember is the actual Z-fold piece. The short end gets attached on the inside panel. The longer piece gets attached across the front of the card. However, it is very important to remember that only the place the long piece is attached is on the very front panel.
I’ve zoomed in the two places where the Z-piece needs to be attached on the following photos:
Using the Foam Adhesive Sheet
Trying to use dimensionals under “coffee” would have been next to impossible. Therefore, I used a piece of a foam adhesive sheet to pop the whole word up.
Steps to using the adhesive sheets:
Cut a piece of the adhesive sheet down to just a bit bigger than the die.
Take off the backing paper on one side of the adhesive sheet.
Attach a piece of cardstock to the adhesive sheet.
Run the adhesive sheet and attached cardstock through the cut and emboss machine. Make sure that you have the cardstock side facing UP. If you don’t, the word “coffee”, in this case, will come out backwards. Not saying I’ve done that, but just take my word for it. I learned my lesson.
Stamping
The sentiment strip for “A day without” was easy-peasy to stamp in Early Espresso on white. However, the “is like, ummm…..” and “just kidding, I have no idea.” are both on one stamp. I simply used a post-it note to mask off the parts I wanted to separate and stamped them individually. Just remember to take the mask off before stamping. You will have a mess if you don’t.
I stamped eight of the coffee cups and cropped them using the coffee cup die. Since I used Early Espresso ink, I needed to make sure I really let the ink dry before using the blends on them.
Actually, the colors of the coffee cups dictated the color scheme for the card. In the very beginning, i thought I’d use Early Espresso and Soft Succulent on Very Vanilla. When I started coloring the coffee cups using the Soft Succulent blends, I thought eww, I wouldn’t drink out of that color coffee cup. So, I changed to Early Espresso, Pool Party, and white.
I did have to use the Soft Suede blends for the brown part of the coffee cups, which worked out. I colored the inside of the cup using the dark Pool Party blend.
Finishing Up
I wanted the card to have a fun feeling to match the sentiment. Therefore, only two coffee cups are straight up and down. The others slant to create a playful, less formal feel to the card.
Finally, I thought the coffee cup on the full, back panel needed to have some steam rising out of it. I used a Crumb Cake Stampin’ Write Marker and very lightly drew five squiggly lines for steam.
After trimming the DSP on the envelope flap, I’d finished this card/envelope/seal coordinated set.
Back to the InKing Royalty Blog Hop
Thank you for stopping by today. I hope you’ll hop along to the next stop on the blog hop, Renae Novak at Blessed by Cards. There’s lots of inspiration to be found in this group – and you don’t want to miss it!
Thank you for hopping along with us. If you get stuck during the Blog Hop, please use this line-up as a guide:
The United Through Creativity FREE Digital Download features inclusive, multicultural, and multilingual craft elements that represent each of Stampin’ Up!’s markets. And, it’s free for all! Print your favorite pieces, color and create, then share to social media using #UnitedThroughCreativity!
Do you live in the U.S. and need a demonstrator? If so, I’d love to talk to you!
Do You Want to Place an Order?
Of course you do!
If you are ordering less than $150.00, please use the host code shown. If you are ordering more than $150.00, please contact me first so you can get your stamping rewards! Any order over $50 will earn a little surprise from me.
The HOST CODE through June, 2021 is 26AD7SA3.
Again, thank you for stopping by my blog today! I appreciate your comments and your time.
Welcome to InKing Royalty’s May Blog Hop! During this year’s blog hops, we are having fun with our stamping favorites – our favorite themes for seasonal cards and projects. This month’s projects are centered around Travel & Transportation, so prepare yourself for a fun journey. We are excited to share our creations with you today! After you read my post, I hope you’ll hop over to the next person on the list at the base of this post.
After I show you my card, I’ll explain my thinking.
Here it is:
I can almost see you looking at this card and thinking…. snails….. for travel and transportation?? What in the world does a snail have to do with the theme?
Here’s my thinking: snails travel with their homes on their backs. Definitely had to think outside of the box for this one!
Another reason I wanted to showcase the Snail Mail Suite is because after June 30th, 2021, the Suite will be gone! I really didn’t think I’d use this suite, but then I saw all the adorable cards and decided I had to have it! Don’t let this one slip by!
Measurements:
I used Bermuda Bay for the base of the card. The cardstock measures 4-1/4 inches by 11 inches, scored at 5-1/2 inches to form a tent card.
The Snail Mail DSP mat measures 4-1/8 inches by 5-3/8 inches.
The white cardstock background paper started out measuring 5-1/2 inches by 4-1/4 inches. Since the Painted Textures 3D embossing folder has such a deep emboss, I waited to trim it to 4 inches by 5-1/4 inches until after I’d finished embossing it.
I used the Snail Mail DSP and the coordinating die set to crop the circle sentiment,the DSP block behind the snail, the envelope, and the heart. While the die set contains dies to crop snails directly from the DSP, this guy needed to be fussy cut. I just thought he looked like French, which explains the use of “bonjour”.
For the mat of the snail block of DSP, I simply measured and trimmed a piece of Bermuda Bay cardstock to size.
While I had the DSP handy, I trimmed a piece for the envelope flap. It measures 2-1/2 inches by 6 inches. I’ve been known to inadvertently put my envelope flap paper back into the coordinating storage folder. Therefore, I’ve been adhering it to the envelope flap as soon as I trim it down, which saves me time in the long run.
Assembly:
Once I had all the pieces cropped, cut, or trimmed, the card went together in a snap!
The Blushing Bride Snail Mail DSP layer is adhered to the card base using multipurpose glue.
There are dimensionals under the snail and the sentiment bubble.
Since I tied a length of Real Red ribbon in a bow, I also used dimensionals to pop up the white cardstock layer.
I don’t know why, but I seem to have a difficult time keeping the envelope sides all stuck together. I did use my bone folder to creases the folds imprinted by the envelope die, but I still struggled. My tip for securing the front of the envelope: use at least two glue dots. I used a third glue dot to adhere the heart.
The snail’s background block is adhered to the Bermuda Bay cardstock using my fav multipurpose glue. I also used the glue to adhere the envelope to the front.
Those three adorable resin hearts, also in the suite, were randomly placed in a triangle around the rest of the elements.
The white cardstock for the inside panel measures 4 inches by 5-1/4 inches. I used the “You snailed it” sentiment for the inside and stamped it using the Momento Tuxedo Black ink pad.
With that, I’d finished this card/envelope coordinating set.
Back to the IRBH!
Thank you for stopping by today. I hope you’ll hop along to the next stop on the blog hop,Renae Novak at Blessed by Cards. There’s lots of inspiration to be found in this group – and you don’t want to miss it!
Thank you for hopping along with us. If you get stuck during the Blog Hop, please use this line-up as a guide:
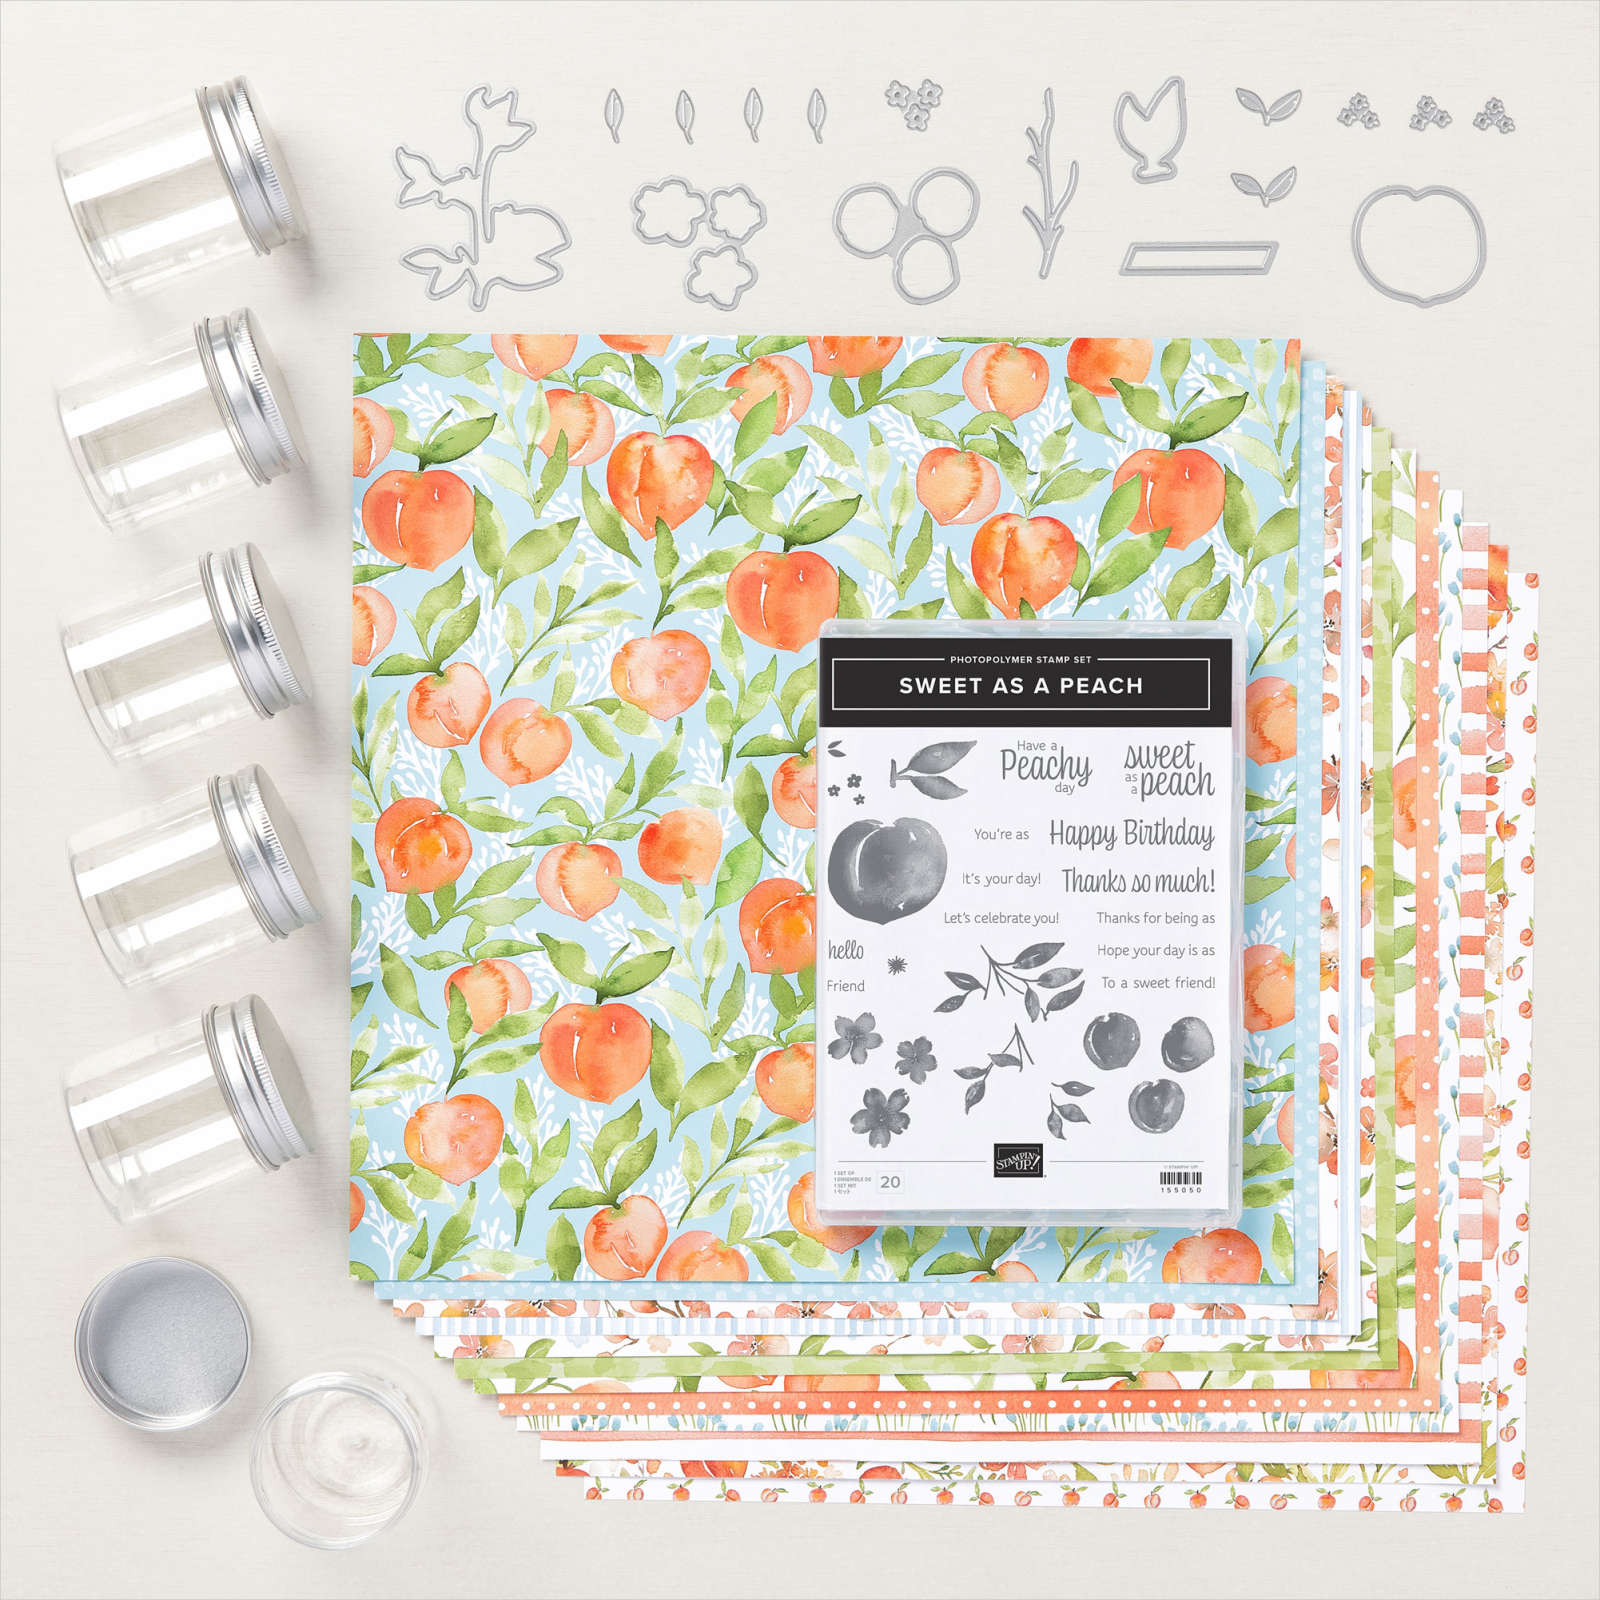
Of course, I purchased the You’re a Peach Suite on the first day of ordering! Take a look at this fabulous suite!
I say “Have a Peachy day” to my kids (aka students) all. the. time. Hence, the Just Peachy Stamping name. Naturally this suite is a must have!
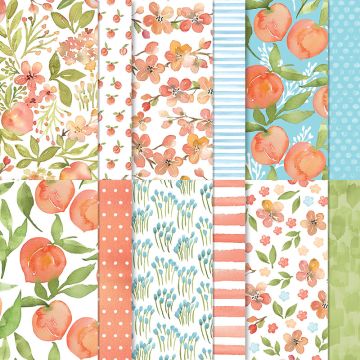
The picture doesn’t do the DSP justice, so here’s a look at just that:
Join the Fun!
It’s a fabulous time to join Stampin’ Up! New team members get even MORE FREE products in their customizable Starter Kit. From 4–31 May, new team members can get $155 USD worth of products for only $99 USD + free business supplies + free shipping + all the fun being a part of Stampin’ Up!
Do you live in the U.S. and need a demonstrator? If so, I’d love to talk to you!
Do You Want to Place an Order?
Of course you do!
If you are ordering less than $150.00, please use the host code shown. If you are ordering more than $150.00, please contact me first so you can get your stamping rewards! Any order over $50 will earn a little surprise from me.
The HOST CODE for May is ZM63ASKZ.
Again, thank you for stopping by my blog today! I appreciate your comments and your time.
Welcome to InKing Royalty’s April Blog Hop! During this year’s blog hops, we are having fun with our stamping favorites – our favorite themes for seasonal cards and projects. This month’s projects feature a mix of butterflies and dragonflies – just in time for Spring. We are excited to share our creations with you today! After you read my post, I hope you’ll hop over to the next person on the list at the base of this post.
Here’s my card:
A dear friend asked for a Mother’s Day card, and I thought I could combine the card with this Blog Hop. I used the Fine Art Floral Gallery DSP with the Dandy Laser Cut
Measurements:
I used Pretty Peacock cardstock trimmed to 4-1/4 inches by 11 inches, scored at 5-1/2 to form a tent card. This is one of the retiring In Colors I will greatly miss!
The black mat on the front of the card measures 4-1/8 inches by 5-3/8 inches.
The Pool Party background of the front of the card comes from the Floral Art Gallery DSP, which retires when the January – June mini catalog ends. It’s trimmed to 4 inches by 5-1/4 inches.
While I had this DSP handy, I trimmed a piece to 6 inches x 2-1/2 inches for the envelope flap.
The white panel for the inside of the card measures 4 inches by 5-1/4 inches, as usual.
What I Did:
The laser cut dragonflies started out white. I used a blending brush and Pretty Peacock ink to color these gorgeous dragonflies.
After the ink dried completely, I used the clear Wink of Stella to add sparkle to all of the inked dragonflies. I have to say, the results are the best I’ve had lately with Wink of Stella. There aren’t any drips or blobs, thankfully, because I didn’t have any more of this laser cut design.
Here’s a close-up of the Wink of Stella:
After adhering the laser cut dragonflies to the DSP using multipurpose glue, I wrapped a length of the Pool Party sheer ribbon around the DSP and tied it in a bow.
I’d already picked the sentiment for the front of the card, and it is perfect for my friend’s lovely mother. After stamping it on a scrap of white cardstock in Momento Tuxedo Black ink, I cropped it using the Nested Labels die. Then, I used the Pretty Peacock marker to outline the hexagon, which meant I didn’t need to add a mat.
I used multipurpose glue to adhere the black mat to the card base. Next, I used dimensionals to pop up the top layer to the black cardstock base.
I used two sentiments from the Strong and Beautiful stamp set for the inside of the card, as shown below:
Then I adhered the panel to the card base using multipurpose glue. Can you tell this is my go-to adhesive?
Next, I trimmed the DSP adhered to the envelope flap.
Using the 1 inch circle punch, I punched a seal for the envelope flap. After running it through my XYRON sticker maker, I’d finished this card/envelope/sticker to seal coordinated card set.
Back to the InKing Royalty Blog Hop
Thank you for stopping by today. I hope you’ll hop along to the next stop on the blog hop, Lynn Kolcun at Avery’s Owlery. There’s lots of inspiration to be found in this group – and you don’t want to miss it!
Thank you for hopping along with us. If you get stuck during the Blog Hop, please use this line-up as a guide:
So far, I’ve only gotten the new In-Color basic supplies. However, I will be putting in another pre-order. There are two suites at the top of my wish list, and as soon as I can order them, I will. There’s a sneak peak of the first suite on the cover of the 2021 – 2022 Annual Catalog:
That DSP is absolutely, stunningly gorgeous! I can not wait to order this on May 4th!
It’s a fabulous time to join Stampin’ Up! New team members get even MORE FREE products in their customizable Starter Kit. From 4–31 May, new team members can get $155 USD worth of products for only $99 USD + free business supplies + free shipping + all the fun being a part of Stampin’ Up!
Do you live in the U.S. and need a demonstrator? If so, I’d love to talk to you!
Do You Want to Place an Order?
Of course you do!
If you are ordering less than $150.00, please use the host code shown. If you are ordering more than $150.00, please contact me first so you can get your stamping rewards! Any order over $50 will earn a little surprise from me.
The HOST CODE for April is 6QMKRYXG.
Again, thank you for stopping by my blog today! I appreciate your comments and your time.
Welcome to InKing Royalty’s February Blog Hop! During this year’s blog hops, we are having fun with our stamping favorites – our favorite themes for seasonal cards and projects. This month’s projects feature Flowers & Fauna, a brilliant starting point for so many projects. We are excited to share our creations with you today! After you read my post, I hope you’ll hop over to the next person on the list at the base of this post.
One Sheet Wonder Flowers
First, let me share the four cards I created:
Here’s the template and sketches I used for inspiration:
Each of the four card bases measure 8-1/2 inches by 5-1/2 inches, scored at 4-1/4 inches to create tent cards.
The four white mats on the front measure 4 inches by 5-1/4 inches, as do the inside panels. That’s only two sheets of white cardstock.
The white front mats all went through the Big Shot using the coordinating Painted Texture 3D embossing folder. Stampin’ Up! designers really nailed this DSP, stamp/die set bundle, and the embossing folder combination. Perfection!
I used scraps of white cardstock for the sentiment panels. Next, I layered each sentiment on Merry Merlot and Night of Navy cardstock mats.
Next, I cut the first 6 x 6 inch square of Fine Art Floral DSP according to the template. That’s when I realized I would need to use a different DSP pattern for the coordinating pieces. I decided on the very textured ombre DSP from the same DSP set. While I had the DSP at the trimmer, I cut 4 pieces of the floral DSP to 6 inches by 2-1/2 inches for the envelope flaps.
After All the Prep Work…
One of my favorite ribbons ever is the polka dot tulle ribbon. Since I didn’t want something solid, I thought a simple piece wrapped around the white cardstock and tied it in a simple square knot.
Finally, I used several layers of my dark Night of Navy blend to color the Pearl Basic Jewels. Each card has three pearls placed kind of randomly in a triangle shape.
All four of the front sentiments came from the In Bloom photopolymer stamp set. I used Merry Merlot ink on white cardstock scraps for each sentiment. Then, I cropped each of them using a die from the Rectangle Stitched Die set.
I used multipurpose glue for all to adhere down all of the DSP pieces on the white cardstock mat. I used dimensionals under each of the sentiment panels.
After adhering the DSP to the envelope flaps and trimming it all down, I’d finished this set of four coordinating cards and envelopes sets.
Thank you for stopping by today. I hope you’ll hop along to the next stop on the blog hop,Lynn Kolcun at Avery’s Owlery. There’s lots of inspiration to be found in this group – and you don’t want to miss it!
Have a Peachy day!
Sue
Thank you for hopping along with us. If you get stuck during the Blog Hop, please use this line-up as a guide:
Just look at all that gorgeousness! The butterfly stamp is all one piece, as is the coordinating die. The die will also perfectly crop out butterflies on the coordinating DSP! No coloring needed, unless you want to do so.
Do you live in the U.S. and need a demonstrator? If so, I’d love to talk to you!
Do You Want to Place an Order?
Of course you do!
If you are ordering less than $150.00, please use the host code shown. If you are ordering more than $150.00, please contact me first so you can get your stamping rewards! Any order over $50 will earn a little surprise from me.
The HOST CODE for MARCH is 7EUAPNKA.
Again, thank you for stopping by my blog today! I appreciate your comments and your time.
Welcome to InKing Royalty’s February Blog Hop! During this year’s blog hops, we are having fun with our stamping favorites – our favorite themes for seasonal cards and projects. This month’s projects feature balloons, so you are in for a celebratory treat. We are excited to share our creations with you today! After you read my post, I hope you’ll hop over to the next person on the list at the base of this post.
Here’s my card:
Special Someone
My main supplies for this adorable card are the Balloon Bouquet punch, the Special Someone photopolymer stamp set, and the coordinating Special Day die set. I could have used the balloon stamps and dies from the set, but I wanted the balloons to be much bigger. After all, the whole theme of the Hop is balloons.
This set comes with two-step stamps for this raccoon, a squirrel, and a rat. Even the rat is cute! It’s so cute, I used it on the inside of the card, shown below:
Measurements:
I used Pacific Point for the base of the card. It measures 4-1/4 by 11 inches, scored at 5-1/2 inches to create a tent card.
The white background measures 4-1/8 by 5-3/8 inches. I didn’t get the sandwich correct when rolling the white cardstock through the Big Shot using the subtle embossing folder. Even though the texture is very, very subtle on the background, it works with all the texture of the balloons and the layers of grass.
While I had the white out, I trimmed a panel for the inside to 4 inches by 5-1/4 inches.
Next, it was time to do all my stamping. I stamped the birthday sentiment on a scrap piece of white cardstock. tamping the raccoon on Smoky Slate cardstock using the Momento Tuxedo Black ink pad.
I also did all the inside stamping as well so I could put my ink pad away.
Then I cropped all the pieces I’d need: the raccoon, the birthday sentiment speech bubble, the two layers of grass, and the two sets of balloon strings, and a little bow for the strings.
Finally, I punched the balloons from some scraps of the 6 x 6 inch Brights DSP. At this point, I also trimmed a piece of the DSP to 2-1/2 inches by 6 inches to use for the envelope flap.
Assembly:
First, I layered my grass on the bottom of the card. I adhered the first layer directly on the white background and then used dimensionals to pop up the front layer.
Then, I popped the raccoon up on dimensionals and placed him between the layers of the grass.
Next, I played around with the balloon arrangement and placement. The set of balloon strings from the die set only has three strings, but I had five balloons. Therefore, I trimmed the bottom of one set of the strings and carefully adhered it to the other string set. Ta-da! I now had five strings. The strings are adhered to the white cardstock using multipurpose liquid glue. I also used a tiny dot of the liquid glue to adhere the bow to the strings.
The balloons needed strings on them as well. I used the bullet end of my black Stamping Write Marker to just draw little lines where the strings belonged.
Since I wanted all five balloons to have dimension, I used really large glue dots under the large balloons.
Next, I used dimensionals for the small balloons to pop them up. However, I needed to just place them up the middle of the balloons so the little bit of height of the large balloons wouldn’t be an issue.
I really wanted the sentiment speech bubble to stand out on the card. Therefore, I used the brush end of the Pacific Point marker to outline the bubble before adhering it with dimensionals.
The more I looked at what I thought was my finished card, the more I knew I needed something else. I went back to the stamp set, and grabbed the two tiny butterfly stamps. After stamping three on the front, and three on the inside, I colored them using the bullet end of the Stamping Write markers.
The only thing left to do was adhere and trim the DSP on the envelope flap.
With that, I’d finished this card/envelope set.
Back to the InKing Royalty Blog Hop
Thank you for stopping by today. I hope you’ll hop along to the next stop on the blog hop, Renae Novak at Blessed by Cards. There’s lots of inspiration to be found in this group – and you don’t want to miss it!
Thank you for hopping along with us. If you get stuck during the Blog Hop, please use this line-up as a guide:
Do you live in the U.S. and need a demonstrator? If so, I’d love to talk to you!
Do You Want to Place an Order?
Of course you do!
If you are ordering less than $150.00, please use the host code shown. If you are ordering more than $150.00, please contact me first so you can get your stamping rewards! Any order over $50 will earn a little surprise from me.
The HOST CODE for FEBRUARY is 7EUAPNKA.
It’s Sale-a-Bration! Sale-a-Bration ends on February 28, 2021!
Welcome to Just Peachy Stamping by Sue Jackson: an independent Stampin' Up demonstrator.
Through Stampin' Up!, I happily share my love of papercrafting through sales, classes, small stamping group meet-ups and workshops. I think that being a teacher in my "real life", I have a unique approach to sharing my fantastic hobby. I look forward to connecting with you!


