Welcome to the Cardz 4 Guyz #364 challenge! Deb H., our host this challenge chose Lighthouses for the theme. When you finish here, please visit the challenge site to see what the rest of the very talented design team members created. Then, don’t forget to upload your creations to our gallery. We look forward to seeing your creations there!
I haven’t made a side-step card in a while, so I went back to a Connie Stewart video for one of her Simple Stamping videos. Whenever I need a quick card and want to try a new fun fold, I know I can find something on Connie’s YouTube channel.
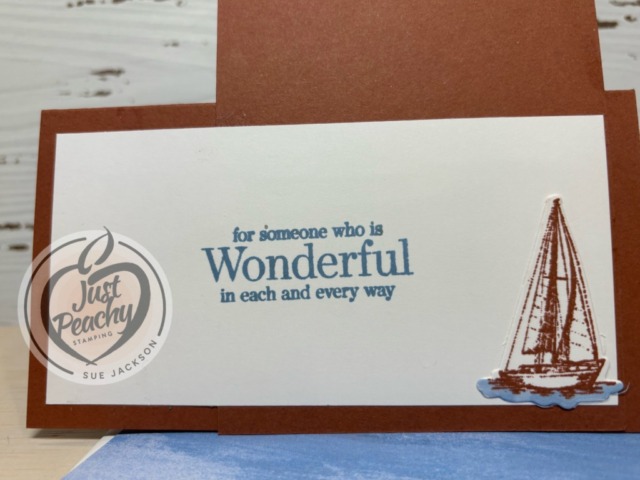
I used the retired Smooth Sailing stamp set and coordinating die set for my card. The Boho Blue DSP (designer series paper) is from the Cheerful Daisy paper set. I love Boho Blue with Copper Clay and am going to miss these colors when they retire with the introduction of the 2025 – 2026 catalog.
The front sentiment is from the Sweetly Scripted stamp set. The back sentiment is from the Special Moments stamp set.
I thought the DSP on the background needed something, so I used the compass rose from the Smooth Sailing stamp set. After rubbing down the DSP with my embossing buddy, I stamped the compass rose with VersaMark ink and covered it with clear embossing powder, which I heat set. I’ll never tire of watching the magic happen when heat setting embossing powder.
The January – April 2025 mini-catalog, the Sale-a-Bration, and the joining promotion all went live on January 7, 2025. Take a peek at some of the new products:
Welcome to the first Cardz 4 Guyz challenge of 2025! Melanie, our host for C4G #363, chose Tic-Tac-Toe for the theme. You can find her game board below. When you finish here, please visit the challenge site to see what the rest of the very talented design team members created. Then, don’t forget to upload your creations to our gallery. We look forward to seeing your creations there!
Here’s my Tic-Tac-Toe card using the center vertical line using blue, snow, and winter sentiment:
Here’s the game board:
Measurements:
The Night of Navy base measures 8-1.2 by 5-1/2 inches, scored at 4-1/4 inches
Trim a piece of Balmy Blue to 4-1/8 by 5-3/8 inches
After embossing a piece of white cardstock using the Snowflake Sky 3D embossing folder, trim it to 4 by 5-1/4 inches
Trim a piece of DSP (I used the retired 12″ x 12″ Bearly Christmas DSP) to 4 by 2-1/2 inches
Trim a coordinating piece of DSP to 6 inches by 2-1/2 inches for the envelope flap
Don’t forget to punch a 1-inch circle from DSP and run it through your XYRON create-a-sticker for the envelope seal
Use a piece of scrap Balmy Blue for the sentiment banner
Crop a snowflake from white cardstock using one of the Frozen Edges die set, but any snowflake die will work
HINT: I went down the proverbial rabbit hole in videos one night and stumbled across one for creating faux enamel looking die cuts. It’s so simple, and looks gorgeous – before cropping, add a piece of packing tape to the cardstock! I used it very often for my Christmas cards, and will be using it again and again for the rest of my card making time.
Trim a piece white cardstock to 4 by 5-1/4 inches for the inside of the card
What I Did:
The only place where I used dimensionals was under the sentiment banner
I used multipurpose liquid glue to adhere the rest of the elements of the card, including the snowflake
Use an embossing buddy to wipe down a piece of cardstock for the sentiment banner
Stamp your sentiment using VersaMark ink and cover it with white embossing powder
Heat set your sentiment, then crop it using one of the Greetings of the Season dies
HINT: This bundle is being carried over from the mini-catalog which ended in December. If you need more dies for sentiments, I highly recommend this set! Take a look at the different dies below:
I used a Balmy Blue marker to outline both the embossed white cardstock and the sentiment banner
Stamp the snowflakes on the white cardstock for the inside corner in Balmy Blue
Use Night of Navy ink to stamp the sentiment
Finally, add a clear ribboned adhesive backed enamel to the center of the snowflake
With that, you’ve finished this coordinated card, envelope, and envelope seal set
Both of these promotions start today, January 7, 2025. Take a peek at some of the items from the mini-catalog & Sale-a-Bration:
SAB:
Mini-Catalog:
Since the Mini-Catalog and Sale-a-Bration are not live at the time that I am writing this, I can only share a few images. However, the digital catalogs will be available when this post goes live.
Welcome to the newest Cardz 4 Guyz challenge #361! I am hosting this two-week challenge and chose Grateful, Thankful, &/or Blessed for the theme. When you finish here, please visit the challenge site to see what the rest of the very talented design team members created. Then, don’t forget to upload your creations to our gallery. We look forward to seeing your creations there!
I have two posts going live today. The first is this one, and the second is going live at 7 am for the SU! Demos Fun Fold Blog Hop. You can find that link here after 7 am ET.
I decided to use some of my remaining May Paper Pumpkin kit for my card. When you need quick cards, kits are the perfect way to go. I have done cards from the kits by simply following the directions. However, most of the time, I do something a bit different. That’s what I did for this challenge.
Here’s my card:
I’ve made and posted a number of cards from various kits. You can see some of those posts here, here, here, and here.
What I Did:
I used an Early Espresso base, which measures 4-1/4 by 11 inches, scored at 5-1/2 inches
The Misty Moonlight background DSP is actually one of the kit’s card bases, which I trimmed down to 5-3/8 by 4-1/8 inches
The mountain paper is the size from the kit
The sentiment, from the Autumn Leaves stamp set, is stamped in Early Espresso on a banner included with the kit
The branches and the Misty Moonlight strip under the sentiment comes with the kit
I added dimensionals under the strip and sentiment banner
I used multipurpose liquid glue to adhere the rest of the pieces
The white cardstock for the inside panel measures 4 by 5-1/4 inches
Since I used an envelope from the kit, I’d quickly finished this coordinated card and envelope set.
Thank you for stopping by today!
Have a Peachy Day!
Sue
Two fabulous new kits!
This new Layered Landscapes kit is absolutely fabulous! Just take a look:
Here’s the unboxing video:
Of course, this kit comes with step-by-step instructions, as seen below:
If you like to water-color, this next kit is for you!
Product Details:
Embrace your creative side with the Nature’s Paintings Kit. This unique kit includes everything you need for a fun creative experience: a coloring book, watercolor pencils, and a water painter. All you need is some imagination and water! Create lovely, picturesque images using advanced coloring techniques with this craft kit. Or make something that’s never been seen before—like green flowers with purple leaves. Keep it realistic or color outside the lines—it’s up to you. And once you’re done, you can use your finished artwork to create a one-of-a-kind card front!
Kit includes: * Predesigned projects * Line art illustrations * Step-by-step instructions * 24 watercolor paper pages, 2 each of 12 designs * 8 Watercolor Pencils * 1 Water Painter * Coloring Book: 4-1/2″ x 6″ x 1/2″ (11.4 x 15.2 x 1.3 cm) * A 9-7/8″ x 6-1/2″ x 1-3/4″ (25.1 x 16.5 x 4.4 cm) printed designer box for storage or crafting on the go
Product colors: Berry Burst, Coastal Cabana, Daffodil Delight, Early Espresso, Flirty Flamingo, Garden Green, Pumpkin Pie, Red
If you live in the U.S. and don’t already have a Stampin’ UP! demo from whom you order, I would be honored to work with you.
When ordering, please enter the following HOST CODE when prompted:
GYZSYS
Again, thank you for stopping by! Don’t forget to come back at 7 am ET for my fun fold card!
Welcome to the newest Cardz 4 Guyz challenge #360! Billie A. is hosting this two-week challenge and she chose Pick 3 Colors for the theme. When you finish here, please visit the challenge site to see what the rest of the very talented design team members created. Then, don’t forget to upload your creations to our gallery. We look forward to seeing your creations there!
I chose to use the Adventurous Sky bundle and Take to the Sky DSP (designer series paper) for my card. The color combination of the Copper Clay and Boho Blue is one of my current favorite color combinations. The abundant Night of Navy accents on the focal DSP adds the motion to the front of the card.
Here’s my card:
This card, and the relatively short supply list, allows this card to fall into the easy-peasy category, but let’s keep that a secret between us.
Measurements:
The Copper Clay base measures 6-1/4 by 5-1/2 inches, scored at 2 inches
You need two additional pieces of Copper Clay cardstock, each measuring 3-1/4 by 4-3/4 inches
Trim two pieces of white cardstock to 4-5/8 by 3-1/8 inches
The clouds DSP on the inside measures 4-1/8 by 5-3/8 inches
Trim another piece of the clouds DSP to 6 by 2-1/2 inches for the envelope flap
Punch a 1-inch circle of the focal panel DSP and run it through your XYRON create-a-sticker for the envelope seal
Trim a piece of the plane DSP for the front flap to 5-3/8 by 2 inches
The focal DSP measures 3 inches by 4 inches
Stamping & Assembly:
Since this is a Cardz for Guyz card, I wanted to keep the front as clean as possible, especially with all the DSP patterns. Therefore, I didn’t use any extra embellishments.
I only used multipurpose liquid glue for this card assembly
On one of the white cardstock pieces, stamp some clouds using the second generation stamping technique and Boho Blue ink
HINT: It sounds fancy, but it just means after you ink your stamp, stamp it the first time on scrap paper and then stamp the second time on the white cardstock
By using second generation stamped clouds, the Copper Clay stamped sentiment would really stand out
One the second piece of white cardstock, stamp the plane using second generation stamping in Copper Clay
Stamp the inside sentiment using Boho Blue ink
Adhere the planes DSP to the flap on the front of the card
Adhere the outside white cardstock to one of the Copper Clay cardstock mats
Align the focal DSP on the front of the white cardstock/Copper Clay layers
Add liquid glue to the left 1-1/4 inches of the newly created focal panel and adhere it to the flap
HINT: Do not add glue to the whole focal panel because the card will then seal shut
Adhere the clouds DSP to the inside of the card
The easiest way to make sure your inside white cardstock panel stays perfectly aligned with the layered focal panel on the front is as follows:
Open the card so it lays flat
Lay the inside white cardstock/Copper Clay panel on the back of the front panel, making sure all the edges line up
Adhere liquid glue to the BACK of the inside white cardstock/Copper Clay panel
Fold the back of the card over onto the back of the inside panel
Since you are using liquid glue, you will have a small window of time to make sure the edges all align before securely adhering the inside panel to the back of the card
With that, you’ve finished this coordinated card, envelope, and envelope seal set for one of your “guyz”
I already know that I am going to use this sale to reorder drying out Stampin’ Blends, order some cardstock I missed on my last order, and the Winterly Tree Tops bundle and coordinating Nests of Winter DSP!
Here are all the details:
From the 2024–2025 Annual Catalog:
10% off ink, including pads, refills, markers, and Stampin’ Blends. Ink pad bundles and third-party ink pads are NOT included.
10% off cardstock. Close To My Heart cardstock is NOT included.
20% total off all stamp and die bundles and stamp and punch bundles. (Stamp bundles are normally 10% off. With this sale you get an additional 10% off.)
20% off all Designer Series Paper.
Important Information:
Shop online to see the full selection of discounted products available; this is a limited time offer.
Products are available while supplies last.
Discounts are automatically applied when sale items are added to any order, including Starter Kits.
Another Fabulous New Kit:
This new Layered Landscapes kit is absolutely fabulous! Just take a look:
Here’s the unboxing video:
Of course, this kit comes with step-by-step instructions, as seen below:
Welcome to the newest Cardz 4 Guyz challenge #359! Caz, our fearless leader for this and a number of other challenges, is hosting this two-week challenge and she chose A Taste of Autumn/Fall for the theme. When you finish here, please visit the challenge site to see what the rest of the very talented design team members created. Then, don’t forget to upload your creations to our gallery. We look forward to seeing your creations there!
I am trying to get the 20 Thanksgiving cards done so I am not working on them the week of Thanksgiving. I need cards for single guys, and this card is one of them.
Here’s my card:
This hidden flap fun fold is absolutely perfect for the 6 x 6 inch DSP (designer series paper) packs. For this one, I trimmed off 3/4 of an inch at the top, then cut the DSP in half. I’ve already made and posted a couple of these cards, and you can see them here, here, and here, .Come back on Thursday for another one for Cardz 4 Galz.
I keep thinking what other 12 x 12 DSP I can cut down to 6 x 6 inch squares for this fun fold. It’s becoming one of my favorite fun folds.
I still can’t find the directions for this card, and am sorry I haven’t given credit to the designer. If you recognize the fold, please let me know so I can go back and update my posts giving credit where credit is due.
Measurements:
They say that a picture is worth 1,ooo words. I have three pictures of the template I use to create this simple but stunning fun fold card:
The two DSP pieces measure 5-1/4 by 3 inches
The Crushed Curry mats each measure 5-3/8 by 3-1/8 inches
After running a piece of Crushed Curry through the Cut & Emboss machine using the falling leaves embossing folder, I trimmed it to 1-1/8 by 5-3/8 inches
I trimmed a piece of Crushed Curry DSP to 6 by 2-1/2 inches for the envelope flap
Then, i punched a 1-inch circle out of coordinating DSP and ran it through the XYRON create-a-sticker to create the envelope seal
Easy Assembly:
The only dimensionals I used adheres the outside flap to the base
I used multipurpose liquid glue to adhere all the pieces and layers together since it already is bulky
The sentiment is from a retired stamp set, but is cropped using dies from the Stylish Shapes die set
Easy-peasy
Thank you for stopping by today!
Have a Peachy Day!
Sue
It’s a Promotion Duo Today!
First, it’s a KIT sale for the month of October!
Details:
ALL kits from our collection qualify for the discount.
All order types qualify for this sale. There is no limit on how many kits you can order, as long as product is available.
Orders must be opened and placed during the promotion dates. Orders opened before October 1 will not qualify for the sale.
Kits on sale will NOT qualify for the Stampin’ Rewards 50% off.
Kits can be added to a Starter Kit at their discounted rate.
Coupon codes can also be used with discounted kits.
I am especially looking forward to getting the Alpine Air Kit! It’s already on my next order.
Next up: A Starter Kit Special!
When new team members purchase their Starter Kit, they will be able to redeem $155 USD of Starter Kit eligible products for just $99 USD . That’s $56 of FREE product!!!
New demonstrators who submit their Independent Demonstrator Agreement (IDA) before October 1 or after October 31 will not be eligible for this offer.
If you decide being a demonstrator is not for you (but really, the discount is DEFINITELY worth being a continuing demonstrator), you can cancel.
Hobbyist demonstrators are very welcome because who doesn’t love a 20% discount, opportunities to see and pre-order from the new catalogs and specials
Please contact me if you are interested in joining my team! I’d love to connect with you!
If you live in the U.S. and don’t already have a Stampin’ UP! demo from whom you order, I would be honored to work with you.
When ordering, please enter the following HOST CODE when prompted:
Welcome to the newest Cardz 4 Guyz challenge #357! Dawn is hosting this two-week challenge and she chose Wheels for the theme. When you finish here, please visit the challenge site to see what the rest of the very talented design team members created. Then, don’t forget to upload your creations to our gallery. We look forward to seeing your creations there!
At first, I thought I didn’t have anything for the theme. I decided on a card with ship wheels, Then I realized I did have DSP for a wheels theme, but by then I had settled on the ship wheels and decided to use a fun fold.
Here’s my ship wheels card:
If you look carefully at the first picture, you can just barely see the inside panels of the flaps, to which I added a piece of Basic Gray cardstock for a handwritten message.
Measurements:
The Night of Navy base measures 5-1/2 by 8-1/2 inches, scored at 1-5/8 & 3-1/4 from each of the long ends
There are 4 pieces of Basic Beige card stock measuring 1-1/2 by 5-3/8 inches
Trim another piece of Basic Beige to 4-1/8 by 5-3/8 inches
I stamped the sentiment and cropped it from the center of this Basic Beige piece of cardstock since no one will see the ugly underneath the pattern #2 DSP
Trim 2 pieces of DSP (designer series paper) pattern #1 to 1-3/8 by 5-1/4 inches
Trim one piece of DSP pattern #2 to 4 by 5-1/4 inches
You also need a piece of coordinating DSP to 6 by 2-1/2 inches for the envelope flap
Punch a 1-inch circle for the envelope seal and run it through your XYRON create-a-sticker
Stamping, Cropping, & Assembly:
I used the retired Smooth Sailing stamp set and coordinating die set
I used multipurpose liquid glue to adhere all the pieces together because the card is already bulky and would need extra postage
The only place I used mini-dimensionals was on the backs of the two wheels with bakers’ twine
I needed to cut the mini-dimensionals into three pieces each.
Crop 6 ship wheels from Night of Navy cardstock
Add baker’s twine to two of the little holes in the center of two ship wheels
HINT: The only way I could’ve accomplished was to use a floss threader. To do this, slide a length of baker’s twine through the threader loop and very, very gently pull the threader and baker’s twine through the hole. Once you get the baker’s twine through the hole, you can tie a knot on one end of the twine.
Here’s the threader I used, which I purchased on Amazon:
WLLHYF 100 Pcs Floss Threaders Multifunctional Deep Clean Floss for Braces, Bridges, and Implants Dental Threader (Blue)
Stamp the sentiment in Night of Navy ink on Basic Gray cardstock and crop the sentiment
Adhere the DSP pattern #1 to two pieces of the Basic Gray cardstock
Adhere the cardstock and DSP combo to the front outside flaps of the card
Adhere the remaining two pieces of Basic Gray cardstock to the inside flaps
Adhere the DSP pattern #2 to the 4 by 5-1/4 inch piece of Basic Gray cardstock
Stamp the lighthouse on Basic Gray cardstock using Night of Navy ink, then crop it out
Stamp the trio of birds randomly on the DSP pattern #2
HINT: I needed to cover a tiny spot of Night of Navy ink, so I added a third partial trio of birds
Adhere the sentiment to the DSP pattern #2 making sure that it is covered by the flaps when closed
Add the wheels to the front flaps, three on each side
HINT: I added the bakers’ twine wheels to the bottom of the front flaps, but I would do it in the middle for a more secure bow
With that, I’d finished this coordinated card, envelope, and envelope seal set
Welcome to Just Peachy Stamping by Sue Jackson: an independent Stampin' Up demonstrator.
Through Stampin' Up!, I happily share my love of papercrafting through sales, classes, small stamping group meet-ups and workshops. I think that being a teacher in my "real life", I have a unique approach to sharing my fantastic hobby. I look forward to connecting with you!