Welcome to the Make My Monday #194 challenge. Our host for this two-week challenge, Debbie, chose all things great and small for the theme. When you finish here, I hope you will visit the challenge website to see what the rest of the design team created to inspire you. Please be sure to upload your creations to our challenge gallery.
I used the retired Turtle Friends stamp set and punch. I’ve used the owls and songbirds a few times lately so I needed to go with something different. My Turtle Friends stamp set is in like new condition, so I really needed to do something with it.
Here’s my z-fold card:
I used this Mint Macaron patter from the host Design a Daydream DSP (designer series paper). I paired the Mint Macaron with some Mango Melody 6 x 6 inch DSP. This color combination surprised me because it worked so well.
Measurements:
The Mint Macaron base measures 11 by 4-1/4 inches, scored at 2-3/4 and 5-1/2 inches to create a z-fold.
I needed two pieces of the Mint Macaron DSP. The first measures 4-1/8 by 2-5/8 inches. The second measures 3-3/8 inches square.
The Mango Melody DSP pieces measure 5-3/8 by 4-2/8 inches and 3-1/2 inches square.
I used a scrap piece of Mango Melody cardstock to crop the branch spray using a die from the Framed Florets die set.
The white cardstock for the inside of the card measures 3-3/8 inches square.
I used scraps to stamp the two turtles, the bird, and sentiment.
The final cuts were a piece of the Mint Macaron DSP to 6 by 2-1/2 inches for the envelope flap. I used a piece of Mango Melody DSP to punch the 1-inch circle needed for the envelope seal.
Assembly:
After burnishing the folds in the cardstock, I used multipurpose glue to attach the DSP pieces to the front.
Next, I adhered the square Mint Macaron DSP to the square Mango Melody piece, again used multipurpose glue. I also added the cropped branch spray to the square DSP.
The images and sentiment are stamped in the Momento Tuxedo Black ink.
The turtles are colored using the Mango Melody and Mint Macaron blends combos.
While I could punch out the larger turtle, I needed to fussy cut the small turtle and the little bird.
I cropped the sentiment using a banner die from the Stylish Shapes die set.
Next, I added dimensionals to both turtles, the sentiment, and the little bird.
I stamped the larger turtle on the inside and used the sentiment stamp for the inside of the turtle.
The Turtle Friends stamp set has the streamer stamp. I used the Mango Melody and Mint Macaron makers to color the streamers.
Finally, I carefully adhered the inside square to the inside of the card so the front panel covers the whole inside panel.
With that, I’d finished this coordinated card, envelope, and envelope seal. set.
Welcome to the bi-weekly Make My Monday challenge. For MMM# 192 our host, Caz, chose locw is in the air for the theme. I’m usually very picky about what I get from the mini-catalog for Valentine’s Day, so I decided that I would try to make a card from the previous two years of January Paper Pumpkin kits, which I never even opened. When you finish here, I hope you will visit the Make My Monday challenge site to see what the rest of the design team created. We’d love to see what you create added to the gallery.
Here’s my scrappy made card:
This card also proved that I can make all the Valentine’s Day cards I need for my great-niece and great-nephew to exchange in their pre-school classes using what I already have.
Measurements and Assembly:
The RealRed base measures 5-1/2 by 8-1/2 inches, scored at 4-1/4 inches.
The purple DSP (designer series paper) measures 4-3/8 by 4-1/8 inches.
The hearts DSP measures 2-1/8 by 4-3/4 inches.
I used two hearts from a past PP kit, along with the sentiments.
I stamped the sentiments in Versamark and added white embossing powder. Then, I heat set the embossing powder.
The two pieces of DSP are adhered using multipurpose liquid glue.
Then, I added a length of ruched Real Red ribbon around the purple DSP and tied it in a bow.
Next, I put dimensionals under the purple DSP and the two hearts and added them to the front of the card base.
Finally, I added some of the leftover little white enamel hearts to some of the hearts on the purple DSP.
The white cardstock panel for the inside measures 4 by 5-1/4 inches.
I used another scrap of DSP for the envelope flap. Amazingly, it already measured 2-1/2 by 6 inches, which fits perfectly for the envelope flap.
With that, I’d finished this coordinated card and envelope set. Keeping it simple today!
Sale-a-Bration is now live until February 28, 2023!
Here are some SU! videos regarding the FREE items you can earn! I have to tell you, the first SAB item I earned was the owls stamp set. So, so, so stinking cute!!! They are so easy to fussy cut as well.
As always, the joining benefits for joining during Sale-a-Bration are spectacular! As always, there’s no commitment, so taking advantage of this promotion doesn’t mean a long-term commitment. If you live in the U.S., and are interested in joining, please contact me at [email protected]
Here’s the joining promotion information:
If you live in the U.S. and do not already have a demonstrator, I would love the opportunity to serve you.
If you want to place an order, please do so using the host code Y6CTX7D3 when prompted. Any order for $50 can not only earn a FREE Sale-a-Bration item, but also a product from me!
If you want to place an order of over $150, (think of the FREE Sale-a-Bration items!) please contact me before placing your order so you can also qualify for STAMPING REWARDS, giving you even more FREE ITEMS!
Welcome to the Make My Monday challenge #192 for this two weeks. The theme for this challenge is to pick a favorite challenge from 2022. I couldn’t resist using the Adorable Owls stamp set from the current Sale-a-Bration promotion. Therefore, I chose the something with wings challenge from November 22, 2022. When you finish here, I hope you will visit the challenge site to see the themes chosen and cards made by the rest of the design team..
Here’s my card:
Yes, this is another twisted easel card. You can see a couple of others I created here.
Once I finished this baby boy card, I really wanted to make a baby girl card. However, I used the Elephants on Parade stamp set instead.
Here’s the baby girl card:
Since the baby boy owl card meets the challenge theme, I’m using the directions for that card.
There are so many videos for creating a twisted easel card. The one I saw a few weeks ago incorporated a book binding side, which I really liked. I can’t for the life of me find the original video I watched, and I am sorry for that problem.
Balmy Blue cardstock base trimmed to 4-1/4 inches by 11 inches.
Score the base along the long side at 5-1/2 and 6-1/2 inches.
Next, score the 4-1/2 by 4-1/4 inch rectangle diagonally as shown in the picture below:
Please note that this is the inside view.
Trim two pieces of DSP to 4-3/8 by 4-1/8 inches. Trim one of the pieces diagonally to use for the back of the standing easel. For this card, this is the two Balmy Blue pattern pieces of DSP (designer series paper).
Trim DSP to 7/8 by 4-1/8 inches for the bookbinding on the front.
Next, trim a piece of white cardstock for the inside to 4-1/8 by 4-3/8 inches.
Finally, trim a piece of DSP for the envelope flap to 6 by 2-1/2 inches.
Assembly:
Adhere the bookbinding piece on the inside of the card. The picture below shows the placement of the adhesive for both the bookbinding part and the white cardstock on the inside.
I wrapped a piece of Old Olive ribbon around the piece of DSP for the bookbinding section on the front of the card.
Adhere the bookbinding piece to the front using dimensionals to allow for the ribbon.
Adhere the triangle piece of DSP to the outside of the card as shown below:
Adhere the whole rectangle of DSP to the bottom triangle on the outside of the card as shown below:
Please note that you only put adhesive on the bottom portion of the triangle. The top half of the DSP should not be adhered.
TA-DAH! You’ve created a twisted easel fun fold card. This card will fit in a medium SU! envelope.
The Owls:
Stamp the sentiment for the front and inside of the card. The sentiments comes from the Happy & Heartfelt stamp set.
Crop the sentiments. For the front, I used one of the square dies from the Stylish Shapes die set. I also cropped a small banner from silver foil to layer under the sentiment. I stamped the inside sentiment in the corner in Night of Navy directly on the white cardstock.
The sentiment placed diagonally was also stamped in Night of Navy and cropped using a rectangle die.
Please note that the angle of the standing easel will depend on the placement of your inside sentiment.
Add dimensionals on the reverse of the front and inside sentiments, especially needed for the inside sentiment.
I used my clear Wink of Stella pen to outline each of the cropped sentiments.
Then, I stamped the owls using Night of Navy ink. The bowtie is colored with the dark Night of Navy blend. I used a white gel pen to outline the bowtie.
I used the light Balmy Blue blend to color the eyes.
The cropped white oval comes from the Framed Florets die set.
While I had the florets dies out, I cropped two sprays from DSP and a third one from silver foil.
Next, I colored and cropped the butterfly and balloon using the Elephants on Parade bundle.
I used multipurpose liquid glue to adhere the oval and sprays.
Then, I used dimensionals to adhere the owls, butterfly, balloon, and front sentiment.
Finally, I added blue gems to the front and the inside sentiment.
With that, I’d finished this coordinated twisted easel card, envelope, and envelope seal set.
Thank you for stopping by my blog today. Have a Peachy day! Sue
Sale-a-Bration is now live until February 28, 2023!
Here are some SU! videos regarding the FREE items you can earn! I have to tell you, the first SAB item I earned was the owls stamp set. So, so, so stinking cute!!! They are so easy to fussy cut as well.
As always, the joining benefits for joining during Sale-a-Bration are spectacular! As always, there’s no commitment, so taking advantage of this promotion doesn’t mean a long-term commitment. If you live in the U.S., and are interested in joining, please contact me at [email protected]
Here’s the joining promotion video:
If you live in the U.S. and do not already have a demonstrator, I would love the opportunity to serve you.
If you want to place an order, please do so using the host code Y6CTX7D3 when prompted. Any order for $50 can not only earn a FREE Sale-a-Bration item, but also a product from me!
If you want to place an order of over $150, (think of the FREE Sale-a-Bration items!) please contact me before placing your order so you can also qualify for STAMPING REWARDS, giving you even more FREE ITEMS!
Welcome to the Make My Monday two-week challenge # 186! I’m the host for #186, and I chose the themes of spooky and/or Halloween colors (purple, orange, green, black). Whether you participate in Halloween or not, I hope you can find some inspiration in my card, which I CASe’d, or the other design team members. I’m looking forward to seeing what you create, so please add your card to our gallery.. Happy crafting!
Here’s my fun fold Scary Cute card:
I’ll admit that I struggled with my own challenge in that I couldn’t figure out what I really wanted to do. When my mojo is missing, I turn to Pinterest for ideas, and this time was no different. I found inspiration in Elaine’s Creations Scary Cute card, and my mojo returned. I didn’t copy her card exactly, but you can see just how much it inspired my own card.
Here’s Elaine’s Creation:
Elaine’s fussy cutting skills are off the charts!
Measurements:
The Parakeet Party base measures 4-1/4 by 11 inches, scored at 5-1/2 inches.
The Basic Black measures 4 inches by 11-1/2 inches, scored at 2-5/8 and 5-1/4 inches.
I used two patterns of the Black and White Designs DSP (designer series paper). The larger piece measures 3-7/8 by 5 inches. The two checkerboard pieces measure 2-5/8 by 4 inches. I punched a 1-inch circle from the stars pattern DSP for the envelope seal.
The Basic White cardstock for the inside measures 4 by 5-1/4 inches.
I used a piece of Parakeet Party 6 x 6 inch DSP for the background of the tree frame. I also cut a piece of this DSP to 6 inches by 2-1/2 inches for the envelope flap.
In addition, I used a scrap piece of Parakeet Party cardstock for the front panel of trick-or-treaters.
Stamping and Cropping:
All the stamps and die cuts come from the Scary Cute bundle. I only used the Momento Tuxedo Black ink for this card.
I stamped the front panel of trick-or-treaters, BOO!, and the bats on a piece of Parakeet Party cardstock.
Next, I stamped the inside sentiment and fairy princess on the white cardstock.
HINT: When using the silhouette stamps, it’s much easier to use the Stamparatus to ensure that you get the depth of color that you want while making sure everything stays lined up correctly.
Next, I cropped everything I needed for both the inside and the outside. Once I had the black tree frame cropped, I used the negative leftover piece to crop the cat.
Any time I’ve cropped this tree frame, I’ve saved the negative pieces. Therefore, I used two of these negative pieces to crop all the bats I needed.
Next, I adhered the frame pieces, the cat, and the bats using multipurpose liquid glue. There are dimensionals under the finished frame.
I cropped the front Parakeet Party cardstock using a deckled rectangle die. Then, I outlined it using the same color marker so the edges would be clean. Next, I added a piece of the black glittery washi tape to the bottom of the panel, which grounded the trick-or-treaters so they don’t look like they are floating. I added dimensionals under this panel as well.
Assembly:
Before adhering the DSP pieces to the front of the card and the white cardstock panel to the inside, I added some glittery Old Olive washi tape to the bottom of the panels.
Then, I adhered the DSP pieces to the cardstock.
I wrapped a length of the gorgeous Metallic Mesh Ribbon around the top of the black easel cardstock and tied it in a bow. Then, I adhered the black base to the Parakeet Party base using multipurpose liquid glue. At the same time, I adhered the white cardstock to the inside of the card.
HINT: This metallic ribbon is also spectacular for Christmas cards, and I’m posting a card with it tomorrow.
The last pieces to add were the frame and the front sentiment.
With that, I’d finished this coordinated card, envelope, and envelope seal set.
Thank you very much for stopping by my blog today.
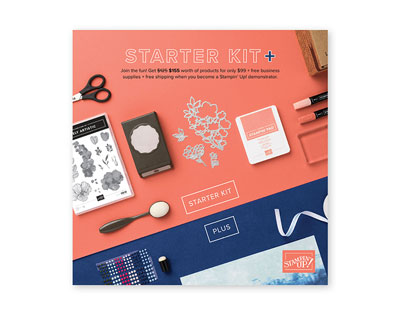
When new team members purchase their Starter Kit, they will be able to redeem $155 USD of Starter Kit eligible products for just $99 USD. That’s $56 of FREE product! Contact me for more details about joining my team!
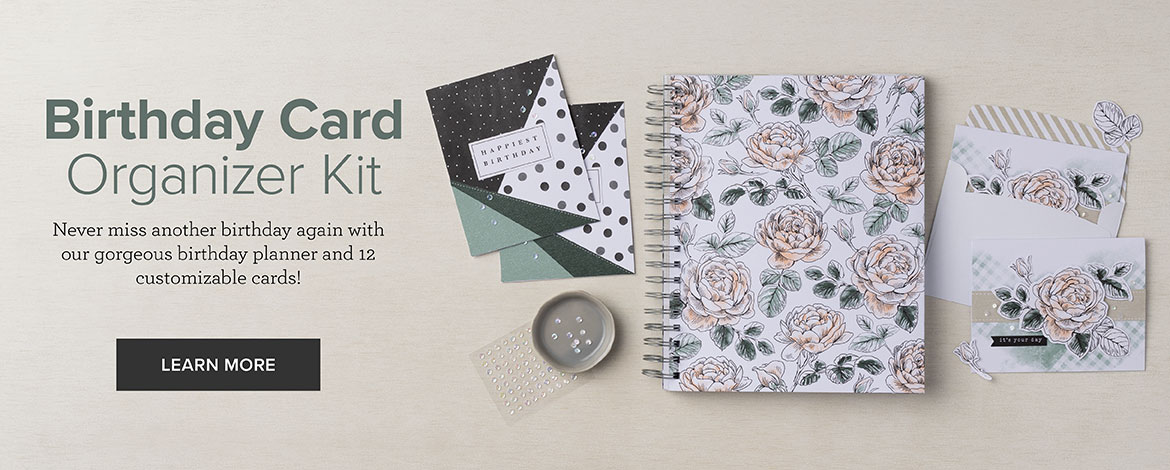
Have you started your Christmas shopping yet?
I did with the purchase of two of these NEW birthday organizer kits! I actually got my delivery with the two kits on Sunday (yes, it was delivered on Sunday)! YEAH!
Here’s an unboxing video explaining the kit contents:
I got one kit for my mom and one for my aunt, neither of whom get out as easily as they used to do. I’m in the process of making additional cards to include with this kit, that I will make for them before I give them as a present.
Again, thank you for stopping by today! Please take just another minute and leave a comment. I’d love to hear from you.
Welcome to the newest two-week Make My Monday challenge, #185. Our host for this challenge, Mary V., chose birthday wishes for the theme. When you finish here, I hope you will visit the challenge site to see what the rest of the design team members created. After being inspired by the variety of projects, I would love to see your creation in our gallery!
My inspiration came from being tagged on a facebook post originally created by ?? I’ve spent 30 minutes searching for it and can’t find the post. If it looks familiar to you, or know who the initial poster was, please, please let me know so I can update the post. Her set of cards were stunning and I thought I could CASe her cards.
Here’s just three of the twelve cards I quickly and easily created after watching the video:
Measurements:
These cards were all created in a single layer. The base for each card measures 5-1/2 by 8-1/2 inches, scored at 4-1/4 inches.
The white cardstock for the front, after trimming, measures 4-1/8 by 5-3/8 inches.
The last measurement is for the inside white cardstock panel, which measures my usual 4 by 5-1/4 inches.
Next, I trimmed a coordinating piece of 6 x 6 inch DSP (designer series paper) to 6 inches by 2-1/2 inches for each envelope. The envelope seals were punched using a different color from the 6 x 6 inch DSP as well.
What I Did:
I figured since every picture equals one thousand words, I’d use pictures instead of words for parts of this card.
First:
Second:
Third:
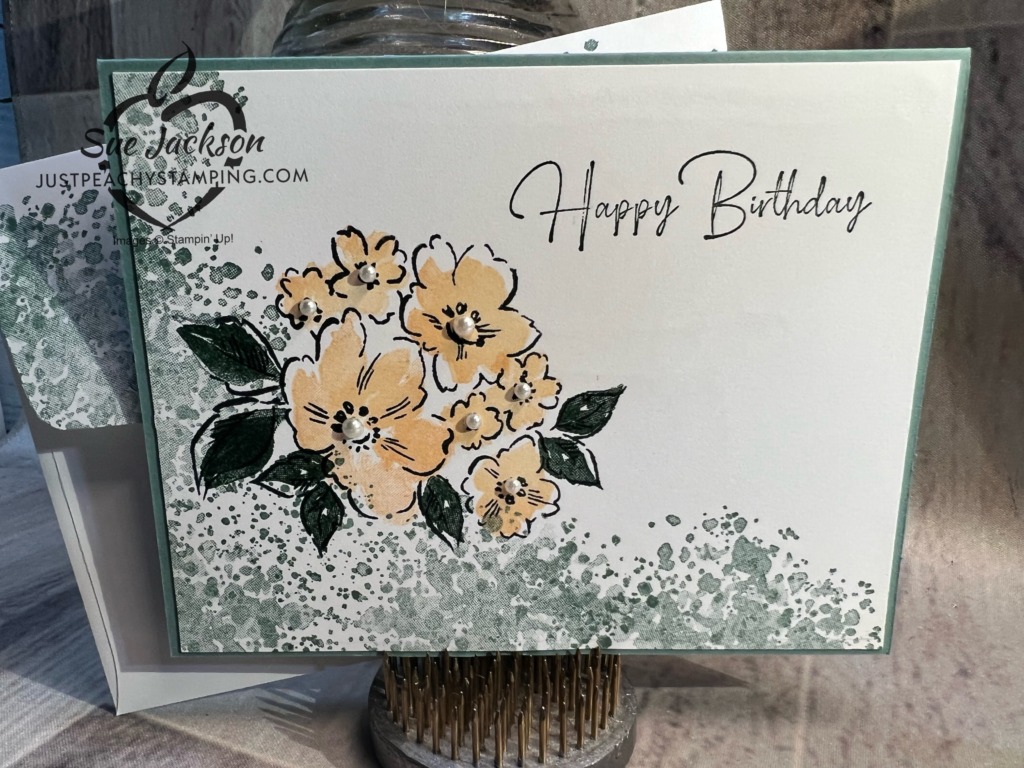
I used the Hand-penned Petals for the flowers and leaves.
The Hand-Penned Petals stamp set contains two sets of two-stamp flowers, so I didn’t even have to color the flowers. Score! I simply stamped the outlines in Momento Tuxedo Black. Then, I used the filler stamps and my chosen ink for the flowers and leaves themselves. Easy-peasy.
The sentiments come from the Flowing Flowers stamp set, but just about any sentiments will work for these cards.
The blotches, splotches, and grain patterned stamps come from the Gorgeous Leaves stamp set.
Since everything is one layer, I only used multipurpose liquid glue to adhere all the pieces together.
Finally, I added basic pearl jewels or matte black jewels to the centers of the flowers.
With that, I’d finished twelve cards in one night.
Why I Made Sets of 4 Cards:
My mom and my aunt aren’t getting around as easily as they used to do.. Christmas presents for them isn’t easy either, because they say they really don’t need anything. However, this year, Stampin’ Up! has released a new product that’s perfect for each of them for Christmas!
Here’s what inspired me to start creating multiple sets of cards:
I’ve already ordered two of these kits, and am patiently (maybe not that patiently) awaiting their arrival!
Here’s and unboxing video from Sara, the Stampin’ UP! CEO:
Thank you very much for stopping by my blog today.
It’s Not Too Late to Sign Up for Paper Pumpkin! Make Sure You Sign Up TODAY, October 10, 2022!
Just Look at All This Cuteness:
If you are new to Paper Pumpkin, here’s a video that will explain all this happiness in a box!
If you live in the U.S. and don’t already have a demonstrator, I’d be honored to work with you.
Do You Want to Place an Order?
Of course you do, especially since you can earn FREE products with a qualifying purchase!
If you are ordering less than $150.00, please use the host code shown. If you are ordering more than $150.00, please contact me first so you an get your stamping rewards! Any order over $50 will earn a little surprise from me.
The HOST CODE through October 31, 2022 is TYFZJGYE
Once again, thank you for stopping by my blog today! I hope you will take another minute and leave a comment.
Welcome to the Make My Monday #184 two-week challenge! Our host this week is also our fearless leader, Caz. She chose autumn flora or fauna, of which I chose autumn flora. When you finish here, I hope you will visit the challenge site to get inspired by the rest of the design team. I’d love to see what you create posted in our gallery. In the meantime stay safe and craft on.
Here’s my autumn flora card:
Once again, I used the Fond of Autumn bundle of a stamp set and coordinating dies. I usually need to make about 25 Thanksgiving cards and this year is no different. Even though I usually create individual cards for everyone, this year I will be creating eight of each of the cards I’ve already created., including this one. You can see my other cards using this bundle here and here.
One of the reasons I love this bundle is because of the versatile dies for the large stamp! The first die for the large stamp will crop the whole image at once. However, the second die really steals the show, and I used it on this card. The second die will crop the image into four separate pieces, as shown below:
Measurements:
The Old Olive base measures 5-1/2 by 8-1/2 inches, scored at 4-1/4 to create a tent fold card.
I used two of the deckled rectangle dies; one for the Crushed Curry DSP (designer series paper) layer and one for the Crumb Cake DSP layer. Both of these deckled rectangles were outlined using the Soft Suede marker.
I also trimmed a piece of the Crumb Cake DSP to 6 inches by 2-1/2 inches for the envelope flap. At this point, I also punched a 1 inch circle from the Crushed Curry layer for the envelope seal. The punched seal is behind the Crumb Cake DSP, so no one will be the wiser.
I cropped the white cardstock for the inside of the card to 4 by 5-1/4 inches.
That’s it for the measurements.
Stamping, Cropping, and Coloring:
First, I stamped the large floral image twice using my Momento Tuxedo Black ink pad. Positioned carefully, you can get both stamped images on one piece of 4-1/4 by 5-1/2 inch piece of cardstock. In addition, I stamped the single flower and single acorn from the stamp set on either bottom corner of the inside of the card.
I cropped one of them using the whole outline die. I cropped the second one using the four part die and colored just this one.
The blends I used were the combos for the following colors:
Mossy Meadow for the oak leaves
Old Olive for the smaller leaves
Pumpkin Pie for the berry-looking parts
Bumblebee (retired) for the petals of the flowers
Crumb Cake for the inside of the flowers and the bottom of the acorns
Soft Suede for the tops of the acorns.
I used my Blackberry Bliss marker for the seeds surrounding the center of the flowers.
I stamped the outside sentiment, which comes from a retired stamp set, in Soft Suede and cropped it using a die from Stylish Shapes.
The inside sentiment, Autumn Wishes, comes from the Fond of Autumn stamp set.
I used multipurpose liquid glue to adhere the inside cardstock, and both of the deckled rectangle layers. Then, I used multipurpose liquid glue to adhere the uncolored large stamp to the Crumb Cake cardstock. This allowed me to perfectly align the 4 pieces of the cropped colored stamped image. I used dimensionals under the colored image and under the sentiment banner, which I outlined with my Pumpkin Pie marker.
Finally, I tied a bunny ears bow and used a glue dot to adhere it on the left of the sentiment.
With that, I’d finished this coordinated card, envelope, and envelope seal set.
Thank you very much for stopping by my blog today.
Who doesn’t absolutely love saving money with a weekly deal?
Check out the current weekly deals below:
Pair the weekly deals with the clearance rack, and you have some pretty fabulous savings:
If you live in the U.S. and don’t already have a demonstrator, I’d be honored to work with you.
Do You Want to Place an Order?
Of course you do, especially since you can earn FREE products with a qualifying purchase!
If you are ordering less than $150.00, please use the host code shown. If you are ordering more than $150.00, please contact me first so you an get your stamping rewards! Any order over $50 will earn a little surprise from me.
The HOST CODE through September 30, 2022 is W9GCXFZ6.
Once again, thank you for stopping by my blog today! I hope you will take another minute and leave a comment.
Welcome to Just Peachy Stamping by Sue Jackson: an independent Stampin' Up demonstrator.
Through Stampin' Up!, I happily share my love of papercrafting through sales, classes, small stamping group meet-ups and workshops. I think that being a teacher in my "real life", I have a unique approach to sharing my fantastic hobby. I look forward to connecting with you!