Welcome to a new Make My Monday biweekly challenge! The host for challenge #202, JoAnn B, chose a summer theme. When you finish here, I hope you will visit the challenge site to see all the other summer fun challenges from the rest of the design team.
Here’s my non-traditional summer fun card:
I used the layout from the Splitcoast Stampers challenge #959.
Trim a piece of Night of Navy cardstock to 8-1/2 by 5-1/2 inches, and score at 4-1/4 inches to form a tent fold.
I used the By the Bay 6 x 6 inch DSP (designer series paper) for all of the patterned paper..
Trim DSP pattern #1 to 4-1/8 by 5-3/8 inches.
Trim DSP pattern #2 to 4 by 5-1/4 inches.
Punch DSP pattern #3 using a 2-1/2 inch circle punch.
I used a circle compass for the large circle in DSP pattern #4 using a 3-1/4 inch radius. I’ve had my circle compass for more than 25 years (scary thought, I know!) but you can still get this fabulous tool using this link on Amazon. For some strange and unknown reason, I can’t get the picture of this compass to paste at all.
For pattern #5, I used a piece of natural ribbon, for which I adhered the ends on the back of DSP #2 using tear-n-tape.
Stamp the sentiment onto DSP pattern #1 using Night of Navy ink. I actually stamped it on the piece of DSP I used for pattern #1 and then punched it using a label punch.
Punch a small hole in the sentiment label, add some linen thread and tie around the natural ribbon.
Trim a piece of white cardstock to 4 by 5-1/4 inches for the inside.
Stamp the greeting using Night of Navy ink.
Trim a piece of DSP to 1/2 by 5-1/4 inches and adhere to the bottom of the white cardstock.
Adhere using multipurpose glue.
Trim a piece of coordinating DSP to 2-1/2 inches by 6 inches for the envelope flap.
Punch a 1 inch circle of DSP for the envelope seal.
With that, I’d finished this coordinated card, envelope, and envelope seal set.
When new team members purchase their Starter Kit, they will be able to redeem $155 USD of Starter Kit eligible products for just $99 USD! No commitment required beyond the starter kit!
If you don’t already have a SU! demo, or if you are interested in joining under the starter kit promotion, I’d be honored to work with you.
The HOST CODE for June is VAMCFNHD!
If you are ordering under $150, please enter the above host code when prompted.
If you are ordering over $150, please contact me first so you can use the Stampin’ Rewards earned from your order.
Again, thank you for stopping by today. I’d love to hear your comments. Sue
Welcome to the 200th Make My Monday biweekly challenge! Woo-HOO! Our host, Jackie, chose Clean and Simple (base plus one layer) for the challenge theme. When you finish here, I hope you will visit the challenge site to see the projects from the rest of the design team. I always enjoy seeing how each member incorporates their own interpretation of the challenge themes. We’d love to have you join us by posting your CAS card in our gallery.
I wound up making two cards for this challenge. The first one is the one posted on the challenge site. The second one does a better job of having just the base and one layer. Both cards use Blackberry Bliss for the card base, and the retired New Horizons DSP (designer series paper). I’m down to my last few 6×6 inch sheets, and am really trying to use it up.
Here are my cards:
Measurements:
Since the second card is more in line with the theme, I’ll give the information for that card.
The Blackberry Bliss base measures 5-1/2 by 8-1/2 inches, scored at 4-1/4 inches.
Using the Painted Textures 3D embossing folder, emboss a piece of Blackberry Bliss cardstock. AFTER you emboss it, trim the cardstock to 4-1/8 by 5-3/8 inches..
Adhere the embossed cardstock to the card base using multipurpose liquid glue.
Trim a piece of New Horizons DSP to 3-3/4 inches by 5-1/4 inches.
Trim a coordinating piece of the DSP to 6 by 2-1/2 inches for the envelope flap.
Punch a 1 inch circle from the DSP for the envelope seal.
Rub down the DSP using your embossing buddy.
I wanted to use Blackberry Bliss ink and clear embossing powder. Therefore, I used my discontinued Stamparatus. If you don’t already have this kind of stamping tool, I highly recommend getting one.
Stamp the sentiment using Blackberry Bliss ink.
Clean the stamp, and restamp using VersaMark.
Cover the sentiment with clear embossing powder and heat set the sentiment.
Adhere the DSP to the dry embossed cardstock using multipurpose liquid glue.
Trim a piece of white cardstock to 5-1/4 by 4 inches for the inside panel.
Stamp your sentiment using Blackberry Bliss ink.
With that, I’d finished this coordinated card, envelope, and envelope seal set.
The individual color families were also refreshed. Some of your favorites have been moved to another family, some retired, and new ones added. Here are the new color families:
While I love a color refresh, it means I have to reorganize my color families to update them. I like to keep my stamp pads in the Stamp-n-Storage inkpad storage in color families. Same with my markers.
HINT: I use a stamp set container to store my markers. It allows me to keep store them flat and I can fit one color family in each container. I just write down a list of the colors on a piece of paper and slip it in the cover.
However, I haven’t reorganized my color families yet. Truth be told, my room is a mess right now because I am in the middle of reorganizing. I have so, so , so much retired product that I need to sell ASAP.
Welcome to the two-week Make My Monday challenge! Our host for #198, Billie A, chose Frame It! as the theme. The variations on this theme are demonstrated by the various members of the design team. When you are finished here, I hope you will hop over to the challenge site for some inspiration. We’d love to have you play along and add your creation to our gallery!
Here’s my card:
I created this for a special friend who loves getting my cards and has been having a tough time lately and I hope this will give her a lift in her day.
For this card, I really let this piece of Fancy Flora DSP (designer series paper) do all the work. While each sheet of this DSP is spectacular, this one is my favorite.
Measurements:
The Evening Evergreen base measures 5-1/2 by 8-1/2 inches, scored at 4-1/4 inches to create a tent fold.
I cropped the frame from a piece of Evening Evergreen measuring 5-1/2 by 4-1/4 inches.
The DSP also measures 5-1/2 by 4-1/4 inches.
I trimmed a 5 by 3/4 inch strip of the DSP for the inside panel of the card.
As for the vast majority of the inside panels for my cards, I trimmed a piece of white cardstock to 5-1/4 by 4 inches.
Then, I trimmed a piece of the Evening Evergreen 6 x 6 inch DSP to 6 by 2-1/2 inches for the envelope flap. I punched a 1-inch circle from the Flora DSP for the envelope seal to finish off the measurements.
Assembly:
Adhere the Flora DSP directly to the card base using multipurpose liquid glue.
Wrap a length of Soft Succulent open weave ribbon around the bottom of the frame. Attach it to the back of the card using small pieces of tear and tape.
Add dimensionals to the back of the frame, and adhere to the Flora DSP;
Tie a double loop bow from twine around the ribbon on the front of the card. Add a glue dot behind the bow to keep it in place on the frame.
Use an embossing buddy on a piece of cardstock vellum.
I used the Charming Sentiments stamp set, and stamped the sentiment using Versamark.
Add gold embossing powder to the sentiment and heat set.
Then, I cropped the sentiment using the Stylish Shapes die set and trimmed the bottom part of the circle.
I’ve found one of the easiest ways to adhere vellum is to use a foam brush and add a light layer of liquid glue to the back of the entire piece of vellum cardstock.
Adhere the vellum to the front of the card, tucking it under the frame.
Add three gold jewels to the front of the card.
I also embossed the inside sentiment using gold powder.
Then, I adhered the strip of DSP to the bottom of the white cardstock.
Finally, I adhered the white cardstock to the inside base of the card.
With that, I’d finished this coordinated card, envelope, and envelope seal set.
There are new and returning colors coming with the new catalog! Sadly, there are also colors that will be retiring. One that makes me sad is Mango Melody, mainly because I’ve recently started really playing with it.
Take a look at this SU! video with the new, returning, and retiring colors:
\
LAST CHANCE up to 60% OFF ITEMS from the CURRENT and MINI Catalogs
Just take a look at these LAST CHANCE lists! I know they are small, but click on the images to download or enlarge them. I’m always sad to see what’s retiring, but then I think of all I can sell when the current catalog ends so I can get new goodies!
Welcome to the newest Make My Monday two-week challenge.. Our host for #197, Pamela, chose P is for …… In my case, I am going with P is for Purple. When you finish here, I hope you will visit the challenge site to see all the different and fabulous interpretations of this challenge. I’m looking forward to seeing what you all create and post to our gallery.
I also want to thank all of you who uploaded an entry for the challenge #196, Spring Colors, which I hosted. Picking my top five favorites was very difficult.
Here’s my P is for …Purple card:
Measurements:
The Gorgeous Grape base measures 8-1/2 by 5-1/2 inches, scored at 4-1/4 inches.
Trim a piece of black cardstock to 4-1/8 inches by 5-3/8 inches.
Next, trim a piece of Hues of Happiness DSP (designer series paper) to 4-1/8 by 5-3/8 inches.
Using the Split Textures die, crop the lower side of the DSP.
Trim a piece of Hues of Happiness DSP to 6 by 2-1/2 inches for the envelope flap.
Then, trim another piece to 1/2 inch by 5-1/4 inches for the trim on the white cardstock on the inside of the card.
Punch a 1-inch circle or coordinating DSP for the envelope seal.
Trim a piece of white cardstock to 4 by 5-1/4 inches for the inside of the card.
Assembly:
Attach the DSP to the black cardstock using multipurpose liquid glue.
Wrap a length of Fresh Freesia ribbon around the DSP/cardstock layer and tie in a bow.
Use multipurpose liquid glue to adhere the DSP/cardstock to the base of the card.. Since the ribbon is so thin, you won’t need to use dimensionals.
Stamp the sentiment on a scrap piece of white cardstock. Then crop using a banner from the Stylish Shapes die set.
Outline the banner using the brush end of a Fresh Freesia Stamping Write Marker.
Add dimensionals under the banner and adhere to the front of the card placing it under the bow.
I had to fussy cut the flower and leaves but it was pretty easy to do so.
Add dimensionals and adhere the flower and leaves to the lower right-hand corner.
Adhere the strip of DSP to the white cardstock for the inside of the card.
I didn’t stamp a sentiment on the inside because the outside sentiment can be used for multiple occasions. When I decide to whom I will be sending this card, I’ll add a sentiment.
With that, I’d finished this coordinated card, envelope, and envelope seal set.
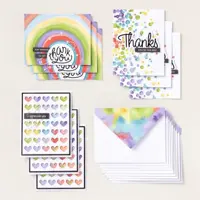
Stampin’ Up! has a number of all-inclusive kits available! If you have ever thought that you just couldn’t create cards, these kits are for you! Each kit comes with everything you will need, except for a stamp block in the stamping kits.
Here are just four of the kits available:
Just click on the image to see a larger picture of the kit!
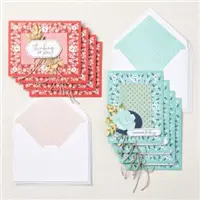
Non-Stamping Kits!
These kits are fabulous because you don’t even need an acrylic block!
My very favorite kit is now available! If you don’t know what to get for your mother for Mother’s Day, or just a gift for yourself, these card organizer kits are FABULOUS!
I have such a hard time shopping for my mom and my aunt for holidays, birthdays, etc. So, for this past Christmas, I got two of these card organizer kits, and put them together. I also included other cards from card kits and some I had created in bulk to split between the two gifts. All total, they received a completed organizer and more than 25 cards for all different occassions. I was so proud to give each one of them this beautiful combination of cards and the love that went into each part of them.
Take a look at just a few of these other non-stamping kits:
Welcome to the newest Make My Monday two-week challenge. It’s my turn to host, and I chose spring colors as the theme. The theme’s only requirement is that you use spring colors in your project. Anything else goes! When you finish here, I hope you will visit the blog site to see the inspiring projects from the rest of the design team.
Here’s my spring colors envelope flap fun fold card:
I’ve seen so many of these online, but for some strange and unknown reason, didn’t save them for the measurements. Therefore I had to figure out what would work for my card.
Since it is a fun fold, that means I get to submit it to the Creative Creases challenge! This challenge is my go-too challenge because the only requirement is that the card be a fun fold of more than one fold.
Here’s the Creative Creases Challenge banner:
Measurements:
The Shaded Spruce base measures 8-1/2 by 5-1/2 inches, scored by 4-1/4 inches.
I used the largest Scalloped Contour die in white cardstock for the front.
Then, I trimmed a piece of white cardstock to 5-1/2 by 4 inches for the inside panel.
The Regency Park DSP (designer series paper) started off as a 5-1/2 by 3-7/8 inches.
Score the DSP at 1-1/2 inches.
After putting a tick mark at the top center, trim the diagonals from the center down to each 1-1/2 inch fold.
HINT: I found it’s easier to have the envelope flap open and close using a steeper diagonal. The longer the envelope flap DSP, the more difficult it will be to open and close the card.
Next, I trimmed a piece of the DSP to 6 inches by 2-1/2 inches for the envelope flap. I also punched a 1-inch circle for the envelope seal out of coordinating DSP.
The Balmy Blue DSP measures 3-3/8 by 4-5/8 inches so it fits inside the scalloped frame.
I cropped a black cardstock circle using the largest Stylish Shapes circle die.
Stamping and Assembly:
First, I added the envelope flap DSP piece to the back of the card base.
Then, I stamped the Hand-Penned Petals outline stamp on a scrap of white cardstock using Momento Tuxedo Black ink.
Next, I used Balmy Blue, Petal Pink, and Mango Melody to stamp the interior of the flowers.
I used Shaded Spruce for the leaves.
Following the flowers on the DSP, I colored the pink and mango centers using my Sweet Sorbet marker. Each center is actually just a bunch of dots.
Next, I used my Mango Melody marker to color a bunch of dots in the center of the Balmy Blue flower.
Then, I used a regular white gel pen to add lines to the flowers and leaves to mimic the designs in the DSP.
Using the coordinating die set, crop the floral image.
After outlining the image with my Mango Melody marker, I used multipurpose liquid glue to adhere it to the black circle. The colors just pop off the black background.
I used the embossing buddy on the Balmy Blue DSP then stamped the sentiment using VersaMark ink.
Cover the sentiment with black embossing powder and heat set with your heat tool.
Adhere the blue DSP to the white scalloped frame using liquid glue.
I used the same floral image in Mango Melody ink for the inside white cardstock panel.
Then, I stamped another sentiment from the Hand-Penned Petals stamp set in Momento Tuxedo black.
Finally, I figured out where I needed to place dimensionals on the back of the black cardstock circle. The right side needs to stay open to allow the flap to slip under the circle. I added dimensionals at 12 o’clock, 6 o’clock, and 9 o’clock on the black of the circle.
Finally,after figuring out how far in the envelope flap would reach, I added a dimensional in the center of the circle.
With that, I’d finished this coordinated card, envelope, and envelope seal set.
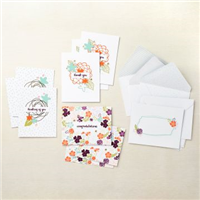
Stampin’ Up! has a bunch of all-inclusive kits available! If you have ever thought that you just couldn’t create cards, these kits are for you! Each kit comes with everything you will need, except for a stamp block in the stamping kits.
Here are just four of the kits available:
Just click on the image to see a larger picture of the kit!
Non-Stamping Kits!
These kits are fabulous because you don’t even need an acrylic block!
My very favorite kit is now available! If you don’t know what to get for your mother for Mother’s Day, or just a gift for yourself, these card organizer kits are FABULOUS!
I have such a hard time shopping for my mom and my aunt for holidays, birthdays, etc. So, for this past Christmas, I got two of these card organizer kits, and put them together. I also included other cards from card kits and some I had created in bulk to split between the two gifts. All total, they received a completed organizer and more than 25 cards for all different occassions. I was so proud to give each one of them this beautiful combination of cards and the love that went into each part of them.
Take a look at just a few of these other non-stamping kits:
Do you live in the United States? Do you want to place an order? Of course you do!
If you are placing an order under $150, please use the host code below.
If you are placing an order over $150, please contact me first so you can take advantage of the Stampin’ Rewards for your order!
HOST CODE for MARCH, 2023 is N46V3KNP.
Again, thank you for stopping by today! Please take another moment and leave a comment.
Welcome to the newest two-week Make My Monday challenge! Our host for #195, Mary V., chose Just Tag It as the theme. I’ve seen the creations from the rest of the design team, and they are as fabulous as they are varied. You don’t want to miss the inspiration, so please visit the challenge site when you are finished here. I’m looking forward to seeing what you create and add to the gallery.
I created a fun fold card using the Adorable Owls stamp set and the Happy Forest DSP (designer series paper). The Adorable Owls stamp set is available FREE with a $50 purchase until midnight (CST) on 02/28/2023! Don’t delay!
Here’s my card:
This fun fold will stand up on it’s own, as shown in the top set of photos. I’m also entering it in the current Creative Creases Challenge. I thoroughly enjoy that challenge because I love creating fun folds and that’s the only requirement since the rest of the challenge is always anything goes.
Taking part in the Creative Creases Challenge means that I also get to enter this card in the Double Trouble Challenge as well.
Measurements:
The Old Olive base measures 5-1/2 by 8-1/2, scored at 4-1/4 inches.
Make a tick mark on the open side of the card two inches up from the bottom.
Then trim the front of the card diagonally from the top fold corner down to the tick mark.
The Old Olive flap measures 5-1/2 by 3-5/8 inches, scored at 1 inch so the front part of the flap measures 4-1/2 by 3-5/8 inches.
Trim two pieces of Calypso Coral cardstock. The first measures 3-3/8 by 4-3/8 inches. The second piece measures 4 inches by 2-1/8 inches.
The ribbon covers most of the top, but I did punch it using a tag topper punch.
Next, I trimmed two pieces of white cardstock. The front tap piece measures 2 by 3-3/8 inches. The piece for the inside sentiment measures 2 by 3-7/8 inches.
I used scraps for the two Stylish Shapes circles for the inside owls. Since the backside of the flying owl would show, I also cropped an Old Olive circle to adhere to the back of the finished owl circle.
Trimming and Adhering the DSP layers:
The inside DSP piece measures 4-1/8 by 5-3/8 inches.
The top flap DSP measures 3-1/8 by 4-1/4 inches.
To create the diagonal piece of Calypso Coral DSP, I first trimmed the piece to 5-3/8 by 4-1/8 inches.
Then, I added a tick mark at 2 inches from the bottom on the right hand side of the DSP.
Next, I trimmed the DSP diagonally from the top left corner to the tick mark on the right hand side.
Then, I trimmed another piece of the Calypso Coral DSP to 6 by 2-1/2 inches for the envelope flap. I punched a 1 inch circle of the inside DSP for the envelope seal.
The Old Olive flap must be adhered first. I just eyeballed it to center the flap. Line up the crease of the flap with the top of the base of the card and adhere using multipurpose liquid glue.
Then, I adhered the inside and diagonal pieces of DSP using multipurpose liquid glue.
The same goes for the Calypso Coral cardstock and DSP on the flap of the card for the front.
Stamping and Coloring:
I stamped all three owls and the flap and inside sentiment in Momento Tuxedo Black.
Use an embossing buddy to clean off the Calypso Coral DSP. Stamp the sentiment using Versamark and cover with black embossing powder. Heat set with a heat tool.
I colored the owls using the Calypso Coral and Crumb Cake blends combos.
The faces and torsos were colored using the ivory blend.
I used the light Old Olive blend for the eyes.
Finally, I used the SU300 from the medium deep natural tone blends for the beaks and feet.
After coloring, I cropped two of the owls using the middle circle from the Stylish Shapes die set. Then, I adhered the middle owl to the Old Olive circle I’d previously cropped.
Stamp the sentiments on the flap and the inside using Momento Tuxedo Black ink.
Adhere the owl tag to the Calypso Coral cardstock Add dimensionals under the tag..
Tie a bow using the Faux Suede Early Espresso ribbon and attach with a glue dot.
Add faux stitching around the inside sentiment panel using a black marker.
Adhere the inside sentiment panel and owls using multipurpose liquid glue.
With that, I’d finished this coordinated fun fold card, envelope, and envelope seal.
NOTE: This card will require extra postage because of all the layers.
March 1, 2023 starts a new online exclusive promotion. The flyer below is a preview of just some of the wonderful products available. There are two returning colors in the set of DSP paper, including Pretty Peacock which has been one of my favorites.
Again, thank you for stopping by my blog today. Please take just another second to leave a comment. Thank you!
Welcome to Just Peachy Stamping by Sue Jackson: an independent Stampin' Up demonstrator.
Through Stampin' Up!, I happily share my love of papercrafting through sales, classes, small stamping group meet-ups and workshops. I think that being a teacher in my "real life", I have a unique approach to sharing my fantastic hobby. I look forward to connecting with you!


 \
\