Welcome to the latest Make My Monday two-week challenge. Our host for # 183, Debbie, chose “friend”ship. When you are finished here, I hope you will join us at the challenge site to see what the rest of the design team members created. I love that there’s always so many wonderful creations from which inspiration can be drawn. I hope you find something to spark an idea, and that you feel compelled to play along.
For my card, I chose the adorable Elephants on Parade bundle. I combined it with Happy Forest Friends DSP (designer series paper). I knew I wanted to make a double Z-fold card, I just had a difficult time figuring out the measurements for what I wanted to accomplish and wound up doing the card twice. It’s all good though because even the OOPS card is adorable and I’m going to take it to work and just leave it on the bookcase behind my desk.
Here’s my final card:
Since this is a fun fold, I will be entering it in the current Creative Creases challenge. I love fun folds, and this challenge theme is always anything goes with a fun fold. I have to make more fun folds so I can join this fun challenge more often! Check it out if you love creating fun fold cards!
Measurements:
The Old Olive base measures 5-1/2 by 11 inches, scored at 5-1/2 and 2-3/4 inches.
The Calypso Coral cardstock measures 8 x 4-3/4 inches, scored at 3-3/4 and 5-7/8 inches.
The So Saffron DSP 5-3/8 by 4-1/8 inches.
Both the Old Olive DSP and the leaves pattern DSP on the inside measure 2 by 5-3/8 inches. I also trimmed a piece of the leaves DSP to 6 inches by 2-1/2 inches for the envelope flap. Then, I punched a 1 inch circle from coordinating DSP for the envelope seal.
The tree DSP on the front measures 4-5/8 by 4-1/2 inches. I only needed half the width for the back panel of trees, so it measures 2 by 4-5/8 inches.
Finally, the blank white cardstock also measures 2 by 4-5/8 inches. I left it blank so I can decide on the inside sentiment when I’m ready to use the card. I temporarily attached it with repositionable tape so I can remove it when I need to stamp the sentiment.
All the DSP panels were adhered with my favorite adhesive, the multipurpose liquid adhesive. Before adhering the front trees DSP, I wrapped a piece of Old Olive ribbon around it and tied it in a square knot. This way, the elephants and sentiment don’t just float on the front of the card. The ribbon grounds everything.
Stamping, Coloring, and Cropping:
Since I used the blends for the vast majority of the coloring, I stamped all the elephant elements using the Momento Tuxedo Black ink pad.
Then, I used the light Petal Pink blend, dark and light Smoky Slate blends, and the light Basic Black blend for the elephants.
I used the Calypso Coral and So Saffron Stamping Write Markers. The black marker filled in the body of the butterflies.
Finally, I used the Crumb Cake blends to color the peanut.
I cropped the sentiment using one of the Stylish Shapes dies.
Everything else was cropped using the elephant dies. I decided to use some scraps of 6 x6 inch DSP to crop the balloons. Since I adhered them onto the stamped balloons, I just needed to trim off the excess . I really don’t think I could have colored the balloons half as cute as they turned out by using the DSP.
I used dimensionals for everything on the front panel of the card.
Since I didn’t want to add any more thickness to the card, I adhered everything on the back panel using multipurpose liquid glue.
With that, I’d finished this second coordinated card, envelope, and envelope seal set.
Who doesn’t absolutely love saving money with a weekly deal?
Check out the current weekly deals below:
Pair the weekly deals with the clearance rack, and you have some pretty fabulous savings:
If you live in the U.S. and don’t already have a demonstrator, I’d be honored to work with you.
Do You Want to Place an Order?
Of course you do, especially since you can earn FREE products with a qualifying purchase!
If you are ordering less than $150.00, please use the host code shown. If you are ordering more than $150.00, please contact me first so you an get your stamping rewards! Any order over $50 will earn a little surprise from me.
The HOST CODE through September 30, 2022 is W9GCXFZ6.
Once again, thank you for stopping by my blog today! I hope you will take another minute and leave a comment.
Welcome to Make My Monday card challenge # 182! Our host, Dawn, chose a back 2 school theme for this time around. When you are finished here, I hope you will visit the challenge website and see what the rest of the design team members created. I can’t wait to see your interpretation of our challenge, especially since mine needs some explaining!
Here’s my card:
Here’s my explanation on why this card goes with back 2 school:
Two years ago, during the summer of COVID, my daughter moved to Northern California in wine country to teach there. About a month ago, she moved from gorgeous wine country to San Francisco to start a new teaching position there. She’s always loved that city, and is thrilled with this new adventure. I created this card for her to celebrate her start of a new school year in a new city. So, you see, this card is for her own back 2 school.
Easy Peasy Card:
It took me longer to decide which colors to use than it did to create this clean-and-simple card. I simply let the DSP (designer series paper) do all the work. I didn’t even add any bling because I wanted the card to be all about the DSP.
The Merry Merlot base measures 4-1/4 by 11 inches, scored at 5-1/2 inches to create a tent card.
I used this stunning piece of DSP, which I trimmed down to 4-1/8 by 5-3/8 inches.
Next, I trimmed a coordinating piece of the DSP to 6 inches by 2-1/2 inches for the envelope flap. Then, I punched a 1-inch circle of DSP for the envelope seal, which I ran through my XYRON create-a-sticker.
I trimmed the white cardstock for the inside of the card to 5-1/4 by 4 inches and used a scrap piece for the sentiment banner.
Both sentiments come from the Color and Contour photopolymer stamp set, as does the floral spray I used for the inside and the front of the envelope. I stamped the sentiments and outlines for the floral sprays using Merry Merlot ink. Then, I stamped the flowers using Polished Pink ink.
After cropping the front sentiment using the smallest deckled rectangle die, I added mini-dimensionals on the underside of it. I wanted to have the sentiment rectangle stand out from the white parts of the background. Therefore, I outlined it using my Granny Apple Green Stamping Write Marker.
I wrapped a length of Polished Pink open-weave ribbon around the DSP and tie it in a bow.
Then, I adhered the sentiment over the ribbon.
Finally, I adhered the front and inside panels of the card using multipurpose liquid adhesive.
With that, I’d finished this quick and easy, clean and simple coordinated card, envelope, and envelope seal set.
Precut pieces (No prep work! Get right to crafting). Including printed die-cut sheets: sticker adhesive sheets & non-adhesive sheets
Makes 12 cards of 1 design
Gold foil accents
Folded card size: 5-1/2″ x 4-1/4″ (14 x 10.8 cm)
12 preprinted envelopes
Enough adhesive to complete projects
Linen thread
A 9-7/8″ x 6-1/2″ x 2-3/4″ (25.1 x 16.5 x 7 cm) printed designer box for storage or crafting on the go
Product colors: Cajun Craze, Early Espresso, Evening Evergreen, Garden Green, Poppy Parade, Pumpkin Pie
Sale-a-Bration is in full swing until midnight on 08/31/2022!!
Sale-a-Bration runs until August 31, 2022. This means you can earn FREE products for just a couple of days! Take a look at these Sale-a-Bration products!!
FREE WITH A QUALIFYING $50 ORDER:
NEW ITEMS HAVE BEEN ADDED TO THE PRODUCTS WHICH ARE FREE WITH A QUALIFYING $100 ORDER:
If you live in the U.S. and don’t already have a demonstrator, I’d be honored to work with you.
Do You Want to Place an Order?
Of course you do, especially since you can earn FREE products with a qualifying purchase!
If you are ordering less than $150.00, please use the host code shown. If you are ordering more than $150.00, please contact me first so you an get your stamping rewards! Any order over $50 will earn a little surprise from me.
The HOST CODE through August 31, 2022 is W4Q23RT4.
Once again, thank you for stopping by my blog today! I hope you will take another minute and leave a comment.
Welcome to the Make My Monday challenge, #181. Our host for this challenge, Meg, chose Christmas in August for the theme of this two-week challenge. When you are finished here, I hope you will visit the challenge blog to see what the rest of the design team members created. Then, I hope you’ll be inspired to play along with our challenge!
Here’s my Christmas in August card:
Measurements and Such:
The Evening Evergreen base measures 8-1/2 inches by 5-1/5 inches, scored at 4-1/4 inches.
This gorgeous background specialty DSP (designer series paper) measures 4-1/8 by 5-3/8 inches.
I trimmed a piece of Evening Evergreen DSP to 6 inches by 2-1/2 inches for the envelope flap. Then, I punched 1-inch circle from a piece of Soft Succulent DSP for the envelope seal.
I cropped a piece of Evening Evergreen using a die from the Deckled Rectangle set. Then, I ran it through my cut and emboss machine using the pine needles Wintery 3D embossing folder.
Then, I used a blending brush and my Soft Succulent ink pad to lightly highlight the pine needles. I finished this panel by splattering clear Wink of Stella on it. Then, I very carefully used multipurpose liquid glue to adhere the wonderful snowflake to the front of the panel, after which I wrapped a length of Soft Succulent ribbon and tied it in a bow.
Next, I stamped the sentiment in VersaMark on Evening Evergreen cardstock, and added silver embossing powder. After using my heat tool to set the embossing powder, I cropped the sentiment using the banner die from the Stylish Shapes die set. Finally, I outlined it using the clear Wink of Stella brush to give it sparkle and added dimensionals underneath it..
Then, I adhered the DSP and the Evening Evergreen panel using multipurpose liquid glue. After adding the popped up sentiment, I placed five rhinestone gems randomly on the front.
I stamped the inside sentiment in Evening Evergreen ink on a piece of white cardstock that measures 4 by 5-1/4 inches. After adhering the inside panel, I’d completed this coordinated card, envelope, and envelope seal set.
The new Holiday Mini-Catalog and Sale-a-Bration are in full swing!!
Sale-a-Bration runs from July 1 to August 31, 2022. This means you can earn FREE products for two months! Take a look at these Sale-a-Bration products!!
FREE WITH A QUALIFYING $50 ORDER:
NEW ITEMS HAVE BEEN ADDED TO THE PRODUCTS WHICH ARE FREE WITH A QUALIFYING $100 ORDER:
Here’s a link to the new Holiday Mini-Catalog, which runs through January 4, 2023.
Click on the following image to open the catalog:
If you live in the U.S. and don’t already have a demonstrator, I’d be honored to work with you.
Do You Want to Place an Order?
Of course you do, especially since you can earn FREE products with a qualifying purchase!
If you are ordering less than $150.00, please use the host code shown. If you are ordering more than $150.00, please contact me first so you an get your stamping rewards! Any order over $50 will earn a little surprise from me.
The HOST CODE through August 31, 2022 is W4Q23RT4.
Again, thank you for stopping by my blog today! I appreciate your comments and your time.
Welcome to my combination card for Make My Monday #180 and Sparkles Christmas Buddies #139. As you might know, MMM challenge run for two weeks and the Sparkles challenge runs for the month. For the MMM challenge our host, Jackie, chose spotlighting a technique. Helen, our host for Sparkles, chose the sentiment as a focal point. I combined them by creating a monochromatic Balmy Blue Christmas card. When you finish here, I hope you will visit each of the challenge sites to see what the rest of the design team members created.
Here’s my card:
Measurements:
The Balmy Blue base measures 8-1/2 by 5-1/2 inches, scored at 4-1/4 inches.
I used the Sale-a-Bration FREE Silver and Gold 6 x 6 specialty paper and trimmed it to 4-1/8 by 5-3/8 inches. I trimmed another piece of the specialty paper to 6 inches by 2-1/2 inches for the envelope flap.
I cropped the Balmy Blue sentiment panel using the Stylish Shapes dies.
The last measurement needed is for the white panel on the inside of the card. I trimmed that to 4 inches by 5-1/4 inches.
That’s all for the measurements.
The Technique and Sentiment:
The silver and gold specialty paper comes with a white background. I used a blending brush and Balmy Blue ink to color the DSP. In the past, I’d used a brayer and ink to color specialty designer paper. Using the blending brush creates a soft background onto which more ink can be laid if desired. It’s difficult to see in the photo, but the blending brush adds a soft texture to the ink on the white paper.
I also colored the specialty paper for the envelope flap.
The sentiment comes from the Hope and Peace stamp set, found in the current mini-catalog. It’s a beautiful stamp set and I love the graceful script font. I stamped it using VersaMark on a piece of Balmy Blue cardstock. Then, I added silver embossing powder and heat set it with my heat tool. I put dimensonals under the sentiment panel.
Next, I added two of the wonderful snowflakes to the specialty paper carefully using multipurpose liquid glue. Then, I added the sentiment panel to the specialty paper.
Since I wanted to add some sparkle to the specialty paper edges. I outlined them using the clear Wink of Stella pen.
The Balmy Blue double-stitched ribbon can be a bit stiff at first. I ran it through my fingers like I would with curling ribbon before tying it in a bow.
In order to accommodate for the ribbon, I added dimensionals under the specialty paper and adhered it to the base of the card.
Finally, I added 7 rhinestones randomly on the front of the card.
After stamping the inside, I’d finished this card and coordinated envelope.
The new Holiday Mini-Catalog and Sale-a-Bration are in full swing!!
Sale-a-Bration runs from July 1 to August 31, 2022. This means you can earn FREE products for two months! Take a look at these Sale-a-Bration products!!
Here’s a link to the new Holiday Mini-Catalog, which runs through January 4, 2023. Click on the following image to open the catalog:
If you live in the U.S. and don’t already have a demonstrator, I’d be honored to work with you.
Do You Want to Place an Order?
Of course you do, especially since you can earn FREE products with a qualifying purchase!
If you are ordering less than $150.00, please use the host code shown. If you are ordering more than $150.00, please contact me first so you an get your stamping rewards! Any order over $50 will earn a little surprise from me.
The HOST CODE through August 31, 2022 is W4Q23RT4.
Again, thank you for stopping by my blog today! I appreciate your comments and your time.
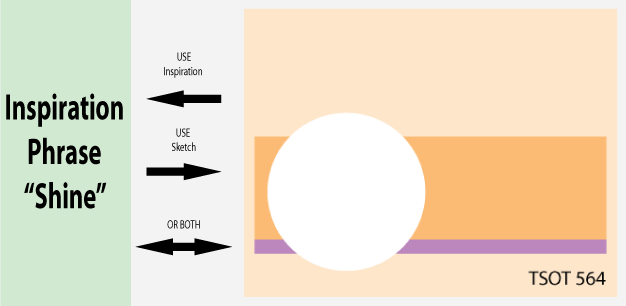
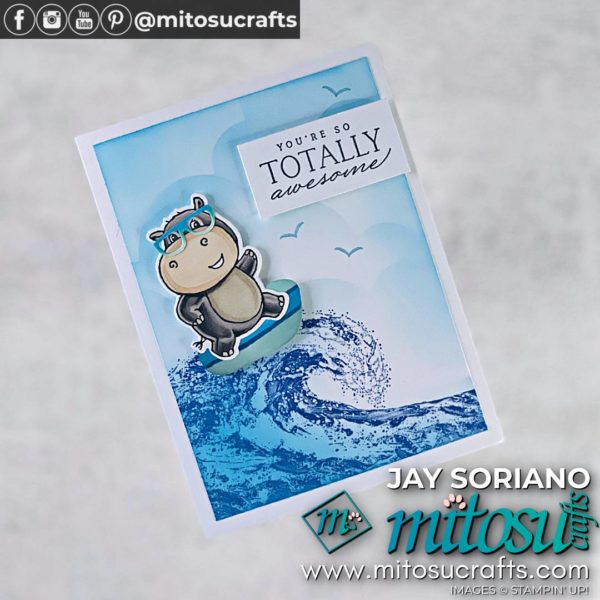
Welcome to the newest two-week challenge for Make My Monday. Our host for this challenge, Claudia, chose outdoor sports for the theme. I used the sketch challenge for Try Stampin’ on Tuesday 564 and a card by Jay Soriano of Mitosu Crafts as my inspiration.
Here’s my card:
Here’s the sketch banner from TSOT:
While I am sharing the latest challenge sketch from TSOT, I also need to say thank you, thank you, thank you! My card for challenge TSOT 562 was chosen as one of the top 3! Thank you to the design team at TSOT! You can see that card here.
Here’s the inspiration card from Jay Soriano:
This card is so adorable and creative! While Jay used just the Waves of Inspiration stamp set, I used the retired DSP, but the idea totally came from here. If you haven’t checked out the mitosucrafts.com website, I highly recommend that you do! They are extremely talented artists!
Measurements:
The Pacific Point base measures 5-1/2 by 8-1/2 inches, scored at 4-1/4 inches to create a tent card.
The Waves DSP (designer series paper) measures 5-3/8 by 4-1/8 inches. I also trimmed a piece of the DSP to 6 inches by 2-3/8 inches for the envelope flap. Then, I punched a 1 inch circle of coordinating DSP for the envelope seal, which I ran through my create-a-sticker.
Next, I trimmed a piece of white cardstock to 4 inches by 5-1/4 inches.
That’s it for measurements.
What I Did:
After rubbing my embossing buddy over a piece of Pacific Point cardstock, I stamped the wave on it using VersaMark.. Then, I covered it in white embossing powder and heat set it with my heat tool.
Next, I used the wave die and cropped the stamped wave. Since the die doesn’t match up exactly with the stamp, the result is a mottled look of white and Pacific Point.
I wanted two-toned waves, so I used a piece of Coastal Cabana and ran it through using the bark embossing folder. Then, I cropped it using the waves die.
I adhered the Pacific Point wave to white cardstock. Then, I adhered the Coastal Cabana pieces using multipurpose liquid adhesive. When I finished with that, I fussy cut the wave and popped it up on dimensionals.
I stamped the penguin in black ink on white cardstock, then added a Pumpkin Pie beak and foot. Then, I fussy cut him out.
Next, I used the hippo dies to crop the goggles and breathing tube out of Pacific Point cardstock and silver foil. I was able to use what I trimmed to make the strap for the goggles.
The penguin is popped up on dimensionals. I also added a tiny sliver of a mini-dimensional to the top of the breathing tube.
I stamped the sentiment from the Happy & Heartfelt stamp set in black in on white cardstock, then cropped it using a waves die.
Next, I adhered it to Pacific Point cardstock and fussy cut the label, which is also popped up on dimensionals.
Finally, I stamped another sentiment from Happy & Heartfelt on the white cardstock and adhered it to the inside of the card.
With that, this coordinated card, envelope, and envelope seal set was complete.
It’s July, 2022 ~ do you know what that means? The new Holiday Mini-Catalog and Sale-a-Bration are in full swing!!
Sale-a-Bration runs from July 1 to August 31, 2022. This means you can earn FREE products for two months! Take a look at these Sale-a-Bration products!!
Here’s a link to the new Holiday Mini-Catalog, which runs through January 4, 2023. Click on the following image to open the catalog:
If you live in the U.S. and don’t already have a demonstrator, I’d be honored to work with you.
Do You Want to Place an Order?
Of course you do, especially since you can earn FREE products with a qualifying purchase!
If you are ordering less than $150.00, please use the host code shown. If you are ordering more than $150.00, please contact me first so you an get your stamping rewards! Any order over $50 will earn a little surprise from me.
The HOST CODE through July 31, 2022 is UKDVYZSG.
Again, thank you for stopping by my blog today! I appreciate your comments and your time.
Welcome to the newest two week challenge for Make My Monday! Our host for challenge #178, Billie A., chose the theme of using splatters. What fun! When you finish here, I hope you will visit the challenge page to check out the fabulous projects from the rest of the design team. I hope you are inspired to play along with us!
Here’s my splatter card:
Here’s the challenge banner from Try Stamping on Tuesday # 562, which I used for inspiration. My three stripes turned out wider than the inspiration sketch, but I wanted to showcase the splatters.
Measurements:
The Starry Sky base measures 5-1/2 by 8-1/2 inches, scored at 4-1/4 inches.
Next, the white cardstock layer measures 4-1/8 by 5-3/8 inches. I also trimmed a piece of white cardstock to 4 by 5-1/4 inches for the inside.
The Real Red cardstock on the front measures 4 by 5-1/4 inches.
I trimmed a piece of the Starry Sky 6 x 6 inch DSP (designer series paper) to 6 inches by 2-1/2 inches for the envelope flap.
After I stamped the splatters, I trimmed the splattered white cardstock to 3-1/2 by 1-1/2 inches.
Stamping and Embossing:
I started with a white piece of cardstock and used Real Red and Starry Sky ink pads for the splatters. I used the two different splatters from the Gorgeous Leaves stamp set. First, I stamped the larger one in Starry Sky. Then I filled in with the smaller stamp in Real Red.
It’s difficult to see, but I stamped the splatter from Painted Poppies in VersaMark randomly around the white cardstock. Then, I covered all those splatters with white embossing powder and heat set it all with my heat tool.
Since I didn’t really get the effect I wanted with the white embossed splatters, I decided to add embossed white splatters on the Starry Sky splatters.
Then, I trimmed the white splattered cardstock down to the size I wanted.
Next, I used the Happy Birthday stamp from the Special Moments stamp set. I masked off the birthday part, and just stamped happy in Real Red ink on vellum cardstock. Then, I quickly added clear embossing powder and heat set it.
I used the Starry Sky 6 x 6 inch DSP to crop out TH using the Playful Alphabet dies. The 4 comes from the retired large numbers die set.
After cropping both circles using the Stylish Shapes dies, I adhered the 4th using multipurpose liquid adhesive. These letters/number allowed me to add liquid glue behind them to adhere the vellum to the front of the card.
For the happy circle, I needed to adhere it in a different way since the adhesive wouldn’t be hidden. So, I grabbed a make-up sponge and my silicone mat. I added liquid glue to the back of the vellum and used the sponge to spread it out evenly on the circle. An even layer of adhesive won’t show through the vellum cardstock.
Finishing Up:
The final touch on the front was to place nine red dots on the white cardstock panels. The ones on the outside of the 4th vellum circle help to anchor the edges to the front of the card.
Then, I punch a 1 inch circle out of some of the leftover splatter paper for the envelope seal. With that, I’d finished this coordinated card, envelope, and envelope seal set.
It’s July, 2022 ~ do you know what that means? The new Holiday Mini-Catalog and Sale-a-Bration are in full swing!!
Sale-a-Bration runs from July 1 to August 31, 2022. This means you can earn FREE products for two months! Take a look at these Sale-a-Bration products!!
Here’s a link to the new Holiday Mini-Catalog, which runs through January 4, 2023. Click on the following image to open the catalog:
Do You Want to Place an Order?
Of course you do, especially since you can earn FREE products with a qualifying purchase!
If you are ordering less than $150.00, please use the host code shown. If you are ordering more than $150.00, please contact me first so you an get your stamping rewards! Any order over $50 will earn a little surprise from me.
The HOST CODE through July 31, 2022 is UKDVYZSG.
Again, thank you for stopping by my blog today! I appreciate your comments and your time.
Welcome to Just Peachy Stamping by Sue Jackson: an independent Stampin' Up demonstrator.
Through Stampin' Up!, I happily share my love of papercrafting through sales, classes, small stamping group meet-ups and workshops. I think that being a teacher in my "real life", I have a unique approach to sharing my fantastic hobby. I look forward to connecting with you!