Welcome to InKing Royalty’s September Blog Hop! This month’s blog hop is dedicated to leaves. As the weather begins to cool, the leaves begin to change colors and fall from the trees. We are excited to share our creations and hope you love them! After you read my post, I hope you’ll hop over to the next person on the list at the base of this post.
Here’s my leafy card:
The Fond of Autumn bundle made creating this card super quick!
Measurements:
The Cajun Craze base measures 4-1/4 by 11 inches, scored at 5-1/2 inches to create a tent fold card.
I also trimmed a piece of Cajun Craze to 4 by 5-1/4 inches for the background of the card.
The white cardstock panel on the inside also measures 4 by 5-1/4 inches.
The last measurement is for the envelope flap. I used a piece of Old Olive 6 x 6 inch DSP trimmed to 6 inches by 2-1/2 inches.
Stamping, and Heat Embossing:
First, I used the large floral/leaf/acorn stamp and Cajun Craze ink to create the background design on the Cajun Craze panel. Since I knew the very center of the panel would be covered, I just worked my way around the outside of the panel. I did rotate the stamp so that the pattern would appear more random..
Then, I used the Cajun Craze marker to outline the panel and added dimensionals to the back of the panel. I also stamped the bottom of the inside white cardstock panel and the bottom of the front of the envelope. Using a piece of scrap white cardstock, I stamped a small section of the leaves and punched out a 1-inch circle for the envelope seal.
I wanted/needed this to be a Thanksgiving card, so I used a (retired) Happy Thanksgiving stamp in Soft Suede for the inside sentiment.
Using a Versamark ink pad, I stamped the same floral/leaf/acorn stamp on white cardstock. In addition, I stamped three of the single leaves. Then, I added black embossing powder and heat set everything.
Coloring with the blends was a bit easier since the edges were all embossed. I used the Old Olive blends combo, as well as the Cajun Craze blends combo..
The acorn just peeks out under the sentiment, and I used the Crumb Cake blends combo for that acorn.
Cropping:
After I finished coloring, I used the detailed die from the bundle. This has to be one of my all-time favorite dies! Just look at the results, which come from another blog post, which you can see here.
For this card, I used the three pieces on the bottom of the first picture. In addition, I had three of the individually cropped leaves, to which I added dimensionals.
Next, I cropped the Soft Suede cardstock label using the Painted Labels die set.
I stamped the sentiment, from the Fond of Autumn stamp set, in Soft Suede and cropped it using a die from the Deckled Rectangles die set (another favorite). To ensure that the sentiment label would pop off the leaves, I outlined it with the Cajun Craze marker and added dimensionals.
Finally, I folded a length of linen thread in half and tied it in a bow. I added it to the Soft Suede cardstock label using a glue dot.
With that, I’d finished this coordinated card, envelope, and envelope seal set.
Back to the InKing Royalty Blog Hop:
Thank you for stopping by today. I hope you’ll hop along to the next stop on the blog hop, Lynn Kolcun at Avery’s Owlery. There’s lots of inspiration to be found in this group – and you don’t want to miss it!
Thank you for hopping along with us. If you get stuck during the Blog Hop, please use this line-up as a guide:
Who doesn’t absolutely love saving money with a weekly deal?
Check out the current weekly deals below:
Pair the weekly deals with the clearance rack, and you have some pretty fabulous savings:
If you live in the U.S. and don’t already have a demonstrator, I’d be honored to work with you.
Do You Want to Place an Order?
Of course you do, especially since you can earn FREE products with a qualifying purchase!
If you are ordering less than $150.00, please use the host code shown. If you are ordering more than $150.00, please contact me first so you an get your stamping rewards! Any order over $50 will earn a little surprise from me.
The HOST CODE through September 30, 2022 is W9GCXFZ6.
Once again, thank you for stopping by my blog today! I hope you will take another minute and leave a comment.
Welcome to InKing Royalty’s August Blog Hop! Can you believe it’s already time for schools to start back up?! The return to school after summer vacation is a really big deal for students, teachers, school workers and the parents who are left home alone. To honor this big event, we have created projects with a back to school theme. We are excited to share our creations and hope you love them! After you read my post, I hope you’ll hop over to the next person on the list at the base of this post.
Here’s what I created for Back to School:
Last month I had to explain my Summer Fun card for July’s IRBH. Now, I need to explain how these cards fit with the Back to School theme for August. I teach high school, and our kids came back to school a week ago today. Our school colors are black and gold, and the mascot is a hornet. I mass produced these 3-1/2 by 5 inch notecards using the Gingham Cottage DSP (designer series paper) found in the current holiday catalog. To create each of the hornets, I used the ladybug builder punch, black cardstock, and two sets of wings punched from vellum cardstock I handed them out to friends at school on the first day.
Measurements:
The Basic White bases measure 7 inches by 5 inches, scored at 3-1/2 inches to create a tent fold.
Next, I trimmed Crushed Curry cardstock to 3-1/2 by 5 inches for the front of the card.
I trimmed the Gingham Cottage DSP to 3-3/8 by 4-7/8 inches.
I cropped the Painted Label die under the hornet from Crushed Curry cardstock.
The notecard envelopes didn’t get any special treatment, mainly because I didn’t have enough Gingham Cottage DSP.
That’s it for the measurements. Simple, sweet, with a perfect sentiment.
The Hornets:
I started by punching ladybug bodies from black cardstock.
Next, I used a gold Sharpie marker to draw three lines on each body. Then, I went over the gold line with my gold Wink of Stella pen to add shimmer.
I punched two sets of vellum wings per “hornet” and added a light coating of clear Wink of Stella for some sparkle.
Then, I used the clear Wink of Stella pen to outline each “hornet” for more sparkle.
I cut one set of wings in half to be able to glue them separately for the top set of wings. Then, I added the bottom set on top of these. Since I knew I’d cover the center of the wings with matte black dots, I used small dots of multipurpose liquid glue to adhere the vellum.
Hornets have stingers, so I added tiny triangular stingers cut from black cardstock.
Finally, I added the googly eyes. Who doesn’t love googly eyes? Since I have more than 1, 100 of them, I get to use them as much as I want.
Back to the InKing Royalty Blog Hop:
Thank you for stopping by today. I hope you’ll hop along to the next stop on the blog hop, Renae Novack at Blessed by Cards. There’s lots of inspiration to be found in this group – and you don’t want to miss it!
Thank you for hopping along with us. If you get stuck during the Blog Hop, please use this line-up as a guide:
Precut pieces (No prep work! Get right to crafting). Including printed die-cut sheets: sticker adhesive sheets & non-adhesive sheets
Makes 12 cards of 1 design
Gold foil accents
Folded card size: 5-1/2″ x 4-1/4″ (14 x 10.8 cm)
12 preprinted envelopes
Enough adhesive to complete projects
Linen thread
A 9-7/8″ x 6-1/2″ x 2-3/4″ (25.1 x 16.5 x 7 cm) printed designer box for storage or crafting on the go
Product colors: Cajun Craze, Early Espresso, Evening Evergreen, Garden Green, Poppy Parade, Pumpkin Pie
Sale-a-Bration is in full swing for two more weeks!!
Sale-a-Bration runs until August 31, 2022. This means you can earn FREE products for two more weeks! Take a look at these Sale-a-Bration products!!
FREE WITH A QUALIFYING $50 ORDER:
NEW ITEMS HAVE BEEN ADDED TO THE PRODUCTS WHICH ARE FREE WITH A QUALIFYING $100 ORDER:
If you live in the U.S. and don’t already have a demonstrator, I’d be honored to work with you.
Do You Want to Place an Order?
Of course you do, especially since you can earn FREE products with a qualifying purchase!
If you are ordering less than $150.00, please use the host code shown. If you are ordering more than $150.00, please contact me first so you an get your stamping rewards! Any order over $50 will earn a little surprise from me.
The HOST CODE through August 31, 2022 is W4Q23RT4.
Again, thank you for stopping by my blog today. Please feel free to leave a comment!
Welcome to InKing Royalty’s June Blog Hop! As we prepare for the July 4 holiday ahead, we are sharing projects that celebrate the Red, White & Blue. Not all projects will be patriotic, but you are certain to be inspired by all of them. After you read my post, I hope you’ll hop over to the next person on the list at the base of this post.
My hairstylist loves displaying cards I’ve made for her in her salon loft. Her birthday is next month, so I made her a red, white, and blue birthday card. She’ll keep it on display until my August hair appointment..
Without further ado, here’s my card:
Once again, I used the Sketch Saturday challenge for the layout of this card. I posted a Father’s Day card using this layout on Monday and you can find that card here. This red, white, and blue version came together very quickly since I already had the measurements figured out.
Here’s the challenge banner from Sketch Saturday:
Measurements:
The Real Red base measures 5-1/2 by 8-1/2 inches, scored at 4-1/4 to create a tent fold card.
I ran a piece of white cardstock through my cut and emboss machine using the brick 3D embossing folder. Then, I trimmed it to 4-18 by 5-3/8 inches.
The Sun Prints blue and white piece of DSP (designer series paper) used for the first layer measures 3-1/2 by 3-3/8 inches. I chose this pattern because I thought it kind of looked like fireworks. Then, I trimmed a piece of this DSP to 6 by 2-1/2 inches for the envelope flap.
Next, I trimmed the red cardstock to 2-3/4 by 3-3/8 inches after I ran it through the Painted Texture 3D embossing folder.
The Starry Sky speckled DSP measures 2-1/2 by 3-1/8 inches. Next, punched a 1-inch circle from this DSP to use for the envelope seal..
This fun sentiment on the front comes from the Hello Ladybug stamp set. I stamped the sentiment on white cardstock using Starry Sky ink. Then I cropped the sentiment and the red cardstock using the stylish shapes die set. After adhering the two squares using multipurpose liquid glue, I put dimensionals under the red square.
I used the same die set to crop the red banner sticking out from the left side of the card.
The inside sentiment, “Best Wishes and Happy Thoughts”, comes from the Nature’s Prints stamp set. I stamped it using Starry Sky on white cardstock.
Next, I added red dots on the left side of the card and on all four corners of the sentiment panel.
Finally, I tied a bunny-ears bow using the Starry Sky metallic woven ribbon and adhered it with a glue dot.
Back to the InKing Royalty Blog Hop:
Thank you for stopping by today. I hope you’ll hop along to the next stop on the blog hop, Jackie Beers at Blue Line Stamping. There’s lots of inspiration to be found in this group – and you don’t want to miss it!
Thank you for hopping along with us. If you get stuck during the Blog Hop, please use this line-up as a guide:
From now until June 30, 2022, all kits are buy one, get one 50% off! Just look at some of the kits available!
Do You Want to Place an Order?
Of course you do!
If you are ordering less than $150.00, please use the host code shown. If you are ordering more than $150.00, please contact me first so you can get your stamping rewards! Any order over $50 will earn a little surprise from me.
The HOST CODE through June 30, 2022 is 6YTD44QQ.
Again, thank you for stopping by my blog today! I appreciate your comments and your time.
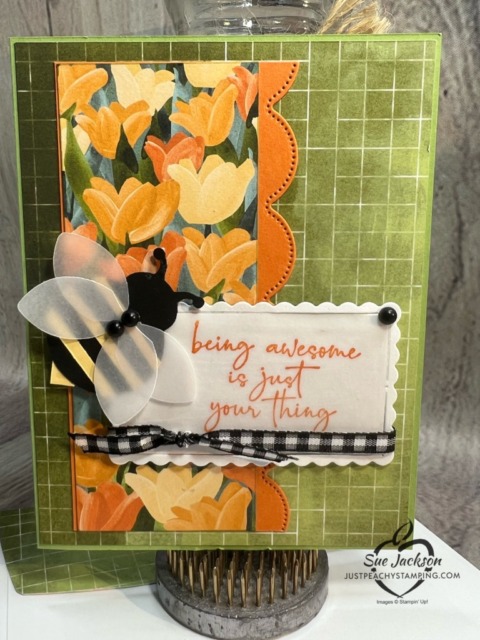
Welcome to InKing Royalty’s May Blog Hop! Spring is just around the corner, so we are sharing Spring projects with bees and birds. We are excited to share our creations and hope you love them! After you read my post, I hope you’ll hop over to the next person on the list at the base of this post.
Here’s my card:
I used the Try Stampin’ on Tuesday sketch #555 for my layout. Here’s their challenge banner:
Measurements:
The Pear Pizazz base measures 5-1/2 inches by 8-1/2 inches, scored at 4-1/4 inches.
Both DSP (designer series paper) patterns come from the Flowering Fields 12 x 12 DSP pack. The green piece measures 4-1/8 inches by 5-3/8 inches. The floral DSP measures 2 inches by 5 inches and I outlined it with a Pear Pizazz marker.
I trimmed another piece of green DSP to 6 inches by 2-1/2 inches for the envelope flap. While I had the DSP handy, I punched out a 1 inch circle from the floral DSP for the envelope seal.
Next, I trimmed a Pumpkin Pie mat for the floral DSP. I started with a piece that measured 2-3/4 inches by 6 inches. After cropping the scalloped trim using a die from the Scalloped Contour die set, I figured out how to get the scallops basically even on the top and bottom.
All of the pieces so far were adhered with multipurpose liquid glue.
The sentiment panel consists of a piece of white cardstock cropped with another die from the scalloped contours die set. The vellum panel fits right inside the scalloped contour outline. Then, I used dimensionals under the sentiment panel.
I trimmed a piece of white cardstock to to 4 inches by 5-1/4 inches for the inside of the card. I left it blank so the card can be used as an all-occasion card
Putting It Together:
This adorable bee was punched using the ladybug builder punch. I punched the body from black cardstock.
Then I trimmed 1/8 inch stripes from So Saffron cardstock. I simply cut off a corner of So Saffron to make the stinger.
Many thanks to a good friend who helped me figure out the wings. I knew I needed to use vellum cardstock for the wings. I punched two sets of vellum wings. Then, I cut one set apart to create the top horizontal set of wings. There’s little dots of liquid glue holding the wings together.
Finally, I added the two matte black dots to the wings. Cuteness overload! Finally, I added dimensionals under the bee.
The sentiment comes from the Happy and Heartfelt stamp set. If you like sentiments, this stamp set is for you! I stamped it on vellum cardstock using Pumpkin Pie ink. Then, I quickly covered the ink with clear embossing powder and set it with my heat tool.
Adhering vellum can be tricky. To adhere this whole vellum piece to the white cardstock mat, I spread liquid glue very thinly to the back of the vellum.
Next, I wrapped a piece of black and white gingham ribbon around the sentiment and simply tied it in a square knot.
With that, I’d finished this coordinated card, envelope, and envelope seal set.
Back to the InKing Royalty Blog Hop Information:
Thank you for stopping by today. I hope you’ll hop along to the next stop on the blog hop, Candy Ford at Stamp Candy. There’s lots of inspiration to be found in this group – and you don’t want to miss it!
Thank you for hopping along with us. If you get stuck during the Blog Hop, please use this line-up as a guide:
Along with the new catalog, there’s a really fabulous joining bonus! As always, your starter kit is just $99 for $125 of your choice of products. The bonus? Over $66 of the new 2022 – 2024 In Color supplies! You get the following at no extra cost to you:
In Color Ink Pad Collection
and In Color Grid Paper
plus In Color Cardstock Collection
and the 6 x 6 inch In Color Designer Series Paper Assortments
Do You Want to Place an Order?
Of course you do!
If you are ordering less than $150.00, please use the host code shown. If you are ordering more than $150.00, please contact me first so you can get your stamping rewards! Any order over $50 will earn a little surprise from me.
The HOST CODE through May 31, 2022 is E3W722BD.
Again, thank you for stopping by my blog today! I appreciate your comments and your time.
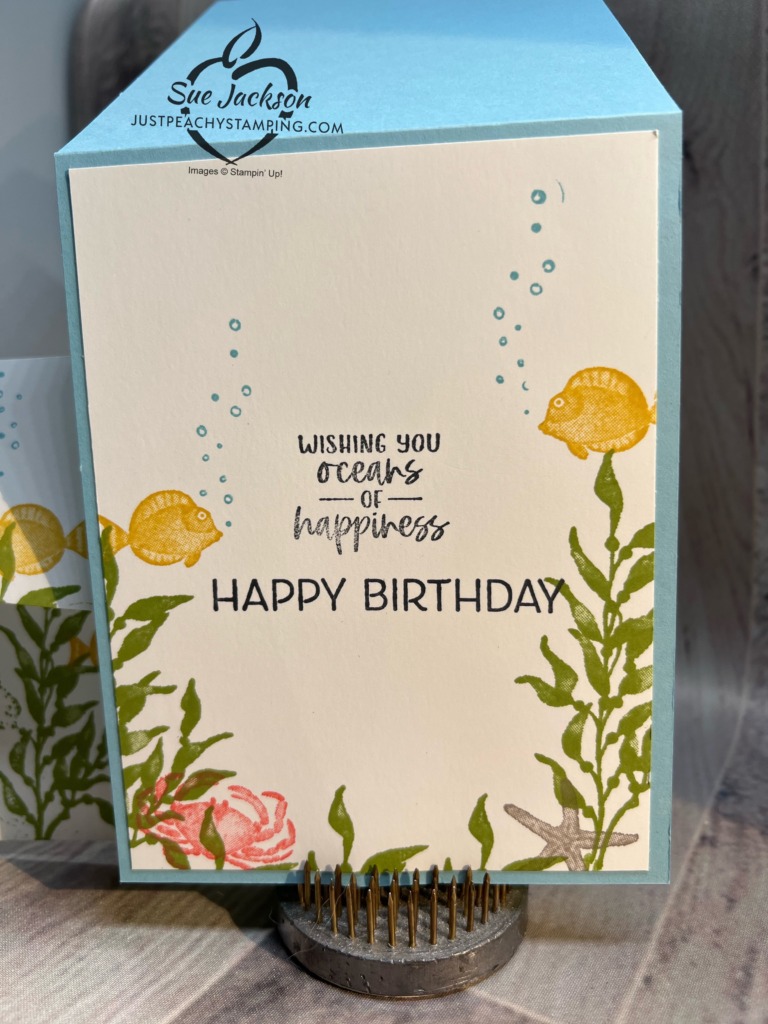
Welcome to InKing Royalty’s April Blog Hop! As the weather gets warmer, it’s time to start planning our trips to the beach, the lake or the in-town aquarium. Today we’re sharing projects inspired by the ocean and sea – we are excited to share our creations and hope you love them! After you read my post, I hope you’ll hop over to the next person on the list at the base of this post.
I chose to use the Seas the Day stamp set and coordinating dies for the hop today. I also used the Gentle Waves background stamp, but more on that in just a bit.
Here’s my Seas the Day card:
While the card may look complicated, when it’s broken down it becomes just a matter of steps.
Measurements:
The Balmy Blue base of the card measures 4-1/4 inches by 11 inches, scored at 5-1/2 inches to create a tent card.
Next, I trimmed another piece of Balmy Blue to 4-1/8 inches by 5-3/8 inches for the top.
I tried to use as little colored cardstock as possible for the front, so I used scraps for the Calypso Coral and Garden Green pieces.
The inside white cardstock panel measures 4 inches by 5-1/4 inches.
Finally, I used some white cardstock scraps for all the stamping and cropping of the starfish, crab, octopus, and fish.
Let’s Break the Card Down:
First, I created the outside top layer. I started by stamping the Balmy Blue cardstock with Balmy Blue ink using the Gentle Waves background stamp. Since the stamp is a horizontal stamp, I needed to stamp, then mask. Here’s an example:
I repeated the stamp, mask, stamp process on the front of the base of the card as well.
Here’s a picture of this fabulous background stamp:
It’s so pretty! If you want this stamp, you need to get it before the mini-catalog ends on June 30, 2022! The Seas the Day bundle is also in the mini-catalog, so just plan to get the bundle and background stamp. Very definitely worth it!
Next, I used the background die from the coordinating Seas Die set to crop the ocean scene from my top layer of Balmy Blue cardstock.
Then I cropped the background die again using the Garden Green scraps and the Calypso Coral scrap. I just needed to snip the unwanted pieces off. Next, I lined up the new layers on the blue layers and adhere them down.
After adhering the seaweed pieces together, I cropped the longer branched pieces of seaweed.
I added dimensionals under the cropped background and adhered it to the base of the card.
Dry-fitting the Layout:
Before doing any of the stamping and cropping of the animals, I used the dies to play around with the placement of each.
Here’s the final dry-fit layout (but please excuse my much loved grid paper underneath):
Now, I just had to stamp and crop each. I used Rich Razzleberry for the octopus, Flirty Flamingo for the crab, Grey Granite for the starfish, and Bumblebee for the fish. I did stamp the bubbles in Balmy Blue directly onto the base of the card.
The octopus and one of the fish are popped up on dimensionals. I adhered the other pieces directly to the cardstock using my favorite multipurpose liquid adhesive.
It took me until the very end to decide what to do about the sentiment. I decided to stamp the sentiment on part of the cropped out front layer. Then, I cropped it using one of the Scalloped Contour dies. I wanted the rest of the card to be the focal point, so I adhered this directly to the cardstock.
Inside and Envelope Stamping:
I tried to mimic the front for the inside of the card. The oceans of happiness sentiment comes from Seas the Day. I got the Happy Birthday sentiment from the Artistically Inked stamp set.
The front of the envelope has just a bit of stamping on the bottom and left side. While stamping the front, I somehow got Garden Green ink on the back of the envelope. It was an easy fix by stamping seaweed, fish, and bubbles to decorate the back of the envelope. Problem solved.
With that, I’d finished this coordinated card and envelope set.
Back to the InKing Royalty Blog Hop:
Thank you for stopping by today. I hope you’ll hop along to the next stop on the blog hop, Candy Ford at Stamp Candy. There’s lots of inspiration to be found in this group – and you don’t want to miss it!
Thank you for hopping along with us. If you get stuck during the Blog Hop, please use this line-up as a guide:
As a demonstrator, I’ve already seen the new 2022 – 2023 catalog and it’s fabulous! I am thrilled to be able to pre-order products on Friday, April 1st (no fooling!). While I can’t show you the inside pages of the catalog, I can share the new 2022 – 2024 In Colors with you! Get ready!
Do you live in the U.S. and need a demonstrator? If so, I’d love to talk to you!
Do You Want to Place an Order?
Of course you do!
If you are ordering less than $150.00, please use the host code shown. If you are ordering more than $150.00, please contact me first so you can get your stamping rewards! Any order over $50 will earn a little surprise from me.
The HOST CODE through April 30, 2022 is VRBF62NN.
Again, thank you for stopping by my blog today! I appreciate your comments and your time.
Welcome to InKing Royalty’s March Blog Hop! As we prepare for Spring, flowers are always on our minds. We are sharing flower-themed projects with you today and hope you love them! After you read my post, I hope you’ll hop over to the next person on the list at the base of this post.
Two Cards, One Blog Hop
I’ve already said I enjoy watching and learning from Jan B’s tutorial videos, and the bookbinding shutter card is what I created for the blog hop. However, since the card is involved, not complicated, just involved, I wanted to include a more mainstream card.
Before I share the bookbinding shutter fold card, I also created a “regular” card using the same materials. Here’s that card:
Measurements and Such:
Both sentiments come from the Easter Friends stamp set. I could very easily make this a birthday card by simply changing the inside sentiment.
The Garden Green base measures 5-1/2 inches by 8-1/2 inches, scored at 4-1/4 inches.
Next, the Basic White layer measures 5-3/8 inches by 4-1/8 inches.
The top layer of DSP measures 4 inches by 5-1/4 inches. I also trimmed a piece of this DSP to 6 inches by 2-1/2 inches for the envelope flap.
I used the Scalloped Contour dies for both the Pale Payapa DSP (designer series paper) pattern and the Basic White layer.
The white panel on the inside measures 4 inches by 5-1/4 inches.
Now, for the Bookbinding Shutter Fold Card:
The size of the finished fun fold card is 5-3/4 inches by 5-3/4 inches. Therefore, I am going to have to make an envelope specifically for this card. Here in the U.S., it’s more expensive to mail a square card, so the envelope I make won’t be a square shape.
JanB’s video is about an hour long. One of the things I really like about her videos is that she gives you all the measurements right in the beginning. Therefore, I write down all the measurements while she’s giving them. Then, I pause the video and do all my trimming and scoring before proceeding with her videos. I made another bookbinding shuttercard and a coordinating “regular” card yesterday, which will be for a future Cardz 4 Galz design team entry
HINT: I learned a huge lesson when creating the first card: I would strongly suggest laying out your DSP pieces before you decide on the decorations. The following is my dry run for today’s card:
Once I had my pieces laid out, I was able to go back and decide on the embellishments for the inside. It was much, much easier to make design decisions when I laid all these out first.
Back to the InKing Royalty Blog Hop:
Thank you for stopping by today. I hope you’ll hop along to the next stop on the blog hop, Candy Ford at Stamp Candy. There’s lots of inspiration to be found in this group – and you don’t want to miss it!
Thank you for hopping along with us. If you get stuck during the Blog Hop, please use this line-up as a guide:
This Mini Stampin’ Cut and Emboss machine WILL be on my next order! The special is available as long as supplies last, so don’t miss out on the machine or the select bundles! 20% off?!?! Yes, please!!
Do you live in the U.S. and need a demonstrator? If so, I’d love to talk to you!
Do You Want to Place an Order?
Of course you do!
If you are ordering less than $150.00, please use the host code shown. If you are ordering more than $150.00, please contact me first so you can get your stamping rewards! Any order over $50 will earn a little surprise from me.
The HOST CODE through March 31, 2022 is KNS7N3KP.
Again, thank you for stopping by my blog today! I appreciate your comments and your time.
Welcome to Just Peachy Stamping by Sue Jackson: an independent Stampin' Up demonstrator.
Through Stampin' Up!, I happily share my love of papercrafting through sales, classes, small stamping group meet-ups and workshops. I think that being a teacher in my "real life", I have a unique approach to sharing my fantastic hobby. I look forward to connecting with you!