
Welcome to InKing Royalty’s May Blog Hop! Spring is just around the corner, so we are sharing Spring projects with bees and birds. We are excited to share our creations and hope you love them! After you read my post, I hope you’ll hop over to the next person on the list at the base of this post.
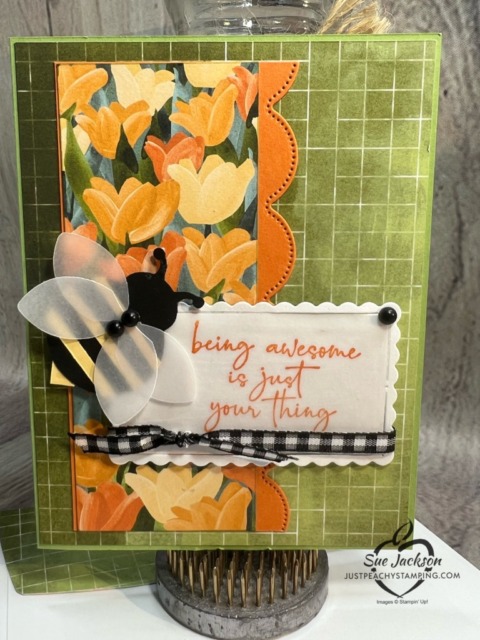
Here’s my card:
I used the Try Stampin’ on Tuesday sketch #555 for my layout. Here’s their challenge banner:

Measurements:
- The Pear Pizazz base measures 5-1/2 inches by 8-1/2 inches, scored at 4-1/4 inches.
- Both DSP (designer series paper) patterns come from the Flowering Fields 12 x 12 DSP pack. The green piece measures 4-1/8 inches by 5-3/8 inches. The floral DSP measures 2 inches by 5 inches and I outlined it with a Pear Pizazz marker.
- I trimmed another piece of green DSP to 6 inches by 2-1/2 inches for the envelope flap. While I had the DSP handy, I punched out a 1 inch circle from the floral DSP for the envelope seal.
- Next, I trimmed a Pumpkin Pie mat for the floral DSP. I started with a piece that measured 2-3/4 inches by 6 inches. After cropping the scalloped trim using a die from the Scalloped Contour die set, I figured out how to get the scallops basically even on the top and bottom.
- All of the pieces so far were adhered with multipurpose liquid glue.
- The sentiment panel consists of a piece of white cardstock cropped with another die from the scalloped contours die set. The vellum panel fits right inside the scalloped contour outline. Then, I used dimensionals under the sentiment panel.
- I trimmed a piece of white cardstock to to 4 inches by 5-1/4 inches for the inside of the card. I left it blank so the card can be used as an all-occasion card
Putting It Together:
- This adorable bee was punched using the ladybug builder punch. I punched the body from black cardstock.
- Then I trimmed 1/8 inch stripes from So Saffron cardstock. I simply cut off a corner of So Saffron to make the stinger.
- Many thanks to a good friend who helped me figure out the wings. I knew I needed to use vellum cardstock for the wings. I punched two sets of vellum wings. Then, I cut one set apart to create the top horizontal set of wings. There’s little dots of liquid glue holding the wings together.
- Finally, I added the two matte black dots to the wings. Cuteness overload! Finally, I added dimensionals under the bee.
- The sentiment comes from the Happy and Heartfelt stamp set. If you like sentiments, this stamp set is for you! I stamped it on vellum cardstock using Pumpkin Pie ink. Then, I quickly covered the ink with clear embossing powder and set it with my heat tool.
- Adhering vellum can be tricky. To adhere this whole vellum piece to the white cardstock mat, I spread liquid glue very thinly to the back of the vellum.
- Next, I wrapped a piece of black and white gingham ribbon around the sentiment and simply tied it in a square knot.
- With that, I’d finished this coordinated card, envelope, and envelope seal set.
Back to the InKing Royalty Blog Hop Information:
Thank you for stopping by today. I hope you’ll hop along to the next stop on the blog hop, Candy Ford at Stamp Candy. There’s lots of inspiration to be found in this group – and you don’t want to miss it!
Thank you for hopping along with us. If you get stuck during the Blog Hop, please use this line-up as a guide:
- Brian King at Stamp with Brian
- Sue Jackson at Just Peachy Stamping<<–YOU ARE HERE
- Candy Ford at Stamp Candy
- Renae Novak at Blessed by Cards
- Ann Murray at Murray Stamps Ink
- Pam Morris at Tap Tap Stamp
- Sheryl Abernathy at Elegant Sentiments
- Robin Myren at Songbird Designs by Robin
- Lynn Kolcun at Avery’s Owlery
- Jan Dufour at Stamp Me Silly
Thank you very much for stopping by my blog today!
Have a Peachy Day!
Sue
Colors Used:
Supplies Used:
Basic Crafting Supplies:
The 2022 – 2023 Catalog is Now Live!!
Here are just a few of my favorite new things:
But wait, there’s more:
Along with the new catalog, there’s a really fabulous joining bonus! As always, your starter kit is just $99 for $125 of your choice of products. The bonus? Over $66 of the new 2022 – 2024 In Color supplies! You get the following at no extra cost to you:
- In Color Ink Pad Collection
- and In Color Grid Paper
- plus In Color Cardstock Collection
- and the 6 x 6 inch In Color Designer Series Paper Assortments

Do You Want to Place an Order?
Of course you do!
If you are ordering less than $150.00, please use the host code shown. If you are ordering more than $150.00, please contact me first so you can get your stamping rewards! Any order over $50 will earn a little surprise from me.
The HOST CODE through May 31, 2022 is E3W722BD.
Again, thank you for stopping by my blog today! I appreciate your comments and your time.


You nailed the sketch with your cute card Sue. The colors are gorgeous.
Great sketch for inspiration. Your card is amazing! I love the scallops…they add so much!
Thanks, Pam. I’m glad the challenge had the scallops as well.
OK that does it. I am going to use the lady bug bundle and make big bees. Love your card!
I never thought to put an extra set of wings. How cool is that! Beautiful card!
Sue, great minds think alike. I love your ladybug bee. Great idea to have double wings. Love it
You nailed it with that BEE ! Too cute adding the black matte dots ! Also, love your great directions …..so easy to follow !
Great card, Sue! Love the colors, the layout, and that bee!
I love all the layers on your card. It really makes you look more than once to get the full effevt
Such a great card, Sue! I love this mix of Designer Series Paper and bee. That sentiment is perfection, too! So glad you joined us in the hop today. ♥
I love all the layers and detail in this beautiful card. So creative!
Sue, love your bold beautiful card you created using our Try Stampin’ on Tuesday sketch! The bee is so cute and looks very happy buzzing above the field of tulips. Thank you so much for sharing your card and talents with us at TSOT!!! -Donna
What a stunning color scheme! Just love the bee and the black and white bow. Thank you so much for sharing this beautiful card at Try Stampin’ On Tuesday.
Thank you! I really enjoy playing along with your sketches.
What a colorful card. I love all of the patterned papers. Thank you for joining us for this challenge at Try Stampin’ on Tuesday and look forward to seeing you again soon!
Anna, Design Team