Welcome to the Cardz 4 Guyz challenge #296, Dawn, our host for this challenge, chose wildlife for the theme. There’s a wide variety in the wildlife cards submitted by the design team members, and I hope you will visit the challenge site for inspiration. We’d love to have you play along with us!
Here’s my wildlife card:
In Florida, we have black bears. Lots of them, and not just in rural areas. However, since black bears are common, that’s what I used for this quick (relatively speaking) card.
Measurements and Such:
The Mossy Meadow base measures 8-1/2 inches by 5-1/2 inches. I scored it at 4-1/4 inches.
Next, I trimmed another piece of Mossy Meadow down to 4-1/4 inches by 5-1/2 inches. I ran that piece through my cut and emboss machine using the fern 3D embossing folder. Then I trimmed it to 4 inches by 5-1/4 inches and put dimensionals under it. The fern embossing folder really added so much texture to the mat for this card.
I used a leftover piece of Mossy Meadow DSP and trimmed it to 3/4 inch by 4 inches.
The gray striped DSP comes from the Heart and Home DSP, found in the current mini-catalog. I trimmed that layer to 4 inches by 1-1/4 inches. I layered both these DSP pieces and adhered them using multipurpose glue. Then, I punched a 1 inch circle out of the gray DSP for the envelope seal, which I ran through my XYRON create-a-sticker.
The Mossy Meadow DSP for the envelope flap measured 6 inches by 2-1/2 inches, which I adhered using the multipurpose glue and trimmed down.
Stamping:
The sentiment and the bear come from the Wildlife Wonder stamp set. All the wildlife stamps in this set are distinktive stamps, so the shading is already done for you. I stamped the bear using Momento Tuxedo Black ink. Then I used Basic Gray for the shadow under the bear. I really, really like how the shadow matches the stride of the bear so well. After stamping, I trimmed the white cardstock to 3-1/4 inches by 2-1/2 inches and attached it to the front of the card.
I stamped the sentiment in Mossy Meadow on white cardstock.. Next, I created banners from the white sentiment strip and the Basic Gray mat. The layers are adhered with multipurpose glue. I added dimensionals under the banner.
While I had the white cardstock handy, I trimmed a piece to 4 inches by 5-1/4 inches for the inside of the card.
HINT: I took two packs of white cardstock to my local FedEx office store and had them cut it down to 5-1/2 inches by 4-1/4 inches. I only had to pay for two cuts since they have a commercial guillotine cutter. Since I am left-handed, even the home use guillotine cutters scare the bejeebers out of me! I’m always afraid I will chop off something I would much rather keep attached to my body.
The card needed something before I could call it finished. I decided to add a line of three matte black dots to the top, left corner of the card. Then, I put one on the sentiment banner.
With that, I’d finished this coordinated card, envelope, and envelope seal set.
Along with the new catalog, there’s a really fabulous joining bonus! As always, your starter kit is just $99 for $125 of your choice of products. The bonus? Over $66 of the new 2022 – 2024 In Color supplies! You get the following at no extra cost to you:
In Color Ink Pad Collection
and In Color Grid Paper
plus In Color Cardstock Collection
and the 6 x 6 inch In Color Designer Series Paper Assortments
Do You Want to Place an Order?
Of course you do!
If you are ordering less than $150.00, please use the host code shown. If you are ordering more than $150.00, please contact me first so you can get your stamping rewards! Any order over $50 will earn a little surprise from me.
The HOST CODE through May 31, 2022 is E3W722BD.
Again, thank you for stopping by my blog today! I appreciate your comments and your time.
Welcome to the new Cardz 4 Guyz challenge # 295. For this challenge, Deb chose the theme of D is for………… The sky is the limit for this challenge! As long as your project is for a guy of any age and has to do with a word starting with D, it works! When you finish here, I hope you will pop over to the Cardz 4 Guyz challenge site to see the projects from the rest of the design team. Then, create your own project and add it to the gallery! Fun!
Here’s my D is for……. Dog card:
When I was growing up, we had a mini-schnauzer, and this cute little guy always brings back happy memories. He’s so cute, I had to use him on the inside and outside. The dog on the inside looks like I totally meant to put him in the corner to fit under the sentiment. However, I really didn’t have a choice on the placement of the pup. I’m running out of the dog DSP (designer series paper) and could only crop one without a tail. Whatever works, right?
Measurements and Such:
The Real Red base measures 5-1/2 inches by 8-1/2 inches. I scored it at 4-1/4 inches to create a tent card.
The Basic Black cardstock layer measures 5-3/8 inches by 4-1/8 inches.
The piece of red striped DSP for the envelope flap measures 6 inches by 2-1/2 inches.
I usually use thin borders for mats, but I had this piece of the background DSP already trimmed to 5-1/8 inches by 3-7/8 inches, so I really didn’t have a choice in the orientation of the card.
The black DSP square measures 2-5/8 inches squared. I popped it up on dimensionals and adhered the schnauzer directly to the DSP using 9my fav) multipurpose liquid glue. I didn’t add dimensionals under the pup so I could add a bone trinket and still have the card fit in the envelope.
This fabulous Happy Birthday sentiment comes from the Party Puffins cling stamp set. The playful font coordinates perfectly with the rest of the elements on the card.
I stamped both the inside and the outside sentiments using the Momento Tuxedo Black ink pad.
The Real Red banner measures 1-1/8 inches wide. I trimmed the white banner to 1 inch wide.
I thought the sentiment banner really needed a little something, so I added a matte black dot to the bottom corner.
After I adhered the pup on the inside to the white cardstock, I adhered that layer down to the base.
Finally, I trimmed the envelope flap and punched a 1 inch circle of the black DSP for the envelope seal. I started making envelope seals during COVID so I wouldn’t have to keep writing “no saliva was used to seal this envelope”. The XYRON create-a-sticker is perfect for these seals.
With that, I’d finished this coordinated card, envelope, and seal set.
Thankyou very much for stopping by my blog today!
Have a Peachy Day!
Sue
Today is the Day! The new annual catalog goes live today!
Here’s just a little bit of a preview:
I’m so happy that a number of items carried over into this catalog. However, I’m even happier with so many of the new products!
But wait, there’s more:
Along with the new catalog, there’s a really fabulous joining bonus! As always, your starter kit is just $99 for $125 of your choice of products. The bonus? Over $66 of the new 2022 – 2024 In Color supplies! You get the following at no extra cost to you:
Do you live in the U.S. and need a demonstrator? If so, I’d love to talk to you!
Do You Want to Place an Order?
Of course you do!
If you are ordering less than $150.00, please use the host code shown. If you are ordering more than $150.00, please contact me first so you can get your stamping rewards! Any order over $50 will earn a little surprise from me.
The HOST CODE through May 31, 2022 is E3W722BD.
Again, thank you for stopping by my blog today! I appreciate your comments and your time.
Leave a Reply
Today is the Day! The new annual catalog goes live today!
Here’s just a little bit of a preview:
I’m so happy that a number of items carried over into this catalog. However, I’m even happier with so many of the new products!
But wait, there’s more:
Along with the new catalog, there’s a really fabulous joining bonus! As always, your starter kit is just $99 for $125 of your choice of products. The bonus? Over $66 of the new 2022 – 2024 In Color supplies! You get the following at no extra cost to you:
Do you live in the U.S. and need a demonstrator? If so, I’d love to talk to you!
Do You Want to Place an Order?
Of course you do!
If you are ordering less than $150.00, please use the host code shown. If you are ordering more than $150.00, please contact me first so you can get your stamping rewards! Any order over $50 will earn a little surprise from me.
The HOST CODE through May 31, 2022 is E3W722BD.
Again, thank you for stopping by my blog today! I appreciate your comments and your time.
Welcome to a new challenge at Cardz 4 Guyz! For challenge # 293, Melanie has chosen the theme of adding texture. I added texture to almost every piece of paper on this card. Fun! When you finish here, I hope you will check out the cards from the rest of the design team members. Each one is unique and awesome!
Here’s my textured card:
What I Used and What I Did:
This card took almost no time to create, even with all the dry embossing. Therefore, the measurements and directions will be short and sweet.
The Misty Moonlight base measures 5-1/2 inches by 8-1/2 inches, scored at 4-1/4 inches.
I used the retired World of Good DSP (designer series paper) for the front of the card. I trimmed a piece of the Mossy Meadow DSP to 6 by 6 inches. Then, I ran it through my cut and emboss machine using the Subtles embossing folder. There are some things I won’t give up simply because they retired – including masculine DSP and the Subtles embossing folder. Next, I trimmed the DSP to 41/8 inches by 5-3/8 inches. If I had trimmed the DSP to size before embossing, the DSP might have been too small for what I wanted.
I also used this Mossy Meadow DSP pattern for the envelope flap. As when using embossing folders, I ran this piece through the cut and emboss machine using the bark 3D embossing folder. Then, I trimmed it to 6 inches by 2-1/2 inches.
Then, I ran a piece of the Misty Moonlight DSP compass rose pattern through the cut and emboss machine using the Painted Texture 3D embossing folder. After it was embossed, I trimmed three pieces to 1/2 inch by 5 inches.
I made this card for friends who are moving from Florida to Georgia and I wanted the top DSP to include something about the move. So, I picked the map DSP and cropped it using a stitched rectangle die. I made sure that at least a small part of Florida (the Keys) and part of Georgia would show behind the sentiment tag. Since this DSP already had enough details I chose not to emboss it..
I decided to add a piece of burlap ribbon under the map DSP to add yet another texture.
Finishing Up:
The very appropriate sentiment came from the Timeless Tropical cling stamp set. I stamped it in Momento Tuxedo Black ink on a piece of Very Vanilla Cardstock. The sentiment mat is cut from Misty Moonlight. I used the Banners Pick a Punch for each piece of cardstock and then adhered them together.
I used dimensionals under the map DSP to accommodate the burlap ribbon. There are also dimensionals under the sentiment tag. I used my favorite multipurpose liquid adhesive for everything else.
After trimming the DSP on the envelope flap, and making the envelope seal, I’d finished this coordinated card, envelope, and envelope seal set.
As a demonstrator, I’ve already seen the new 2022 – 2023 catalog and it’s fabulous! I am thrilled to be able to pre-order products on Friday, April 1st (no fooling!). While I can’t show you the inside pages of the catalog, I can share the new 2022 – 2024 In Colors with you! Get ready!
Do you live in the U.S. and need a demonstrator? If so, I’d love to talk to you!
Do You Want to Place an Order?
Of course you do!
If you are ordering less than $150.00, please use the host code shown. If you are ordering more than $150.00, please contact me first so you can get your stamping rewards! Any order over $50 will earn a little surprise from me.
The HOST CODE through April 30, 2022 is VRBF62NN.
Again, thank you for stopping by my blog today! I appreciate your comments and your time.
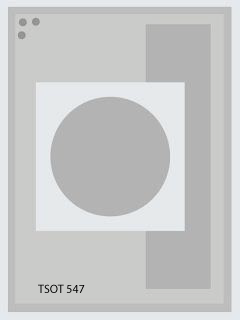
Welcome to this three-for post! Jolanda chose the equinox as the theme for the Cardz 4 Guyz challenge # 292. I used the sunflower to represent the equinox, but you will see it stands for so much more. Since today is the fourth Tuesday of the month, it’s also the Pals Fun Fold Blog Hop, and I learned a number of new fun folds over Spring Break last week. Some went really well, a couple others not so much. The layout comes from the Try Stamping on Tuesday challenge # 547. Score!
Here’s. my fun fold card:
Here’s the challenge banner from TSOT #547
Finally, here’s one of the fun folds I made that didn’t turn out the way I thought it would, but I found a new-to-me fold through the process. Originally, I intended to create a double easel card. It didn’t work out that way.
Measurements for the First Challenge Card:
The Pacific Point base measures 11 inches by 4-1/4 inches, scored at 5-1/2 inches.
The top Basic Black base measures 4-1/8 inches by 10-3/4 inches, scored at 5-3/8 inches. Then, I simply adhered this black card to the front of the Pacific Point base.
I used white cardstock trimmed to 4 inches by 5-1/4 inches for the inside of the Pacific Point card.
Starting from the front, both the Daffodil Delight and the Pacific Point DSP is from the Brights 6 x 6 DSP (designer series paper) collection. I trimmed the Daffodil Delight to 5-1/4 inches by 4 inches. The Pacific Point DSP measures 1-3/8 inches by 3-5/8 inches.
Next, I trimmed the DSP for the second layer to 5-1/4 inches by 4 inches. I also trimmed a piece of this DSP to 6 inches by 2-1/2 inches for the envelope flap.This fabulous black and white pattern comes from the host DSP Pattern Party pack. If you like black and white patterns, this host DSP pack is for you!
I cropped the open square using two of the square dies found in the Stitched Shapes die set.
Stamping and Coloring:
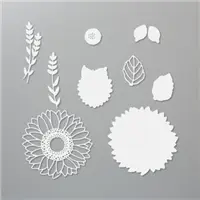
Now for the fun, aka stamping and coloring, part. These sunflower stamps come from the Celebrate Sunflowers stamp set. Love! The Momento Tuxedo Black ink pad is a must when coloring with blends because it won’t run. I stamped two sunflowers and cropped them out with the sunflower die. Then, I made two sunflower masks out of copy paper to create the middle layer of the card.
HINT: Don’t use cardstock for a masking layer because it’s two thick. Copy paper works wonderfully. Just remember to take a tiny step back from the edge of the image you are masking. That way, your new image will line up right next to the first image. Does that make sense?
Finally, I stamped a sunflower on the corner of the inside of the card and on the front, bottom corner of the envelope.
HINT: When using blends on an envelope, make sure you have a scrap of cardstock inside the envelope so the blends don’t bleed to the back of the envelope. Trust me – don’t forget the scrap.
I used the dark and light Daffodil blend for the sunflower petals. Next, I used the Old Olive blends combo for the leaves. Finally, I used the Crumb Cake blends combo for the centers of the sunflowers.
Both the front and middle sentiments come from the Flowing Flowers stamp set, found in the current January – June 2022 mini catalog.
The inside sentiment comes from the Celebrate Sunflowers stamp set.
Finishing Up:
At this point, I decided the front needed a little something, so I cropped the Crumb Cake stalks using the sunflower die set.
The middle part definitely needed something behind the sunflowers. Therefore, I used the scalloped contour dies to crop a Daffodil Delight layer from the cardstock. Then, I trimmed the sunflower layer to size.
In order to echo the TSOT challenge sketch, I added 3 matte black dots in the top left-hand corner of the outside layer.
After adhering everything with multipurpose adhesive, I popped the two front sunflowers up on dimensionals.
Finally, I trimmed the DSP on the envelope flap and punched a 1 inch circle from the Daffodil Delight DSP for the envelope seal.
With that, I’d finished this coordinated fun fold card, envelope, and envelope seal set.
Pals Fun Fold Blog Hop:
After finishing here, the other Pals and I would greatly appreciate you hopping along with us for the fun folds. Thanks!
This Mini Stampin’ Cut and Emboss machine WILL be on my next order! The special is available as long as supplies last, so don’t miss out on the machine or the select bundles! 20% off?!?! Yes, please!!
Do you live in the U.S. and need a demonstrator? If so, I’d love to talk to you!
Do You Want to Place an Order?
Of course you do!
If you are ordering less than $150.00, please use the host code shown. If you are ordering more than $150.00, please contact me first so you can get your stamping rewards! Any order over $50 will earn a little surprise from me.
The HOST CODE through March 31, 2022 is KNS7N3KP.
Again, thank you for stopping by my blog today! I appreciate your comments and your time.
Welcome to the Cardz 4 Guyz challenge # 291. I am hosting this challenge theme, and I chose slimline cards. When you finish here, I hope you will visit the challenge blog to see what all the other design team members created. Each one is fabulous!
Here’s my slimline card:
Measurements and Such:
The Misty Moonlight base measures 8-1/2 inches by 7 inches, scored at 3-1/2 inches to form a tent card.
I used a piece of the Beauty of the Earth DSP (designer series paper) and trimmed it to 8-1/4 inches by 3-1/4 inches.
The white panel for the inside of the card measures 3-1/3 inches by 8-1/4 inches.
For the sentiment, I used the Biggest Wish stamp set. First, I stamped “HAPPY” in Cinnamon Cider. Then, I stamped “birthday” using Misty Moonlight.
The sentiment rectangle, and the two mats behind it, were all cropped using the rectangle stitched dies.
I used the TomBow multipurpose glue, which is my favorite adhesive, for all the paper elements, with the exception of the Cinnamon Cider mat for the sentiment. The Misty Moonlight cardstock is adhered directly to the DSP.
Then, I tied a square knot on a piece of the Misty Moonlight ribbon that I’d wrapped around the DSP. This ribbon goes over the Misty Moonlight sentiment mat.
Finally, I popped the sentiment block up on dimensionals and placed it over the ribbon.
At this point, I thought I had finished. However, when I came back to the card later, I decided that I needed to add something else. So, I used three of the 2020 – 2022 In Color enamel Cinnamon Cider dots on the top, left-hand corner of the DSP.
Ta-da! My simple slimline was complete!
Thank you very much for stopping by my blog today!
Click on the following image to view the mini catalog in all its glory!
My Favorite Things from the Current Mini Catalog
While the new mini catalog and the Sale-a-Bration catalog are both packed with great products, here are some of my personal favorites.
Do you live in the U.S. and need a demonstrator? If so, I’d love to talk to you!
Do You Want to Place an Order?
Of course you do!
If you are ordering less than $150.00, please use the host code shown. If you are ordering more than $150.00, please contact me first so you can get your stamping rewards! Any order over $50 will earn a little surprise from me.
The HOST CODE through March 31, 2022 is KNS7N3KP.
Again, thank you for stopping by my blog today! I appreciate your comments and your time.
Welcome to the Cardz 4 Guyz challenge #290! Billie A. chose fun folds as the theme, which works perfectly for the Pals Fun Fold Hop. When you finish here, I hope you will go to the Cardz 4 Guyz site to see all the inspirational projects from the other design team members. In addition, please check out the fun fold cards from the other Pals.
Here’s my fun fold birthday card:
I’ve seen landscape easel cards with two stationary side panels. For this card, I knew I wanted to use the Biggest Wish stamp set so I needed to modify the layout a bit.
Measurements:
The Night of Navy base measures 4-1/4 inches by 11 inches, scored at 5-1/2 inches.
Next, I cut the front part of the card at 1-1/2 inches up to the fold line.
That cut leaves a 2-3/4 inch wide panel for the sentiments. In order to be able to create the easel part of the card, I scored it in half at 2-3/4 inches. At this point I burnished the folds using my bone folder to have the easel fold easily.
The DSP I used is one of the many patterns found in the host DSP set Pattern Party. If you haven’t gotten this yet, it is well worth it. There’s 48 sheets of 12 x 12 inch DSP. Each sheet has a colorful pattern on one side and a black and white pattern on the reverse side. If you love black and white patterns, this DSP pack is definitely for you.
I also trimmed two pieces of the DSP to 2-5/8 inches square. I used the pieces on the back of the easel part of the card. The reverse of this pattern is a pink cheetah print, so covering it with the black and white DSP. I used the second piece on the back of the Night of Navy part of the easel.
Finally, I trimmed a piece of the DSP to 2-1/2 inches by 6 inches.
Both white cardstock panels measure 2-5/8 inches by 5-3/8 inches. Since I needed a popped up tag to hold the easel in place, I stamped the sentiment on a scrap piece of white cardstock, which I then matted on a scrap piece of Night of Navy cardstock.
Putting It Together:
I used multipurpose glue to adhere everything except the tag, which got popped up on dimensionals.
The Stamparatus was required for the repeated birthday sentiments on the front easel panel. The whole process was relatively easy using a hinge stamping method for the acrylic panel. Jackie Bolhuis’, of Klompenstampers, has a step-by-step video for hinge stamping, which you can find here.
First, I stamped five “HAPPY” words in Basic Gray.
Then I went back and stamped the “birthday” words in Night of Navy using the same hinge stamping method.
Finally, I trimmed the DSP on the envelope flap and punched a 1 inch circle for the envelope seal.
With that, I’d finished this coordinated card, envelope, and seal set.
Back to the Pals Fun Fold Blog Hop!
I hope you hop over to the Pals Fun Fold Blog Hop, which you can find below, to see the cards created by some other Pals. There’s inspiration to be found in each of the cards. Make sure you click on the button to view the cards from the other Pals.
While the new mini catalog and the Sale-a-Bration catalog are both packed with great products, here are some of my personal favorites.
Do you live in the U.S. and need a demonstrator? If so, I’d love to talk to you!
Do You Want to Place an Order?
Of course you do!
If you are ordering less than $150.00, please use the host code shown. If you are ordering more than $150.00, please contact me first so you can get your stamping rewards! Any order over $50 will earn a little surprise from me.
The HOST CODE through February 28, 2022 is XPS7HK9N.
Again, thank you for stopping by my blog today! I appreciate your comments and your time.
Welcome to Just Peachy Stamping by Sue Jackson: an independent Stampin' Up demonstrator.
Through Stampin' Up!, I happily share my love of papercrafting through sales, classes, small stamping group meet-ups and workshops. I think that being a teacher in my "real life", I have a unique approach to sharing my fantastic hobby. I look forward to connecting with you!