Welcome to the latest Cardz 4 Guyz #303 biweekly challenge! Our hose this time, Melanie chose using a stencil to create a card. I used one of the Wonderful Snowflakes as my stencil, and am rather pleased with the result. When you finish here, I hope you will visit the challenge website to see the projects the rest of the design team created.
Here’s my card:
I found this fun fold on Connie Stewart’s YouTube channel. It’s so much fun, and so incredibly easy! It looks complicated, but truly it isn’t! You can find her video here.
Measurements:
The Cherry Cobbler base measures 5-1/4 by 11 inches. It’s scored at 1-3/4 and 3-1/2 inches from either end of the length of the base.
I also trimmed 3 pieces of Cherry Cobbler to 1-3/4 by 4 inches for the flaps.
The last piece of Cherry Cobbler I trimmed is for the mat on the front of the card. It measures 3 x 3 inches.
I needed two pieces of Basic White cardstock. The first is for the front and the final measurement (after using the embossing folder) is a 2-7/8 inch square. The second piece goes on the inside and measures 3-3/4 by 5 inches.
I used a piece of Sahara Sand cardstock on which I mounted the Cherry Cobbler base. The Sahara Sand measures 5-1/2 by 4-1/4 inches.
After I used the snowflake as a stencil, I trimmed the cardstock to 3-3/4 by 4-7/8 inches. From that piece, I trimmed it down to three equal pieces measuring 1-3/8 by 3-3/4 inches.
Finally, I trimmed a piece of Cherry Cobbler DSP to 6 inches by 2-1/2 inches for the envelope flap.
The Wonderful Snowflake as a Stencil:
I now have one very inked up snowflake after I used it as the stencil. I found out a couple of things as I was creating the background.
HINT 1: I found it much easier to use the snowflake when I figured out to use a small amount of removable tape on the back of the center of the snowflake. That way I didn’t have to work so hard to keep the snowflake lined up.
HINT 2: I used a blending brush with Sahara Sand ink on a piece of Sahara Sand cardstock. Since the snowflake is so fragile on the outward spokes, I found it much easier to use the blending brush in outward strokes from the center rather than in a circular motion.
When I finished stenciling the snowflakes, I splattered clear Wink of Stella over the cardstock. As usual, the Wink of Stella doesn’t show up well in photos, so I took a close-up of it:
The Kindest Gnomes:
I stamped the gnomes on white cardstock using Momento Tuxedo Black ink.
Then, I colored these cuties using the light and dark Cherry Cobbler and Crumb Cake blends combos.
I used the medium SU500 natural tone blend for the skin color and the dark Early Espresso blend for the shoes.
Finally, I used the light Smoky Slate blend for their beards.
The sentiment on the front comes from the Kindest Gnome stamp set. I stamped it in Cherry Cobbler ink then cropped it using a banner from the Stylish Shapes die set. Then, I outlined the banner using a Crumb Cake marker.
The last thing I did was add iridescent pearls randomly on the embossed snowflake square.
I really hope you try this fun fold! It truly is remarkably easy and people will think it took you forever. Honestly, it took longer to create the stenciled cardstock background than it did to create the whole rest of the card.
Welcome to the latest Cardz 4 Guyz two-week challenge! Our host, Jolanda, chose Get a Little Grungy for the theme. When you finish here, I hope you will visit the challenge site to see the cards from the rest of the design team. I’d love to see you play along and join the gallery!
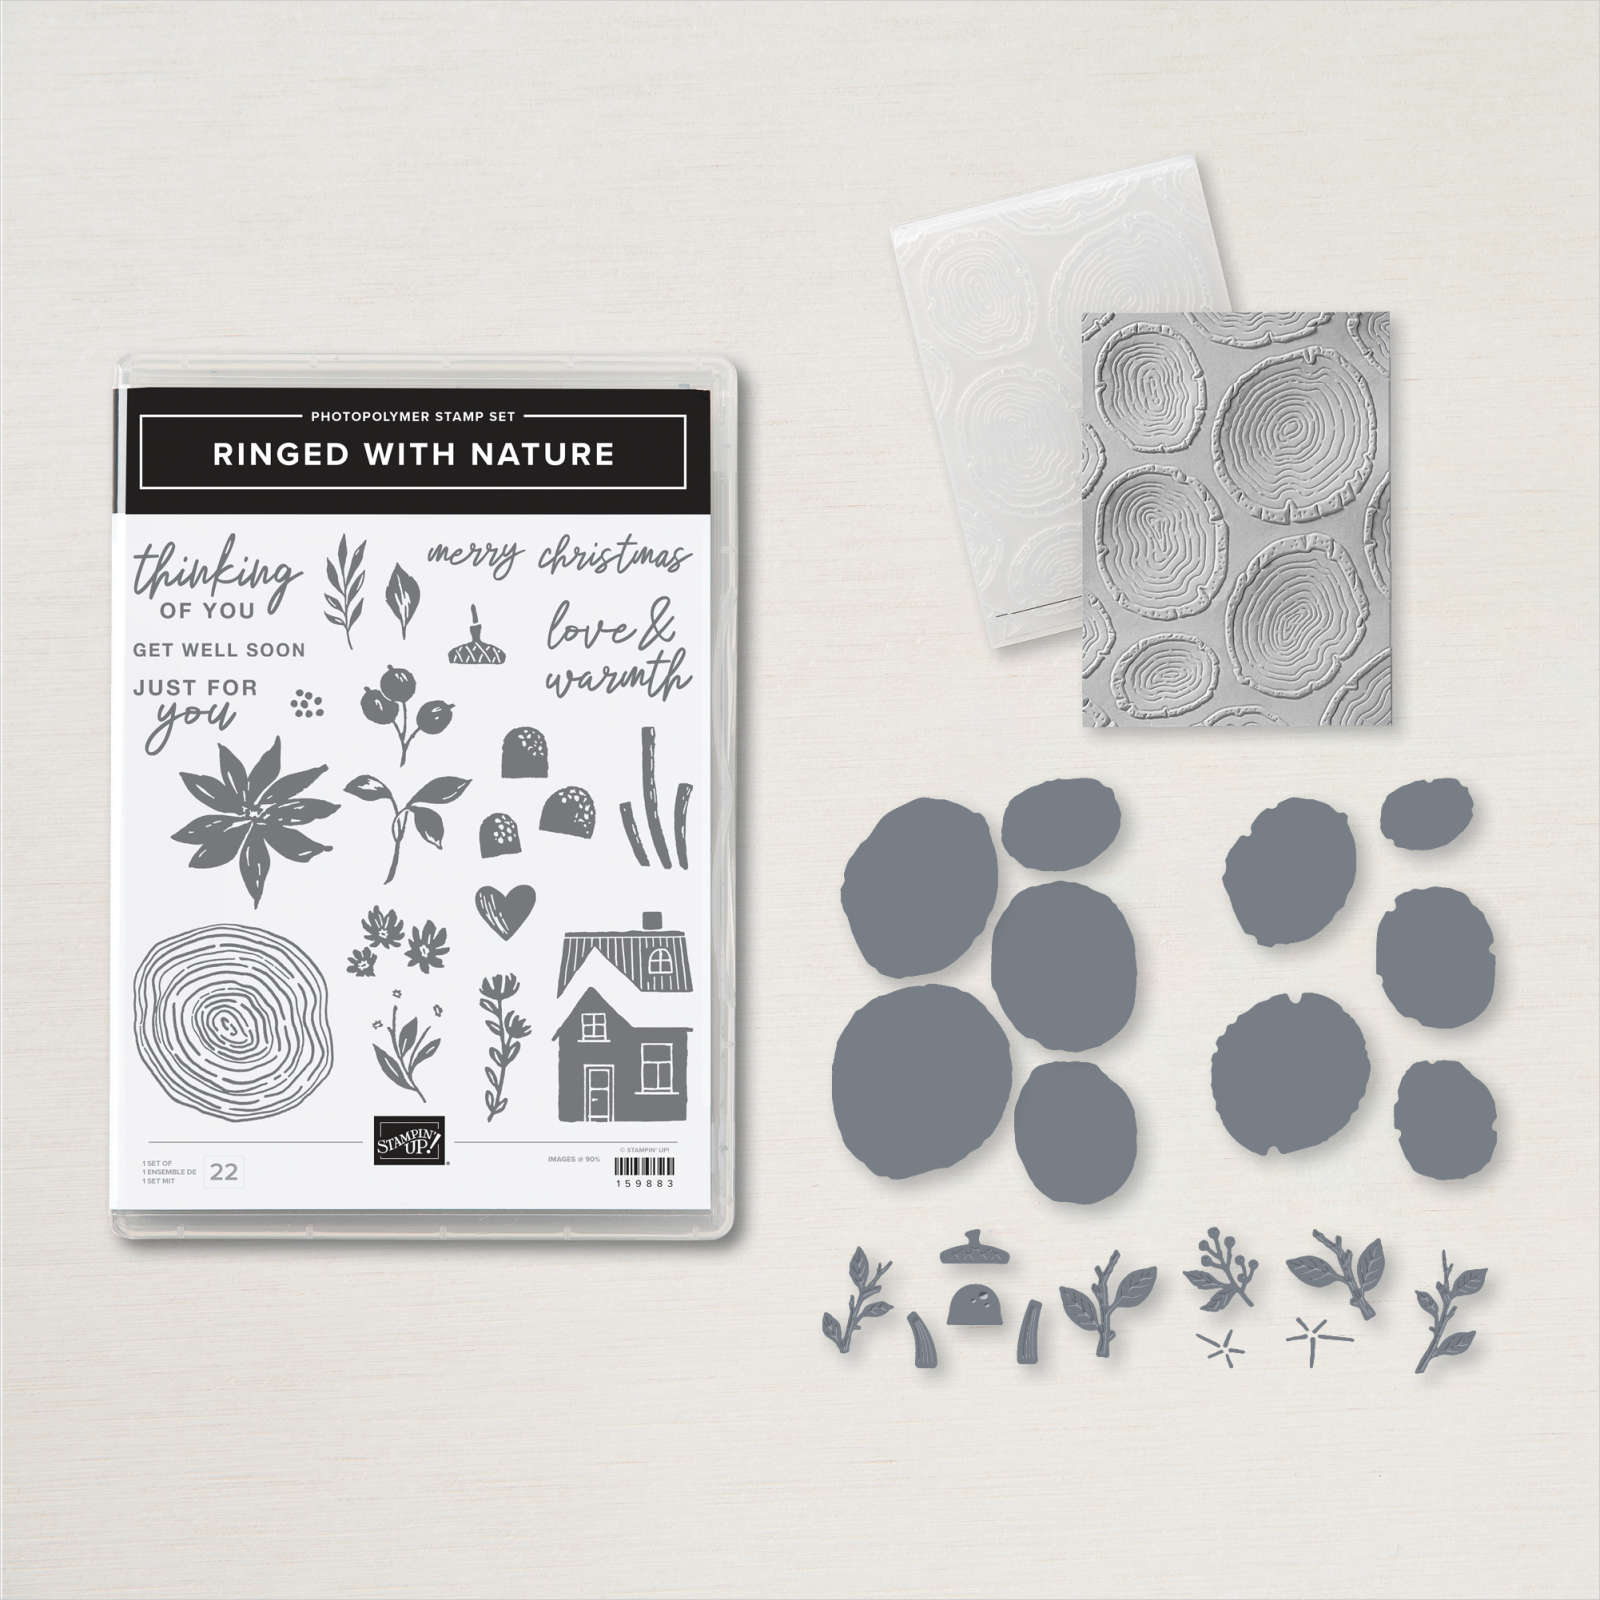
Here’s my card, for which I used the Rings of Love DSP:
This whole pack of DSP (designer series paper) is stunning! It can be earned FREE with a qualifying $50 purchase during Sale-a-Bration, which runs through the end of the month. At first, I really didn’t think I’d get it. However, as soon as I saw cards created with these prints, I knew I had to have it! Just look at the colors and prints in this paper:
Measurements and Such:
This card came together so quickly and, I think, it falls under the easy-peasy category.
The Night of Navy base measures 5-1/2 by 8-1/2 inches, scored at 4-1/4 inches.
The tree pattern DSP measures 4-1/8 by 5-3/8 inches.
Using the Deckled Rectangle dies, I cropped a piece of Night of Navy and DSP with the second and third largest dies.
I also trimmed a piece of the bird pattern DSP to 6 by 2-1/2 inches for the envelope flap. Then, I punched a 1 inch circle from the trees DSP pattern for the envelope seal.
The white inside panel is trimmed to 4 by 5-1/4 inches. I cropped the sentiment panel from a scrap of white cardstock., I stamped the sentiment from the Peaceful Moments stamp set in Night of Navy. Then, I cropped it using one of the deckled rectangle dies.
Distressed Look:
I specifically used the deckled rectangle dies because 1.) I love them, and 2.) they would fit the theme of distressing.
In addition, I outlined all of the pieces on the front of the card using my Stamping Write Markers. I tried not to be careful so that the markers would wind up adding some distress to each piece. I used Soft Suede for the trees DSP. Then, I used Night of Navy for both the cardstock mat and the sentiment panel. Finally, I distressed the birds DSP using Crushed Curry.
Next, I adhered the trees DSP to the base and the birds DSP to the Night of Navy mat.
Then, I cut three lengths of linen thread and wrapped them around the Night of Navy mat and tied them in a square knot. Since the thread is thin, I was able to use multipurpose liquid glue to adhere it to the trees DSP. I purposely adhered that panel just a bit off-center.
I added mini-dimensionals to the back of the sentiment panel and adhered it to the card.
The three yellow dots were added to cover an “oops” on the sentiment panel. I didn’t notice the oops until I tried to take a picture, but I wound up with a smudge of blue ink on the sentiment.
Finally, I stamped the inside panel with another sentiment from Peaceful Moments: You shouldn’t have, but I am glad you did. I’ve learned the hard way that I need to stamp the sentiment before attaching the inside panel to the base of the card.
With that, I’d completed this coordinated card, envelope, and envelope seal set.
The new Holiday Mini-Catalog and Sale-a-Bration are in full swing!!
Sale-a-Bration runs from July 1 to August 31, 2022. This means you can earn FREE products for two months! Take a look at these Sale-a-Bration products!!
FREE WITH A QUALIFYING $50 ORDER:
NEW ITEMS HAVE BEEN ADDED TO THE PRODUCTS WHICH ARE FREE WITH A QUALIFYING $100 ORDER:
The coordinating bundle for the Rings of Love DSP is on page 62:
Here’s a link to the new Holiday Mini-Catalog, which runs through January 4, 2023.
Click on the following image to open the catalog:
If you live in the U.S. and don’t already have a demonstrator, I’d be honored to work with you.
Do You Want to Place an Order?
Of course you do, especially since you can earn FREE products with a qualifying purchase!
If you are ordering less than $150.00, please use the host code shown. If you are ordering more than $150.00, please contact me first so you an get your stamping rewards! Any order over $50 will earn a little surprise from me.
The HOST CODE through August 31, 2022 is W4Q23RT4.
Again, thank you for stopping by my blog today! I appreciate your comments and your time.
Welcome to the latest Cardz 4 Guyz challenge! Billie A. chose the theme of recycling something for this challenge. In addition, today is the day of the monthly Pals’ Fun Fold Blog Hop! As you know, I love fun folds! For this card, I took my inspiration, and template, from Jackie Beer’s card for the June Fun Fold Blog Hop! I enjoyed her card and directions, so I recreated it with my recycled background for the front flap and one of the much loved gnomes.
Here’s my card:
Here’s the link to Jackie Beer’s card and template on her Blue Line Stamping blog:
The white cardstock on the inside measures 4-1/8 by 5-3/8 inches.
I trimmed a piece of the Sale-a-Bration DSP (designer series paper), which can be earned for FREE with a $50 purchase, This DSP pattern of trees comes from the Rings of Love DSP, coordinates with the Rings of Nature bundle in the current mini-catalog for July – December. This DSP is gorgeous! Honestly, I didn’t originally think I’d get it. However, after seeing cards with these beautiful patterns, I completely changed my mind.
I also trimmed a piece of this DSP to 6 inches by 2-1/2 inches for the envelope flap.
Recycled Cover:
I’ve had this piece of watercolor paper for about a year just waiting for the time to use it. I created this with shaving cream, Night of Navy, and Crumb Cake reinkers. That’s it.
Here’s a picture of the start of this technique, but with Poppy Parade, Crushed Curry, and Mint Macaron. These colors come from the Rings of Love DSP. I spread out some shaving cream on a length of parchment paper.
HINT: In this case, less is more. I really should’ve used less shaving cream and less ink. However, you get the point. It’s messy, but simple. Just remember, you have to use watercolor paper. Regular cardstock will roll up.
Kindest Gnomes:
I go back to work on 08/01 after being off for the summer. Therefore, I wanted to make a card to mail for my husband to get either Monday or Tuesday when I am not home.
The sentiment on the front comes from the Kindest Gnomes stamp set. I paired it with this gnome. I stamped both the sentiment and the gnome using Momento Tuxedo Black ink.
Then, I cropped the sentiment and Crumb Cake mat using the deckled rectangle dies.
Then, I colored the gnome using my blends in the Smoky Slate combo, the light Crumb Cake, and the Night of Navy combo. I used my black marker and So Saffron marker as well.
Then, I popped this guy up on dimensionals, and added him to the side of the sentiment panel.
The sentiment on the inside comes from the Happy & Heartfelt stamp set for the inside.
I didn’t want a piece of white cardstock showing when the card is folded closed. Therefore, I very carefully trimmed a piece of the recycled watercolor paper to 4-1/8 by 3/4 inches and adhered it to the white inside panel.
After trimming the envelope flap and punching the envelope seal, I’d finished this coordinated card, envelope, and envelope seal.
Back to the Pals’ Fun Fold Blog Hop:
When you finish here, I hope you will visit the blogs listed below. Each one of us loves fun fold cards, and I always learns something new!
It’s July, 2022 ~ do you know what that means? The new Holiday Mini-Catalog and Sale-a-Bration are in full swing!!
Sale-a-Bration runs from July 1 to August 31, 2022. This means you can earn FREE products for two months! Take a look at these Sale-a-Bration products!!
Here’s a link to the new Holiday Mini-Catalog, which runs through January 4, 2023. Click on the following image to open the catalog:
If you live in the U.S. and don’t already have a demonstrator, I’d be honored to work with you.
Do You Want to Place an Order?
Of course you do, especially since you can earn FREE products with a qualifying purchase!
If you are ordering less than $150.00, please use the host code shown. If you are ordering more than $150.00, please contact me first so you an get your stamping rewards! Any order over $50 will earn a little surprise from me.
The HOST CODE through July 31, 2022 is UKDVYZSG.
Again, thank you for stopping by my blog today! I appreciate your comments and your time.
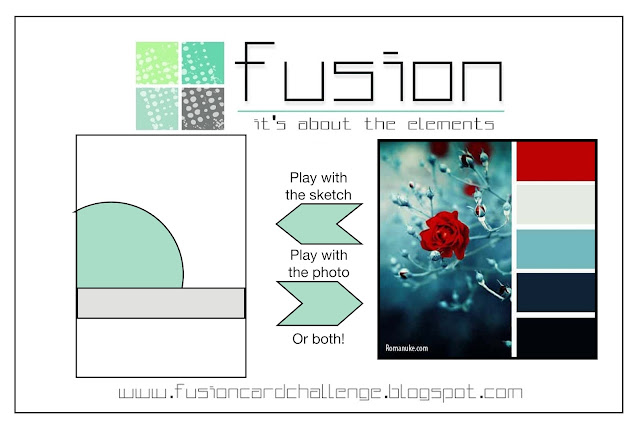
Welcome to the newest Cardz 4 Guyz Challenge! Our host for C4G #299, Pamela, chose summer for the theme. Both the Cardz 4 Guyz #299 and the June Pals Fun Fold Blog Hop go live on the same day, so I knew I needed to combine the two. Then I saw the layout for Try Stampin on Tuesday #561 and knew I wanted to incorporate that layout. The color palette inspiration comes from the Fusion card challenge. Score!
When you are finished here, I hope you will visit the Cardz 4 Guyz challenge and the Pals Fun Fold Blog Hop, the links for which follow my blog post for the card.
Here’s my card:
I do need to thank the design team at Try Stampin on Tuesday. They chose my card as one of the Top 3 for TSOT559. You can see that card here, which was a three-fer by combining TSOT #599, Color Throwdown #696, and the Double Trouble challenge. Thank you very much!!! Once again, I feel completely honored.
Here are the Fusion and TSOT challenge banners:
The Hippest Hippos stamp set and coordinating dies make this card too stinking cute! You can earn each of these FREE, with a qualifying purchase, starting July 1, 2022 with Sale-a-Bration!
Measurements:
The Poppy Parade base measures 4-1/4 by 11 inches, scored at 2-3/4 and 5-1/2 inches.
I used Gray Granite following the Fusion colors, for the mat, which measures 4-1/8 by 5-3/8 inches.
The white panel for the inside of the card also measures 4-1/8 by 5-3/8 inches.
After doing all the math for the layout pieces on the front of the card, I created a template, which will save so much time for the next time I want to use this layout. Here’s the template:
I had enough leftovers to stamp, color, and crop all the elements on the front of the card and the birds on the inside.
I used a piece of Basic Gray 6 x 6 DSP trimmed to 6 by 2-1/2 inches for the envelope flap. Then, I punched a 1 inch circle from Pool Party DSP to create the envelope seal.
What I Did:
I started this card with my blending brush and Pool Party ink on white cardstock. The hippo dies have one for waves. Since I wasn’t happy with the waves I created for the first card I made with this set (you can see that card here), I needed to figure out something else to do. I grabbed a piece of a window sheet and cropped out a stencil of the waves. I used the stencil and worked my way up the white cardstock.
HINT: Make sure you move the stencil placement so that the waves form a very random pattern. Do the same thing for the clouds.
By working my way up the white cardstock, I was able to create darker waves at the bottom and lighter ones at the top.
I repeated the process for the clouds again using Pool Party ink and my blending brush.
Of course, I couldn’t leave the inside white piece of cardstock plain, so I added waves at the bottom and clouds at the top.
Here’s a picture of the well-loved stencils I created by cropping window sheets with the dies:
Hippos:
Next, I worked on the hippos, which I stamped using Momento Tuxedo Black ink and colored with the Smoky Slate light and dark blends combo. The hippo in the tub is actually a tutu wearing ballet hippo. However, since the challenge is to make a card for a guy (of any age), I simply cut off the tutu. I used another blending brush and Night of Navy ink to create a base on which the tub could sit.
Both the tub and the boat dies come with the hippo die set. I cropped each in Basic Gray cardstock. Then, I added dimension using my gray ink tones blending brush and Basic Gray ink. The effect is subtle, but I think it works.
Then, I used Poppy Parade cardstock and cropped the googles, breather tube, life saver and sunglasses. So stinking cute!!
If you use the multipurpose glue carefully and sparingly, you can easily adhere these cropped pieces to the hippos.
The hippo in the boat and in the tub got popped up on dimensionals.
The water droplets for each hippo needed some height, but not by using dimensionals. I cropped enough droplet sets to layer three droplets on top of each other. Since the Pool Party cardstock blended in with the background, I added Wink of Stella to each of the droplets.
Finishing Up:
The bottom horizontal panel really had me stumped. A quick perusal of my stamp sets led me to the school of fish stamp from the Whale Done stamp set. I stamped it in Pacific Point ink going across the bottom panel. Then, I added some to the waves on the inside panel as well.
This bottom panel also needed some sort of dimension. Therefore, I stamped the fish from Seas the Day four times using Pacific Point ink on Pool Party cardstock. I didn’t want to use dimensionals under these fish, so I adhered two fish together and then adhered them to the bottom panel.
The Waves of Inspiration stamp set contains a small bird, which I stamped three times across the top using Gray Granite ink.
The outside sentiment comes from the Catch You Later stamp set and the inside sentiment comes from Happy and Heartfelt. I stamped both using Night of Navy Ink.
I still needed something to hold the easel upright and settled on the birds from the Waves die set. The birds would need to be high enough to hold the easel, but I didn’t want to even begin to try to add dimensionals or foam adhesive behind the birds. Therefore, I cropped enough birds from Gray Granite cardstock to adhere five birds on top of each other. Five layers of cardstock turned out to be enough to hold up the easel.
Finally, I trimmed the DSP on the envelope flap and ran the 1 inch circle envelope seal through my XYRON create-a-sticker. With that, I’d finished this coordinated easel card, envelope, and seal set.
From now until June 30, 2022, all kits are buy one, get one 50% off! Just look at some of the kits available!
Do You Want to Place an Order?
Of course you do!
If you are ordering less than $150.00, please use the host code shown. If you are ordering more than $150.00, please contact me first so you can get your stamping rewards! Any order over $50 will earn a little surprise from me.
The HOST CODE through June 30, 2022 is 6YTD44QQ.
Again, thank you for stopping by my blog today! I appreciate your comments and your time.
Welcome to the Cardz 4 Guyz challenge #298. Our host, Caz, chose Father’s Day for our theme, which is June 19th here in the States. When you are finished here, I hope you will hop over to the challenge site to see what the rest of the design team created. Then, I hope you are inspired to join in the challenge fun. I can’t wait to see what you upload to our gallery!
Through commenting on gallery submissions, I’ve been introduced to new-to-me challenges. I found my inspiration for the layout from a new-to-me challenge, Sketch Saturday #702.
Here’s my card:
Here’s the challenge banner from Sketch Saturday:
It actually took me longer to figure out what DSP (designer series paper) patterns I wanted to use than it did to create the card. I enjoyed the sketch so much that I used it for my card for the InKing Royalty Blog Hop, which goes live Wednesday morning.
Measurements:
The Evening Evergreen base measures 5-1/2 by 8-1/2 inches, scored at 4-1/4 to create a tent fold card.
The plaid Evening Evergreen piece of DSP (from the 6×6 inch In Color DSP) measures 3-1/2 by 3-3/8 inches.
I used the 12 x 12 inch He’s the Man DSP for the rest of the patterned paper. First, I trimmed the background Sahara Sand print to 4-1/8 inches by 5-3/8 inches. You can’t see it, but I punched out a 1 inch circle for the envelope seal. It doesn’t matter because no one can see the hole in the background DSP.
Next, I trimmed the Early Espresso to 2-3/4 by 3-3/8 inches.
The fun camping DSP measures 2-1/2 inches by 3-1/8 inches. I also trimmed a piece of this DSP to 6 by 2-1/2 inches for the envelope flap.
Then, I trimmed a piece of Soft Succulent cardstock to 2-5/8 inches by 3-1/4 inches.
Using the Stylish Shapes die set, I cropped a banner out of white cardstock and the background Sahara Sand DSP.
Instead of using white cardstock for the inside panel, I trimmed a piece of Sahara Sand cardstock to 4 by 5-1/4 inches. The Sahara Sand cardstock is light enough to write on and isn’t as stark as white cardstock would’ve been.
That’s it for the measurements!
What I Did:
I wanted the camping DSP to stamp out from the Soft Succulent cardstock. Therefore, I used the brush end of my Soft Succulent marker to outline both the DSP and the cardstock. The effect is subtle, but clearly defines the ends of both papers.
I used multipurpose glue to adhere all the patterned DSP down.
The sketch calls for a bow on the right side of the center panel. However, this Dad card didn’t need a bow. I used a length of linen thread and folded it back and forth so I had 4 pieces. Believe me, it is much easier to tie a knot before cutting the ends loose, so that’s what I did. One mini-glue dot adhered the knot to the right side of the center DSP.
Both the inside and outside sentiments come from the Happy and Heartfelt stamp set. I just love the font used for this set of 15 sentiments. I used Evening Evergreen ink for both sentiments.
In order to have the Sahara Sand DSP show on either end of the white sentiment banner, I simply cut it in half and adhered them to the ends of the sentiment banner. Next, I added dimensionals under the banner to accommodate the linen thread and adhered it down.
Following the challenge sketch, I added two Evening Evergreen matte dots to the top, left-hand side of the card. My sense of balance really wanted me to add a third dot to form an eye-pleasing triangle. Therefore, I added a small matte dot to the end of the white cardstock banner.
Finally, I adhered the Sahara Sand cardstock to the inside of the card using multipurpose liquid glue.
With that, this coordinated card, envelope, and envelope seal set was complete.
Here are just a few of my favorite new things, and about half of which arrived Monday! I’ve already been playing with my new goodies. I’m also working on a pre-order from the upcoming July – December mini-catalog. Fun times!!
Do You Want to Place an Order?
Of course you do!
If you are ordering less than $150.00, please use the host code shown. If you are ordering more than $150.00, please contact me first so you can get your stamping rewards! Any order over $50 will earn a little surprise from me.
The HOST CODE through June 30, 2022 is 6YTD44QQ.
Again, thank you for stopping by my blog today! I appreciate your comments and your time.
Welcome to the newest Cardz 4 Guyz challenge #297. Julie, our host, chose “on the water” for the theme of this two week challenge. When you finish here, I hope you will visit the Cardz 4 Guyz blog to see the projects from the rest of the design team. I always enjoy seeing how differently we all incorporate the theme in our projects.
A good friend asked me to create a Father’s Day card for her dad using an ocean theme. I used the Waves of Inspiration bundle and 12 x 12 inch DSP (designer series paper) with the Happy & Heartfelt sentiment stamp set for my card.
Here’s the easel card I created:
Measurements:
The Pacific Point base measures 5-1/2 inches by 8-1/2 inches. To create the easel, I scored the base at 4-1/4 inches and 2-1/8 inches.
The white cardstock mat for the front and the panel on the inside each measure 5-3/8 by 4-1/8 inches.
Next, I trimmed all the DSP I would need. The piece on the front of the card measures 4 x 5-1/4 inches. I trimmed another panel to 2 inches by 5-3/8 inches for the back of the white cardstock that stands up over the Pacific Point base. Finally, I trimmed a piece to 6 inches by 2-1/2 inches for the envelope flap. I’ve found that I need to adhere the DSP to the envelope flap right away.
At this point, I also punched a 1 inch circle out of Pacific Point 6 x 6 inch DSP for the envelope seal. To finish the seal, I ran it through my XYRON create-a-sticker.
Then, I adhered the cardstock and DSP together using my fave adhesive, multipurpose glue.
Cropping:
I used the Waves Dies set to crop everything I needed for this card.
There are two waves dies, and I chose to crop the more open wave from white cardstock. Then, I used the shimmery white embossing paste and a palette knife to add a thin layer of paste to the wave. The shimmer of the paste adds sparkles to the wave without leaving glitter everywhere.
Even though the cropped wave pieces are thin, I was able to use multipurpose liquid glue to adhere it to the DSP.
Next, I used my Stamparatus to help me stamp the pelican on the pilings. I used my Basic Gray ink pad and stamped it three times to get the color saturation I wanted. The distinkive pilings part of the stamp adds texture without having to color them.
The pilings stamp has rope already on it, but I wanted to add some texture. I cut a length of white baker’s twine to wrap around the piling. I pulled one of the three stands of twine out of the length to cut down on bulk. Then, I added a piece of tear and tape to the back of the piling. This helped me be able to easily wrap the twine around following the stamped rope. Then, I added dimensionals under the pilings/pelican piece.
I needed the black cardstock birds to function as a stop for the easel part of the card. In order to accomplish this, I cropped 8 pairs of each of the birds. Then, I put some liquid glue on a piece of plastic and used my reverse tweezers to dip each end and the point of the bird layers.
Stamping:
If you haven’t gotten the Gentle Waves stamp from the mini-catalog yet, you have until the end of June to do so. I used Pacific Point ink on just the top part of the stamp and stamped the waves on the inside piece of white cardstock.
Then, I stamped the outside sentiment on white cardstock using the tuxedo black ink. I cropped the label using a die from the Waves Dies set. The sentiment fit perfectly inside it. I added dimensionals under the sentiment label.
I wanted the fonts for both sentiments to match since both would show at once. Therefore, I chose the “we have to celebrate this!” sentiment for the inside of the card. I used the tuxedo black ink to stamp this sentiment and the single bird to the left of the pelican.
I also stamped the pelican/pilings on the front, bottom, right-hand corner of the envelope. Then, I stamped three birds close to the pelican so they won’t interfere with the postage stamps.
Once I had my stamping completed, I adhered the birds using multipurpose glue. I also adhered the pilings/pelican down.
I needed one more stop for the right side of the easel, but didn’t want to add another layered bird to that area. So, I just used a white elegant faceted gem.
With that, I’d finished this coordinated fun fold easel card, envelope, and seal set.
Thank you very much for stopping by my blog today!
Here are just a few of my favorite new things and I can not wait for my order to arrive! Then, I will just have to pick out some new favorite things to purchase!
The 2022 – 2023 Catalog is Now Live!!
Here are just a few of my favorite new things. I can not wait for this order to arrive!
But wait, there’s more, and this bonus ends TONIGHT!
Along with the new catalog, there’s a really fabulous joining bonus! As always, your starter kit is just $99 for $125 of your choice of products. The bonus? Over $66 of the new 2022 – 2024 In Color supplies! You get the following at no extra cost to you:
In Color Ink Pad Collection
and In Color Grid Paper
plus In Color Cardstock Collection
and the 6 x 6 inch In Color Designer Series Paper Assortments
Do You Want to Place an Order?
Of course you do!
If you are ordering less than $150.00, please use the host code shown. If you are ordering more than $150.00, please contact me first so you can get your stamping rewards! Any order over $50 will earn a little surprise from me.
The HOST CODE through May 31, 2022 is E3W722BD.
Again, thank you for stopping by my blog today! I appreciate your comments and your time.
Welcome to Just Peachy Stamping by Sue Jackson: an independent Stampin' Up demonstrator.
Through Stampin' Up!, I happily share my love of papercrafting through sales, classes, small stamping group meet-ups and workshops. I think that being a teacher in my "real life", I have a unique approach to sharing my fantastic hobby. I look forward to connecting with you!