This month, the theme is “Fun Family Occasions.” We hope to inspire you with our creations today! You will find the lineup at the end of my post to help you “hop” along from Pal to Pal.
Every June for the past 40 plus years (with the exception of June, 2020), my family has been spending a week together at the beach. What started out with my siblings, parents, and me has grown to nieces & nephews, two of their spouses, great nieces, a great nephew, my mom, and my daughter, Therefore, I used our beach week as my inspiration for my card.
Here’s my card:
I combined my beach week card with The Color Hues Challenge #86. I knew I wanted a clean card with pops of color, and this challenge filled the need for those pops.
Measurements:
Trim a piece of Basic Black cardstock to 8-1/2 by 5-1/2 inches and score at 4-1/4 to create a tent card.
Using a Countryside Corner die, crop the middle out of a piece of 4-1/2 by 5-3/4 inch piece of white cardstock.
Run the negative of the white cardstock through your Emboss and Cut machine using one of the basics 3D embossing folders ( an online exclusive set).
Trim the embossed white cardstock to 4-1/8 by 5-3/8 inches for the front of the card.
Trim a piece of Granny Apple Green to 4-1/8 by 5-3/8 inches for the mat on the inside. My mat is actually pretty darn ugly because the middle of it has multiple die cuts. However, since it is a mat, it doesn’t matter how ugly it is.
Trim a piece of white cardstock to 4 by 5-1/4 inches for the inside of the card.
I used a piece of 6 x 6 inch Granny Apple Green DSP (designer series paper) for the envelope flap. It measured 6 by 2-1/2 inches, adhered to the flap, and cut to size.
Next, I used a 1-inch circle punched from the same DSP for the envelope seal. When I ran it through my XYRON create-a-sticker, I made sure the back side of the DSP is the seal side.
Thankfully, I was able to use scraps for all the pieces of the front of the card.
Stamping, Cropping, & Coloring (Oh my!):
I stamped everything I needed at once, including the Fresh Freesia and Granny Apple Green surfboards. Since I used Momento Tuxedo Black ink, I was able to color using the blends combo sets of Fresh Freesia and Granny Apple Green.
I stamped the sentiment for the front and trimmed it down to size. I added dimensionals to the bottom of the sentiment banner. I outlined the sentiment using a black marker.
I also stamped the sentiment on the inside white cardstock before adhering the other pieces.
Since I just wanted pops of color, I colored the ball, chair, round life-preserver, and the flag.
Unless noted, I used multipurpose liquid glue to adhere the card pieces.
Next, I cropped all the pieces out. In addition, I cropped the lifeguard stand and birds from black cardstock so I could layer them slightly off from the white cardstock pieces.
Then I used a black marker to outline the Countryside Corner die cut and added dimensionals under it.
Adhere the embossed frame and the die cut to the front of the card.
Adhere the surfboards, black cardstock “grasses” along with the sufboard on the inside with the black fence and grass piece.
Add dimensionals behind the chair, lifeguard stand, and two of the birds. Adhere the pieces to the front of the card.
Add the sentiment to the bottom of the card.
Adhere the white cardstock to the Granny Apple Green cardstock layer for the inside of the card. Then, adhere it to the card.
With that, I’d finished this coordinated card, envelope, and envelope seal set.
Back to the Pals’ Blog Hop:
There’s more inspiration to show you, so use the lineup below to visit the rest of the Design Team. Please mark your calendars for our next blog hop next month, when our theme will be “New In Color Inspiration.”
What’s just as exciting as the new 2024 – 2025 Annual Catalog? That would be the new kits now available. They are fabulous, but I must get the one with the adorable dogs ASAP after it comes back in stock!
Take a look at these all-inclusive kits! All you need to add is a pair of snips/scissors and an acrylic block for stamping.
.
If you live in the U.S. and don’t already have a Stampin’ UP! demo from whom you order, I would be honored to work with you.
When prompted, please enter the following HOST CODE:
Welcome to the latest Cardz 4 Guyz challenge! Billie A. chose the theme of recycling something for this challenge. In addition, today is the day of the monthly Pals’ Fun Fold Blog Hop! As you know, I love fun folds! For this card, I took my inspiration, and template, from Jackie Beer’s card for the June Fun Fold Blog Hop! I enjoyed her card and directions, so I recreated it with my recycled background for the front flap and one of the much loved gnomes.
Here’s my card:
Here’s the link to Jackie Beer’s card and template on her Blue Line Stamping blog:
The white cardstock on the inside measures 4-1/8 by 5-3/8 inches.
I trimmed a piece of the Sale-a-Bration DSP (designer series paper), which can be earned for FREE with a $50 purchase, This DSP pattern of trees comes from the Rings of Love DSP, coordinates with the Rings of Nature bundle in the current mini-catalog for July – December. This DSP is gorgeous! Honestly, I didn’t originally think I’d get it. However, after seeing cards with these beautiful patterns, I completely changed my mind.
I also trimmed a piece of this DSP to 6 inches by 2-1/2 inches for the envelope flap.
Recycled Cover:
I’ve had this piece of watercolor paper for about a year just waiting for the time to use it. I created this with shaving cream, Night of Navy, and Crumb Cake reinkers. That’s it.
Here’s a picture of the start of this technique, but with Poppy Parade, Crushed Curry, and Mint Macaron. These colors come from the Rings of Love DSP. I spread out some shaving cream on a length of parchment paper.
HINT: In this case, less is more. I really should’ve used less shaving cream and less ink. However, you get the point. It’s messy, but simple. Just remember, you have to use watercolor paper. Regular cardstock will roll up.
Kindest Gnomes:
I go back to work on 08/01 after being off for the summer. Therefore, I wanted to make a card to mail for my husband to get either Monday or Tuesday when I am not home.
The sentiment on the front comes from the Kindest Gnomes stamp set. I paired it with this gnome. I stamped both the sentiment and the gnome using Momento Tuxedo Black ink.
Then, I cropped the sentiment and Crumb Cake mat using the deckled rectangle dies.
Then, I colored the gnome using my blends in the Smoky Slate combo, the light Crumb Cake, and the Night of Navy combo. I used my black marker and So Saffron marker as well.
Then, I popped this guy up on dimensionals, and added him to the side of the sentiment panel.
The sentiment on the inside comes from the Happy & Heartfelt stamp set for the inside.
I didn’t want a piece of white cardstock showing when the card is folded closed. Therefore, I very carefully trimmed a piece of the recycled watercolor paper to 4-1/8 by 3/4 inches and adhered it to the white inside panel.
After trimming the envelope flap and punching the envelope seal, I’d finished this coordinated card, envelope, and envelope seal.
Back to the Pals’ Fun Fold Blog Hop:
When you finish here, I hope you will visit the blogs listed below. Each one of us loves fun fold cards, and I always learns something new!
It’s July, 2022 ~ do you know what that means? The new Holiday Mini-Catalog and Sale-a-Bration are in full swing!!
Sale-a-Bration runs from July 1 to August 31, 2022. This means you can earn FREE products for two months! Take a look at these Sale-a-Bration products!!
Here’s a link to the new Holiday Mini-Catalog, which runs through January 4, 2023. Click on the following image to open the catalog:
If you live in the U.S. and don’t already have a demonstrator, I’d be honored to work with you.
Do You Want to Place an Order?
Of course you do, especially since you can earn FREE products with a qualifying purchase!
If you are ordering less than $150.00, please use the host code shown. If you are ordering more than $150.00, please contact me first so you an get your stamping rewards! Any order over $50 will earn a little surprise from me.
The HOST CODE through July 31, 2022 is UKDVYZSG.
Again, thank you for stopping by my blog today! I appreciate your comments and your time.
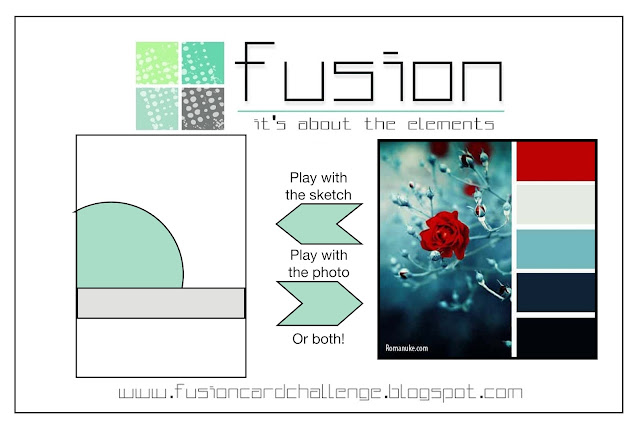
Welcome to the newest Cardz 4 Guyz Challenge! Our host for C4G #299, Pamela, chose summer for the theme. Both the Cardz 4 Guyz #299 and the June Pals Fun Fold Blog Hop go live on the same day, so I knew I needed to combine the two. Then I saw the layout for Try Stampin on Tuesday #561 and knew I wanted to incorporate that layout. The color palette inspiration comes from the Fusion card challenge. Score!
When you are finished here, I hope you will visit the Cardz 4 Guyz challenge and the Pals Fun Fold Blog Hop, the links for which follow my blog post for the card.
Here’s my card:
I do need to thank the design team at Try Stampin on Tuesday. They chose my card as one of the Top 3 for TSOT559. You can see that card here, which was a three-fer by combining TSOT #599, Color Throwdown #696, and the Double Trouble challenge. Thank you very much!!! Once again, I feel completely honored.
Here are the Fusion and TSOT challenge banners:
The Hippest Hippos stamp set and coordinating dies make this card too stinking cute! You can earn each of these FREE, with a qualifying purchase, starting July 1, 2022 with Sale-a-Bration!
Measurements:
The Poppy Parade base measures 4-1/4 by 11 inches, scored at 2-3/4 and 5-1/2 inches.
I used Gray Granite following the Fusion colors, for the mat, which measures 4-1/8 by 5-3/8 inches.
The white panel for the inside of the card also measures 4-1/8 by 5-3/8 inches.
After doing all the math for the layout pieces on the front of the card, I created a template, which will save so much time for the next time I want to use this layout. Here’s the template:
I had enough leftovers to stamp, color, and crop all the elements on the front of the card and the birds on the inside.
I used a piece of Basic Gray 6 x 6 DSP trimmed to 6 by 2-1/2 inches for the envelope flap. Then, I punched a 1 inch circle from Pool Party DSP to create the envelope seal.
What I Did:
I started this card with my blending brush and Pool Party ink on white cardstock. The hippo dies have one for waves. Since I wasn’t happy with the waves I created for the first card I made with this set (you can see that card here), I needed to figure out something else to do. I grabbed a piece of a window sheet and cropped out a stencil of the waves. I used the stencil and worked my way up the white cardstock.
HINT: Make sure you move the stencil placement so that the waves form a very random pattern. Do the same thing for the clouds.
By working my way up the white cardstock, I was able to create darker waves at the bottom and lighter ones at the top.
I repeated the process for the clouds again using Pool Party ink and my blending brush.
Of course, I couldn’t leave the inside white piece of cardstock plain, so I added waves at the bottom and clouds at the top.
Here’s a picture of the well-loved stencils I created by cropping window sheets with the dies:
Hippos:
Next, I worked on the hippos, which I stamped using Momento Tuxedo Black ink and colored with the Smoky Slate light and dark blends combo. The hippo in the tub is actually a tutu wearing ballet hippo. However, since the challenge is to make a card for a guy (of any age), I simply cut off the tutu. I used another blending brush and Night of Navy ink to create a base on which the tub could sit.
Both the tub and the boat dies come with the hippo die set. I cropped each in Basic Gray cardstock. Then, I added dimension using my gray ink tones blending brush and Basic Gray ink. The effect is subtle, but I think it works.
Then, I used Poppy Parade cardstock and cropped the googles, breather tube, life saver and sunglasses. So stinking cute!!
If you use the multipurpose glue carefully and sparingly, you can easily adhere these cropped pieces to the hippos.
The hippo in the boat and in the tub got popped up on dimensionals.
The water droplets for each hippo needed some height, but not by using dimensionals. I cropped enough droplet sets to layer three droplets on top of each other. Since the Pool Party cardstock blended in with the background, I added Wink of Stella to each of the droplets.
Finishing Up:
The bottom horizontal panel really had me stumped. A quick perusal of my stamp sets led me to the school of fish stamp from the Whale Done stamp set. I stamped it in Pacific Point ink going across the bottom panel. Then, I added some to the waves on the inside panel as well.
This bottom panel also needed some sort of dimension. Therefore, I stamped the fish from Seas the Day four times using Pacific Point ink on Pool Party cardstock. I didn’t want to use dimensionals under these fish, so I adhered two fish together and then adhered them to the bottom panel.
The Waves of Inspiration stamp set contains a small bird, which I stamped three times across the top using Gray Granite ink.
The outside sentiment comes from the Catch You Later stamp set and the inside sentiment comes from Happy and Heartfelt. I stamped both using Night of Navy Ink.
I still needed something to hold the easel upright and settled on the birds from the Waves die set. The birds would need to be high enough to hold the easel, but I didn’t want to even begin to try to add dimensionals or foam adhesive behind the birds. Therefore, I cropped enough birds from Gray Granite cardstock to adhere five birds on top of each other. Five layers of cardstock turned out to be enough to hold up the easel.
Finally, I trimmed the DSP on the envelope flap and ran the 1 inch circle envelope seal through my XYRON create-a-sticker. With that, I’d finished this coordinated easel card, envelope, and seal set.
From now until June 30, 2022, all kits are buy one, get one 50% off! Just look at some of the kits available!
Do You Want to Place an Order?
Of course you do!
If you are ordering less than $150.00, please use the host code shown. If you are ordering more than $150.00, please contact me first so you can get your stamping rewards! Any order over $50 will earn a little surprise from me.
The HOST CODE through June 30, 2022 is 6YTD44QQ.
Again, thank you for stopping by my blog today! I appreciate your comments and your time.
It’s time for the May Pals’ Fun Fold Blog Hop! I love learning new fun folds, so I’m excited to see what my fellow Pals have created! When you are finished here, please hop along to the other Pals’ sites using the links at the bottom of this post.
I really wanted to use this DSP (designer series paper) from the new Awash in Beauty DSP found in the new annual catalog. Therefore, I decided to go with a simple Z-fold card so I wouldn’t have to cut the DSP too much.
Here’s my fun fold card:
Clean and Simple:
The Balmy Blue base measures 5-1/2 by 8-1/2 inches. To create the Z-fold, score the base at 4-1/4 inches and 2-1/8 inches.
I really didn’t want to cut this gorgeous DSP up. Creating a card to show off the beautiful colors and flowers worked perfectly for this card. The larger piece measures 5-3/8 by 4-1/8 inches. The smaller piece measures 5-2/8 inches by 2-1/8 inches.
I used white cardstock measuring 5-3//8 by 2-1/8 inches for the inside panel and left it blank. When the time comes to use it, I can stamp a sentiment on the white panel or leave it blank for a handwritten message.
Since I didn’t want to cover a lot of the floral DSP, so I trimmed a piece of Balmy Blue cardstock to 34 by 8-1/2 inches for the strip that makes the z-fold. Just like the base, I scored this pieces at 4-1/4 inches and 2-1/8 inches. The most important part for this card is this strip of cardstock. The longest part gets attached to the very front panel. Then, the short end gets attached to the back piece of the base.
Next, I trimmed the DSP for the connecting strip. I needed two pieces measuring 5/8 by 2-1/8 inches. The longer piece measures 5/8 by 4-1/8 inches. I also trimmed a piece of this Polished Pink DSP to 6 inches by 2-1/2 inches for the envelope flap.
Stamping and Finishing Up:
Both sentiments come from the Happy and Heartfelt cling stamp set. I just love the font used for all the sentiments in this stamp set! I used Momento Tuxedo Black ink for both sentiments. After stamping “congratulations”, I trimmed the white cardstock to 1/2 by 2-1/2 inches and added dimensionals to the back of it.
I stamped the second sentiment directly on the DSP.
I used multipurpose liquid glue to adhere all the pieces with the exception of the “congratulations” sentiment.
Finally, I added five self-adhesive butterflies to the DSP. Can you find all five?
With that, I’d finished this coordinated card, envelope, and envelope seal set.
Back to the Pals’ Fun Fold Blog Hop!
I hope you will hop along with us. Please use the following line-up as a guide in case you get lost: Thank you!
Along with the new catalog, there’s a really fabulous joining bonus! As always, your starter kit is just $99 for $125 of your choice of products. The bonus? Over $66 of the new 2022 – 2024 In Color supplies! You get the following at no extra cost to you:
In Color Ink Pad Collection
and In Color Grid Paper
plus In Color Cardstock Collection
and the 6 x 6 inch In Color Designer Series Paper Assortments
Do You Want to Place an Order?
Of course you do!
If you are ordering less than $150.00, please use the host code shown. If you are ordering more than $150.00, please contact me first so you can get your stamping rewards! Any order over $50 will earn a little surprise from me.
The HOST CODE through May 31, 2022 is E3W722BD.
Again, thank you for stopping by my blog today! I appreciate your comments and your time.
I just absolutely love the Ladybug Wishes stamp set and punch and am going to be very sad when it retires at the end of June. However, this is a set that will have a home in my “blue room” (aka studio) for a long time.
When you finish here, I hope you will follow the Pals’ Fun Fold Blog Hop information at the bottom of my post!
Here’s my quick ladybug fun fold card:
Measurements:
I’ve seen this fun fold quite a bit on Pinterest and thought that I needed to just figure out the math and make one of my own. Trust me, if you can score paper, you CAN do this!
The Real Red base measures 8-1/2 inches by 5-1/2 inches. Then, I scored the card at 1-3/8 inches and 2-1/8 inches. I rotated the cardstock 180 degrees and repeated the score lines. They say a picture is worth 1,000 words, so here’s a picture of my score lines:
The measurements on the right are purposely upside down because that’s how I rotated the cardstock 180 degrees.
The black cardstock on the front measures 4-1/8 inches by 5-3/8 inches.
All the DSP (designer series paper) I used comes from the Pattern Party host DSP set. This DSP will retire with the 2021 – 2022 annual catalog, so if you want this fabulous 48 sheet set, time is running out! I also trimmed a piece to 6 inches by 2-1/2 inches for the envelope flap.
The striped DSP on the front measures 4 inches by 5-1/4 inches.
I trimmed the white cardstock on the reverse side of the card to 4-1/8 inches by 5-3/8 inches.
If you want to decorate both sides of the folded parts you will need to make the following cuts: 4 panels trimmed to 4-1/8 inches by 1-1/4 inches and 2 panels trimmed to 4-1/8 inches by 5/8 inch.
That’s it for the trimming!
What I Did:
I’ve already posted a ladybug card using this same color scheme, and you can see that card here. I used vellum under each ladybug in that card, and wanted to do something similar for this card. Therefore, I stamped the large leaf from the stamp set using my VersaMark ink pad on the vellum cardstock. Next, I covered each with white embossing powder and heat set them. Finally, I fussy cut the leaves. I’m pleased with the results.
Then, I stamped the Real Red wings on white cardstock. The black dots are super easy to add using the dots only stamp set. After that, I punched out two black ladybug bodies and both wings. I used multipurpose liquid glue to attach the wings to the ladybug body and added dimensionals to the underside of the ladybugs.
These darling googly eyes came from Amazon. When I originally ordered them, I needed 6 googly eyes. Of course, I ordered a larger set than just the 6 or so. I ordered a set of 1,200 eyes in varying sizes. It comes in it’s own organizer and the eyes are self-adhesive. What more could anyone possibly want for googly eyes?! You can find the same set I used here.
Since I didn’t need to worry about adhesive showing through the vellum, I was able to use multipurpose liquid glue to adhere them to the DSP.
I used the scalloped die from the scalloped contours for the top panel. I trimmed it to 4-1/8 inches wide.
Before I adhered the scalloped panel to the DSP, I wrapped the end of my Real Red ribbon (from the Playful Pets ribbon set) around the scalloped panel and tied it in a bow. I used glue dots to adhere the bow to the scalloped panel. Since the ribbon is so thin, I was able to use liquid glue to attach it to the DSP.
I added matte black dots to each of the visible scallops.
The HAPPY BIRTHDAY sentiment comes from the Party Puffins stamp set.
I stamped a sentiment from the Ladybug Wishes stamp set and another ladybug on the white cardstock for the back. This ladybug is a two-stamp process. First, the ladybug is stamped in Tuxedo Black ink. Second, the Real Red insert gets stamped directly on top of the first stamp. Since the set is photopolymer, lining everything up is a snap.
I stamped the same ladybug on the front of the envelope and trimmed the DSP on the flap. Finally, I punched a 1 inch circle for the envelope seal. With that, I’d finished this coordinated, card, envelope, and seal set.
Pals’ Fun Fold Blog Hop!
I hope you check out the other projects created by my fellow Pals! I’m always inspired by everyone’s creations!
Thankyou very much for stopping by my blog today!
Have a Peachy Day!
Sue
Do you live in the U.S. and need a demonstrator? If so, I’d love to talk to you!
Do You Want to Place an Order?
Of course you do!
If you are ordering less than $150.00, please use the host code shown. If you are ordering more than $150.00, please contact me first so you can get your stamping rewards! Any order over $50 will earn a little surprise from me.
The HOST CODE through April 30, 2022 is VRBF62NN.
Again, thank you for stopping by my blog today! I appreciate your comments and your time.
The 2021 – 2022 annual catalog ends May 2nd! Now’s the time to stock up on some of your must-have retiring items!
Follow the link to shop for LAST CHANCE ITEMS! Remember, the host code is VRBF62NN.
Check out the 2022 – 2024 New In Colors!
As a demonstrator, I’ve already seen the new 2022 – 2023 catalog and it’s fabulous! I am thrilled to be able to pre-order products on Friday, April 1st (no fooling!). While I can’t show you the inside pages of the catalog, I can share the new 2022 – 2024 In Colors with you! Get ready!
Do you live in the U.S. and need a demonstrator? If so, I’d love to talk to you!
Do You Want to Place an Order?
Of course you do!
If you are ordering less than $150.00, please use the host code shown. If you are ordering more than $150.00, please contact me first so you can get your stamping rewards! Any order over $50 will earn a little surprise from me.
The HOST CODE through April 30, 2022 is VRBF62NN.
Again, thank you for stopping by my blog today! I appreciate your comments and your time.
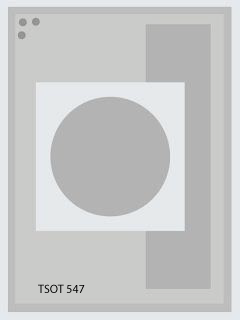
Welcome to this three-for post! Jolanda chose the equinox as the theme for the Cardz 4 Guyz challenge # 292. I used the sunflower to represent the equinox, but you will see it stands for so much more. Since today is the fourth Tuesday of the month, it’s also the Pals Fun Fold Blog Hop, and I learned a number of new fun folds over Spring Break last week. Some went really well, a couple others not so much. The layout comes from the Try Stamping on Tuesday challenge # 547. Score!
Here’s. my fun fold card:
Here’s the challenge banner from TSOT #547
Finally, here’s one of the fun folds I made that didn’t turn out the way I thought it would, but I found a new-to-me fold through the process. Originally, I intended to create a double easel card. It didn’t work out that way.
Measurements for the First Challenge Card:
The Pacific Point base measures 11 inches by 4-1/4 inches, scored at 5-1/2 inches.
The top Basic Black base measures 4-1/8 inches by 10-3/4 inches, scored at 5-3/8 inches. Then, I simply adhered this black card to the front of the Pacific Point base.
I used white cardstock trimmed to 4 inches by 5-1/4 inches for the inside of the Pacific Point card.
Starting from the front, both the Daffodil Delight and the Pacific Point DSP is from the Brights 6 x 6 DSP (designer series paper) collection. I trimmed the Daffodil Delight to 5-1/4 inches by 4 inches. The Pacific Point DSP measures 1-3/8 inches by 3-5/8 inches.
Next, I trimmed the DSP for the second layer to 5-1/4 inches by 4 inches. I also trimmed a piece of this DSP to 6 inches by 2-1/2 inches for the envelope flap.This fabulous black and white pattern comes from the host DSP Pattern Party pack. If you like black and white patterns, this host DSP pack is for you!
I cropped the open square using two of the square dies found in the Stitched Shapes die set.
Stamping and Coloring:
Now for the fun, aka stamping and coloring, part. These sunflower stamps come from the Celebrate Sunflowers stamp set. Love! The Momento Tuxedo Black ink pad is a must when coloring with blends because it won’t run. I stamped two sunflowers and cropped them out with the sunflower die. Then, I made two sunflower masks out of copy paper to create the middle layer of the card.
HINT: Don’t use cardstock for a masking layer because it’s two thick. Copy paper works wonderfully. Just remember to take a tiny step back from the edge of the image you are masking. That way, your new image will line up right next to the first image. Does that make sense?
Finally, I stamped a sunflower on the corner of the inside of the card and on the front, bottom corner of the envelope.
HINT: When using blends on an envelope, make sure you have a scrap of cardstock inside the envelope so the blends don’t bleed to the back of the envelope. Trust me – don’t forget the scrap.
I used the dark and light Daffodil blend for the sunflower petals. Next, I used the Old Olive blends combo for the leaves. Finally, I used the Crumb Cake blends combo for the centers of the sunflowers.
Both the front and middle sentiments come from the Flowing Flowers stamp set, found in the current January – June 2022 mini catalog.
The inside sentiment comes from the Celebrate Sunflowers stamp set.
Finishing Up:
At this point, I decided the front needed a little something, so I cropped the Crumb Cake stalks using the sunflower die set.
The middle part definitely needed something behind the sunflowers. Therefore, I used the scalloped contour dies to crop a Daffodil Delight layer from the cardstock. Then, I trimmed the sunflower layer to size.
In order to echo the TSOT challenge sketch, I added 3 matte black dots in the top left-hand corner of the outside layer.
After adhering everything with multipurpose adhesive, I popped the two front sunflowers up on dimensionals.
Finally, I trimmed the DSP on the envelope flap and punched a 1 inch circle from the Daffodil Delight DSP for the envelope seal.
With that, I’d finished this coordinated fun fold card, envelope, and envelope seal set.
Pals Fun Fold Blog Hop:
After finishing here, the other Pals and I would greatly appreciate you hopping along with us for the fun folds. Thanks!
This Mini Stampin’ Cut and Emboss machine WILL be on my next order! The special is available as long as supplies last, so don’t miss out on the machine or the select bundles! 20% off?!?! Yes, please!!
Do you live in the U.S. and need a demonstrator? If so, I’d love to talk to you!
Do You Want to Place an Order?
Of course you do!
If you are ordering less than $150.00, please use the host code shown. If you are ordering more than $150.00, please contact me first so you can get your stamping rewards! Any order over $50 will earn a little surprise from me.
The HOST CODE through March 31, 2022 is KNS7N3KP.
Again, thank you for stopping by my blog today! I appreciate your comments and your time.
Welcome to Just Peachy Stamping by Sue Jackson: an independent Stampin' Up demonstrator.
Through Stampin' Up!, I happily share my love of papercrafting through sales, classes, small stamping group meet-ups and workshops. I think that being a teacher in my "real life", I have a unique approach to sharing my fantastic hobby. I look forward to connecting with you!