Welcome to the newest Make My Monday bi-weekly challenge #243. Our host for this challenge, Guylane, chose Snowflakes for the theme. When you finish here, please visit the challenge site to see what the rest of the very talented design team members created. Then, don’t forget to upload your creations to our gallery. We look forward to seeing your creations there!
I have had this sheet of snowflake vellum on my mind for the majority of the time I was making Christmas cards. I knew I wanted to use it, but wasn’t sure how. This challenge gave me an opportunity to do so!
Here’s my Lost Lagoon snowflake card:
Easy Peasy Does It
The Lost Lagoon base measures 8-1/2 by 5-1/2 inches, scored at 4-1/4 inches
There’s a piece of white cardstock under the vellum, which measures 5-3/8 by 4-1/8 inches
The vellum also measures 5-3/8 inches by 4-1/8 inches
The white cardstock on the inside measures 4 by 5-1/4 inches
Trim a piece of Lost Lagoon to 4-1/8 by 5-3/8 inches, then crop the center out using a deckled rectangle die
Use a scrap piece of Lost Lagoon for the sentiment banner
Wipe down the scrap of Lost Lagoon using your embossing buddy
Stamp the sentiment using VersaMark ink and cover it in silver embossing powder, then heat set
Crop the sentiment using a die from the Greetings of the Season die set
I outlined the sentiment banner using the clear Wink of Stella pen
Assembly:
Unless otherwise noted, I used multipurpose liquid glue to adhere the pieces together
Adhere the vellum to the white cardstock by adding glue so it will be covered by the Lost Lagoon frame
Stamp the Lost Lagoon frame using the snowflake cluster from Frozen Edges and Lost Lagoon ink
Stamp the same snowflakes and ink on the envelope flap
Adhere the frame to the vellum/cardstock layer
Wrap a length of Lost Lagoon ribbon around the vellum/cardstock/frame layers and tie in a knot
Add dimensionals to the back of the sentiment banner and adhere to the card
Finish by adding silver enamel dots to the centers of the snowflakes on the vellum
Thank you for stopping by today!
Have a Peachy Day!
Sue
What’s New?
The January – April 2025 mini-catalog, the Sale-a-Bration, and the joining promotion all went live on January 7, 2025. Take a peek at some of the new products:
Welcome to the new Cardz 4 Galz bi-weekly challenge #202 for today, June 29, 2023. Our host for this time, Helen, chose fun folds for the theme. If you haven’t noticed, I love fun folds! When you finish here, I hope you will visit the challenge site to see what the rest of the design team created. There’s also a call for new design team members or guest designers for a month (2 challenges). If you are interested, you can find the information there.
I’ll be entering this one in the Creative Creases challenges as well.
Here;s my tri-fold birthday card for my great-niece’s 7th birthday:
I used Debbie Henderson’s video for all the measurements for this card. She used the Countryside Inn suite of products. I used the Bright and Beautiful suite of products along with the deckled rectangle die set. But I, did use her measurements. The only thing I have to do is get the gift card for her present. I will add a pocket on the back of the third panel when I get the card.
NOTE: This card will fit inside a medium white Stampin’ Up! envelope. However, for mailing in the U.S., it will require additional postage (2 stamps will work) in order to be mailed.
Putting the Card Together:
The Bright and Beautiful DSP (designer series paper) is adhered with multipurpose liquid glue, as are the two deckled rectangle pieces.
Add dimensionals under all the balloons and decide where your strings need to be stamped BEFORE you adhere the balloons together.
HINT: I first cropped out the trio of balloons from the die set in black cardstock. That allowed me to adhere the balloons without having to figure out where to place each balloon.
I used the clear Wink of Stella pen to outline the balloons to make the edges more definitive.
Stamp the birthday sentiment using Momento Tuxedo Black on a piece of Bright and Beautiful DSP. Crop using the sentiment label die from the Bright and Beautiful die set.
Outline the die cut using a Basic Black marker.
Adhere a piece of the adhesive foam sheets to a piece of black cardstock.
Crop the black cardstock using the same label die.
Use multipurpose liquid glue to adhere the sentiment DSP panel to the blackcardstock.
Peel off the backing on the adhesive sheet and adhere it to the middle panel of the card.
Use baker’s twine to tie a bow through the hole at the top of the sentiment panel.
I stamped the sentiments on the deckled rectangle pieces using Misty Moonlight after I adhered the balloons.
Trim a piece of Bright and Beautiful DSP to 6 inches by 2-1/2 inches for the envelope flap.
Punch another piece of DSP using your 1-inch circle punch for the envelope seal.
If you live in the U.S., the HOST CODE for June is VAMCFNHD.
If you don’t already have a Stampin’ Up! demo with whom you work, I’d love to be your stamping buddy! If you are placing an order for under $150, please use the host code above. If you are placing an order over $150, please contact me so you can get the benefit of the Stampin’ Rewards you will earn. OR, you can take advantage of the joining promotion going on through the end of the month with no long-term commitment! Spend $99 and get $155 of product! Winner!
JUST A COUPLE OF DAYS for ADDITIONAL OPPORTUNITIES!
BOTH OF THE FOLLOWING PROMOTIONS END ON JUNE 30,2023!
It’s a fabulous time to join Stampin’ Up! New team members will get even more FREE products in their customizable Starter Kit. Between 1–30 June, those who sign up can get $125 USD | $165 CAD$155 USD |$206 CAD worth of products for only $99 USD | $135 CAD + free business supplies + free shipping + all the fun being a part of Stampin’ Up!
If you live in the U.S. and want to be a part of my team, please contact me at justpeachystamping@gmail.com.
Welcome to InKing Royalty’s Blog Hop! We have created wintry projects to share with you today – snow, sleds and mittens are sure to be found in our lineup. We are excited to share our creations and hope you love them! After you read my post, I hope you’ll hop over to the next person on the list at the base of this post.
I’ve made and posted a dancing gnomes card before, and you can see that post here.
For this blog, I used the Sun Prints DSP because the gnomes DSP (designer series paper) is out of stock. However, the gnomes dies are still available because they coordinate with a new gnomes stamp set coming up in the mini-catalog that starts in January.
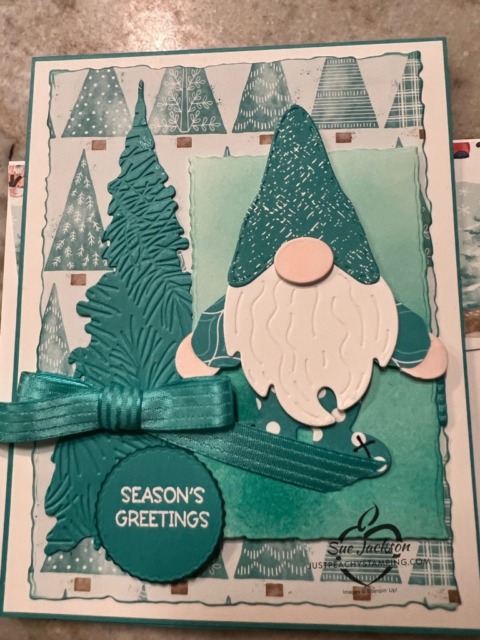
Here’s my first dancing gnomes card:
.
InKing Royalty’s Blog Hop
The first bottom picture shows how the bottom of the gnome moves. It does swing freely, if you are careful to not let the mechanism underneath get caught on the rest of the gnome.
Once I got started with this guy, I felt like I needed to make more. Here are those cards:
InKing Royalty’s Blog Hop
I stumbled across this dancing gnomes video from Susan Campfield and found out how easy it really is to create this adorable gnomes. You can find her video here. Believe me, her video makes more sense than anything I could write.
Measurements:
All of these measurements come from the Sun Prints DSP card.
The Starry Sky base measures 5-1/2 by 8-1/2 inches, scored at 4-1/4 inches.
The white cardstock mat measures 5-3/8 by 4-1/8 inches.
I used the largest deckled rectangle die for the Sun Prints DSP.
Next, I cropped white cardstock using a smaller deckled die.
I used two of the DSP patterns to crop the hat and the bottom of the body of the gnome.
The beard and the three pieces for the nose and two hands were cropped from white cardstock.
The white cardstock for the inside of the card measures 5-1/4 inches by 4 inches. I used Starry Sky ink and one of the Framed and Festive sentiments for the inside of the card.
I trimmed another pattern from the Sun Prints DSP to 6 by 2-1/2 inches for the envelope flap.
Putting the Card Together:
I used the SU1000 natural blend to color the nose and hands.
I used the black blunt end of a black marker to outline the hat and the ties on the feet.
I trimmed a strip of DSP to 1/2 by 1-1/4 inches and then trimmed it in half to create arms. After I trimmed them, I slightly rounded the corners so they wouldn’t be blocky arms.
HINT: When adding the arms, make sure they don’t rub up against the mechanism that allows the gnome legs to swing. I found that if I trimmed the “shoulders” then glued the arms under where the hat attaches, I could minimize the interference.
I cropped the panel behind the gnome from white cardstock. Then, I used a blending brush and Starry Sky ink to color the white cardstock. Then, I attached the gnome using dimensionals.
HINT: Only put one dimensional under the hat and one under each hand. Any more dimensionals will interfere with the swinging legs.
I used some multipurpose liquid glue to adhere a wonderful snowflake to the DSP on the top.
Next, I trimmed another snowflake so that it peeks out from under the bottom of the blended panel.
Before I attached the gnome panel, I wound a combination of the silver mesh and Starry Sky metallic ribbon around the DSP and tied it in a bow.
Then, I added dimensionals to the blended panel and adhered it to the front of the DSP.
I used multipurpose liquid adhesive to attached the DSP to the white cardstock, and the cardstock to the front of the card.
Finally, I trimmed the DSP for the envelope flap, and punched a 1-inch circle for the envelope seal. With that, I’d finished this coordinated card, envelope, and envelope seal.
Back to the InKing Royalty’s Blog Hop:
Thank you for stopping by today. I hope you’ll hop along to the next stop on the blog hop, Candy Ford at Stamp Candy.
Thank you for hopping along with us. If you get stuck during the Blog Hop, please use this line-up as a guide:
The following products are being retired with the end of the mini-catalog at the end of this month. There are some great deals included in this product showcase! Take a look for yourself:
Welcome to the Make My Monday #184 two-week challenge! Our host this week is also our fearless leader, Caz. She chose autumn flora or fauna, of which I chose autumn flora. When you finish here, I hope you will visit the challenge site to get inspired by the rest of the design team. I’d love to see what you create posted in our gallery. In the meantime stay safe and craft on.
Here’s my autumn flora card:
Once again, I used the Fond of Autumn bundle of a stamp set and coordinating dies. I usually need to make about 25 Thanksgiving cards and this year is no different. Even though I usually create individual cards for everyone, this year I will be creating eight of each of the cards I’ve already created., including this one. You can see my other cards using this bundle here and here.
One of the reasons I love this bundle is because of the versatile dies for the large stamp! The first die for the large stamp will crop the whole image at once. However, the second die really steals the show, and I used it on this card. The second die will crop the image into four separate pieces, as shown below:
Measurements:
The Old Olive base measures 5-1/2 by 8-1/2 inches, scored at 4-1/4 to create a tent fold card.
I used two of the deckled rectangle dies; one for the Crushed Curry DSP (designer series paper) layer and one for the Crumb Cake DSP layer. Both of these deckled rectangles were outlined using the Soft Suede marker.
I also trimmed a piece of the Crumb Cake DSP to 6 inches by 2-1/2 inches for the envelope flap. At this point, I also punched a 1 inch circle from the Crushed Curry layer for the envelope seal. The punched seal is behind the Crumb Cake DSP, so no one will be the wiser.
I cropped the white cardstock for the inside of the card to 4 by 5-1/4 inches.
That’s it for the measurements.
Stamping, Cropping, and Coloring:
First, I stamped the large floral image twice using my Momento Tuxedo Black ink pad. Positioned carefully, you can get both stamped images on one piece of 4-1/4 by 5-1/2 inch piece of cardstock. In addition, I stamped the single flower and single acorn from the stamp set on either bottom corner of the inside of the card.
I cropped one of them using the whole outline die. I cropped the second one using the four part die and colored just this one.
The blends I used were the combos for the following colors:
Mossy Meadow for the oak leaves
Old Olive for the smaller leaves
Pumpkin Pie for the berry-looking parts
Bumblebee (retired) for the petals of the flowers
Crumb Cake for the inside of the flowers and the bottom of the acorns
Soft Suede for the tops of the acorns.
I used my Blackberry Bliss marker for the seeds surrounding the center of the flowers.
I stamped the outside sentiment, which comes from a retired stamp set, in Soft Suede and cropped it using a die from Stylish Shapes.
The inside sentiment, Autumn Wishes, comes from the Fond of Autumn stamp set.
I used multipurpose liquid glue to adhere the inside cardstock, and both of the deckled rectangle layers. Then, I used multipurpose liquid glue to adhere the uncolored large stamp to the Crumb Cake cardstock. This allowed me to perfectly align the 4 pieces of the cropped colored stamped image. I used dimensionals under the colored image and under the sentiment banner, which I outlined with my Pumpkin Pie marker.
Finally, I tied a bunny ears bow and used a glue dot to adhere it on the left of the sentiment.
With that, I’d finished this coordinated card, envelope, and envelope seal set.
Thank you very much for stopping by my blog today.
Who doesn’t absolutely love saving money with a weekly deal?
Check out the current weekly deals below:
Pair the weekly deals with the clearance rack, and you have some pretty fabulous savings:
If you live in the U.S. and don’t already have a demonstrator, I’d be honored to work with you.
Do You Want to Place an Order?
Of course you do, especially since you can earn FREE products with a qualifying purchase!
If you are ordering less than $150.00, please use the host code shown. If you are ordering more than $150.00, please contact me first so you an get your stamping rewards! Any order over $50 will earn a little surprise from me.
The HOST CODE through September 30, 2022 is W9GCXFZ6.
Once again, thank you for stopping by my blog today! I hope you will take another minute and leave a comment.
Welcome to InKing Royalty’s September Blog Hop! This month’s blog hop is dedicated to leaves. As the weather begins to cool, the leaves begin to change colors and fall from the trees. We are excited to share our creations and hope you love them! After you read my post, I hope you’ll hop over to the next person on the list at the base of this post.
Here’s my leafy card:
The Fond of Autumn bundle made creating this card super quick!
Measurements:
The Cajun Craze base measures 4-1/4 by 11 inches, scored at 5-1/2 inches to create a tent fold card.
I also trimmed a piece of Cajun Craze to 4 by 5-1/4 inches for the background of the card.
The white cardstock panel on the inside also measures 4 by 5-1/4 inches.
The last measurement is for the envelope flap. I used a piece of Old Olive 6 x 6 inch DSP trimmed to 6 inches by 2-1/2 inches.
Stamping, and Heat Embossing:
First, I used the large floral/leaf/acorn stamp and Cajun Craze ink to create the background design on the Cajun Craze panel. Since I knew the very center of the panel would be covered, I just worked my way around the outside of the panel. I did rotate the stamp so that the pattern would appear more random..
Then, I used the Cajun Craze marker to outline the panel and added dimensionals to the back of the panel. I also stamped the bottom of the inside white cardstock panel and the bottom of the front of the envelope. Using a piece of scrap white cardstock, I stamped a small section of the leaves and punched out a 1-inch circle for the envelope seal.
I wanted/needed this to be a Thanksgiving card, so I used a (retired) Happy Thanksgiving stamp in Soft Suede for the inside sentiment.
Using a Versamark ink pad, I stamped the same floral/leaf/acorn stamp on white cardstock. In addition, I stamped three of the single leaves. Then, I added black embossing powder and heat set everything.
Coloring with the blends was a bit easier since the edges were all embossed. I used the Old Olive blends combo, as well as the Cajun Craze blends combo..
The acorn just peeks out under the sentiment, and I used the Crumb Cake blends combo for that acorn.
Cropping:
After I finished coloring, I used the detailed die from the bundle. This has to be one of my all-time favorite dies! Just look at the results, which come from another blog post, which you can see here.
For this card, I used the three pieces on the bottom of the first picture. In addition, I had three of the individually cropped leaves, to which I added dimensionals.
Next, I cropped the Soft Suede cardstock label using the Painted Labels die set.
I stamped the sentiment, from the Fond of Autumn stamp set, in Soft Suede and cropped it using a die from the Deckled Rectangles die set (another favorite). To ensure that the sentiment label would pop off the leaves, I outlined it with the Cajun Craze marker and added dimensionals.
Finally, I folded a length of linen thread in half and tied it in a bow. I added it to the Soft Suede cardstock label using a glue dot.
With that, I’d finished this coordinated card, envelope, and envelope seal set.
Back to the InKing Royalty Blog Hop:
Thank you for stopping by today. I hope you’ll hop along to the next stop on the blog hop, Lynn Kolcun at Avery’s Owlery. There’s lots of inspiration to be found in this group – and you don’t want to miss it!
Thank you for hopping along with us. If you get stuck during the Blog Hop, please use this line-up as a guide:
Who doesn’t absolutely love saving money with a weekly deal?
Check out the current weekly deals below:
Pair the weekly deals with the clearance rack, and you have some pretty fabulous savings:
If you live in the U.S. and don’t already have a demonstrator, I’d be honored to work with you.
Do You Want to Place an Order?
Of course you do, especially since you can earn FREE products with a qualifying purchase!
If you are ordering less than $150.00, please use the host code shown. If you are ordering more than $150.00, please contact me first so you an get your stamping rewards! Any order over $50 will earn a little surprise from me.
The HOST CODE through September 30, 2022 is W9GCXFZ6.
Once again, thank you for stopping by my blog today! I hope you will take another minute and leave a comment.
Welcome to Just Peachy Stamping by Sue Jackson: an independent Stampin' Up demonstrator.
Through Stampin' Up!, I happily share my love of papercrafting through sales, classes, small stamping group meet-ups and workshops. I think that being a teacher in my "real life", I have a unique approach to sharing my fantastic hobby. I look forward to connecting with you!