Welcome to the Stampin’ Pretty Pals’ Blog Hop! This month our blog hop theme is Sale-a-Bration! We hope you will be inspired by all the beautiful creations the Pals have made for you! As you hop from blog to blog, we would love for you to leave a comment. You will find the lineup at the end of my post to help you “hop” along from Pal to Pal.
I used the SAB owl stamp set (earn with a $50 purchase), a piece of window sheet, and the Dainty Flowers DSP (earn with a $50 purchase). I’ve made two twisted easel cards for you, both of which use the Dainty Flowers DSP.
Here are my twisted easel cards:
The above card turned out to be much more involved than. I originally planned. Therefore, I created a second card for you to see how just trimming and scoring the DSP and cardstock can turn these papers into a beautiful card. Honestly, the DSP does all the work.
Here’s my second card:
There are so many videos for creating a twisted easel card. The one I saw a few weeks ago incorporated a book binding side, which I really liked. I can’t for the life of me find the original video I watched, and I am sorry for that problem.
For simplicity purposes, I am including the measurements and directions for the second card on this post. I’ve already got all the pieces cut for two more twisted easel cards, so I will include in progress pictures for one of them.. Actually, you are getting a sneak preview of my Make My Monday Challenge design team card going live on Monday, 01/16/2023.http://mmmchallengeblog.blogspot.com/
Rich Razzelberry cardstock base trimmed to 4-1/4 inches by 11 inches.
Score the base along the long side at 5-1/2 and 6-1/2 inches.
Next, score the 4-1/2 by 4-1/4 inch rectangle diagonally as shown in the picture below:
Please note that this is the inside view.
Trim two pieces of DSP to 4-3/8 by 4-1/8 inches. Trim one of the pieces diagonally to use for the back of the standing easel. For the example card, this is the Old Olive piece of DSP.
Trim DSP to 7/8 by 4-1/8 inches for the bookbinding on the front.
Next, trim a piece of white cardstock for the inside to 4-1/8 by 4-3/8 inches.
Finally, trim a piece of DSP for the envelope flap to 6 by 2-1/2 inches.
Assembly:
Adhere the bookbinding piece on the inside of the card. The picture below shows the placement of the adhesive for both the bookbinding part and the white cardstock on the inside.
I wrapped a piece of Old Olive ribbon around the piece of DSP for the bookbinding section on the front of the card.
Adhere the bookbinding piece to the front using dimensionals to allow for the ribbon.
Adhere the triangle piece of DSP to the outside of the card as shown below:
Adhere the whole rectangle of DSP to the bottom triangle on the outside of the card as shown below:
Please note that you only put adhesive on the bottom portion of the triangle. The top half of the DSP should not be adhered.
Stamp the sentiment for the front and inside of the card. The front sentiment comes from the Framed Florets stamp set.
Crop the sentiments. For the front, I used one of the square dies from the Stylish Shapes die set. The inside sentiment was also cropped using the banners from the Stylish Shapes dies.
Add dimensionals on the reverse of the sentiments, especially needed for the inside sentiment.
Please note that the angle of the standing easel will depend on the placement of your inside sentiment.
TA-DAH! You’ve created a twisted easel fun fold card. This card will fit in a medium SU! envelope.
With that, I’d finished this coordinated twisted easel card, envelope, and envelope seal set.
Back to the Pals’ Blog Hop!
More inspiration awaits, so use the lineup below to visit the rest of the Design Team. The Pals are excited to show you what they’ve created! Then, please mark your calendars for our next blog hop on February 8th, when we will be creating projects for Random Acts of Kindness Week.
Sale-a-Bration is now live until February 28, 2023!
Here are some SU! videos regarding the FREE items you can earn! I have to tell you, the first SAB item I earned was the owls stamp set. So, so, so stinking cute!!! They are so easy to fussy cut as well.
As always, the joining benefits for joining during Sale-a-Bration are spectacular! As always, there’s no commitment, so taking advantage of this promotion doesn’t mean a long-term commitment. If you live in the U.S., and are interested in joining, please contact me at justpeachystamping@gmail.com
Here’s the joining promotion video:
If you live in the U.S. and do not already have a demonstrator, I would love the opportunity to serve you.
If you want to place an order, please do so using the host code Y6CTX7D3 when prompted. Any order for $50 can not only earn a FREE Sale-a-Bration item, but also a product from me!
If you want to place an order of over $150, (think of the FREE Sale-a-Bration items!) please contact me before placing your order so you can also qualify for STAMPING REWARDS, giving you even more FREE ITEMS!
I have been having an absolute blast with this Kindest Gnomes bundle! When I saw this gnome garland at Dollar Tree, I knew exactly what I was going to do. So, with the help of three strands of garland and a small wreath frame ($5.00 plus tax), I knew exactly what I needed to create: a gnome wreath with two $10 gift cards from Amazon. Who doesn’t love Amazon?!?!
Making the Wreath:
Even if you’ve never made a wreath before, this one will come together in a snap. Truly. It’s easy. Trust me, please.
Here’s a picture of a small wreath, just for reference:
There were only two strands of the gnomes garland left, so I also picked up a red and silver garland. I used that one first, kind of like the base. I tied a very small knot with the end of the garland onto one of the middle circle bar. Then, I just wove the red/silver garland around the two middle circle bars.
Next, I tied the white gnome garland to an outside crossbar and the garland around the whole frame to start on the candy cane-ish look I wanted to achieve.
Then, I repeated the process with the red gnome garland, making sure I kept the candy cane look going.
I did just tie off all the ends of the garland. That’s it. The wreath was done. Now for the fun part – adding gnomes!
The Whimsical Woodland Tags:
I started with three pieces of white cardstock measuring 5-1/2 by 8-1/2 inches. Then, I ran it through my SU! Cut and Emboss machine using the Whimsical Woodland 3D embossing folder.
HINT: I found that if I placed the white cardstock into the folder so that I had about 4-1/4 inches inside, I could just emboss half, take out the cardstock and flip it around and emboss the other end.
After embossing, I cut down the white cardstock to the size I’d need for these gnomes. Your size tags will depend on which gnome you use.
The Kindest Gnomes:
I chose to make the whole gnome from die cuts so I didn’t have to color more than the nose and hands (this is a last minute gift after all). Also, I could more easily control the colors of the gnome’s clothes.
It’s just me, but I like these gnomes to have arms. First, I cropped all the bottoms and hat pieces I needed using the Real Red and Garden Green 6 x 6 inch DSP, Then, I trimmed the “arms” using the same DSP to 1/2 inch by 1-1/2 inches. Next time, I will use 5/8 inch though.
I used white cardstock for the beards and the button nose pieces, which I also used for the hands. Bless SU! for including two of these dies in the gnomes die set.
I used Gray Granite ink and a blending brush to color the beards. I really tapped off almost all the ink from the brush before I used it to color the beard.
The nose and hand pieces were quickly colored using the SU 1000 natural tone blend.
I used a fine end of a black marker to outline the hats and to highlight the ties in the feet.
I glued the gnomes together and then added dimensionals to the back of them.
Then, I adhered each of them to a tag.
Next, I created a smaller tag for the greeting at the bottom using the Framed and Festive sentiment stamp set. Since I didn’t plan ahead, I needed to use my Stamparatus to stamp the sentiment in Mossy Meadow.
HINT: I’ve found it much easier to keep my cardstock in place on the Stamparatus grid paper by using removable tape on the back in addition to the magnets on the front.
Assembly:
After punching a small hole at the top of the tag, I used some Real Red mini-ruffled ribbon to attach each tag to the wreath.
I did the same with the sentiment tag at the bottom.
The final touch was to tie two $10 Amazon gift cards to the wreath using metallic red pipe cleaners. I didn’t need to buy any pipe cleaners (I’m a teacher – I have them coming out of my ears in my classroom storage), but you can get these at Dollar Tree as well.
With that, my Last Minute White Elephant gift is done! Now I just have to find a box so I can wrap it up.
Back to the Pals’ Blog Hop:
More inspiration awaits, so use the lineup below to visit the rest of the Design Team. The Pals are excited to show you what they’ve created! Then, please mark your calendars for our next blog hop on January 11 when our theme will be Sale-A-Bration Time. The design team will showcase projects made from Sale-A-Bration items. (I already have the SAB Adorable Owls stamp set and can’t wait to use it!)
This month, the theme is a Color Challenge. Using Crumb Cake, Mango Melody, Cajun Craze and Mossy Meadow, the Design Team has created some great projects that you will all want to see. We hope that you will be inspired by all the amazing creations! As you hop from blog to blog, we would love for you to leave a comment. Then, you will find the lineup at the end of my post to help you “hop” along from Pal to Pal.
Here’s my card in two versions:
For this absolutely adorable card, I used a tutorial video from Susan Campfield that I stumbled across on YouTube. Her directions for creating the moving part is so much easier to watch than for me to explain it to you. Truly, the moving part takes less than 5 minutes to create and anyone who receives the card will think you worked for a long time on it. Don’t tell anyone how easy it actually is!
I don’t know why this video posted in such a massive size. Please excuse the size.
Measurements:
The Mossy Meadow base measures 41/4 by 11 inches, scored at 5-1/2 inches to create a tent fold card.
AFTER I ran the Crumb Cake cardstock through the Brick and Mortar 3D embossing folder, I trimmed it to 4-1/8 by 5-3/4. Then, I used my Cajun Craze marker to outline the Crumb Cake for definition.
I used the deckled rectangle dies for the Cajun Craze mat and the sentiment block.
The white cardstock for the inside measures my usual 4 by 5-1/4 inches.
That’s it for measurements.
Stamping and Cropping:
I used the large floral spray stamp from the Natural Prints stamp set for under the Cajun Craze mat. I stamped it in Mango Melody twice and cropped them out with the Natural Prints die.
Next, I cropped all the gnome pieces. I needed one hat, for which I used Mossy Meadow DSP (designer series paper) from the neutrals 6 x 6 inch DSP.
I cropped the legs/feet using a scrap piece of Mango Melody 6 x 6 inch DSP. When cropped, the die leaves an “X” on each foot, so I used a black marker to outline those marks. I also cut a piece of Mango Melody cardstock to 3/4 inch by 1 inch to attach to the top of the legs for the swinging mechanism. Thankfully, I still have my circle punches and used the 1/2 inch punch for the hole needed for the dimensional.
I needed three of the little oval circles, one for the nose and two for the hands. I cropped white ovals and colored all three of them using the SU900 natural tone blend. It’s the lightest blend from the set.
In my humble opinion, the gnome needed arms. I used two of the ovals for the hands. The sleeves are simply Mossy Meadow 1/2 inch by 5/8 inch pieces of cardstock. I glued the “hands” to the back of the sleeves.
HINT: The most important thing to remember when adding the arms is that they need to be glued in place. If you use dimensionals, they will interfere with the swinging movement. In addition, you have to be careful where you place them. My arms are sticking out more than I wanted. However, if I placed them any lower and closer to the body, it would interfere with the swinging. Believe me, I tried to get them closer to the body but couldn’t.
With that, I’d finished these dancing gnome cards. So cute! So easy!
Back to the Pals’ Blog Hop:
More inspiration awaits, so use the lineup below to visit the rest of the Design Team. The Pals are excited to show you what they’ve created! Then, please mark your calendars for our next blog hop on November 9th when the theme will be Home for the Holidays.
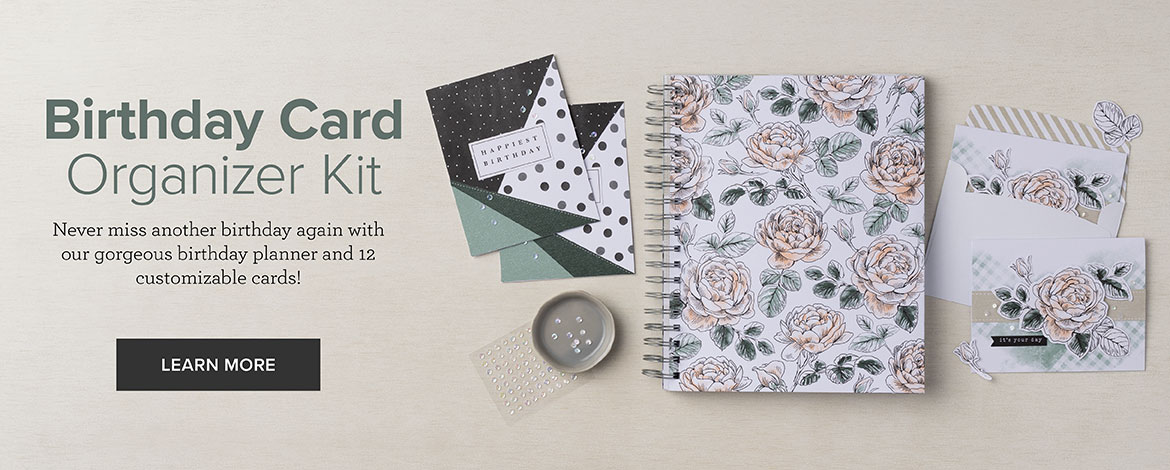
I did with the purchase of two of these NEW birthday organizer kits! I got my email today saying that they have been shipped! YEAH!
Here’s an unboxing video explaining the kit contents:
I got one kit for my mom and one for my aunt, neither of whom get out as easily as they used to do. I’m in the process of making additional cards to include with this kit, that I will make for them before I give them as a present.
Again, thank you for stopping by today! Please take just another minute and leave a comment. I’d love to hear from you.
This month, the theme is Focus on the Sentiment. Our Design Team are showcasing a sentiment as the focal point of their project. We really hope that you will be inspired by all the amazing creations the Pals share with you! As you hop from blog to blog, we would love for you to leave a comment. You will find the lineup at the end of my post to help you “hop” along from Pal to Pal.
I chose a monochromatic color combination of Evening Evergreen and Soft Succulent for my card. I paired the colors with the fabulous Fond of Autumn bundle from the July-December mini catalog, which contains a die with which I have quickly fallen in love!
Here’s my card:
The card is simple, but I framed the sentiment, which draws attention to the center of the card.
Focusing on the Sentiment:
The Evening Evergreen base measures 5-1/2 by 8-1/2 inches, scored at 4-1/4 inches to create a tent card.
Next, I used a piece of the Soft Succulent 6 x 6 inch DSP for the first layer. It measures 4-1/8 by 5-3/8 inches. I also cut a piece of this DSP to 6 inches by 2-1/2 inches for the envelope flap. I grabbed a piece of Evening Evergreen DSP and punched a 1 inch circle to use for the envelope seal.
The Basic White panel for the inside of the card measures 4 by 5-1/4 inches.
Then I used a 4-1/4 by 5 inch piece of white cardstock for the stamping for the front of the card.
Stamping and Cropping:
Using the large stamp from Fond of Autumn, I stamped it on white cardstock using Tuxedo Black Momento ink.
Next, I used the embossing buddy on the white cardstock.
Then, I cleaned the stamp and then stamped it on the other half of the white piece of cardstock using Versamark, after which I covered it in black embossing powder and heat set it.
I stamped the sentiment, again using Versamark, on a scrap piece of Evening Evergreen cardstock. Then, I covered the sentiment in white embossing powder and heat set that. The curved banner die comes from the coordinating die set.
I added iridescent basic pearl jewels to the four corners of the banner and put dimensionals under just the end of the banner.
Here’s why this die set has quickly become one of my all-time favorites. I cropped the large stamp done in the Tuxedo Black using the large, outline die. Using mutipurpose liquid glue, I adhered the cropped piece to the Soft Succulent DSP. This allowed me to be more precise when placing the the heat embossed pieces.
The next step kicks this die set up to one of my all time favorites: I used the die that will crop the whole thing into four (!!) separate pieces! Brilliant!!!
Here’s some photos of this brilliance:
I adhered four of the cropped pieces to the already adhered whole die cut using multipurpose liquid glue.
Finishing Up:
Next, I colored the three oak leaves using the Evening Evergreen blends combo markers. Then, I added dimensionals under this piece only and adhered it in place.
The dimensionals hold the banner up on the ends, and I added glue in the middle over the center of the oak leaves.
My whole goal was to bring all the attention to the center of the card by framing the sentiment, which I think I accomplished.
Back to the Pals’ Blog Hop:
More inspiration awaits, so use the lineup below to visit the rest of the Design Team. The Pals are excited to show you what they’ve created! Then, please mark your calendars for our next blog hop on October 12th when our theme will be a color challenge!
More inspiration awaits, so use the lineup below to visit the rest of the Design Team. The Pals are excited to show you what they’ve created! Then, please mark your calendars for our next blog hop on October 12th when our theme will be a color challenge!
This month, the theme is Create Your Own Background. We really hope that you will be inspired by all the amazing creations the Pals are sharing with you! As you hop from blog to blog, we would love for you to leave a comment. You will find the lineup at the end of my post to help you “hop” along from Pal to Pal.
Here’s my card:
I’ve already posted a few cards using this particular gnome, but I think this guy’s the happiest. He reminds me of one of Snow White’s dwarfs.
Measurements:
The Calypso Coral base measures 5-1/2 by 8-1/2 inches, scored at 4-1/4 inches to form a tent card.
Both the inside and the outside white cardstock panels measure 4 by 5-1/4 inches.
I trimmed a piece of Soft Succulent DSP to 6 inches by 2-1/2 inches for the envelope flap.
Then I punched a one inch circle from Calypso Coral DSP for the envelope seal, which I ran through my XYRON create-a-sticker.
That’s it for the measurements.
Creating the Background:
For some strange and unknown reason, I didn’t take pictures of the process of creating the Balmy Blue clouds. However, I’ve used this technique before using Bermuda Bay ink and did take pictures for that.
I used a piece of window sheet film and cropped it with the cloud looking die from the basic borders die set. Then, I used the window sheet clouds as a stencil. Here are photos of this process using the stencil, a blender brush, and Bermuda Bay ink:
I did move the “clouds” as I worked my way up the white cardstock. I also blended very light areas using the dry blender brush. This way, only the bottom layer of clouds appear stark white.
Stamping and Coloring:
First, I stamped the mushroom, gnome, butterflies, and the sentiment in Momento Tuxedo Black ink on white cardstock. The butterflies come from the Elephant Parade stamp set, while the rest come from the Kindest Gnomes stamp set.
I used the Daffodil Delight blends combo to color the sleeves of the gnome and the two windows in the mushroom.
Then, I colored the mushroom using the blends combos for Calypso Coral and Soft Suede.
I also used Soft Suede for the soles of the gnome’s shoes and outlined them with a black marker and added black lines on the soles.
Next, I colored the rest of the gnome’s clothes using the Balmy Blue blends combo. I only used the light blend on the pants and underside of his hat.
My new favorite skin tone color, SU 500 in the medium blends, comes from the Natural Tones Stampin’ Blends. After I colored the hands, nose, and face, I used the color lifter on a small spot of the nose.
I just used the light Smoky Slate to just outline the stamping on the beard.
As long as I was coloring gnomes, I colored one for the inside of the card and one for the front of the envelope.
Finally, I colored the butterflies using my Daffodil Delight and Calypso Coral Stampin’ Write markers.
I used a stitched rectangle die for the sentiment and the butterfly die from the Elephant Parade’s coordinating dies.
Everything else was cropped using the Gnomes dies.
I added dimensionals under one of the mushrooms, one of the grass pieces, the mushroom, gnome, and the sentiment. The dimensionals necessary under the butterflies are mini-dimensionals cut into quarters. Talk about tiny!!
Everything else was adhered with multipurpose liquid glue.
With that, I’d finished this coordinated card, envelope, and envelope seal.
Back to the Pal’s Blog Hop:
More inspiration awaits, so use the lineup below to visit the rest of the Design Team. The Pals are excited to show you what they’ve created! Then, please mark your calendars for our next blog hop on August 10th. Our theme will be Seasons’ Greetings, where we will showcase projects inspired by our favorite seasonal time of the year.
It’s July, 2022 ~ do you know what that means? The new Holiday Mini-Catalog and Sale-a-Bration are in full swing!!
Sale-a-Bration runs from July 1 to August 31, 2022. This means you can earn FREE products for two months! Take a look at these Sale-a-Bration products!!
Here’s a link to the new Holiday Mini-Catalog, which runs through January 4, 2023. Click on the following image to open the catalog:
Again, thank you for stopping by my blog today! I appreciate your comments and your time.
This month, the theme is “CASE the Catalog” so the Design Team chose a card from the new Annual Catalog and has CASEd it with their own creative twist. We really hope that you are inspired by all the amazing creations the Pals are sharing with you! As you hop from blog to blog, we would love for you to leave a comment. You will find the lineup at the end of my post to help you “hop” along from Pal to Pal.
I chose a card using the Sun Prints suite featured on page 90 of the catalog. I CASE’d my chosen card with just one small exception. Then, I went back and changed it just a bit more to make it an easel card. I just love to create fun folds!
Here’s the original CASE and the easel fun fold:
The changes I made to the original CASE were minimal. I added a white cardstock mat under the DSP. For the easel card, I moved the leave spray on top of the DSP strips instead of underneath them. These colors are so incredibly gorgeous! I just love the Starry Sky color, and Gray Granite is stunning in this DSP.
Measurements:
The measurements for the front of the cards are the same. Since there’s a bit more to the easel card, I’ll go with those measurements and such.
The Night of Navy base measures 8-1/2 by 5-1/2, scored at 4-1/4 and 2-1/8 inches creating a landscape card orientation.
Both the white mat on the front and the white cardstock on the inside measure 4-1/8 inches by 5-3/8 inches. I usually use 4 inches by 5-1/4 inches for the inside panel, but I wanted the sizes to be the same on the front and inside because of the easel.
The Sun Prints DSP pattern for the background measures 4 inches by 5-1/4 inches.
I trimmed down a coordinating piece of DSP for the envelope flap to 6 by 2-1/2 inches. At the same time, I punched a 1 inch circle of the Gray Granite DSP for the envelope seal.
After I dry embossed a piece of white cardstock using the Fern 3D embossing folder, I trimmed it down. I needed two pieces measuring 4-3/4 by 1-1/2 inches.
REMEMBER: if you trim your paper before using any 3D embossing folder, you will wind up with a piece that’s smaller than you wanted because of the deep impression.
The Starry Sky DSP pattern paper measures 4 inches by 1-3/8 inches.
What I Did:
Using the Nature Prints stamp set, I stamped the spray of leaves in Starry Night in the same ink on white cardstock. In addition, I stamped partial leave sprays on the inside white cardstock and on the front of the envelope.
Next, I stamped the sentiment in Starry Sky ink on Gray Granite cardstock.
Then, I colored the basic pearl jewels I needed using the dark Daffodil Delight marker. It’s important to let the mutual layers of ink completely dry before adding another layer. I used 4 or 5 layers of ink on these pearl jewels.
This card features a die from the Nature’s Prints dies to crop the Starry Sky spray. I added dimensionals underneath the spray.
The new Stylish Shapes dies are fabulous, especially if you loved the now retired Stitched Shapes die set. I used one of the circles to perfectly crop the sentiment. There are dimensionals under the sentiment circle. I did have to make sure to add them only where the circle doesn’t touch the spray of leaves.
Figuring out what to use to hold the folded easel card open took some creative thought time. I finally decided to punch a 1 inch circle from coordinating DSP. I trimmed this circle in half and added mini-dimensionals under each semi-circle and attached them to the inside panel.
For good measure, I added two smaller colored basic pearl jewels to help hold up the easel.
If I didn’t put dimensionals under an element, I used multipurpose liquid glue to adhere it together.
With that, I’d finished this coordinated card, envelope, and envelope seal set.
Here are just a few of my favorite new things, and about half of which arrived Monday! I’ve already been playing with my new goodies. I’m also working on a pre-order from the upcoming July – December mini-catalog. Fun times!!
Do You Want to Place an Order?
Of course you do!
If you are ordering less than $150.00, please use the host code shown. If you are ordering more than $150.00, please contact me first so you can get your stamping rewards! Any order over $50 will earn a little surprise from me.
The HOST CODE through June 30, 2022 is 6YTD44QQ.
Again, thank you for stopping by my blog today! I appreciate your comments and your time.
Welcome to Just Peachy Stamping by Sue Jackson: an independent Stampin' Up demonstrator.
Through Stampin' Up!, I happily share my love of papercrafting through sales, classes, small stamping group meet-ups and workshops. I think that being a teacher in my "real life", I have a unique approach to sharing my fantastic hobby. I look forward to connecting with you!