Hello, welcome to the Stampin’ Pretty Pals’ Blog Hop! This month our Design Team is showcasing “My Happiest Season.” We hope you enjoy and will be inspired by them! Don’t forget to leave comments! We love hearing from you. At the end of my post, you will find the full line-up to help you “hop” along from Pal to Pal.
Here’s my card for the hop:
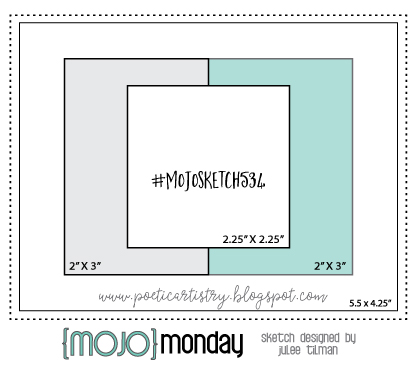
Mojo Monday gave me the layout for this card. Here’s the challenge banner:
My Happiest Season
Just what is my happiest season? I’ve been thinking about this for a couple of weeks and I am still not sure which season makes me the happiest. However, when I saw the August to December mini-catalog, I immediately knew which stamp set, out of all the beautiful stamps sets, made me happiest. You see, I love the Grinch, always have, and have a whole Grinch thing going on for Christmas. I know how long it took Dr. Seuss to write it (45 minutes), that he wrote it poolside on vacation in Africa, and that he’d thought of doing that book for years. He was up against a deadline and needed a book. How the Grinch Stole Christmas became that book.
I do need to say that I had to take a kiddie lit class for my master’s degree. Dr. Seuss was the topic of my major paper for that class. I can give you more information about him than you would ever want to know.
All that to say that the Christmas Means More stamp set makes me very, very happy. Not only does it include a Grinch sentiment, there’s also three other classic Christmas movies in the set: Miracle on 34th Street, Elf, and It’s a Wonderful Life.
What I Decided
#MojoSketch543 really turned out to be the perfect sketch for this card. I chose Grinch colors of Garden Green, Granny Apple Green, and Real Red. My DSP choices all came from either the Regal 6″ x 6″ DSP or the Brights 6″ x 6″ DSP.
The sentiment circle was cropped from the largest circle Stitched Shape die. This circle perfectly fit the Grinch sentiment. Originally, I stamped the sentiment in Real Read and embossed it with clear embossing powder. That did not work at all. Then I decided I would try the Garden Green ink. However, I didn’t want the holly berries to be green. It was actually much easier to get the two colors since I used my Stamparatus. Looking back, I probably did it the hardest way possible. I inked up the sentiment in Garden Green. Then, I very carefully wiped off the green ink from the berries then carefully colored them using the Real Red Stampin’ Write Marker. I repeated that process two more times to get the depth of color I wanted. Then I used the brush end of my Real Red marker to color the border of the circle.
Measurements:
The card base is Real Red. I cut the cardstock to 4-1/4 inches by 11 inches, scored at 5-1/2 inches.
The white cardstock background measures 4 inches by 5-1/4 inches. I ran it through my BigShot using the Subtle embossing folder.
I cut the Granny Apple Green DSP to 2-1/4 inches by 3-1/2 inches.
The Real Red DSP was cut to 3 inches by 4-1/8 inches.
I thought I needed something to border each piece but I didn’t want to add more paper. Therefore, I tapped each edge onto my StazOn Cotton White ink pad.
Next, I wrapped a length of the Polka Dot Tulle ribbon around the Garden Green DSP and tied it in a square knot.
Even though I usually don’t have much luck with the bunny ear method, I used it to tie a small bow using the Playful Pets Real Red ribbon. I used a glue dot to attach the bow to the Polka Dot Tulle square knot.
When I had all my pieces, I simply used the multipurpose liquid adhesive to attach everything except the sentiment. I used dimensionals to pop up the sentiment circle.
Inside and Envelope
Since the Garden Green ink worked so well on the front of the card, I used it on the sentiment on the inside of the card and the “Merry Christmas” stamp on the front, bottom, left-hand corner. Both of these sentiments can be found in the Perfectly Plaid stamp set.
Next, I cut the Whisper White cardstock to 4 inches by 5-1/4 inches.
The DSP strip at the bottom of the inside measures 1/2 inch by 5-1/4 inches.
Finally, I used the Real Red DSP for the envelope flap, which measures 6 inches by 2-9/16 inches. However, I just measure out one tick line from the 2-1/2 inch mark.
With that, I’d finished this Christmas card/envelope set. I see creating many more of these in the near future!
Back to the Pals Blog Hop Information:
More inspiration awaits! Use the Blog Hop Line-up below to visit the rest of this month’s Design Team. My fellow Pals are excited to show you what they’ve created! Mark your calendars for our next blog hop on September 9th when our theme is “It’s the Sentiment that Counts.” The Design Team will showcase a sentiment as the focal point of their project. Don’t miss the fun! Until then, please stay safe and have fun in your craft room.
There’s a bundle I really, really want and have decided I am going to use my bonus day coupons toward the purchase of this Blossoms in Bloom bundle! It’s so gorgeous, and the cards I’ve seen using it are all stunning. Check this out:
Have a Hoot Cling Stamp Set and Dies
Just look at all this adorableness!
How in heaven’s name did I miss the die set when I ordered the stamp set? An order will be placed ASAP!!!!
Take a sneak peek at the September Paper Pumpkin, available to order now!
This looks like a super cute and fun all inclusive Halloween kit!
Again, thank you for stopping by my blog today! I appreciate your time, and enjoy reading, and responding to, comments.
This card is for the third sketch in this month’s Mojo Monday using the colors from the Sunday Stamps Challenge.
First, here’s my card:
Here are the challenge banners:
My First Thoughts
Once I decided on the sketch layout, I had to then to decide which colors to use. Honestly, the last thing I thought of when I saw the color challenge was creating an Easter card. What a completely wrong thought! Turns out that I am in love with the color combination that I used of Soft Suede, Pumpkin Pie, and Granny Apple Green. I colored the bunny using the Crumb Cake blends combo.
Since this layout, 6 x 6 color family DSP sets, these colors and the adorable bunny look so stinking cute, I am quite certain I’ve found my Easter card for my nieces and nephews. I’ve already created cards for my great nieces and soon-to-be great nephew.
Finishing Touches
The Subtle 3D embossing folder created just enough texture for this card, especially with the patterns of DSP.
Can you tell what I used for the Pumpkin Pie heart? If you guessed the detailed hearts die, you would be correct.
The bunny circle is popped up on dimensionals. I wanted the sentiment to be raised as well, but not as much as the dimensionals would have given. Therefore, I pulled out three half inch glue dots. Those suckers will give about half as much height as a dimensional, which is what I wanted.
I kept looking at the pieces when I was dry-fitting them together trying to figure out what was missing. Then it dawned on me: the two pieces of DSP, the bunny, and the sentiment block makes 4 elements on the card. I needed to add something else, but what? When I finally thought of using this detailed border die from the Painted Labels die set I realized using a piece of Pumpkin Pie DSP would finish the card off.
After adding a piece of the Granny Apple Green to the flap of the envelope, this card set was complete. I hope you think it is as cute as I do.
As always, thank you so much for stopping by my blog today. I’d love to hear what you think, and every comment is greatly appreciated!
Please stay safe, healthy, and isolated as much as possible. I know you have many choices of things to do with your time while being socially distant. I am thankful you chose to spend a little time reading my blog today.
Have a Peachy Day!
Sue
Supplies Used:
You can click on any of the products below and you will be directed to my store 24/7.
Thinking About Placing an Order?
Of course you are! Even more so because of the products in the mini-catalog and the Sale-a-Bration FREE items! The HOST CODE for MARCH is WW6HSM6A. If you are ordering less than $150.00, please use the host code shown. If you are ordering more than $150.00, please contact me first so you can get your stamping rewards and FREE SAB items!
Remember, any order over $50 qualifies for at least one FREE SAB item AND some blog candy from me.
Don’t do what I have done, and put off ordering from my wish list. I seem to miss out because when these items run out, they are gone!
Sale-a-Bration’s Third Release started today!
Again, thank you very much for stopping by my blog today!
Welcome to InKing Royalty’s March Blog Hop! During this year’s blog hops, we are enjoying a year of celebrations. Hop, hop! This month’s projects celebrate Easter, so prepare yourself for a variety of gorgeous, Easter-themed projects. We are excited to share our creations with you today! After you read my post, I hope you’ll hop over to the next person on the list at the base of this post.
Welcome Easter
This cling stamp set can be found in the mini-catalog on page 45. Don’t overlook it because it is an “Easter” stamp set. I’ve made some adorable baby cards with this set as well. You can see those baby cards here.
For the InKing Royalty blog hop, I’ve once again created two cards using the same supplies. I’ve created the first one for a beginner lever stamper. The second card is a fun fold card, but it is one of the easier fun folds.
Here are my cards:
Front of fun fold card
Inside of fun fold card
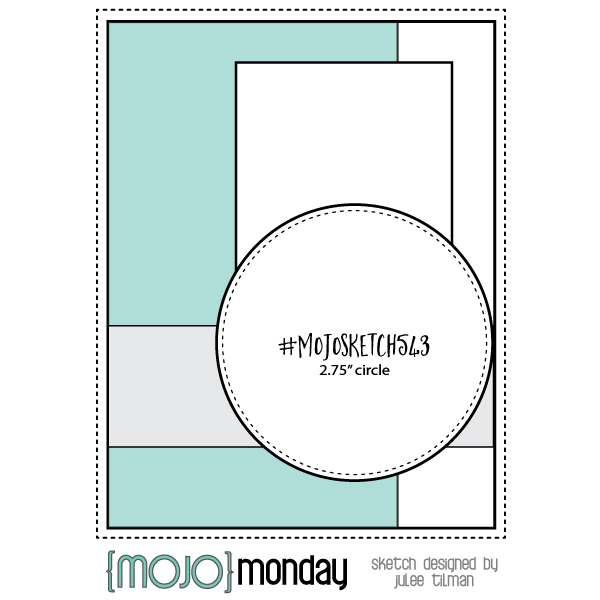
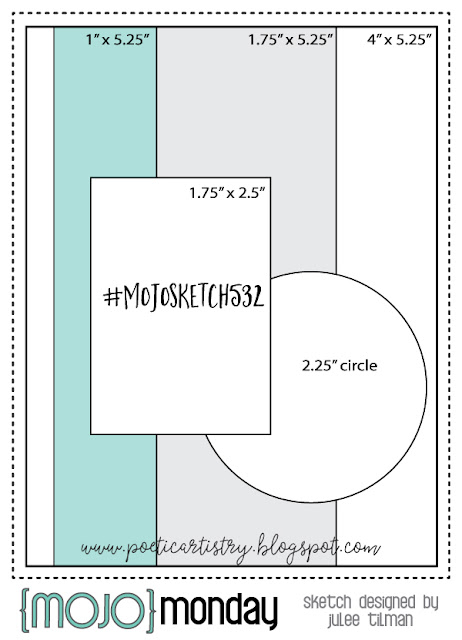
For Mojo Monday this week, hosted on the Poetic Artistry blog, Julee included three layout challenges at once to cover the next 6 weeks.
Here are the layouts I chose to use today:
Follow the Sketch
I used the standard A2 size for each of the cards. The fun fold card started with a piece of 4.25″ by 11″ Gorgeous Grape cardstock scored at 5.5″ for the base. To create the flap, simply score the front of the card at 2.75″ and fold it back on the score line. I used the Highland Heather Subtles 6 x 6 DSP for the panels, mounted on Whisper White.
The “regular” card started with a 5.5″ by 8.5″ piece of Gorgeous Grape for the card base, scored and folded at 4.25″. I lucked out and used scraps I already had for the panels on the front.
Next came the bunnies. I had the “brilliant” idea to color the bunny with Highland Heather. After all, there are purple plush Easter bunnies, right? Well, coloring a bunny purple was not a good idea. I wound up with a bunny that looked like cotton candy. Don’t believe me? See my purple bunny below.
Am I right or am I right? Cotton candy, or creepy. Take your pick.
Therefore, I went back to what I know works: the Smoky Slate blends combo and the light Petal Pink blend.
Bunny Circles
Since I’d used this bunny for the baby cards, I knew I could use the Stitched Shapes die for the bunny. The mat is one of the scalloped circle dies. This worked perfectly for the regular card. While dry-fitting all the pieces together, I found that the sentiment fit perfectly under the gingham DSP. Yeah!
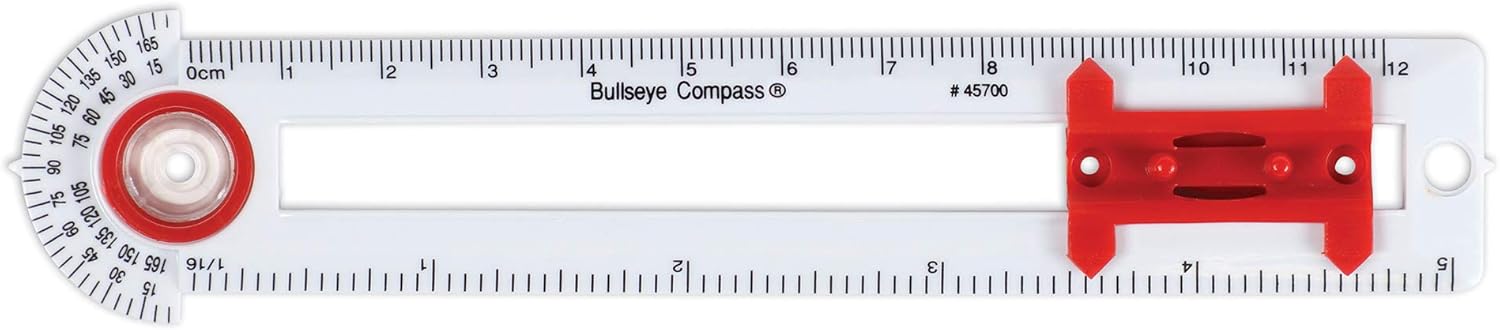
When I tried to create the circle for the fun fold card required some trial and error. In order to have the sentiment on the circle, I needed a much larger Whisper White circle. I wound up using the largest scalloped die from the Layering Circles die set. Then I encountered a bit of a problem because I didn’t have any dies or punches big enough to create a mat. Never fear, former math teacher here (I teach Social Studies now). I searched for, and found, my nifty compass, which allowed me to create a circle which would be just the right size. Then, I fussy cut the circle. Easy peasy! If you have found yourself in the same situation, I would strongly suggest purchasing one of these handy tools. The directions are included on the packaging. I’ve had elementary school kids use this, so I have all the faith in the world that you can use it as well.
Here’s the Amazon information:
Finishing Up
After putting all the pieces together, I decided I needed a little something else on the bunny circles. I grabbed the small bee stamp from the Welcome Easter set and stamped it to the right of each of the bunnies. Since it was just flat, and I wanted something more than flat, I used the fine tip glue pen to create an epoxy effect on the bees and their trails. Just make sure you give the glue ample time to dry or you will have a mess. Don’t ask me how I know that.
Finally, I adhered a piece of the Subtles 6 x 6 DSP to both envelope flaps. Then, I stamped a row of little bees and their trails on the bottom of both envelopes.
I can easily create enough of these cards for my daughter, nieces and nephews and my grand-nieces as well, especially if I just use the “regular” card layout.
Back to the InKing Royalty Blog Hop Info
Thank you for stopping by today. I hope you’ll hop along to the next stop on the blog hop, Shawn de Oliveira at shawnstamps.com. There’s lots of inspiration to be found in this group – and you don’t want to miss it!
Thank you for hopping along with us. If you get stuck during the Blog Hop, please use this line-up as a guide:
Of course you are! Even more so because of the products in the mini-catalog and the Sale-a-Bration FREE items! The HOST CODE for February is WW6HSM6A. If you are ordering less than $150.00, please use the host code shown. If you are ordering more than $150.00, please contact me first so you can get your stamping rewards and FREE SAB items!
Remember, any order over $50 qualifies for at least one FREE SAB item AND some blog candy from me.
Don’t do what I have done, and put off ordering from my wish list. I seem to miss out because when these items run out, they are gone!
Sale-a-Bration and the Mini-Catalog are in Full Swing
Who doesn’t like FREE Stampin’ Up! products? FREE items start with a $50 qualifying purchase! Just look at some of these must-haves!
These gorgeous papers can be colored with the Stampin’ Write Markers!
Please feel free to make my day and leave a comment. You can follow my blog by entering your email address in the space provided in the sidebar.
Welcome to the Pals’ Blog Hop! We’re so glad you’re here. You may be starting the hop here or coming from a previous Pal’s blog. Either way, you’ve come to the right place. This month we are celebrating the 10th anniversary of the Pals Blog Hop with “Critters” from the Stampin’ Pretty Pals. Many of the design team members are offering “Mystery Blog Candy” of their choice to 1 lucky winner. To play along, just leave a comment on as many blog posts as desired. A random winner will be announced on a subsequent blog post by each participating design team member. You’ll find the full line-up below to help you “hop” along from Pal to Pal.
Adorable Bunny Baby Cards
As I have done for both the InKing Royalty and/or the Pals blog hops for the past few months, I once again have two experience levels using the same layout. The first card is for a baby girl, the second more advanced card is for a baby boy, simply because a friend asked for a baby boy card. I used the sketch for Poetry Artistry’s Mojo Monday.
The Sketch and My Cards
First, here’s the challenge banner from Mojo Monday:
Now for my baby girl card:
Next picture is the inside of the baby girl’s card:
Finally, here’s my baby boy card for a casual or advanced stamper:
I’ve been sharing fun folds on these blog hops, and today is no different. The baby boy card is an easel fold, so the following picture is of the card when standing up. I’ve also included a close-up of the easel stop, for which each rectangle is popped up on dimensionals. Yes, this card would require extra postage, but it’s so worth it, don’t you think?
I used Rococo Rose for the girl card and Seaside Spray for the boy card. Both cards also have Smoky Slate as well. Once I had my colors chosen, I got started with my blends for the bunnies. All three bunnies were colored using the dark Petal Pink blends for the ears and pads of the feet. Then, I colored all the bunnies using the Smoky Slate blends combo. Since I wanted contrast between the face and body with the tuft of fur right under the face, I first colored it with the Smoky Slate. Then, I went back with the color lifter blend to make it even lighter.
When I colored the baby boy bunny, I found that I liked the white chest fur. Therefore, I had to go back to the baby girl bunny and use the lifter to get the chest fur as close to white as I could.
Finally, I decided that the Whisper White layer, the Smoky Slate base, and the bunny circles all needed some sort of border. Adding more layers didn’t seem like a good option. Therefore, I outlined all of them using the Basic Black marker. Border accomplished.
It’s all about the DSP and the Sketch
The In Color 2019 – 2021 and the Neutrals 6 x 6 DSP made this card easy to create and the sketch and measurements brought it together quickly. I used the Stitched Shapes dies for the bunny circles, and the Stitched Rectangle dies for the sentiment block and the Smoky Slate mat. I really tried to stay true to the sketch measurements. The slight change I made was to put the focal circle over the sentiment rectangle block. The sentiment for the fronts, insides, and front of the envelope all came from the Wildly Happy stamp set.
While I was running everything through the Big Shot, I saw my Detailed Bee dies on the desk with the cute little hearts die. A lightbulb went off over my head, so I cropped a set of Rococo Rose hearts and the Seaside Spray hearts. The resulting embossed large and small hearts fit perfectly where I wanted to use them. Score!
I did add the Polka Dot Tulle ribbon to each of the cards, even though there wasn’t ribbon on the challenge sketch. This is one of my favorite ribbons and the card seemed to be begging for me to use it. So cute!
Back to the Blog Hop, and Blog Candy
I am participating in the Mystery Blog Candy giveaway. Make sure to leave a comment below in order to be entered in the random drawing determined by a number generator.
More inspiration awaits! Use the Blog Hop Line-up below to visit the rest of this month’s Design Team. My fellow Pals are excited to show you what they’ve created! Mark your calendars for Wednesday, April 8th, for our “Special Occasions” blog hop when our Design Team showcase projects for weddings, graduation, anniversary, baby, Mother’s/Father’s Day or any special occasion. Don’t miss the fun!
It’s Autumn with Come to Gather DSP and the InKing Royalty September Blog Hop
Welcome to InKing Royalty’s September Blog Hop! This year’s Blog Hop themes are inspired by a single word – and this month our projects are centered around AUTUMN. There is so much to love about the transition from summer to winter, even if we have to wait a few more months to have a Florida Fall. Each of us has created a project which means Autumn and we hope you find inspiration in our Autumn-themed projects! After you read my post, I hope you’ll hop over to the next person on the list at the base of this post.
The gorgeous colors in the blog hop banner are from the Come to Gather DSP. This is the same DSP pack I used for this blog hop/Mojo Monday challenge. With the completion of this card, I have about half of the 16 Thanksgiving cards I need. Hopefully, I won’t run out of this fabulous paper before I finish what I need.
Whenever I am stuck creatively I start looking for sketch challenges. If I can pair a sketch challenge with a color challenge, I am a very happy stamper!
Here’s the challenge banner from #MojoSketch523:
Here’s the card I created:
Come to Gather DSP and the Harvest Hellos Bundle
I just love these colors for a Florida Fall card! The deep, rich traditional Thanksgiving colors do not appear this far south. Therefore, I am thankful for the vibrant colors of Pretty Peacock, Mint Macaron, and Early Espresso. The very talented Stampin’ Up! designers really created a phenomenonally gorgeous set of patterns and colors.
Since the measurements have already been worked out for the sketch, I used them for the base of my card. I did scale down the two focal circle elements. Once I had the large circle and the two pumpkins, I knew when I added the sentiment banner I would have an even number of elements. I knew I needed a fifth element, but I also wanted it to be subtle, so I decided to use the Mint Macaron twine from the Nature’s Twine set.
Those pumpkins……. how fabulous that the one punch can create an adorable apple or pumpkin? Talk about versatility! Instead of embossing the Mint Macaron pumpkin I used the very subtle script pattern from the Subtles DSP. When I stamped the pupmkin in Pretty Peacock, I did a little happy dance in my chair. It worked! YEAH!
In order to accomodate all the popped up layers, provided by dimensionals, I needed to add a double high layer of them under the two pumpkins. The picture of my card really doesn’t show how much dimension these little adhesive hexagons provide.
As always, I used a piece of DSP for the envelope flap. This time I chose the feather pattern. I stamped pumpkins using coordinating from Gather Together on the front, bottom, left corner.
If you would like to order the bundle, stamp set, and/or punches, and live in the U.S., please use the icon above to be connected to my store. With just a few simple supplies, you, too, can create fabulous cards. For example, check out this all-inclusive kit: Looking Up Card Kit, item # 149651 ($27.00). If you include a Tombow liquid adhesive (item # 110755, $4.00) you will have everything you need since the ink spot and embellishments are included.. One kit, 15 cards, 3 of each of 5 designs. Score! Check it out!
HOST CODE
IF you are placing an order (you know you want to do so) over $150, please contact me so you can earn all the Host Rewards for which you are entitled. If your order is less than $150, please use YYX6FBEC for the host code.
Wednesday was a HUGE day for Stampin’ Up! Not only did the Holiday Catalog go live for customers, the Buy 3, get 1 Free DSP sale from the annual catalog starts! I already have my FOUR sets of DSP picked out! Get yours now!
To shop from the holiday catalog, available now, click on the image below:
Once again, I am cutting it very close to the deadline for submitting a challenge card, which explains why this is definitely short and sweet today.
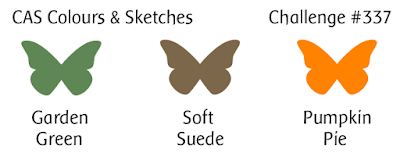
Here’s the challenge banners for both challenges:
Here’s the card I created:
Season of Thanks
Garden Green, Soft Suede, and Pumpkin Pie could very well be all the fall colors I will see in Florida. I used the Come Harvest Hellos bundle for the pumpkin. How great was it for Stampin’ Up! to have a punch that will create both an apple and a pumpkin? I also used Nature’s Roots stamp set for the leaves trio and the wood ring stamp in the background of the vertical panel. I used the Season of Thanks sentiment and the pumpkins on the front of the envelope from the Gather Together stamp set.
While I really tried to follow the Mojo Monday sketch, I also took some creative liberties by adding a layer of the leaves and the pumpkin. The addition of the burlap ribbon layer qualifies as my second creative liberty.
I stamped the pumpkin on Pumpkin Pie cardstock using Soft Suede. Then I used the Light Early Espresso blend for the outlining and the Crumb Cake combo blends.
For the horizontal panel element, I chose DSP from the (now retired) Nature’s Poem, but the leaves on this pattern perfectly match the leaves I put under the pumpkin.. I stamped the leaves in Garden Green on Crumb Cake cardstock. Then I used the Pumpkin Pie blends combo to color in those leaves.
I ran the white layer of cardstock through the Big Shot using the Subtle 3D folder. Then I started putting all the pieces together. In order to accomodate the thickness of the burlap, I used dimensionals to pop that layer off the background. I also used some dimensionals on the top and bottom of the vertical panel so it would lay flat over the DSP. Finally, I used dimensionals again behind the pumpkin. The leaves are attached directly to the pumpkin with Tombow liquid adhesive.
Once again, I finished this card by decorating the envelope. I put a piece of the same DSP on the flap and stamped teh two pumpkins stamps on the bottom left corner of the card. I stamped the large pumpkin full strength and stamped off the smaller pumpkins.
Thank you for stopping by today.
Have a Peachy day!
Sue
You Know You Want to…….
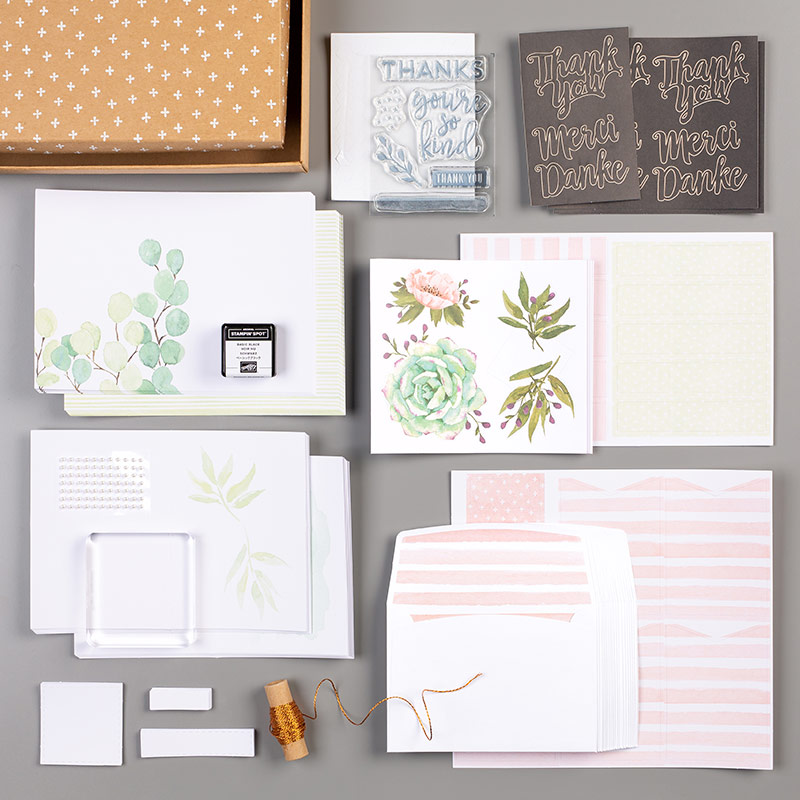
If you would like to order the bundle, stamp set, and/or punches, and live in the U.S., please use the icon above to be connected to my store. With just a few simple supplies, you, too, can create fabulous cards. I would be honored to help you do so. For example, check out this all-inclusive kit: Notes of Kindness Card Kit, item # 148266 ($35.00). The only thing you need to add is a Momento Tuxedo Black ink pad (item # 132708, $6.00) and some Tombow liquid adhesive (item # 110755, $4.00). One kit, 20 cards, 5 of each of 4 designs. Check it out!
HOST CODE
IF you are placing an order (you know you want to do so) over $150, please contact me so you can earn all the Host Rewards for which you are entitled. If your order is less than $150, please use YYX6FBEC for the host code.
Wednesday was a HUGE day for Stampin’ Up! Not only did the Holiday Catalog go live for customers, the Buy 3, get 1 Free DSP sale from the annual catalog starts! I already have my FOUR sets of DSP picked out! Get yours now!
To shop from the holiday catalog, available now, click on the image below:
Welcome to Just Peachy Stamping by Sue Jackson: an independent Stampin' Up demonstrator.
Through Stampin' Up!, I happily share my love of papercrafting through sales, classes, small stamping group meet-ups and workshops. I think that being a teacher in my "real life", I have a unique approach to sharing my fantastic hobby. I look forward to connecting with you!


 Supply List: