Welcome to InKing Royalty’s November Blog Hop! This year’s Blog Hop themes are inspired by a single word – and this month our projects are centered around GRATEFUL. Thanksgiving is tomorrow, and we are grateful you’ve stopped by. We are excited to share our Thanksgiving-themed or grateful-centered projects with you! After you read my post, I hope you’ll hop over to the next person on the list at the base of this post.
Counting My Blessings
Over the course of the last couple of months, I’ve made more than fifteen different Thanksgiving cards, which I will give out on Thursday. I really felt like creating something other than a Thanksgiving card, so I created a “thank you” card. Well, actually, I created two. The first card I created is a double z-fold card using the Magnolia Lane Suite of products. As I was happily coloring, cutting, and stamping, I thought I should also create a card for the beginner or casual stampers/card-creators. No matter your experience level, I hope you will enjoy the two cards I created.
Without further ado, here’s multiple views of the double z-fold card and the more streamlined cards:
Front of double z-fold
Fully opened double z-fold
Front of streamlined card
Inside of streamlined card
The Double z-fold Card
I love fun-fold cards. I’ve created all kinds of them, and we won’t even mention my Pinterest board for just these fun creations.
Once I decided on a double z-fold card, I decided to use my brand new Magnolia Memory dies. I ordered products from this suite one at a time since I didn’t know if I really wanted all of it. Finally, I had enough with fussy-cutting and ordered the dies.
With my DSP decisions made, I happily started stamping and coloring and cropping. Just a little hint, I find it much easier to color before cropping with the dies, or punches. I used the Petal Pink blends combo to color the flowers. The leaves on the stamped images, and the leaves cropped with the dies, were colored with the Mossy Meadow blends combo. I used the brush ends of the MM blends combo and just colored a swatch of Whisper White cardstock in order to get a layered look for the die cut leaves . I traced the leaves onto the colored swatch, fussy cut them, and attached the cropped leaves to the undersides. Two of these leaves were added to the flower collage on the front. The third leaf found a happy home under the magnolia on the inside.
Bringing It All Together
Since I wanted to dress up the z-fold piece of DSP, I attached a lenth of the ribbon to the whole strip. Then I used the twine from the combo to make a bow for the front of the card.
When I dry-fit the flowers, leaves, and ribbon on the front of the card and realized my sentiment block on the inside would show more than I wanted. I already had the perfect piece of cropped petal pink cardstock, and stuck it behind the flowers. Amazingly, I was able to cover the sentiment block on the inside and the petal pink piece of cardstock fits in the collage. Win-win.
One of my favorite go-to die sets is the Stitched Rectangles, and I used that to crop the front and inside sentiment boxes.
I wanted to add something to the inside to dress up the end of the card, which would also help anchor the magnolia. I grabbed the scalloped die and cropped it, Then , I decided I could texture it with the Subtle 3D folder. Lesson learned ~ emboss before cropping. I had to use the die to rub the edge back on the scallop. Emboss, then crop.
A Clean Card is a Beautiful Thing
I used the same DSP to create this card front as I did on the double z-fold card. Same ribbon, same sentiment and cropped box with the same magnolia leaves stamped in the corners. However, I only used one magnolia on the front, to which I added a much simpler bow. Truth be told, that’s the only bow I could get out of my now used-up twine. Time to order more.
Once again, I cropped a scalloped strip of Mossy Meadow, but did not emboss it to keep with the cleaner version. I stamped the gorgeous large magnolia in Petal Pink on the inside, and added the same sentiment on top of the flower.
Both envelopes for these cards are exactly the same. There’s a Petal Pink magnolia stamped off the lower left front corner. Each of the flaps had DSP added to create a coordinated set.
Both of these cards were extremely fun to create. After all, isn’t a hobby supposed to be relaxing and fun?
Thank you for stopping by today. I hope you’ll hop along to the next stop on the blog hop, Linda Krueger at thestampcoach.com. There’s lots of inspiration to be found in this group – and you don’t want to miss it!
Thank you for hopping along with us. If you get stuck during the Blog Hop, please use this line-up as a guide:
Thank you so very much for stopping by my blog today. I appreciate your the time you take to read, and comment, on my cards.
Have a Peachy Day!
Sue
Contemplating placing an order today? Of course you are, especially because the new Stamping Trimmer is now available! If you don’t already have a Stampin’ Up! demonstrator, I would be honored to work with you. Please contact me or visit my shop to order the supplies for this card.
If you are ordering $150 or more, please contact me first so you earn all the Stamping Rewards for your order.
If you are ordering less than $150, please use the host code, 49KJF94R when prompted. I use the combined rewards for gifts for customers.
Supplies Used
Magnolia Lane bundle, item # 151087
OR Good Morning Magnolia stamp set, item # 149298
AND Magnolia Memory dies, item # 149578
Magnolia Lane DSP, item # 149484
Magnolia Lane ribbon combo pack, item # 149485
Mossy Meadow blends combo, item # 148547
Petal Pink blends combo, item # 147272
Petal Pink cardstock, item # 146985
Mossy Meadow cardstock, item # 133676
Whisper White cardstock, item # 100730
Memento Tuxedo Black stamp pad, item # 147111
Soft Suede stamp pad, item #
Petal Pink stamp pad, item # 147108
Stitched Rectangles die set, item # 148551
Dimensionals, item # 104430
Tombow liquid adhesive (my fav!), item # 110755
Paper Pumpkin! An All-inclusive Kit Arrives Every Month!
Contact me to subscribe, or order, January’s Paper Pumpkin kit! Doesn’t the floral design just scream “spring is coming”?
Welcome to InKing Royalty’s October Blog Hop! This year’s Blog Hop themes are inspired by a single word – and this month our projects are centered around SPOOKY. With Halloween just around the corner, we are excited to share our spooky, fun projects with our neighbors, coworkers and family – and we’re excited to share our creations with you today! After you read my post, I hope you’ll hop over to the next person on the list at the base of this post.
But First……Color Throwdown #564 Quickly
One of the challenges I really enjoy is the Color Throwdown challenge. It’s even better when I can pair it with a sketch challenge, in this case the Fusion card challenge. Last night I was over the top honored, floored, bewildered, surprised, and awestruck that my card was chosen for this week’s Color Throwdown featured stamper. What?!?!? I earned a place as the guest stamper on the October 23 challenge, and I am so honored. You can see that card here.
Spooky??
I have to admit I didn’t think I would be able to create a card worthy of this blog hop since I didn’t purchase anything specifically for Halloween. Therefore, I had to get very creative with what I already had in my possession.
I’ve used the pumpkin from Harvest Hellos quite a lot for Thanksgiving cards. At least I had a pumpkin, and a Jack-o-Lantern face from that set. While looking for a sentiment, I came across my Everything Festive stamp set.
Here’s my card:
A Spooky Card was Born
I gathered the cardstock and DSP colors I thought I would use and got busy….. having so much fun! The bottom base is Basic Black cardstock, with a layer of the Gorgeous Grape gingham from the Brights DSP pack. SincemI knew this card really wanted to be a collage, I knew I needed to leave some open space. When I started putting pieces together, I decided to use a Stamping Write Basic Black marker to color just the bats from the sentiment. This card really needed something subtle, so I stamped the two bats four or five times before recoloring the stamp. I didn’t want a pattern for the bats, so all my stamping needed to remain random.
The Stamparatus really saved me when I stamped the sentiment. With that stamping done, I cropped both the Whisper White and Gorgeous Grape using the ovals from the Stitched Shapes die set. I also used it for the Jack-o-Lantern face on my colored pumpkin and I am so happy I did that. Because of the coloring with the light and dark Pumpkin Pie blends, I really needed a dark face so it would pop. Using the Stamparatus allowed me to have the face as dark as I wanted and still be perfectly lined up.
The punch from the Harvest Hellos bundle saved me from fussy cutting. I used the Shaded Spruce DSP for the stem and leaf, then outlined each with the black marker.
Let the (Messy) Fun Begin!
When I started dry-fitting all my pieces together, I just knew something was missing. I stamped and cropped two of the pumpkin sets from the Gather Together bundle and placed them behind my cute as a button focal pumpkin. I still wasn’t satisfied, and thought about adding a black mat. This did get me closer to a spooky look, but plain black cardstock didn’t seem right.
Therefore, I used the splatter stamp from Gather Together and some of the silver ink and splattered the whole piece of cardstock. It still didn’t it look cute and spooky, so I went another step further.
Wink of Stella added the sparkle I really wanted. I made sure the brush end had a full load of the glitter ink, and started tapping away to create a really sparkly black base without having to use glitter (which is not really allowed in my blue/craft room). I continued to load the brush and tap/splatter until I had an abundance of sparkle on the black. LOVE!
I really though I moved all of the other card elements out of the way before I started splattering. However, the stray splatters of Wink of Stella all over the other pieces indicated I did not succeed in moving them out of the splatter zone.
Finishing Touches
Once again, I dry-fit all of my pieces,and tied a square knot in the ribbon, then popped up the pumpkin and the sentiment using dimensionals. After I adhered all the pieces down, I decided another little touch needed to be added. I grabbed my dark Basic Black blend and colored three of the smallest epoxy droplets, waited for them to dy, and placed them within the collage so they made sense.
I created a coordinating envelope using a piece of the Gorgeous Grape DSP on the flap and stamped pumkins and bat on the front. With that, I’d completed my spooky card without anything specifically purchased for Halloween. Yeah!
Thank you for stopping by today. I hope you’ll hop along to the next stop on the blog hop, Linda Krueger at the Stamp Coach. There’s lots of inspiration to be found in this group – and you don’t want to miss it!
It’s Autumn with Come to Gather DSP and the InKing Royalty September Blog Hop
Welcome to InKing Royalty’s September Blog Hop! This year’s Blog Hop themes are inspired by a single word – and this month our projects are centered around AUTUMN. There is so much to love about the transition from summer to winter, even if we have to wait a few more months to have a Florida Fall. Each of us has created a project which means Autumn and we hope you find inspiration in our Autumn-themed projects! After you read my post, I hope you’ll hop over to the next person on the list at the base of this post.
The gorgeous colors in the blog hop banner are from the Come to Gather DSP. This is the same DSP pack I used for this blog hop/Mojo Monday challenge. With the completion of this card, I have about half of the 16 Thanksgiving cards I need. Hopefully, I won’t run out of this fabulous paper before I finish what I need.
Whenever I am stuck creatively I start looking for sketch challenges. If I can pair a sketch challenge with a color challenge, I am a very happy stamper!
Here’s the challenge banner from #MojoSketch523:
Here’s the card I created:
Come to Gather DSP and the Harvest Hellos Bundle
I just love these colors for a Florida Fall card! The deep, rich traditional Thanksgiving colors do not appear this far south. Therefore, I am thankful for the vibrant colors of Pretty Peacock, Mint Macaron, and Early Espresso. The very talented Stampin’ Up! designers really created a phenomenonally gorgeous set of patterns and colors.
Since the measurements have already been worked out for the sketch, I used them for the base of my card. I did scale down the two focal circle elements. Once I had the large circle and the two pumpkins, I knew when I added the sentiment banner I would have an even number of elements. I knew I needed a fifth element, but I also wanted it to be subtle, so I decided to use the Mint Macaron twine from the Nature’s Twine set.
Those pumpkins……. how fabulous that the one punch can create an adorable apple or pumpkin? Talk about versatility! Instead of embossing the Mint Macaron pumpkin I used the very subtle script pattern from the Subtles DSP. When I stamped the pupmkin in Pretty Peacock, I did a little happy dance in my chair. It worked! YEAH!
In order to accomodate all the popped up layers, provided by dimensionals, I needed to add a double high layer of them under the two pumpkins. The picture of my card really doesn’t show how much dimension these little adhesive hexagons provide.
As always, I used a piece of DSP for the envelope flap. This time I chose the feather pattern. I stamped pumpkins using coordinating from Gather Together on the front, bottom, left corner.
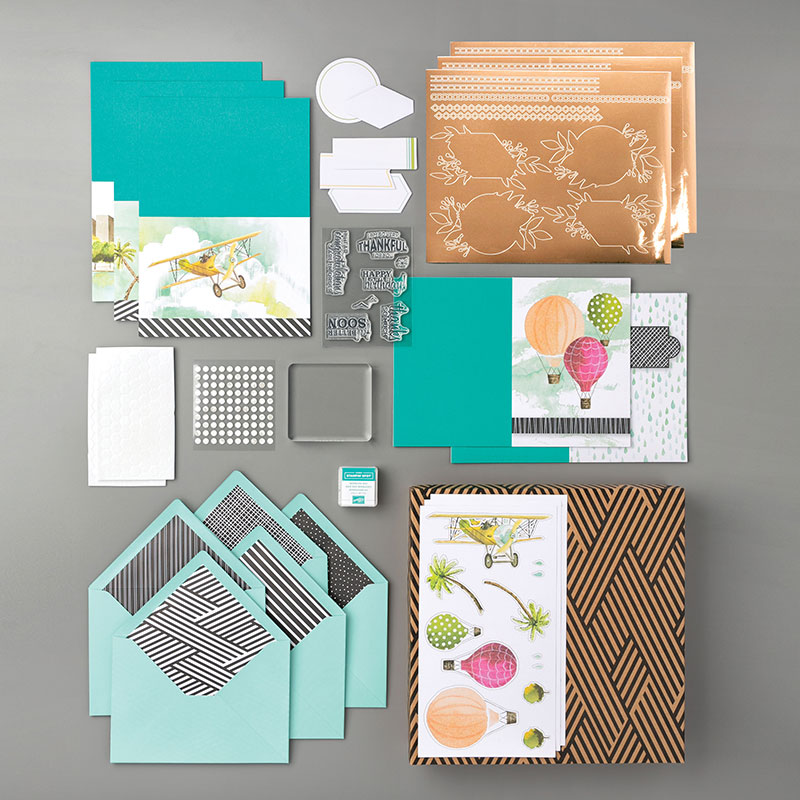
If you would like to order the bundle, stamp set, and/or punches, and live in the U.S., please use the icon above to be connected to my store. With just a few simple supplies, you, too, can create fabulous cards. For example, check out this all-inclusive kit: Looking Up Card Kit, item # 149651 ($27.00). If you include a Tombow liquid adhesive (item # 110755, $4.00) you will have everything you need since the ink spot and embellishments are included.. One kit, 15 cards, 3 of each of 5 designs. Score! Check it out!
HOST CODE
IF you are placing an order (you know you want to do so) over $150, please contact me so you can earn all the Host Rewards for which you are entitled. If your order is less than $150, please use YYX6FBEC for the host code.
Wednesday was a HUGE day for Stampin’ Up! Not only did the Holiday Catalog go live for customers, the Buy 3, get 1 Free DSP sale from the annual catalog starts! I already have my FOUR sets of DSP picked out! Get yours now!
To shop from the holiday catalog, available now, click on the image below:
This year’s Blog Hop themes are inspired by a single word – and this month our projects are centered around VACATION. While many are reminiscing about their summer vacations, others are looking forward to the long weekend just around the corner. We are excited to share our creations with you today! After you read my post, I hope you’ll hop over to the next person on the list at the base of this post.
High Tide Vacation
One of the vacations I would really enjoy would be to rent a small RV and drive from Central Florida to Maine. I’m playing around with the plans in my head, but I think three weeks during the summer when I am off would be heavenly. We’d be able to stop along the way and take our time. My husband grew up and lived in Southern California until 12 years ago, so seeing the east coast would be a great adventure.
When I thought about this vacation, I kept thinking about lighthouses, and planning to see a number of them along the coast. Naturally, the High Tide photopolymer stamp set seemed to fit the theme. I have to confess, I have had this set for about a year and this is the first time I have used it. Overall I am pleased with the card, although there are a couple of small things I might change the next time I use this set.
Here’s the card I created:
When I was showing my husband the card, I also showed him the stamp set. I knew I’d used a number of stamps, but didn’t know I’d used ten of them. Ten stamps sounds intimidating, but this set makes it relatively easy.
Colors, Stamps, and Paper, Oh My!
The colors I used include Memento Tuxedo Black, So Saffron, Basic Gray, Smoky Slate, Soft Suede, Crumb Cake, Pretty Peacock and Seaside Spray. Initially, I thought that Pretty Peacock and Seaside Spray might not work together. However, they work very well together, just like the SU! designers intended.
I started with the dirt/sand with two layers of Soft Suede. Then I went back in using the small sand stamp and added in layers of Crumb Cake. I also stamped the water using Seaside Spray. I’m so impressed with the thought that went into the water stamp. The left and right ends fit together perfectly without creating straight lines. Therefore, it is a breeze to create the water element.
Next, I tackled the lighthouse. After a few practice tries, I decided to stamp the background lighthouse using Smoky Slate, and the detailed lighthouse with Basic Gray.
Now that I had the lighthouse placed inside the sand, I started stamping the beach grass. The taller grass is first generation stamping of Pretty Peacock. Then I went back and added dimension and a variety of stamping with the small grass using first, second, and third generation stamping.
I actually stamped the birds and the birds and sentiment before I stamped the light beam. I needed to make sure that I had room for the sentiment and thought the birds would naturally be flying through the beam.
Finally, I stamped water and birds on the bottom of the envelope. I used a piece of the Pretty Peacock DSP for the envelope flap.
Many Thanks, Blog Line-up, and Supply List
Thank you for stopping by today. I hope you’ll hop along to the next stop on the bloghop, Jackie Beers from Blue Line Stamping. You don’t want to miss all the inspiration found in this group!
Have a Peachy day!
Sue
Thank you for hopping along with us. Please use the following list as a guide if you get lost while hopping:
If you would like to order this versatile photopolymer stamp set today and live in the U.S. please CLICK HEREto be connected to my store. With just a few simple supplies, you, too, can create fabulous cards, and I would be honored to help you do so.
This year’s Blog Hop themes are inspired by a single word – and this month, our projects are centered around SUNSHINE. The Sun is the single most important source of energy for life on Earth – it guides our clocks, calendars and planting schedules. We may be enduring a heat wave this week, but we still associate the Sun with positivity, joy and renewal. We are excited to share our creations with you today! After you read my post, I hope you’ll hop over to the next person on the list found at the base of this post.
The Library Challenge and Sunshine!
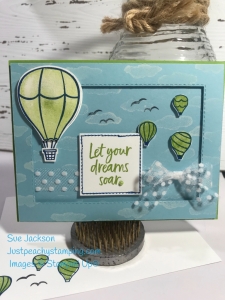
One of the blog challenges in which I have enjoyed participating in the past is The Library Challenge, and I think the theme of challenge #38 fits with the InKing Royalty Blog Hop theme of Sunshine. Challenge #38’s book title is Five Weeks in a Balloon, by Jules Verne, and the project inspiration can come from the title, cover, or story.
Here’s the cover:
How does this book relate to sunshine for the Blog hop? I am so glad you asked. I can’t imagine taking a hot-air balloon ride on a stormy, rainy day. The perfect weather for this kind of adventure is SUNSHINE, so there’s the connection.
Here’s my card:
A Go-To Die Set
I’ve said it before, but the Rectangle Stitched Framelit die set is one of my all-time favorite sets, partly because I love the double stitching on each die. However, my most favorite reason is because of the amount of cardstock I can save by using these framelits on the mats of cards!
For example, in this card, the background Balmy Blue cardstock is the middle of a mat for another card. I chose the appropriate sized die for the frame based on the size of the middle mat, and then used the rectangle dies. I now have the two pieces I needed for the frame card and another center piece for a different card.
Here’s an example cut I cropped from the Granny Apple Green cardstock base:
I found that I absolutely love (!!!) the color combination of Balmy Blue, Blueberry Bushel, and Granny Apple Green when I played along with the Paper Players #450 challenge. I decided to go with Granny Apple Green balloons, the largest of which I stamped off. The smaller balloons also in Granny Apple Green, colored the baskets with Blueberry Bushel, then fussy cut the balloons. I stamped the sentiment in Granny Apple Green as well, and cropped it using the Stitched Shapes dies. I used Blueberry Bushel marker to color in the stitched ditch
The Balmy Blue Background Cardstock
When I was finished with the balloons, I used the cloud stamp (3 clouds, one stamp, wonderfully easy) and StazOn Cotton White ink for the clouds. The resulting light white and lighter white clouds gave the Balmy Blue some much needed texture.
After I got the frame and base put together using dimensionals, and then dry fit the balloons and sentiment piece, I thought I needed something else. The Whisper White Polka Dot Tulle added some interest without bulk, so I threaded it through the frame. I really thought I would wind up with a square knot, again, as always because I am “bow challenged”. But, to my surprise and glee, I created an actual bow! YEAH!
I popped all the pieces up with dimensionals and again realized I needed something else, more specifically something flat and not popped up. Therefore, I grabbed the bird stamp, stamped it a couple of times and it finally felt done.
Thank you for stopping by today. I hope you’ll hop along to the next stop on the bloghop, Lynn Holcun at Avery’s Owl. You don’t want to miss all the inspiration found in this group!
Welcome to InKing Royalty’s June Blog Hop! Each of this year’s Blog Hop themes is inspired by a single word – and this month our projects are centered around NEW. With the launch of Stampin’ Up!’s 2019 Annual Catalog, NEW gives us the opportunity to showcase new products and play with new colors. You will see a variety of project which celebrate new occasions (babies, weddings, graduations) in this hop. We are excited to share our creations with you today! After you read my post, I hope you’ll hop over to the next person on the list at the base of this post.
Something New, and Something Blue
While I have had the Happy Tails photopolymer stamp set and coordinating dog punch for a few months, I am finally using it for the first time. My card could be used for a new pet, or a tried and true four- legged family member. However, in this case, I created a card for a friend whose much loved dog, Gumbo, recently crossed the Rainbow Bridge.
Here’s the front and inside of my card:
Gumbo was a black lab mutt mix, and his “overcoat” was the Blueberry Bushel color, both of which inspired my color choices. My color palette consists of Blueberry Bushel, Grey Granite, Smokey Slate, Basic Black, and Whisper White.
I didn’t have any coordinating DSP, therefore, I created my own by using 4 of the individual stamps from the Happy Tails set. Since I didn’t want to stamp all four individually, I put all of them on one acrylic block and just stamped away in Basic Black.
I Love Creating Window Cards
Window cards with a middle mat require 3 cuts, so I used the Square Nesting Die set. This set, as in all the nesting sets, makes it so easy to get even layers. I used Blueberry Bushel for the card base, the ink for the sentiments, and the heart. This adorable, perfectly sized heart is punched out of the dog punch, which makes it so easy to get a proportioned heart.
I wanted to have just that much more dimension, so I used dimensionals to pop up the top layer. The dog is dimensional as well, but that’s more of a happy accident. Since I used blends to color the dog, the color bled through the cardstock. I didn’t want the backside to show when the card was opened, so I punched a Whisper White dog for the underlayer. The first dog I colored, and attached to the underlayer, was too dark once I got it on the card. Therefore, I stamped and colored another dog using only the light Smoky Slate blend. The dark Smoky Slate blend was only used as an outline and highlighter. The placement of the dog in the window was intentional so that it would cover “So sorry for your loss”.
After I put the card together, I decided that I didn’t want just a sentiment showing through the window. Therefore, I pulled the paw print stamp out again and used Smokey Slate to stamp the diagonal pawprints.
That’s it. I am ready to mail this card to my friend and her family.
Many Thanks and Have Fun Hopping!
Thank you for stopping by today and I hope you’ll hop along to the next stop on the bloghop, Brian King at Stamp with Brian, our fearless leader. You don’t want to miss all the inspiration found in this group, so please sit back, relax, and enjoy all the creations.
Have a Peachy day!
Sue
Thank you for hopping along with us. The following line-up will help guide you if you get stuck during the hop:
What a fun hop today! I’m always excited to see the beautiful variety of projects y’all make – and these “new”-themed creations were no exception. Such great inspiration! ♥
Please update the links on your blog at some point today to keep the hop evergreen forever and ever and ever. Links are below.
Please let me know when your post has been updated.
♥ ♥ ♥
Thank you for hopping along with us. If you get stuck during the Blog Hop, please use this line-up as a guide:
Welcome to Just Peachy Stamping by Sue Jackson: an independent Stampin' Up demonstrator.
Through Stampin' Up!, I happily share my love of papercrafting through sales, classes, small stamping group meet-ups and workshops. I think that being a teacher in my "real life", I have a unique approach to sharing my fantastic hobby. I look forward to connecting with you!


 Supply List: