Welcome to the Cardz 4 Guyz #379 challenge! Caz, our fearless leader and host for this challenge, chose Purple, Orange, and Black Colors for the theme. When you finish here, please visit the challenge site to see what the rest of the talented design team members created. Then, don’t forget to upload your creations to our gallery. We look forward to seeing your creations there!
Once again, I used the Fright Night Bundle and the Spooky Sweet DSP (designer series paper) and coordinating sticker sheet for this card. This card is for my 5 year old great-nephew. I’ve already posted a number of cards using this combination of products, and you can see them here, here, here, here, and here.
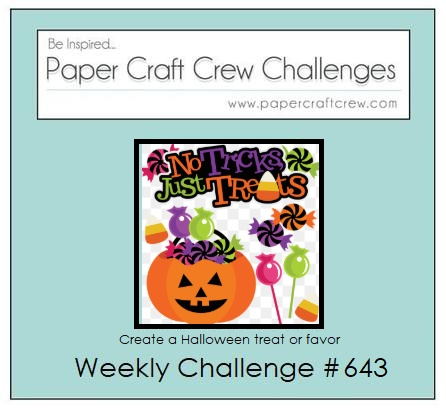
The third challenge is the Paper Craft Crew #643 challenge. here’s the challenge theme banner:
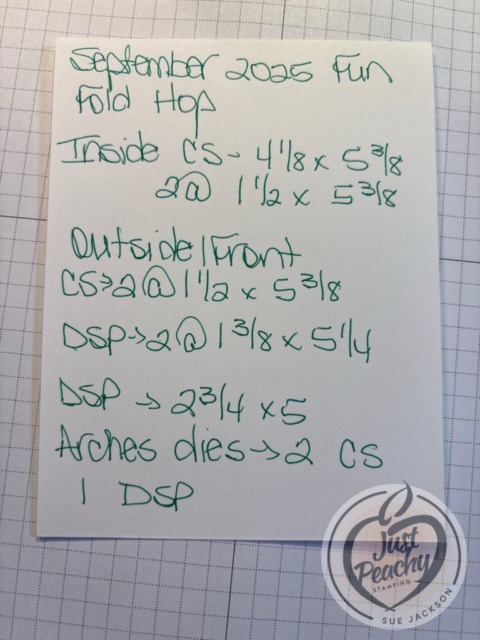
Measurements:
I posted another of these modified z-fold cards, which you can see here.
For that card, I created a template so that I would be able to easily recreate it.
Here’s my template:
Putting the Card Together:
I used multipurpose liquid glue to adhere all the pieces together since the card already has some bulk to it
I’m going to be mailing this card along with my great-niece’s card in a padded manila envelope but if you are mailing it separately, remember you will need extra postage
I cropped the EEK! sentiment 3 times and layered them on top of each other instead of trying to use dimensionals
The bats, pumpkin/crow piece, and the mummy rhino all come from the sticker sheet with the Spooky Sweet DSP
I added the Gorgeous Grape stamped around the inside sentiment to cover the oops I made when stamping the sentiment
With that, I’d finished this adorable coordinated card, envelope, and envelope seal set.
I do hope you try this one, especially if you love fun folds as much as I do!
Two Joining Promotion Options for the Month of October!
Join Our Community
Become a Stampin’ Up! demonstrator when you choose one of these amazing Starter Kit offers. (And did we mention your Starter Kit comes with FREE shipping, FREE business supplies, AND a bonus, FREE Paper Pumpkin kit?) Join from October 1 to 31 and experience all the amazing benefits that come with being a demonstrator.
Honestly, I saw this promotion banner and was stunned in a very good way! This deal is amazing, and what’s more there are no other purchase requirements!
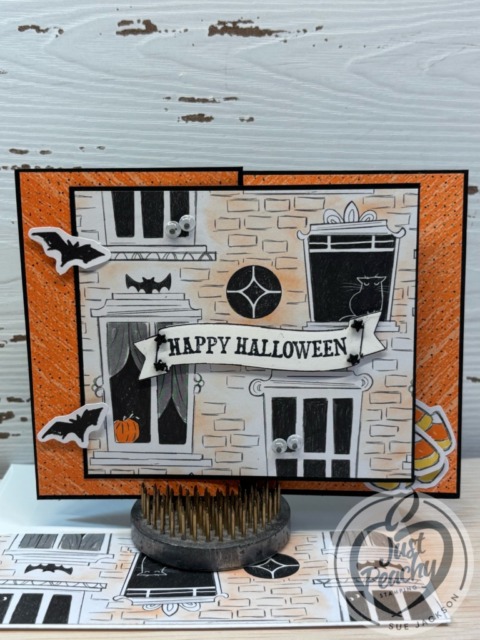
Welcome to the newest Make My Monday bi-weekly challenge #263. Our host, Pamela, chose (Halloween) Colors of Black, Purple, and Orange for the theme. For my purple, I used Petunia Pop mainly because of the DSP I wanted to use, so I am calling it a light shade of purple.
When you finish here, please visit the challenge site to see what the rest of the very talented design team members created. Then, don’t forget to upload your creations to our gallery. We look forward to seeing your creations there!
The Fright Night bundle and the Spooky Sweet DSP (designer series paper) are absolutely fabulous and I’m having so much fun playing with all the papers, stamps, dies, and punch out pieces.
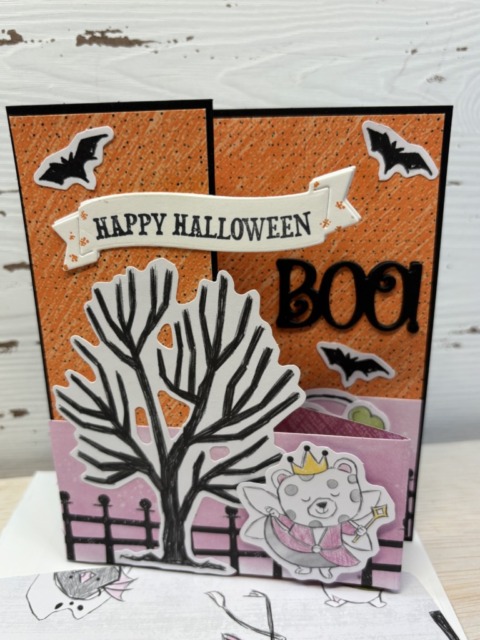
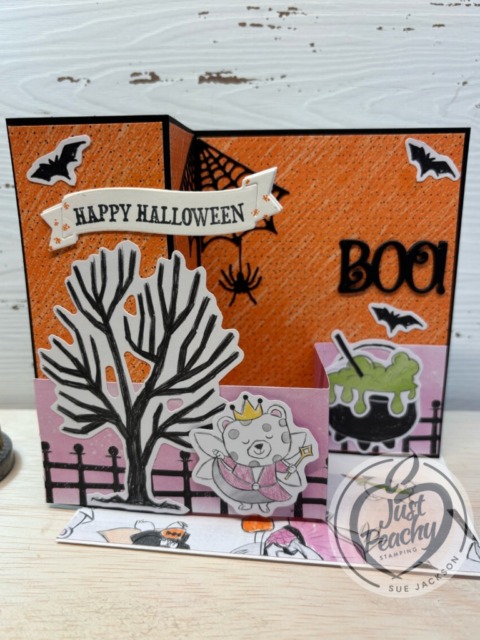
Here’s my double-z fold Halloween card for my great-niece:
I’ve already posted two other Halloween cards using this suite of products which you can see here, here, and here. My great-nephew’s card goes live tomorrow, October 21, for the Cardz 4 Guyz challenge # 379. Please come back to see it then!
Two Joining Promotion Options for the Month of October!
Join Our Community
Become a Stampin’ Up! demonstrator when you choose one of these amazing Starter Kit offers. (And did we mention your Starter Kit comes with FREE shipping, FREE business supplies, AND a bonus, FREE Paper Pumpkin kit?) Join from October 1 to 31 and experience all the amazing benefits that come with being a demonstrator.
Honestly, I saw this promotion banner and was stunned in a very good way! This deal is amazing, and what’s more there are no other purchase requirements!
Welcome back to the bi-weekly Cardz 4 Galz challenge #261. Debbie, our host for this bi-weekly challenge, chose For a Little Girl for the theme. When you finish here, please visit the challenge site to see what the rest of the design team members created. Then, don’t forget to upload your creations to our gallery. We look forward to seeing your creations there!
My great-niece is 7 years old, so that makes her a little girl, right? I’ve made Halloween cards for her and her 5 year old brother, which will be my design team member post for Cardz 4 Guyz #379 on Tuesday, October 25. After it goes live, I will back link it here.
Here’s my double z-fold Halloween card for a 7 year old girl:
I’ve already posted two other Halloween cards using this suite of products which you can see here and here.
As always with a fun fold card, I will be adding this to the Creative Creases Challenge where the theme is always Anything Goes with a Fun Fold.
Here’s My Template:
In addition, I needed to trim a piece of Spooky Sweet DSP (designer series paper) to 6 by 2-1/4 inches for the envelope flap
Next, I punched a 1-inch circle from DSP and ran it through my XYRON create-a-sticker for the envelope seal
Tips & Tricks for Assembly:
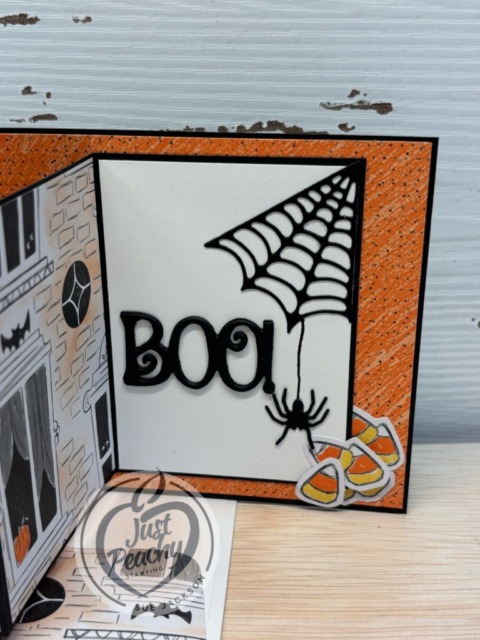
I used multipurpose liquid glue to adhere all the pieces together except for the sentiment banner and bats on the front of the card, and the top layer of candy corn pieces on the inside
The bats and candy corn pieces also come from the Spooky Night DSP pack
There’s two 12 x 12 pages of punch-outs for this set ~ cuteness abounds
Googly eyes makes everything cuter, and I used those for the two pairs of eyes on the DSP for the front of the card
I cropped three layers of the “BOO!” sentiment from black cardstock and layered them together for the inside of the card
The web and spider are also cropped from black DSP and adhered to the inside
I used a black Stamping Write Marker to connect the spider to the web
The black stars on the sentiment banner come from the same suite of products
Since this card would require extra postage, is bulky, and has the googly-eyes, I will be mailing this card and her brother’s card in a padded manila envelope
With that, I’d finished this coordinated card, envelope, and envelope seal set
Two Joining Promotion Options for the Month of October!
Join Our Community
Become a Stampin’ Up! demonstrator when you choose one of these amazing Starter Kit offers. (And did we mention your Starter Kit comes with FREE shipping, FREE business supplies, AND a bonus, FREE Paper Pumpkin kit?) Join from October 1 to 31 and experience all the amazing benefits that come with being a demonstrator.
Honestly, I saw this promotion banner and was stunned in a very good way! This deal is amazing, and what’s more there are no other purchase requirements!
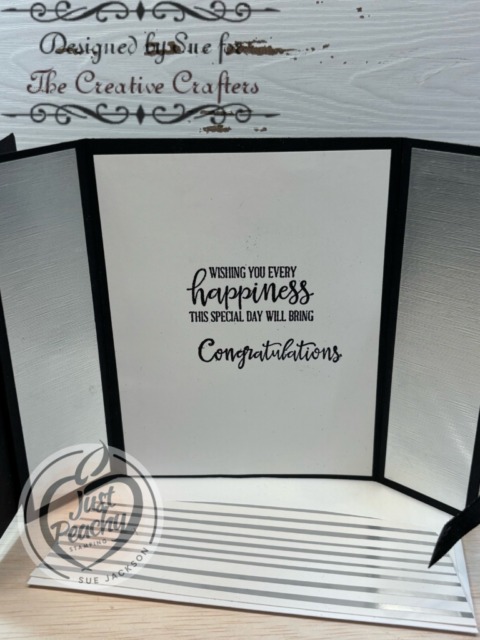
Welcome to my one card, two challenges post. As always, the theme for The Creative Crafters challenge # 93 is always Anything Goes. This month I have a latch fold wedding card I created for my niece’s wedding. The colors she chose were black and white with pops of silver and gold. It was such a beautiful wedding!
Here’s my card:
It’s just a given that fun fold cards also post to the Creative Creases Challenge. Debbie Mageed at Secret Stamper coordinates both this hop and the challenge. Hopefully, you will be inspired to upload your own fun fold project to the challenge!
I have another latch fold card for you, but this time it’s for a birthday! You can see some of my other latch fold cards here, here, here, and here.
My Basic Template:
One of the things I absolutely love about this card is that it is so easy to change up the front of the card, as you can tell by my other posts.
Here’s the basic template that I use and revise as needed:
I trimmed a piece of retired silver and white specialty DSP to 6 by 2-1/2 inches for the envelope flap
Then I punched a 1-inch circle from a leftover piece of black embossed cardstock and ran it through the XYRON create-a-sticker for the envelope seal
There is a pretty significant amount of bulk to this card, but it still fit in a medium white SU! envelope
If this card needed to be mailed, I would put it in a small padded manila envelope for safe travels and add extra postage
Putting the Card Together:
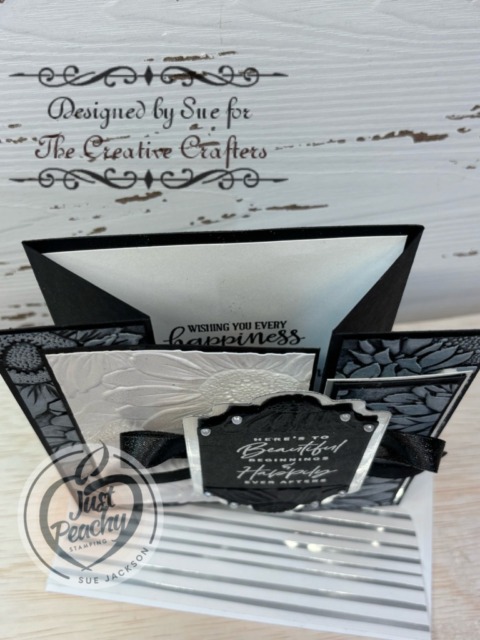
The absolute star of this card is the Sunflowers 3D embossing folder!
It’s really hard to see in the pictures, but I stamped VersaMark ink on the raised side of the embossing folder
After I wiped a 4-1/4 by 5-1/2 piece of white cardstock down with my embossing buddy, I ran it through my Cut & Emboss machine
Then, I added clear embossing powder to the ink and heat set it with my heat tool
Then I trimmed down the cardstock to fit the measurements of the template
I used two 4-1/4 by 5-1/2 inch pieces of black cardstock and ran them each through the embossing folder in the Cut & Emboss machine
Using a fairly wet white craft ink pad, I lightly swiped multiple layers of white ink onto the raised sunflowers
I did let each layer of ink dry before I added more ink
It was necessary to add more ink to the ink pad to get the depth of white that I wanted
The sentiment on the front of the card comes from the Something Fancy stamp set, and I used white embossing powder on the back cardstock
After heat embossing and cropping the black sentiment cardstock, I decided I needed to add texture to the panel so I very carefully embossed the top and bottom using the Sunflower embossing folder
I used silver foil for mats on this card mainly because the black ribbon has silver flecks running through it
I’ve added information for the loopy loop bow below
Finally, I added some pearlized dots to the corners of the sentiment panel
With that, I’d finished this coordinated wedding card, envelope, and envelope seal set
Heat-embossing HINTS:
One of the most important steps when using embossing powder is to wipe down the cardstock using your embossing buddy, which is available in the Embossing Additions Tool kit
Another important thing to remember is to use the sticky end of your Take Your Pick tool to remove stray flecks of embossing powder before heat embossing
Make sure to let your embossed sentiments dry completely before trying to crop the sentiments, otherwise you might smear your beautiful embossed sentiment
While my heat tool is warming up (especially helpful with metallic powders) I will warm the underside of the cardstock to help keep the warping to a minimum
The Loopy Loop Bow:
I was able to watch Mary Deatherage’s, from Stamps -n- Lingers, Perfectly Pears tutorial. In that video, she showed her loopy-loop bow. That’s what I used for the front of my card. I’m bow-challenged and this technique allows me to relatively easily add ribbon without adding the bulk of a tied bow. If you’ve never seen her videos, you owe it to yourself to watch them. I think she’s the Queen of the Collage. Gorgeous cards!!
Two Joining Promotion Options for the Month of October!
Join Our Community
Become a Stampin’ Up! demonstrator when you choose one of these amazing Starter Kit offers. (And did we mention your Starter Kit comes with FREE shipping, FREE business supplies, AND a bonus, FREE Paper Pumpkin kit?) Join from October 1 to 31 and experience all the amazing benefits that come with being a demonstrator.
Honestly, I saw this promotion banner and was stunned in a very good way! This deal is amazing, and what’s more there are no other purchase requirements!
This month’s theme is all about Acts of Kindness, Gratitude, and Thanksgiving! The Pals are here to inspire you with heartfelt card ideas and creative paper crafts made with Stampin’ Up! products. Be sure to visit each participant’s blog — you’ll find the full list at the end of this post so you can easily hop along and enjoy all the inspiration!
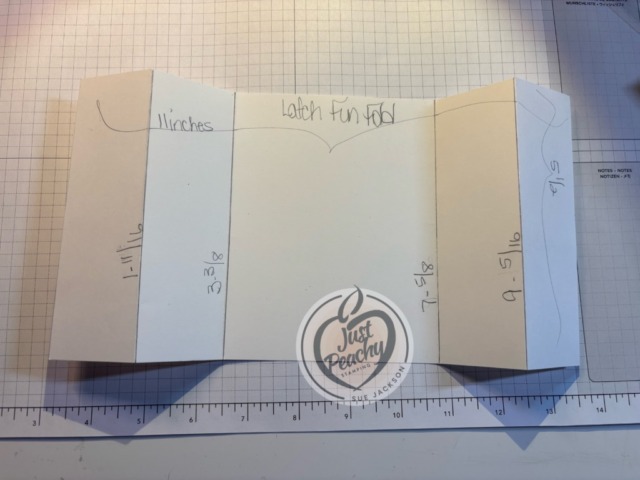
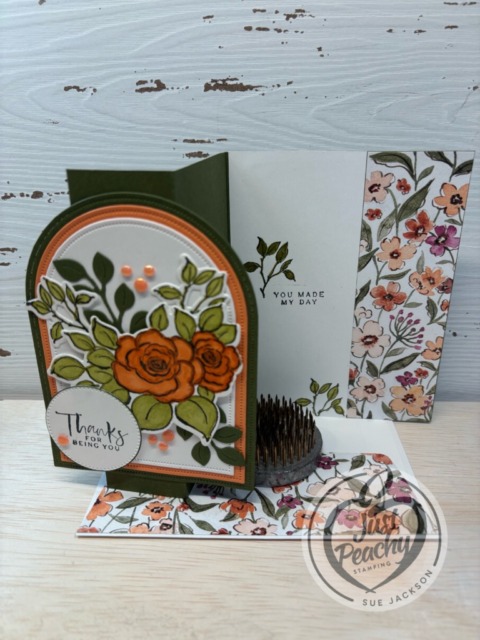
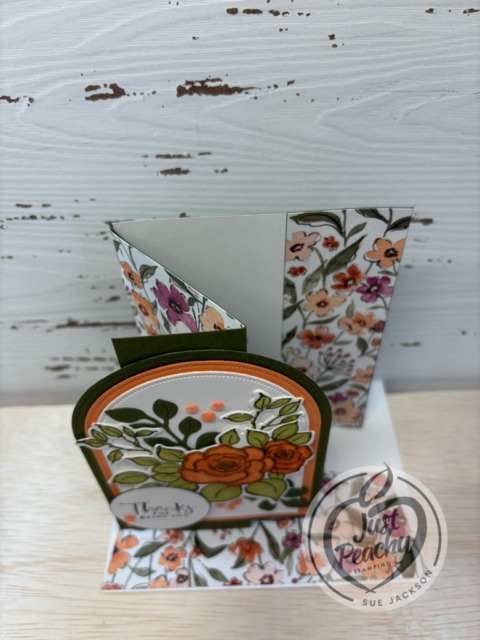
Here’s my modified z-fold card:
I came across this modified z-fold card on Pinterest created by Patti Dolan from P. S. Paper Crafts. Her post includes a video and a PDF document of directions. I modified the measurements just a tad, and then created a template, shared below:
It’s just a given that fun fold cards also post to the Creative Creases Challenge. Debbie Mageed at Secret Stamper coordinates both this hop and the challenge. Hopefully, you will be inspired to upload your own fun fold project to the challenge!
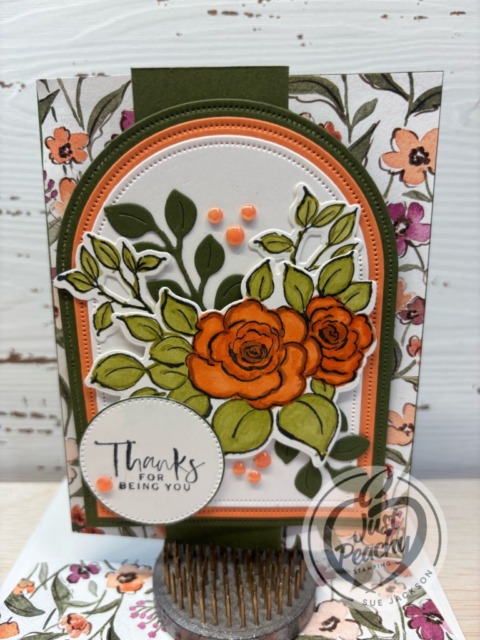
Creating the Card:
I used the Charming Day bundle and the coordinating Floral Charm 12 x 12′ DSP (designer series paper)
After trimming the DSP pieces, I decided that I would use 3 layers of arches so I could incorporate more of the Timid Tiger color
Therefore, my three main colors are Timid Tiger, Mossy Meadow, and Basic White
With careful planning, I stamped all the images to be colored then cropped and the sentiment on one piece of white cardstock measuring 4-1/4 by 5-1/2 inches
I stamped all the floral stamps and the sentiment stamps in Momento Tuxedo Black ink
I used layers of the Old Olive blends combo for the leaves
Then, I colored the flowers using the Timid Tiger blends combo and the Light Pecan Pie blend
I cropped two of the leaf sprays from Mossy Meadow and all the other floral/leaf pieces using the Charming Day die set
The sentiment was cropped using the Stylish Shapes circle die
I used multipurpose liquid glue to adhere all the cardstock, the DSP, arches, and leaf images to the base of the card
Then, I added dimensionals under the flowers and leaves focal image to adhere it to the arches
Next, I added dimensionals to the bottom half of the sentiment circle and adhere the top of it to the leaves with multipurpose liquid glue
Finally, I added seven Timid Tiger dots
After adhering the DSP to the envelope flap and trimming it, I punched a 1-inch circle for the envelope seal, which I ran through the XYRON create-a-sticker
With that, I’d finished this coordinated card, envelope, and envelope seal set
Back to the Pals’ Blog Hop:
The creativity doesn’t stop here! Be sure to hop along using the lineup below to explore even more inspiring projects from the Pals. And mark your calendar — next month, we’re spreading holiday cheer with our “Season’s Greetings” theme!
Become a Stampin’ Up! demonstrator when you choose one of these amazing Starter Kit offers. (And did we mention your Starter Kit comes with FREE shipping, FREE business supplies, AND a bonus, FREE Paper Pumpkin kit?) Join from October 1 to 31 and experience all the amazing benefits that come with being a demonstrator.
Honestly, I saw this promotion banner and was stunned in a very good way! This deal is amazing, and what’s more there are no other purchase requirements!
Welcome back to the monthly Stampin’ UP! Demonstrators Fun Fold Blog Hop. If you love fun folds, you’ve come to a hop filled with really great projects by some very talented fellow demonstrators. When you finish here, I hope you will hop along with the rest of the demos using the links below.
It’s just a given that fun fold cards also post to the Creative Creases Challenge. Debbie Mageed at Secret Stamper coordinates both this hop and the challenge. Hopefully, you will be inspired to upload your own fun fold project to the challenge!
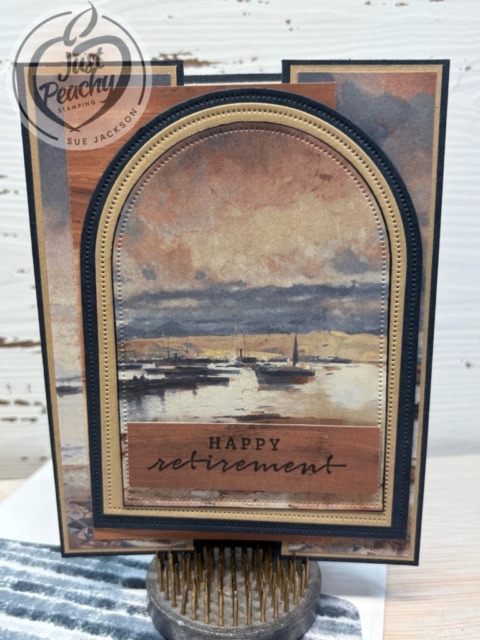
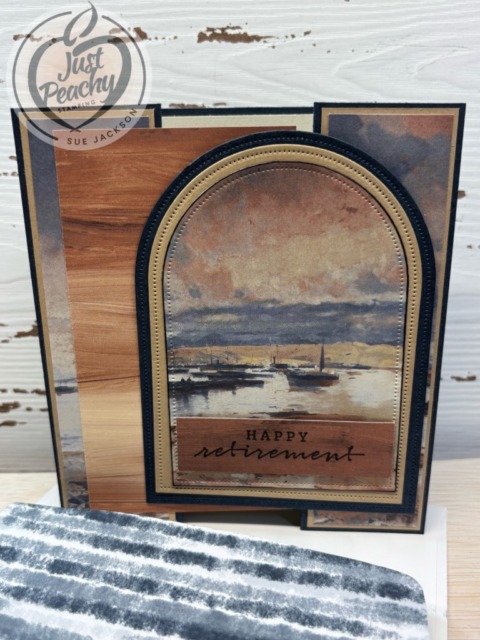
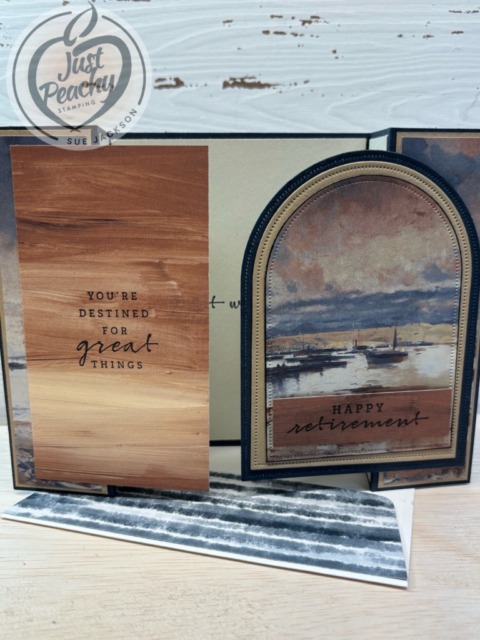
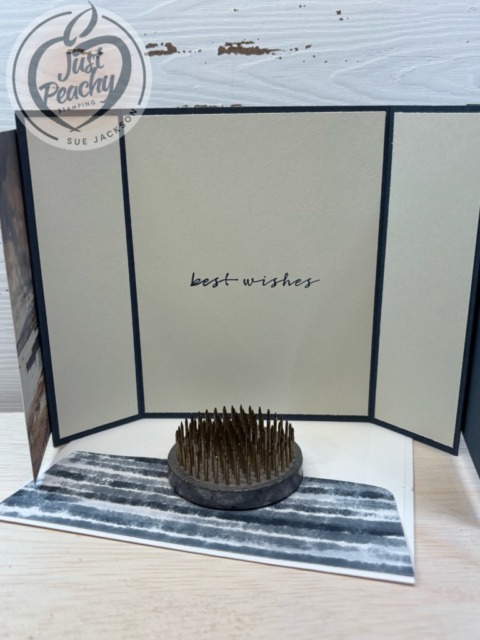
I need a retirement card which a group of people will want to sign. I used the Beautiful Gallery DSP, the Sunrise Sailing photopolymer stamp set, and the Everyday Arches die set to create a latch fold card. Here’s my card:
This gorgeous DSP is one of the two main reasons I purchased the DSP pack. I fell in love with the colors and designs because they remind me of growing up on the South Shore of Long Island and walking to the bay or boating out to the best clamming spots.
I’ve made a number of latch fold cards in both vertical and horizontal layouts. You can see some of the vertical cards here and here.
Measurements:
As with many of my fun fold cards, I have created templates for all the measurements.
Here are the templates for this latch fold card:
HINT: I find it easier to score at 1-11/16 and 3-3/8 and then flip the cardstock to the other end and score at 1-11/16 and 3-3/8. I only have to remember two measurements that way.
HINT #2: 1-11/16 is one tick mark before 1-3/4 inches if you are using the Stampin’ Up! trimmer
Some Hints:
I did plan out how I was going to trim the Beautiful Gallery DSP so I could get everything I needed from two of the 6 x 6 inch papers and still have some leftover for another card
The Cajun Craze piece of DSP used as the part to fold under the latch is the reverse side of the boats pattern
I used a scrap of the DSP for the retirement sentiment
All the sentiments come from the Sunrise Sailing stamp set and I stamped them all using Secret Sea
I am probably going to have to trim another piece of Basic Beige to adhere to the back of the card if we run out of room on the cardstock pieces on the inside
I did all my trimming, then cropping using the Everyday Arches dies, then adhered everything together
The only place where I used dimensionals was under the retirement sentiment
I adhered all the other pieces using multipurpose liquid glue
This will fit in a medium white envelopes but since it’s going to be hand-delivered.I don’t need to add extra postage, which would be necessary if mailing this
While the card looks complicated, the hardest part was trying to be very frugal when trimming and cropping the DSP because I don’t want to waste any of it; if I could, I’d buy a whole pack of just this boat paper
Back to the Stampin’ Up! Demonstrator’s Fun Fold Blog Hop:
Before you go, I hope you will hop along with us! I always learn something new from everyone on the hop, and I think you will as well. Inspiration comes from so many places. Lately I’ve been really watching cloud formations to get ideas for coloring or inking clouds on my projects. Embracing the process can lead to new and exciting end results, at least that’s what I keep telling myself.
The September – December 2025 Mini-Catalog is now available!
Of course, this means there are new Online Exclusives as well! Here are some examples:
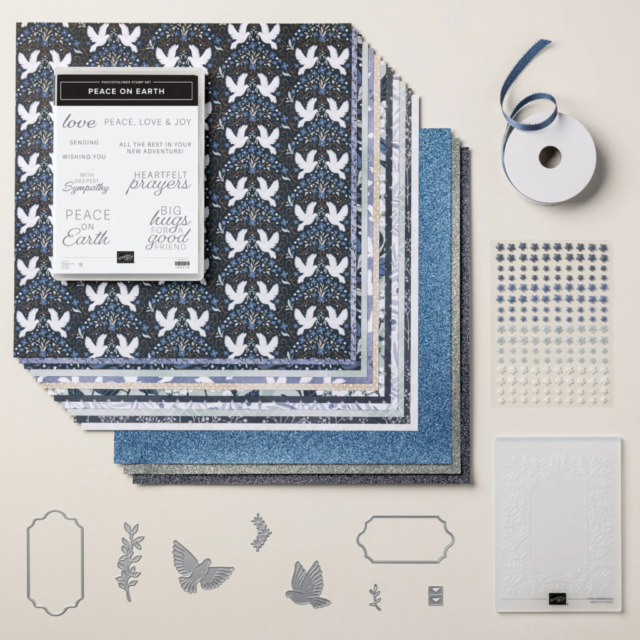
This Peaceful Garden Suite Collection is beautiful, and I love non-traditional colors for Christmas. I thought I would be able to use this suite for all my Christmas cards.
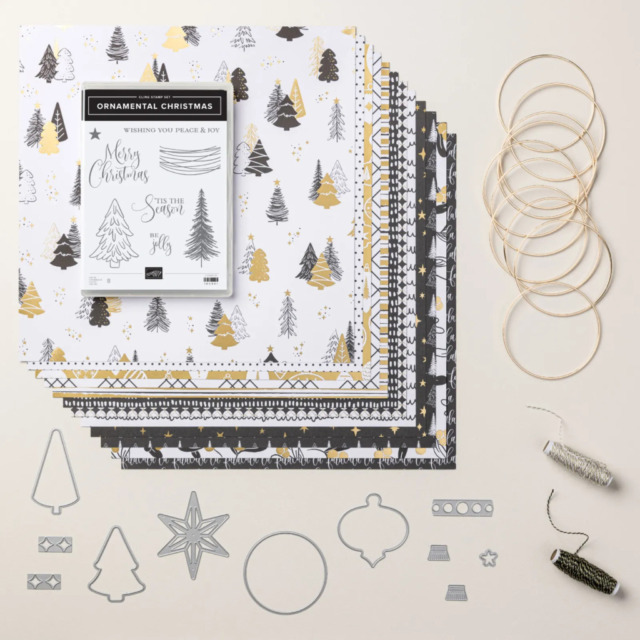
This Modern Christmas Suite Collection is absolutely gorgeous! I told myself that I wouldn’t need anything other than the Peaceful Garden Suite Collection. I was wrong. This suite is already in my cart:
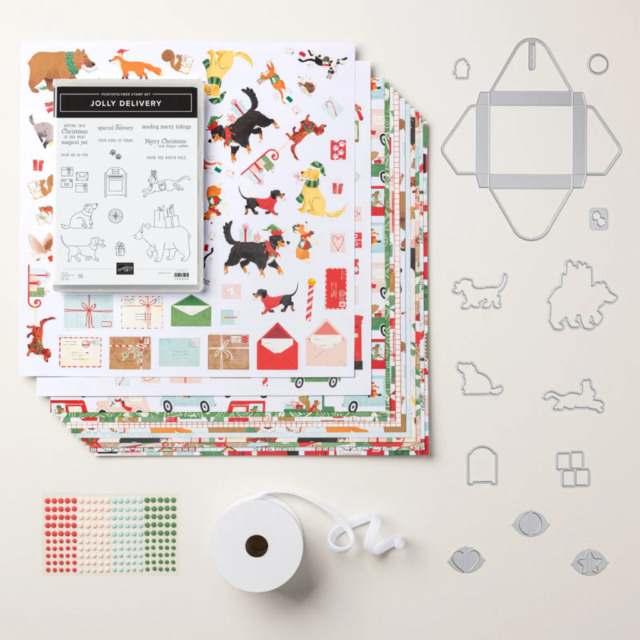
Of course, I had to get a cute Christmas critters set of products. This Jolly Delivery Suite fit the bill perfectly:
Last Chance Stamping Write Markers!
While you are shopping, make sure you pick up the Last Chance Stamping Write Markers! These markers, including the 2025 – 2027 In Color markers, are being discontinued. I love using these markers when sending cards because I can coordinate the card with the writing color. Therefore, I have all the available sets ready and waiting in my SU! cart.
If you live in the U.S. and don’t already have a Stampin’ UP! demo from whom you order, I would be honored to work with you. You can reach me at my [email protected].
Welcome to Just Peachy Stamping by Sue Jackson: an independent Stampin' Up demonstrator.
Through Stampin' Up!, I happily share my love of papercrafting through sales, classes, small stamping group meet-ups and workshops. I think that being a teacher in my "real life", I have a unique approach to sharing my fantastic hobby. I look forward to connecting with you!