Welcome to the Cardz 4 Guyz #380 challenge! Billie A., our host for this challenge, chose A Birthday Card with Some Purple for the theme. When you finish here, please visit the challenge site to see what the rest of the talented design team members created. Then, don’t forget to upload your creations to our gallery. We look forward to seeing your creations there!
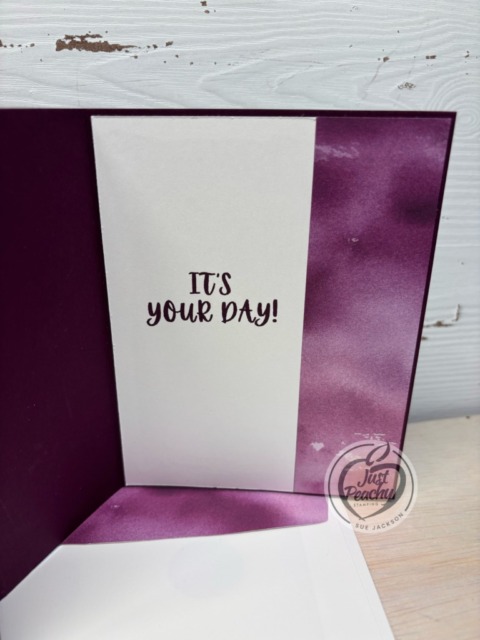
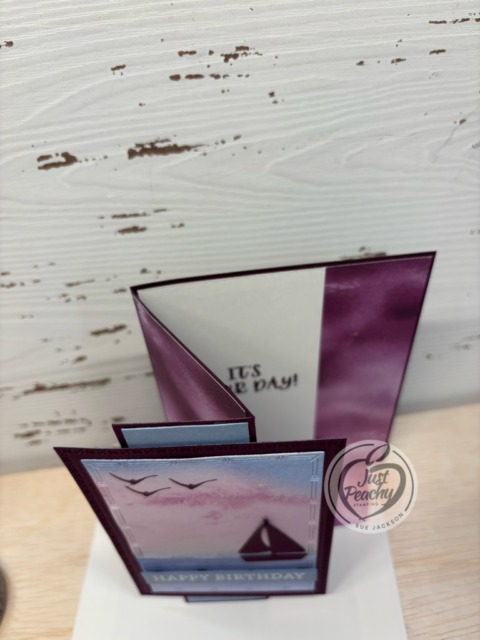
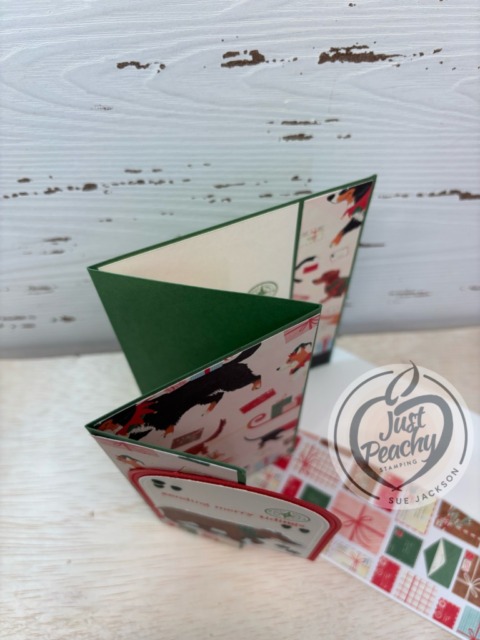
Here’s my modified z-fold birthday card with a purple, or Blackberry Bliss instead:
It’s just a given that fun fold cards also post to the Creative Creases Challenge. Debbie Mageed at Secret Stamper coordinates the challenge, and it’s one of my favorite challenges. Hopefully, you will be inspired to upload your own fun fold project to the challenge!
I have already posted modified z-fold card, which you can see here. For that card, I used arches instead of the Textured Notes Dies.
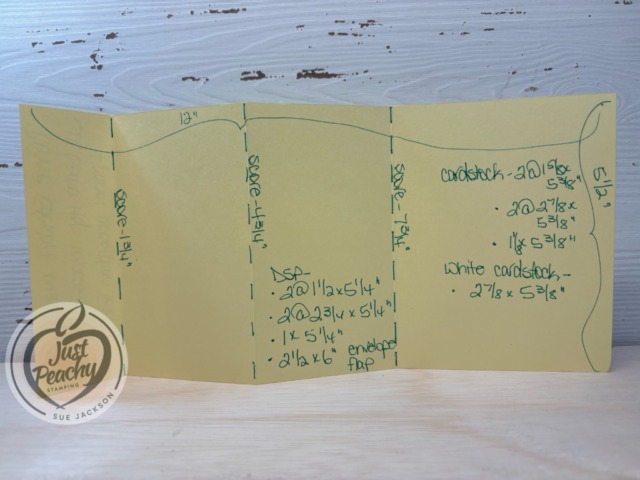
I came across this modified z-fold card on Pinterest created by Patti Dolan from P. S. Paper Crafts. Her post includes a video and a PDF document of directions. I modified the measurements just a tad, and then created a template, shared below:
Here’s the template, and the measurements have the arches, but I thought the rectangle dies would be more masculine.
Putting the Card Together:
I used a piece of the Thoughtful Journey for the center part of the card and stamped the three birds in Blackberry Bliss ink
The Berry Burst DSP is also from the Thoughtful Journey 6 x 6 inch DSP pack
I used Blackberry Bliss for the card base and the mat on the front of the card
The die for the Blackberry Bliss boat for the front was cropped from one of the Sunrise Sailing dies
The birthday sentiment comes from the Beautiful Butterflies stamp set, and I was so happy that it fit on the DSP perfectly
The inside sentiment is from the Coneflower Celebration stamp set
I used the retired Boho Blue cardstock for the front flap and the sentiment banner
For the inside sentiment cardstock, I used Very Vanilla because the Basic White seemed too bright
As always, I trimmed a piece of the DSP to 6 by 2-1/2 inches for the envelope flap
Then, I punched a 1-inch circle from the DSP I used on the front and ran it through my XYRON create-a-sticker for the envelope seal
As a Stampin’ Up! demonstrator, I get to start pre-ordering products from the upcoming mini-catalog which starts in January. As soon as I get my new products, I will make sure to start sharing cards made with new products.
Kits Make Crafting Simple, Fun, and Just Simply Fun!
Here’s a look at the two new kits available:
First, it’s the Everyday Beauty Kit, which retails for $25 USD.
Create the perfect card for any occasion using the all-inclusive Everyday Beauty Kit. This kit comes with everything you need to make three unique card designs: printed card bases and coordinating envelopes with lovely botanical patterns, precut paper pieces, timeless faux wax seals, shimmering metallic thread, and a versatile stamp set that you can use on countless other projects.
DETAILS – Makes 9 cards: 3 each of 3 designs – Folded card size: 5-1/2″ x 4-1/4″ (14 x 10.8 cm) – Colors: Basic Beige, gold, Gray Granite, Lost Lagoon, Night of Navy, Petal Pink – Also available in French
Kit includes one of each item listed below. – Everyday Beauty Photopolymer Stamp Set – Clear stamp block – Night of Navy Classic Stampin’ Spot – Step-by-step instructions – 9 printed envelopes – Faux wax seal stickers – Metallic thread – Adhesive
The second kit is the Adventure Awaits kit, which retails for $14 USD.
Let your creativity take the driver’s seat with the Adventure Awaits Kit. Coast in the retro colours and hand-drawn artwork that can be either feminine or masculine. With printed sentiments, precut paper, and vellum details, this kit comes with everything you need to make nine cute cards.
DETAILS – Makes 9 cards: 3 each of 3 designs – Folded card size: 5-1/2″ x 4-1/4″ (14 x 10.8 cm) – Colors: Basic Black, Coastal Cabana, Crushed Curry, Garden Green, Granny Apple Green, Pecan Pie, Petal Pink, Poppy Parade, Pretty Peacock, Timid Tiger – Sentiments printed in English, French, and German
Kit includes one of each item listed below. – Step-by-step instructions – 9 printed envelopes – Vellum – Adhesive
If you have any questions, or need a bit of a creative mojo boost, you can reach me at my [email protected].
If you live in the U.S. and don’t already have a Stampin’ UP! demo from whom you order, I would be honored to work with you.
Welcome to the Stampin’ Pretty Pals’ Blog Hop! Ready to sprinkle some holiday magic into your crafting this season?This month’s theme, Season’s Greetings, is all about celebrating the joy of handmade creations. The Stampin’ Pretty Pals have come together to share festive cards and paper craft ideas using our favorite Stampin’ Up! products — each project designed to inspire your creativity and help you capture the spirit of the season.
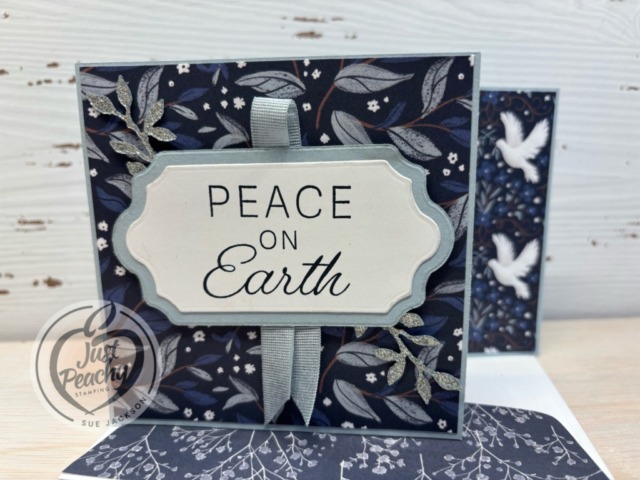
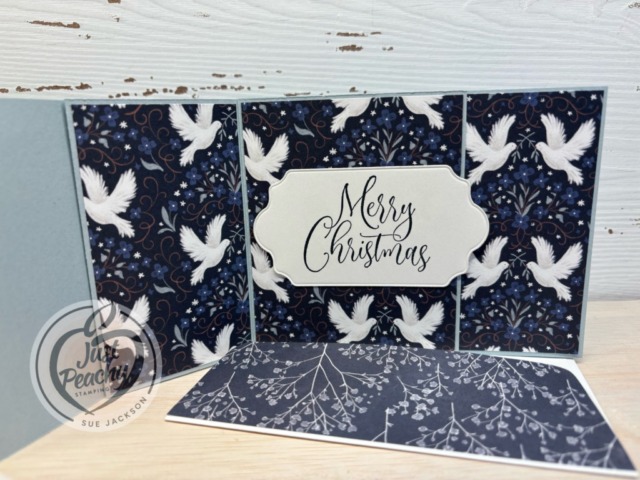
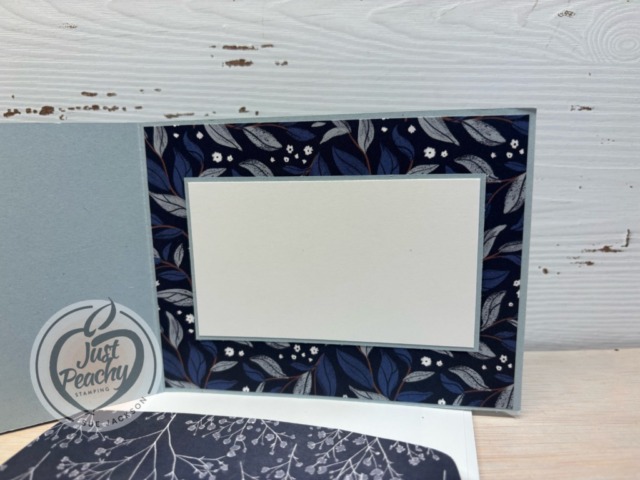
Here’s my double opening fun fold card:
As always, I’ll be uploading this card to the Creative Creases Challenge, where it’s always everything goes with a fun fold.
I found this fun fold on Pinterest from Heidi Collins from On Y Go Stamping for her Double Opening Fun Fold card. Her post includes a link to a YouTube tutorial and a free project sheet. Heidi uses 1/4 inch margins, so I did change that so that all my measurements were 1/8 inch wider and higher. Basically, it’s a regular card base measuring 11 by 4-1/4 inches, scored at 5-1/2 inches. The top fun fold is an adjusted size z-fold card. But them together, and you get a fabulous new-to-me fun fold.
Some Hints:
I knew I wanted to use the label dies from the Peace on Earth for my sentiment, so I increased the size of the front piece of cardstock to 4-1/4 by 4-1/4 inches
The DSP for this piece of cardstock measures 4-1/8 by 4-1/8 inches
I used the larger label die and a stamp from the Ornamental Christmas stamp set to add a sentiment to the middle of the card
I cropped two leave sprays from the silver glimmer paper to add behind the front label sentiments
HINT: I’ve found it’s easier to crop the glimmer paper using dies by putting the face size down on the cutting pad
Since I wanted to add a bit more silver sparkle to the card, I used the clear Wink of Stella brush to outline both labels on the front and the one on the inside
This card will require additional postage, but it will still fit into a Stampin’ Up! medium envelope
In addition to the measurements Heidi listed, I trimmed a piece of DSP (designer series paper) to 6 by 2-1/2 inches for the envelope flap
I punched a 1-inch circle from a coordinating piece of DSP and ran it through the XYRON create-a-sticker for the envelope seal
With that, I’d finished this coordinated card, envelope, and envelope seal set
Back to the Pals’ Fun Fold Hop:
I hope today’s project sparked some holiday cheer and crafting inspiration! There’s so much more to see — keep the fun going by following the lineup below to visit the rest of the Pals. And be sure to join us next month when we create our own Winter Wonderland!
Kits Make Crafting Simple, Fun, and Just Simply Fun!
Here’s a look at the two new kits available:
First, it’s the Everyday Beauty Kit, which retails for $25 USD.
Create the perfect card for any occasion using the all-inclusive Everyday Beauty Kit. This kit comes with everything you need to make three unique card designs: printed card bases and coordinating envelopes with lovely botanical patterns, precut paper pieces, timeless faux wax seals, shimmering metallic thread, and a versatile stamp set that you can use on countless other projects.
DETAILS – Makes 9 cards: 3 each of 3 designs – Folded card size: 5-1/2″ x 4-1/4″ (14 x 10.8 cm) – Colors: Basic Beige, gold, Gray Granite, Lost Lagoon, Night of Navy, Petal Pink – Also available in French
Kit includes one of each item listed below. – Everyday Beauty Photopolymer Stamp Set – Clear stamp block – Night of Navy Classic Stampin’ Spot – Step-by-step instructions – 9 printed envelopes – Faux wax seal stickers – Metallic thread – Adhesive
The second kit is the Adventure Awaits kit, which retails for $14 USD.
Let your creativity take the driver’s seat with the Adventure Awaits Kit. Coast in the retro colours and hand-drawn artwork that can be either feminine or masculine. With printed sentiments, precut paper, and vellum details, this kit comes with everything you need to make nine cute cards.
DETAILS – Makes 9 cards: 3 each of 3 designs – Folded card size: 5-1/2″ x 4-1/4″ (14 x 10.8 cm) – Colors: Basic Black, Coastal Cabana, Crushed Curry, Garden Green, Granny Apple Green, Pecan Pie, Petal Pink, Poppy Parade, Pretty Peacock, Timid Tiger – Sentiments printed in English, French, and German
Kit includes one of each item listed below. – Step-by-step instructions – 9 printed envelopes – Vellum – Adhesive
If you have any questions, or need a bit of a creative mojo boost, you can reach me at my [email protected].
If you live in the U.S. and don’t already have a Stampin’ UP! demo from whom you order, I would be honored to work with you.
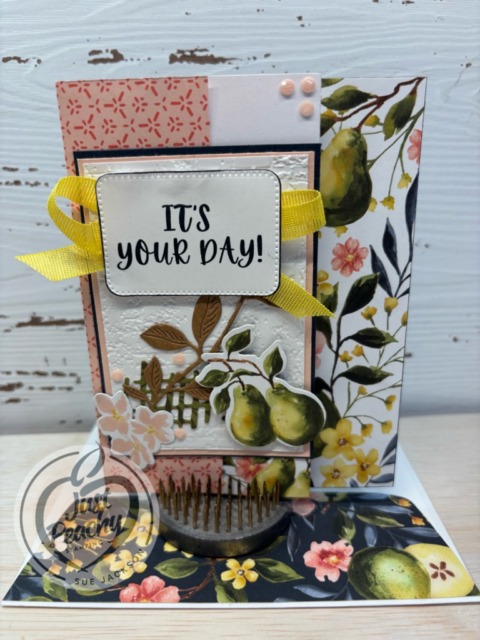
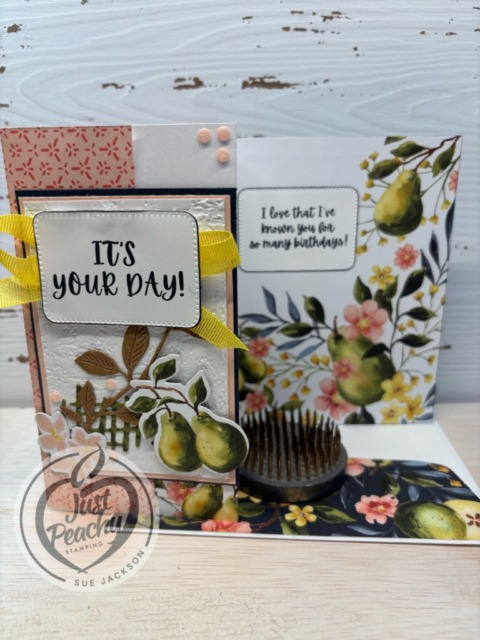
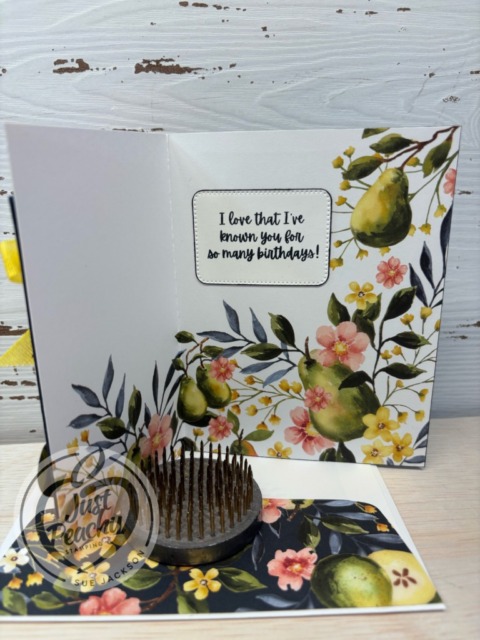
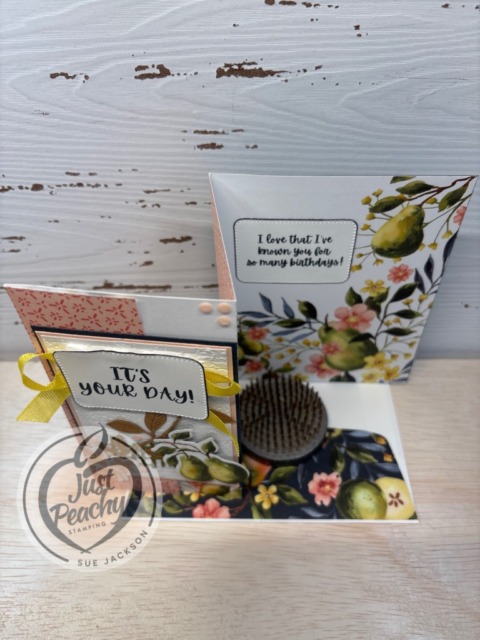
Welcome to the newest Make My Monday bi-weekly challenge #264. Our host, Billie A., chose Add at Least One Flower for the theme. I used border print from the Perfectly Pears DSP, which already has many flowers, but did add more to the front of the card.
When you finish here, please visit the challenge site to see what the rest of the very talented design team members created. Then, don’t forget to upload your creations to our gallery. We look forward to seeing your creations there!
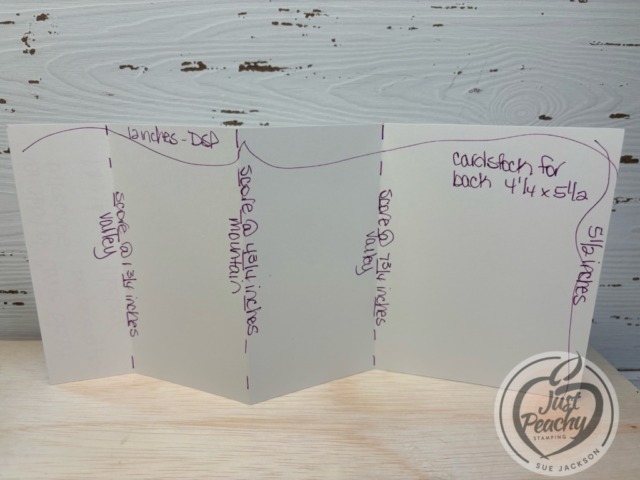
I know I had seen a video for a 4 panel accordion fold using a piece of DSP measuring 5-1/2 by 12 inches. I used it for this card, and for some strange and unknown reason, didn’t write down the source, even though I am fairly certain it was a video tutorial from the annual catalog DSP.
Since the base of this card is DSP, I added a piece of 4-1/4 by 5-1/2 inches piece of cardstock to the back of the last panel of the DSP
You will need a piece of DSP measuring 6 by 2-1/2 inches for the envelope flap
Punch a 1-inch circle from coordinating DSP and run it through the XYRON create-a-sticker for the envelope seal
For this card, I did adhere the front flap to the second flap
I used scraps of Secret Sea and Petal Pink cardstock for the front sentiment layers
I used the exposed brick embossing folder for the white background layer
One of the fabulous features of this pack of DSP is that the dies will crop out the pears and trio of flowers so I didn’t color anything for this card
I cropped the lattice die from a scrap piece of the DSP
Some of the branches in the DSP are Pecan Pie, so I cropped a branch from that cardstock for the front
Both of the sentiments come from the Perfectly Pears stamp set and were stamped using Secret Sea ink
I used one of the Nested Essentials die to crop both of the sentiments and outlined them using the Secret Sea marker
The Loopy Loop Bow:
I was able to watch Mary Deatherage’s, from Stamps -n- Lingers, Perfectly Pears tutorial. In that video, she showed her loopy-loop bow. That’s what I used for the front of my card. I’m bow-challenged and this technique allows me to relatively easily add ribbon without adding the bulk of a tied bow. If you’ve never seen her videos, you owe it to yourself to watch them. I think she’s the Queen of the Collage. Gorgeous cards!!
It doesn’t get much more southern than to say y’all. I still remember the look of astonishment on the faces of my many relatives on Long Island, where I was born and raised, the first time I’d said it in front of them. Of course, I’d lived here three or four years by then. Can you imagine saying y’all with a Long Island accent? Yes, it was that interesting, to say the least.
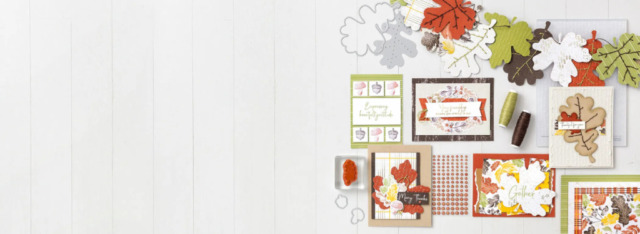
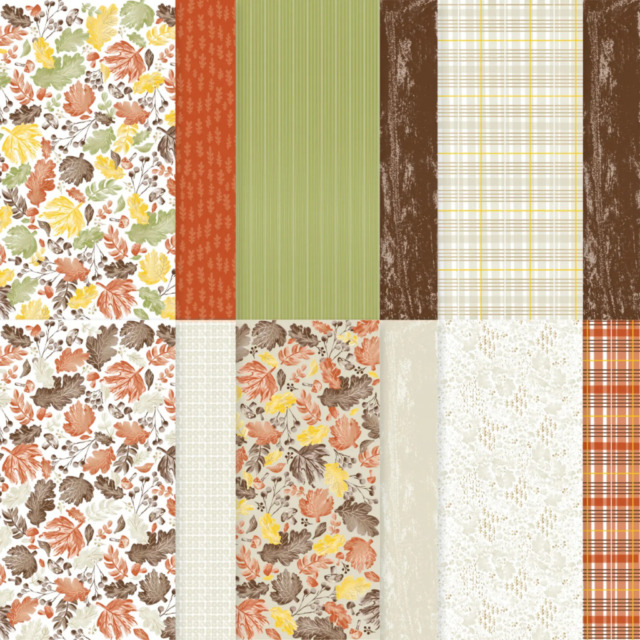
Stampin’ Up! has a fabulous suite for all your Happy Fall projects and cards. While the whole suite is a must-have, the DSP is stunning! I miss real falls, even raking leaves!
Here’s a close-up of the DSP:
I’ll be posting a slimline card using the plaid DSP pattern on the top row tomorrow. Make sure you come back to see the beautiful gold foil, Basic Beige, and Crushed Curry plaid. Such pretty paper!
If you have any questions, or need a bit of a creative mojo boost, you can reach me at my [email protected].
If you live in the U.S. and don’t already have a Stampin’ UP! demo from whom you order, I would be honored to work with you.
Welcome to the October, 2025 edition of the Sparkles Christmas Challenge # 178! Thank you very much for all the participants for our October challenge! Our host for this month’s challenge, Kate, chose Festive Wear for the theme. When you get finished here, I hope you will visit the challenge site to view the creations from the very talented members of our design team. After you’ve created your own themed card, please don’t forget to upload it to our gallery.
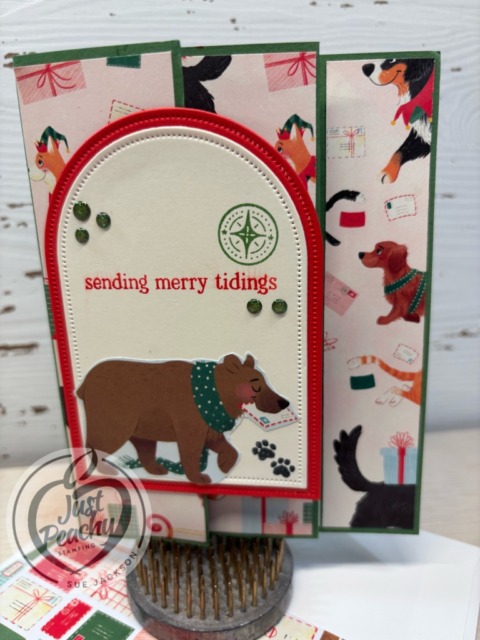
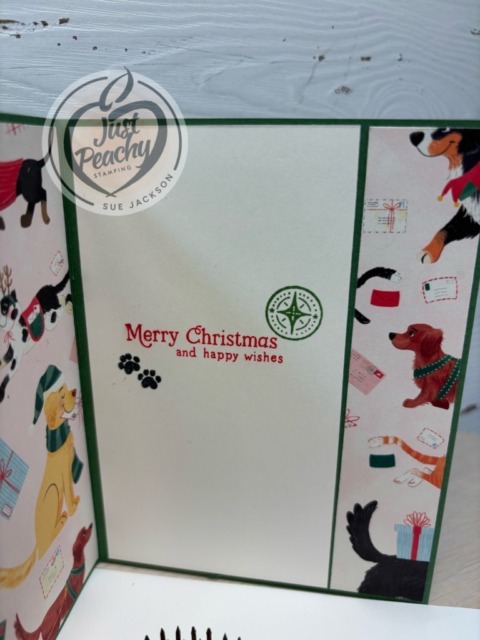
Here’s my Jolly Delivery Festive Wear card:
This North Pole Delivery 12 x 12 inch Specialty DSP (designer series paper) is so stinking cute! This four panel card can be made with one 6″ x 12″ piece of the DSP.
It’s just a given that fun fold cards also post to the Creative Creases Challenge. Debbie Mageed at Secret Stamper coordinates both this hop and the challenge. Hopefully, you will be inspired to upload your own fun fold project to the challenge!
My Template & Hints:
While watching Connie’s video I wrote down the measurements, then created a template.
Here’s the template:
Hints:
I didn’t use the cardstock mats for this card, so I used those measurements to trim the DSP
Don’t forget to punch a 1-inch circle and run it through the XYRON create-a-sticker for the envelope seal
The base is Garden Green with a Very Vanilla piece on the last panel as well
I used Poppy Parade and Very Vanilla for the arches
BIG HINT: If you want your DSP patterns to line-up and match from the front to the back you need to trim with the reverse side up – trust me on that hint as I may or may not have had a problem when trimming
The inks are Poppy Parade, Garden Green and Tuxedo Black
I fussy cut the jolly bear for the front of the card
I need three Christmas cards for my two great-nieces and one for my great-nephew, and am planning to use this stamp and die set bundle with the DSP for those cards
I only used multipurpose liquid glue to adhere the pieces together since dimensionals would’ve made it much bulkier
This card will require extra postage, but will fit in a medium size SU! envelope
With that, I’d finished this coordinated card, envelope, and envelope seal set.
It doesn’t get much more southern than to say y’all. I still remember the look of astonishment on the faces of my many relatives on Long Island, where I was born and raised, the first time I’d said it in front of them. Of course, I’d lived here three or four years by then. Can you imagine saying y’all with a Long Island accent? Yes, it was that interesting, to say the least.
Stampin’ Up! has a fabulous suite for all your Happy Fall projects and cards. While the whole suite is a must-have, the DSP is stunning! I miss real falls, even raking leaves!
Here’s a close-up of the DSP:
I’ll be posting a slimline card using the plaid DSP pattern on the top row next week. Make sure you come back to see the beautiful gold foil, Basic Beige, and Crushed Curry plaid. Such pretty paper!
If you have any questions, or need a bit of a creative mojo boost, you can reach me at my [email protected].
If you live in the U.S. and don’t already have a Stampin’ UP! demo from whom you order, I would be honored to work with you.
Welcome back to the bi-weekly Cardz 4 Galz challenge #262. Pamela, our host for this bi-weekly challenge, chose Coloring for the theme. When you finish here, please visit the challenge site to see what the rest of the design team members created. Then, don’t forget to upload your creations to our gallery. We look forward to seeing your creations there!
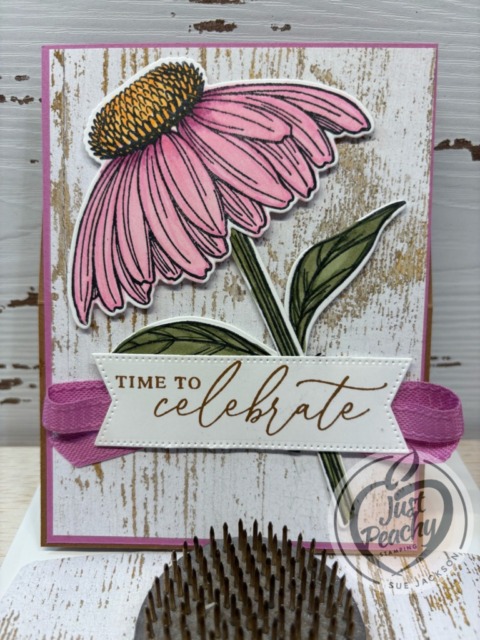
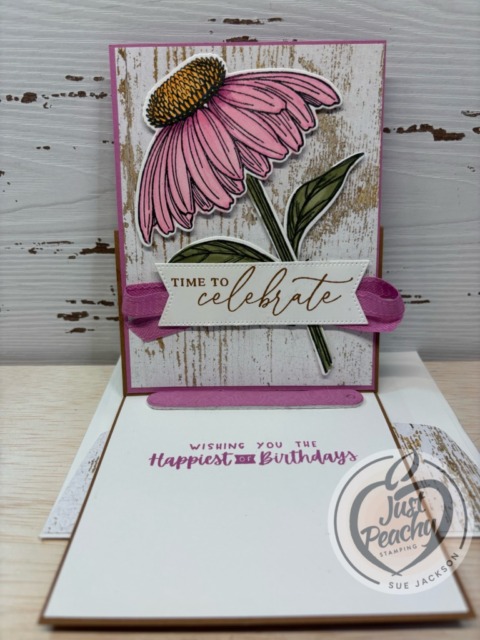
Here’s my Coneflower Celebration colored card:
As always with a fun fold card, I will be adding this to the Creative Creases Challenge where the theme is always Anything Goes with a Fun Fold.
Short & Sweet:
“I’m late. I’m late, for a very important date” (I forgot today is C4Galz). “No time to say hello, good-bye. I’m late, I’m late, I’m late. “
The Cheshire Cat
The Pecan Pie base measures 4-1/4 by 11 inches, scored at 2-3/4 and 5-1/2 inches
I used Petunia Pop for the cardstock mat, and it measures 4-1/8 by 5-3/8 inches
The Country Woods DSP measures 4 by 5-1/4 inches
I trimmed a piece of white cardstock to 4-1/8 by 5-3/8 inches for the inside
Another piece of the Country Woods DSP was trimmed to 6 by 2-1/2 inches for the envelope flap
I punched a 1-inch circle from a scrap piece of Petunia Pop 6 x 6 inch DSP and ran it through my XYRON create-a-sticker for the envelope seal
I stamped all the Coneflower Celebration flower parts in Tuxedo Black ink
Then, I colored the flower part with light and dark Bubble Bath blends
I added layers of Dark Flirty Flamingo around the center part of the flower and to outline the petals
The stem and leaves were colored using Mossy Meadow & Old Olive light and dark blends
The sentiment was stamped in Pecan Pie ink and then cropped with a banner die from Stylish Shapes
I stamped the inside sentiment using Petunia Pop ink
I added some foam adhesive to the back of a piece of Petunia Pop cardstock and cropped it with a banner die to use as the stopper
The Petunia Pop loopy loop bow is adhered to the DSP using glue dots
Then, I added dimensionals to the back of the flower, stem, leaves, and sentiment banner pieces and adhered them to the DSP
The rest of the parts of the card were adhered using multipurpose liquid glue
With that, I’d finished this coordinated card, envelope, and envelope seal set.
Thank you for stopping by my short and sweet post today!
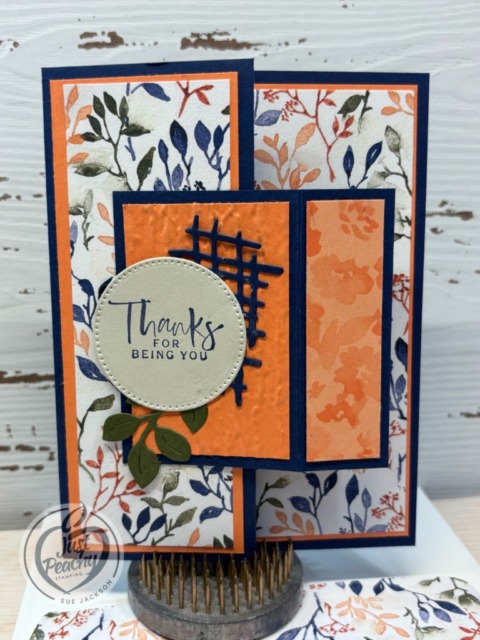
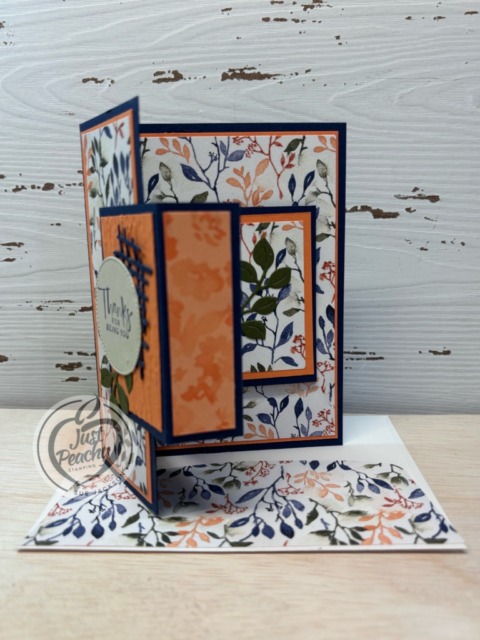
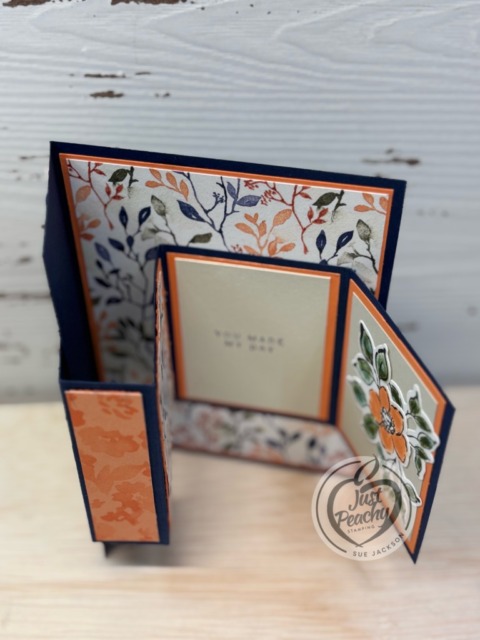
Welcome back to the monthly Stampin’ UP! Demonstrators Fun Fold Blog Hop. If you love fun folds, you’ve come to a hop filled with really great projects by some very talented fellow demonstrators. When you finish here, I hope you will hop along with the rest of the demos using the links below.
It’s just a given that fun fold cards also post to the Creative Creases Challenge. Debbie Mageed at Secret Stamper coordinates both this hop and the challenge. Hopefully, you will be inspired to upload your own fun fold project to the challenge!
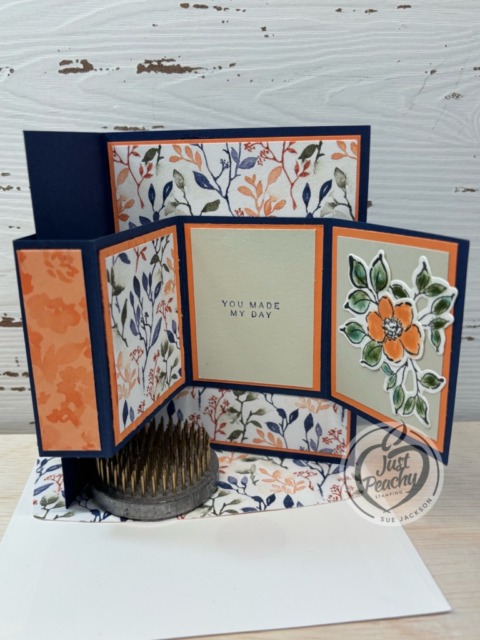
Here’s my card:
I was inspired by Debbie’s September Fun Fold Blog Hop card, which you can see here, and the post includes the measurements. I used her measurements to create my card. Debbie’s card used 1/4 inch margins on the mats, which I followed to a T. I’ll be creating another card using 1/8 inch margins on the mats and DSP. I also followed the directions on Patty Bennett’s of Patty Stamps video for putting the card together, Patty’s didn’t use mats on her card. They are both gorgeous!
I used the Floral Charm DSP (designer series paper), along with Basic Beige, Night of Navy, and Timid Tiger cardstock, with just a bit of Mossy Meadow scraps.
Measurements:
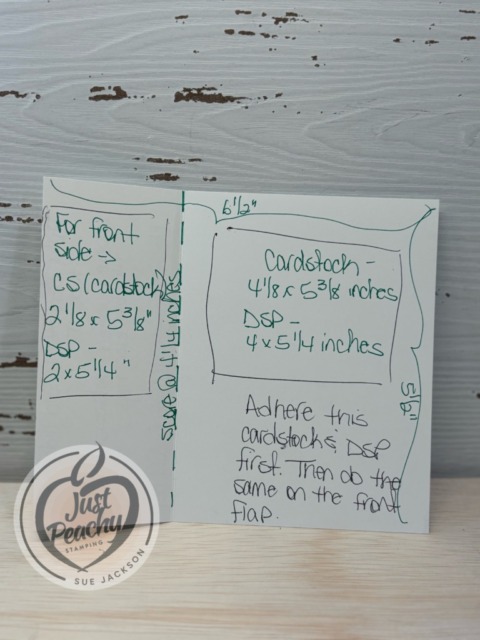
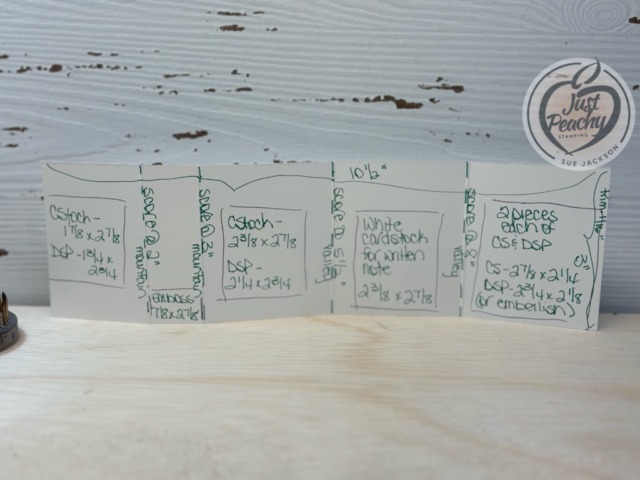
I created a template for my next trifold hidden flap card which will have narrower margins.
Here are the two pieces of this template:
These templates have a lot going on on each piece. To make it a bit clearer for me, I boxed off the cardstock and DSP measurements for each piece.
I did trim off just 1/16 of an inch for the piece that folds inward at the end to make it lay flatter.
Having Debbie’s measurements allowed me to trim all the pieces I needed before I went to Patty’s video. This prep work made the whole card come together relatively easily.
I also trimmed a piece of DSP to 6 by 2-1/2 inches for the envelope flap.
Then, I punched a 1-inch circle and ran it through my XYRON create-a-sticker for the envelope seal.
I already have the cardstock colors and DSP picked for the next card and can’t wait to put it together!
Once I saw her do it, I realized that this card looks so much more complicated than I originally thought
Following Debbie’s lead, I did add some Charming Day stamped/cropped pieces to the last inside flap instead of using another piece of DSP
I used multipurpose liquid glue to adhere all the pieces together
Since the DSP print looks water-colored, I wanted the flower and leaves on the die cuts to come out very soft
I struggled with different techniques to color the pieces and finally landed on using Q-tips and the stamp pads to do the coloring
I didn’t add any jewels or ribbon because the card is already so bulky
This card will be bulky even if leaving off the cardstock mats, so make sure you add extra postage
This card is really worth all the trimming to be able to make it over and over again because it just consists of trimming and scoring
Back to the SU! Demo Fun Fold Blog Hop:
We all hope you will follow the links below and hop along with us. There’s so much inspiration to be found here. We’d love to see what inspires you to create a fun fold as well. Don’t forget to upload it to the Creative Creases challenge!
If you get lost along the way, you can always come back here to find the next demo in line.
Welcome to Just Peachy Stamping by Sue Jackson: an independent Stampin' Up demonstrator.
Through Stampin' Up!, I happily share my love of papercrafting through sales, classes, small stamping group meet-ups and workshops. I think that being a teacher in my "real life", I have a unique approach to sharing my fantastic hobby. I look forward to connecting with you!