Welcome to the newest Cardz 4 Guyz challenge! I’m hosting this week and chose Get Messy for the theme. When you finish here, I hope you will visit the challenge site and get some inspiration from all the design team members. Then, post your own Get Messy card to our gallery! I can’t wait to see what you create!
While my card may not seem messy, I can 100% guarantee you my desk is an absolute mess! Well, actually, I have 3 desks, and they all need some help. I am in the middle of reorganizing, and getting another desk (strictly to be able to record video tutorials), so things are really messy now. Frankly, I am surprised I finished this card without getting ink on my hands. I should give myself a gold star.
Here’s my card:
Measurements:
The Night of Navy base measures 5-1/2 by 8-1/2 inches, scored at 4-1/4 inches.
The Sun Prints DSP (designer series paper) background in Grey Granite measures 4-1/8 by 5-3/8 inches. Don’t forget – with 3D embossing folders, you need to emboss first, then trim.
Trim a Night of Navy mat for the focal panel to 3 by 4-5/8 inches.
Trim a piece of Gray Granite cardstock to 2-3/4 by 4-3/8 inches.
Using the fern stamp from the Nature’s Prints stamp set, randomly stamp ferns in Gray Granite ink.
Using the blotchy stamp from the same stamp set, I stamped off Night of Navy once and randomly added blotches.
Use your embossing buddy on a scrap piece of Night of Navy cardstock large enough to stamp the foliage spray and the sentiment.
Stamp the focal image foliage spray and the sentiment using VersaMark on the cardstock.
Cover the spray with white embossing powder and heat set.
Assembly:
Crop the foliage spray with the die from the coordinating die set.
Crop the sentiment using the banner die from Stylish Shapes die set.
Using multipurpose liquid glue, attach the background to the card base.
Adhere the Gray Granite cardstock to the Night of Navy mat.
Adhere the foliage spray using dimensionals.
Wrap a piece of Gray Granite ribbon around the Night of Navy/Gray Granite focal panel and tie in a square knot. Secure the square knot with a glue dot.
Using liquid glue and a dimensional (on the right side of the sentiment only), adhere the sentiment banner.
I stamped another sentiment from the Forever Fern stamp set on the inside white panel. The white cardstock panel measures 4 by 5-1/4 inches.
I also added two ferns to the bottom of the inside of the card, along with a Night of Navy splotch.
Finally, I randomly stamped the Grey Granite ferns and stamped off Night of Navy splotches on the envelope flap. Then, I punch a 1-inch circle from the same DSP pattern as the card background.
With that, I was finished with this coordinated card, envelope, and envelope seal.
Welcome to the Cardz 4 Guyz challenge #320. This challenge is a two-week challenge, as always. Our host for #320, Billie A., chose wet or dry embossing for the theme. When you are done here, I hope you will visit the challenge site to see the inspirational pieces by the rest of the design team members.
My posted challenge card is below:
I did emboss the background DSP using the retired subtle embossing folder. That’s one of my favorite folders and I just can’t let it go yet.
However, while driving home from work today (Monday evening) I thought I’d create a quick clean and simple guyz sympathy card. I’ve been seeing a lot of cards created using the New Horizons (retired) DSP (designer series paper) and thought I could make use of both dry and wet embossing. This card literally took me 15 minutes to make, and that’s including hunting for a sympathy sentiment I thought would fit with this card.
Here’s my favorite, quick, clean and simple card for challenge #320:
Measurements and Assembly:
The Blackberry Bliss base measures 5-1/2 inches by 8-1/2 inches, scored at 4-1/4 inches.
After I embossed a piece of white cardstock to Painted Texture 3D embossing folder, I trimmed the cardstock to 4-1/8 by 5-3/8 inches.
HINT: Trim your cardstock after dry embossing it. If you trim it before, especially with a 3D embossing folder, you might have a problem getting the size you want.
The New Horizons DSP measures 4-3/4 by 2-1/2 inches.
I matted the DSP with a piece of Blackberry Bliss cardstock measuring 4-7/8 by 2-5/8 inches.
After rubbing a scrap piece of Blackberry Bliss with my embossing buddy, I stamped the sentiment, From Special Moments, using VersaMark.
Then, I covered it in white embossing powder and heat set the powder with my heat tool.
Next, I cropped the sentiment using a banner die from the Stylish Shapes die set.
I used multipurpose liquid glue to adhere the white cardstock and the DSP panel to the card base.
After adding dimensionals to the back of the sentiment banner, I added it to the front of the card.
Since I made this card literally right before I sat down to type, I didn’t get the envelope or envelope seal done yet. But, I did get the card done in time to write this post.
Thank you for stopping by my short and sweet blog post today.
Welcome to the latest Cards 4 Guyz two-week card challenge. The host for # 319, Caz, chose numbered birthdays as the theme, and the timing for this really worked out perfectly for me! When you finish here, I hope you will visit the challenge website to see the creations from the rest of the design team. Once you are inspired, please remember to upload your creation to our gallery.
My great-nephew had his third birthday party this weekend and the theme was Jurassic Park. I combined the theme for the party and the theme for the C4G challenge, and came up with one z-fold card.
Here’s my card:
Even though I used mostly retired products for this card, hopefully there’s something here that will inspire you.
Measurements:
This is a typical z-fold card.
The Evening Evergreen base measures 4-1/4 by 11 inches, scored at 2-3/4 and 5-1/2 inches.
The DSP (designer series paper) for the inside measures 4-1/8 by 5-3/8 inches.
I needed two DSP panels measuring 4-1/8 by 2-5/8 inches for the folded part of the card.
It’s not necessary to put DSP on the inside fold, but I like to do that.
The Old Olive panel on the front measures 4-5/8 by 3-1/2 inches.
Both the Old Olive DSP on the front and the white cardstock panel on the inside measure 3-1/4 by 4-1/2 inches.
The square on the front was cropped using a square die from the Stylish Shapes die set.
As always, I trimmed a coordinating piece of DSP to 6 inches by 2-1/2 inches for the envelope seal. I also punched a 1-inch circle of DSP for the envelope seal.
What I Did:
Wrap linen thread around the front panel DSP as desired. Do this before you adhere the DSP to the cardstock so the thread doesn’t show on the back.
I adhered all the panel pieces to cardstock using multipurpose liquid glue.
I trimmed a piece of an adhesive sheet down to just bigger than the 3 from the Alphabet A La Mode die set, found in the current mini-catalog.. Trim a piece of Evening Evergreen to the same size as the adhesive sheet and attach.
Crop the 3 from the adhesive sheet/cardstock sandwich (for the lack of a better term).
Make sure you run it back and forth in your cut and emboss machine at least 2 or 3 times.
HINT: Trust me, it’s not worth the trouble to crop the cardstock and adhesive sheet separately and then try to match them up. It is not worth the little bit of adhesive sheet you could save. Just trust me on this.
After I adhered the 3 to the cardstock panel, I decided I needed to add a layer of Wink of Stella to it so it really stands out.
Adhere the front DSP/cardstock/embellishment panel so it sits in the middle of the front of the card.
HINT: The easiest way I have found to adhere the inside panel so it doesn’t show when the card is closed is to work from the back.
Open the card so the front panel is showing.
Lay the stamped white cardstock panel FACE DOWN on the back of the front panel.
Apply liquid glue to the back side of the white cardstock.
Very carefully, fold the back of the card on top of the white cardstock and adhere the pieces together.
I added dimensionals to the dinosaur and birthday block to the front of the card.
With that, I’d finished this coordinated card/envelope/envelope seal set.
There are new and returning colors coming with the new catalog! Sadly, there are also colors that will be retiring. One that makes me sad is Mango Melody, mainly because I’ve recently started really playing with it.
Take a look at this SU! video with the new, returning, and retiring colors:
\
IF you haven’t heard yet, the Stamparatus is retiring!! Sadness!! Heartbroken! I’m ordering another one now because I use mine so much!
LAST CHANCE up to 60% OFF ITEMS from the CURRENT and MINI Catalogs
Just take a look at these LAST CHANCE lists! I know they are small, but click on the images to download or enlarge them. I’m always sad to see what’s retiring, but then I think of all I can sell when the current catalog ends so I can get new goodies!
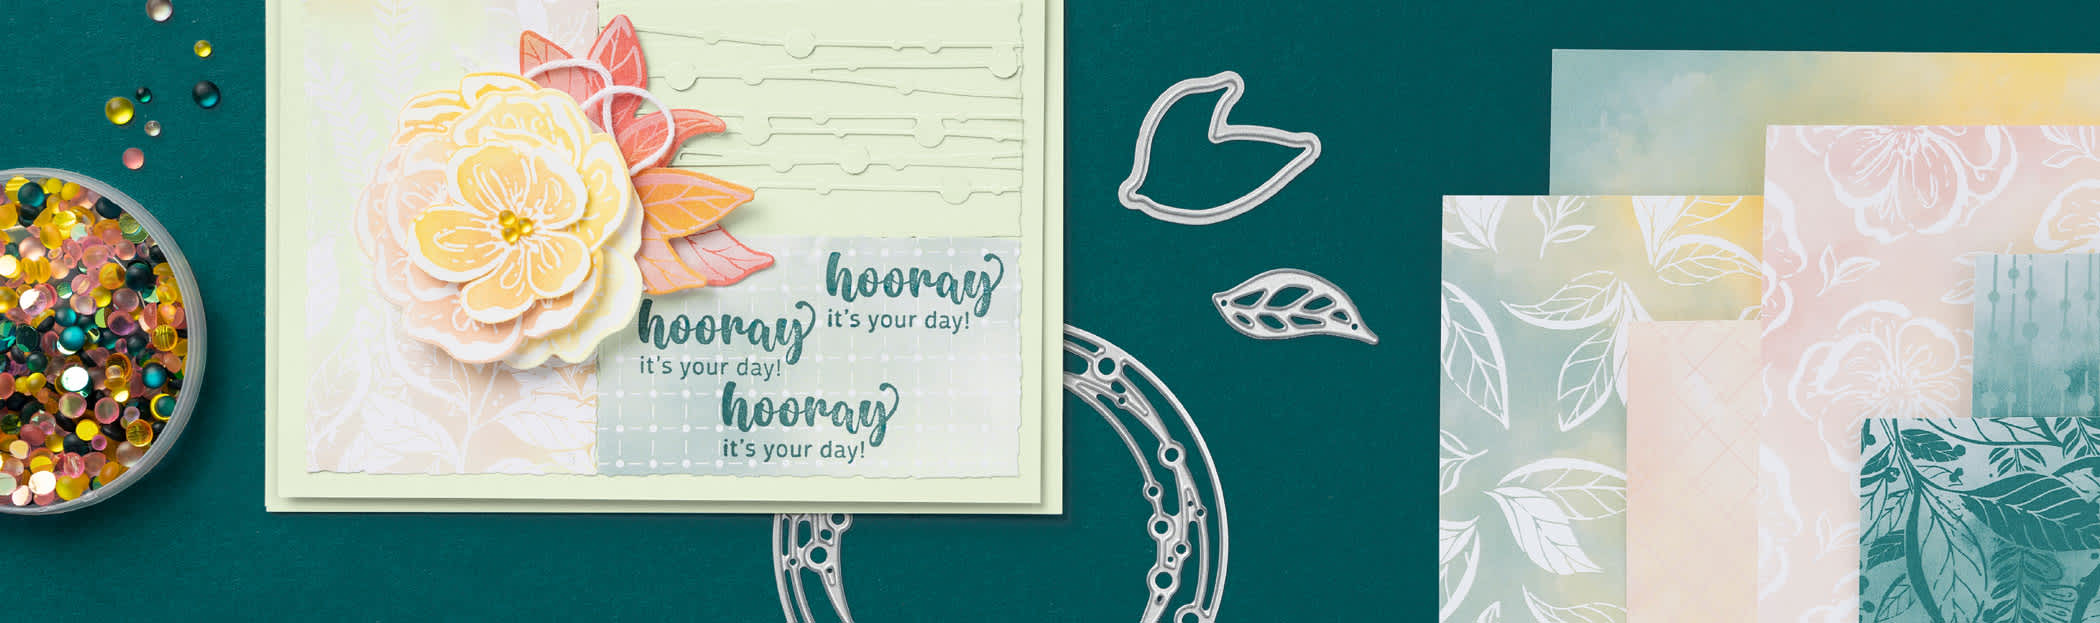
Welcome to the newest Cardz 4 Guyz challenge! The theme for this two-week challenge is using any coloring medium. The Rainy Days suite is just wonderful, and I am thoroughly looking forward to getting the dies and loose flowers which were on backorder until this past weekend. When you finish here, I hope you will head over to the challenge site to see the projects from the rest of the design team members. I always enjoy seeing how others interpret the theme.
Here’s my coloring card:
The sketch and optional theme of weather from the Try Stamping on Tuesday # 598 gave me the layout of this card. I am also adding it to the gallery for the Creative Creases challenge.
I used the sketch from the Try Stampin’ on Tuesday #598 challenge sketch for my layout. I turned the sketch so it’s landscape, but you can definitely see the inspiration there. I used clear sequins for the stars in the center of the sketch, and the dots on either end, which can easily be seen if you click on the photo above.
Here’s the Try Stampin’ on Tuesday sketch:
Measurements:
The Balmy Blue base measures 4-1/4 by 11 inches, scored at 2-3/4 and 5-1/2 inches.
I used four pieces of the umbrella DSP (designer series paper). The inside piece measures 4-1/8 by 5-3/8 inches.
The piece for the envelope flap measures 6 by 2-1/2 inches.
Finally, there are 2 pieces trimmed to 4-1/8 by 2-5/8 inches for the two shorter ends.
I trimmed a piece of Balmy Blue for the outside and Basic White for the inside. Each piece measures 3-1/4 by 4-1/4 inches. I did embossed the Balmy Blue using the raindrop embossing folder before I trimmed it to the final size.
I trimmed the banner to two inches wide and punched the diagonal ends using the Pick-a-Banner punch. I used the shiny paper from the Regency Park suite of products.
Finally, I punched a 1-inch circle from coordinating DSP for the envelope seal.
Assembly:
I adhered all the DSP pieces using multipurpose liquid adhesive.
Then, I put a couple of drops of white craft ink on an acrylic block and used a finger daubber to lightly add white to the Balmy Blue embossed cardstock.
Using an empty clear Wink of Stella pen, I added a tiny amount of glitter ink to each raindrop..
Next, I used the Stamparatus to stamp the turtle using black ink. I cleaned the stamp, and restamped it using VersaMark ink. After covering the turtle in clear embossing powder, I heat set it with my heat tool.
I used the Mango Melody and Old Olive blends combos to color in the turtle using the DSP turtle as a guide. I pretty pleased with the way it turned out and I assure you that I really did color it. When I finished, I fussy cut that turtle and the turle on the inside from another piece of DSP.
Next, I stamped the sentiment and umbrella on the inside white panel. I colored the umbrella using an Old Olive Stamping Write Marker.
I added a piece of Old Olive ribbon to the front of the banner and then tied some white bakers’ twine around the ribbon.
I added dimesnionals under the banner and the turtle for the front.
Adhere the Balmy Blue piece to the front flop of the Balmy Blue base.
Adhere the pieces using the dimensionals.
I added three sequins to the banner on. the front. Then, I added three sequins to the top right and lower left corners.
Next, I added the white cardstock to the inside of the card.
HINT: I’ve found it’s easier to add the inside cardstock by working from the back side of the front.
After putting the front Balmy Blue piece face down, I can line up the white cardstock to the front piece.
Then, add liquid glue to the backside of the white cardstock.
Turn the back of the card over onto the white cardstock. This way,. your pieces will line up.
Add the turtle using liquid glue to the inside corner of the white cardstock.
With that, I’d finished this cute as a button coordinated card envelope, and envelope seal set.
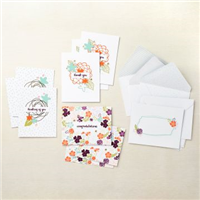
Stampin’ Up! has a numbe of all-inclusive kits available! If you have ever thought that you just couldn’t create cards, these kits are for you! Each kit comes with everything you will need, except for a stamp block in the stamping kits.
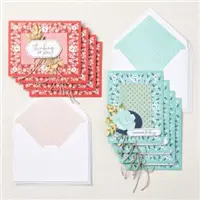
Here are just four of the kits available:
Just click on the image to see a larger picture of the kit!
Non-Stamping Kits!
These kits are fabulous because you don’t even need an acrylic block!
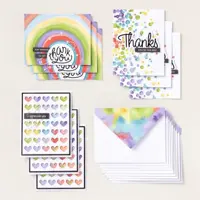
My very favorite kit is now available! If you don’t know what to get for your mother for Mother’s Day, or just a gift for yourself, these card organizer kits are FABULOUS!
I have such a hard time shopping for my mom and my aunt for holidays, birthdays, etc. So, for this past Christmas, I got two of these card organizer kits, and put them together. I also included other cards from card kits and some I had created in bulk to split between the two gifts. All total, they received a completed organizer and more than 25 cards for all different occassions. I was so proud to give each one of them this beautiful combination of cards and the love that went into each part of them.
Take a look at just a few of these other non-stamping kits:
Welcome to Cardz 4 Guyz challenge #317. Our host for this two week challenge, Julie, chose Make Us Smile for a theme. So much fun! When you finish here, I hope you will visit the challenge site linked above. It’s always very interesting to see the interpretations of the theme by the rest of the design team members.
Here’s my card:
The layout for this card comes from the Try Stampin’ on Tuesday challenge #596. I’ve always enjoyed these challenges and am glad things worked out so that I could join in on this one. The size of my circles is a little bit off, but the inspiration is definitely evident. I used the Rainy Days DSP (designer series paper) for this card. Pictures don’t really do it justice! The raindrops on the background are heat embossed, as are the umbrellas and the turtle’s shell and flower. The dies and the tiny flowers from the suite are unavailable until next week, and you can bet I will be placing an order asap!
Here’s the challenge banner:
Measurements:
The Mango Melody base measures 11 by 4-1/4 inches, scored at 5-1/2 inches to create a tent fold.
The raindrop background DSP measures 4-1/8 by 5-3/8 inches.
I used the second largest Scalloped Contour die for the umbrella DSP.
After cropping a piece of the flower DSP with the same scalloped die, I trimmed the DSP to 2 by 4 inches, then cut the chevron end.
I used one of the Stylish Shapes circle dies to crop the turtle.
The yellow flower DSP (under the vellum) measures 3-7/8 by 1-1/8 inches.
The vellum was cropped using another Stylish Shape die.
For the inside, the white panel measures my regular 4 by 5-1/4 inches.
The DSP on the bottom of the white panel measures 4 by 1/2 inch.
I used a smaller circle die from the Stylish Shapes for the flowers in the corner and trimmed the sides after I adhered everything together.
I trimmed a piece of the Old Olive flowered DSP to 6 by 2-1/2 inches for the envelope flap then punched a 1 inch circle for the envelope seal.
What I Did:
I used a Balmy Blue Stamping Write marker to outline all the DSP pieces on the front of the card. I should’ve done it for the inside as well, but didn’t think about it before I adhered the inside down.
I adhered the raindrop DSP, the umbrella DSP, and the inside panel using multipurpose liquid glue.
Next, I added dimensionals under the flowered DSP banner and adhered it down.
Then, I carefully added dimensionals under the yellow DSP on either end so it would straddle the banner.
After dry-fitting the turtle circle, I added dimensionals under the top left 1/4 of the circle. I adhered the rest of the circle down using liquid glue.
I used my embossing buddy on a piece of vellum, then stamped the sentiment using VersaMark ink.
Next, I added black embossing powder and heat set it using my heat tool.
HINT: Be careful because the vellum will scorch easily. I found it easier to let the heat tool heat up more than usual so the powder would melt faster.
I added matte Old Olive dots to the corners of the sentiment banner.
I stamped the sentiment on the inside using the Momento Tuxedo Black ink pad. and adhered the inside panel with multipurpose liquid glue.
As an after-thought, I added a baker’s twine bow to the front of the card.
With that, I’d finished this coordinated card, envelope, and envelope seal set.
Starting on March 1, 2023, Stampin’ Up! released an ONLINE EXCLUSIVE line of products! I’ve already gotten my Irresistible Blooms bundle, and the DSP will be joining my stash of DSP next week!
Just Look at this Fabulous Selection of Products!
Even though the two circle punches are at the end of the list below, I’d highly suggest getting them. I use mine all the time. My circle punches are some of my favorite punches!
Do you live in the United States? Do you want to place an order? Of course you do!
If you are placing an order under $150, please use the host code below.
If you are placing an order over $150, please contact me first so you can take advantage of the Stampin’ Rewards for your order!
HOST CODE for MARCH, 2023 is N46V3KNP
Again, thank you for stopping by today! Please take another moment and leave a comment.
Welcome to the newest two-week Cardz 4 Guyz challenge, Our host, Dawn, chose Something Sporty as the theme for #316. When you finish here, I hope you will visit the challenge site to see the all the projects from the rest of the design team members.
For a few years, I’ve been making cards for a work colleague’s family birthdays, anniversaries, holidays, etc. His father’s birthday is at the beginning of March, and the only request was to use the colors of the Mets baseball team. Therefore, I used Pacific Point and Calypso Coral to create a beachy scene. We’re in Florida, so the beach is definitely something “sporty”. At least that’s my story for this challenge.
Here’s my double z-fold card:
I added the white panel to the back of the card so there’d be enough room to write a note and sign it.
Measurements:
The Pacific Point base measures 11 by 4-1/4 inches, scored at 2-3/4 and 5-1/2 inches.
Two of the dark DSP (designer series paper) panels measure 2-5/8 by 4-1/8 inches. The third measures 5-3/8 by 4-1/8 inches.
The Calypso Coral DSP strip measures 11 inches by 1-1/2 inches, scored at 2-3/4 and 5-1/2 inches.
The white panel on the back measures 5-3/8 by 4-1/8 inches.
The last cut measures 6 by 2-1/2 inches of the Calypso Coral DSP for the envelope flap.
Assembly:
I used multipurpose liquid glue to attach the Pacific Point DSP panels.
Next, I attached the Calypso Coral DSP. Just make sure that the 5-1/2 inch side to the front fold only. The shorter pieces go on the right side of the card. You only want to adhere the short panel to the inside, right side.
I stamped the pier using Momento Tuxedo Black ink. Then, I colored the piers using Cajun Craze blends. I colored the pelican using a Basic Grey marker. The final coloring was done using the Basic Black marker to outline the rope. Then, I cropped the piece using the die from the Waves die set. I adhered it using dimensionals.
Next, I cropped two of the waves using the same die set. I used white cardstock for the bottom layer and the Calypso Coral DSP for the top layer. After layering the two pieces, I attached them to the Calypso Coral DSP strip.
I used the sentiment from the stamp set on white cardstock then cropped it using a die from the waves set. I added white ribbon to each of the ends, then attached only the left side to the front fold.
Finally, I stamped the wave in Calypso Coral on the white cardstock. Then I stamped the sentiment in Pacific Point.
With that, I’d finished this coordinated card and envelope set.
Welcome to Just Peachy Stamping by Sue Jackson: an independent Stampin' Up demonstrator.
Through Stampin' Up!, I happily share my love of papercrafting through sales, classes, small stamping group meet-ups and workshops. I think that being a teacher in my "real life", I have a unique approach to sharing my fantastic hobby. I look forward to connecting with you!


 \
\