Welcome to the newest Cardz 4 Guyz challenge! Our host for challenge #346, Julie., chose Welcome to the Jungle for the theme. When you finish here, please visit the challenge site to see what the rest of the very talented design team members created. Then, don’t forget to upload your creations to our gallery. We look forward to seeing your creations there!
Here’s my Little Monkey Jungle card:
This stamp set and punch are too stinking cute! However, all good things must come to an end, including this stamp set and punch. It’s on the last chance list, and since the new catalog goes live on Wednesday, 05/01/2024, the last chance availability really is coming to a close. Don’t delay!
The layout for this card comes from the Freshly Made Sketches that ended yesterday afternoon. I thought it would be perfect for my jungle card.
Here’s the sketch banner:
Measurements:
The Old Olive base measures 8-1/2 by 5-1/2 inches.
I used the retired Happy Forest DSP (designer series paper) for the background pieces. The bottom DSP measures 4-1/8 by 5-3/8 inches.
The two side pieces of DSP each measure 1-7/8 by 2-5/8 inches.
I also trimmed a piece of DSP to 6 by 2-1/2 inches for the envelope flap.
Then, I punched a 1-inch circle of DSP for the envelope seal, and ran the circle through my XYRON create-a-sticker.
The white cardstock for the front measures 3 by 4-3/8 inches.
Next, I trimmed a piece of white cardstock to 4 by 5-1/4 inches for the inside of the card.
I used leftover pieces to stamp the monkey.
Stamping, Coloring, & Assembly:
I outlined the bottom DSP mat using my Crumb Cake marker.
The two front side pieces of DSP are outlined using a Mossy Meadow marker.
I stamped everything using the Momento Tuxedo Black ink pad so I could use my blends combos to color in the images. All the stamps come from the Little Monkey stamp set.
For the leaves on the bottom of the white panel, I stamped one of the leaf sprays and fussy cut it out. Then I used the cut-out to mask the leaf sprays by working my way across the bottom.
I alternated coloring the sprays using the Mossy Meadow and Old Olive blends combos.
Next, I colored the vines and the leaves on the tree branch using the Old Olive blends combo.
I used the (now retired) Soft Suede blends combo to color the tree branch.
I colored the monkey using the Crumb Cake blends combo.
After punching the monkey out, I added dimensionals to the back so I could adhere it to the white cardstock panel.
I repeated the monkey stamping and coloring on the white cardstock for the inside of the card. I did stamp a banana because of the sentiment, but I still don’t know how I feel about it on the card.
All the other pieces of the card were adhered using multipurpose liquid glue.
With that, I’d finished this coordinated card, envelope, and envelope seal set.
Everyone loves a good bargain, and Stampin’ Up! provides a great selection of savings on the clearance rack. The products below are from the clearance rack as of Monday evening, 04/29/2024:
If you live in the U.S. and don’t already have a Stampin’ UP! demo from whom you order, I would be honored to work with you.
When prompted, please enter the following HOST CODE:
Welcome to the first bi-weekly Cardz 4 Galz challenge for 2024! Our host for this challenge, Dawn W., chose On Safari as the theme. When you finish here, I hope you will visit the challenge site to see how the rest of the design team members used sequins in their projects. We always love it when you play along with our themes, so please remember to upload your project to our gallery.
Here’s my On Safari card:
Measurements:
The Old Olive base measures 5-1/2 by 8-1/2 inches, scored at 4-1/4 inches.
The Old Olive cardstock frame piece measures 4-1/8 by 5-3/8 inches.
I used two pieces of white cardstock, each measuring 4 by 5-1/4 inches. One is under the frame on the front and the other is on the inside of the card.
I trimmed a piece of Sweet Sorbet 6 x 6 inch DSP (designer series paper) to 6 by 2-1/2 inches for the envelope flap.
Then I punched a 1-inch circle of Old Olive 6 x 6 inch DSP and ran it through my XYRON create-a-sticker.
That’s it for the measurements.
Stamping and Coloring:
After running the frame piece of Old Olive cardstock through the Cut & Emboss machine using the Stitched Greenery die, I used the Stylish Shapes dies for the banner and the four squares on the frame.
Using Pecan Pie ink, I stamped the vines and branches on the white cardstock for the front.
HINT: line up the frame piece of cardstock on top of the white cardstock. I used a pencil to very, very lightly mark the corners of each square so I knew where to stamp the vines and branches. After stamping, and letting the ink dry thoroughly, I carefully erased the corner marks. I did the same thing for the sentiment banner.
I used the Old Olive and Pecan Pie markers to color the vines and branches.
Then I stamped the sentiment in Momento Tuxedo Black ink and let it thoroughly dry before erasing the pencil marks.
Using a 4-1/4 by 5-1/2 inch piece of white cardstock, I stamped one monkey, then punched it out. Then I repeated the process three more times.
HINT: By stamping and punching one monkey at a time I was able to minimize the waste, which left me with a decent size leftover piece.
I colored the monkeys using the Crumb Cake combo blends markers. Then, I added rosy cheeks and touches of pink in the ears using the lightest natural tone blend.
Using the trio of bows die from the Playing in the Rain die set, I cropped four Sweet Sorbet bows for the monkeys. Cute!
Since the front sentiment allows this card to be an all-occasion card, I didn’t stamp a sentiment on the inside. I will do so when I decide for which occasion I will use this card.
Assembly:
I wanted to make sure that the frame didn’t collapse on itself, so I lined the frame of the Old Olive cardstock frame using foam adhesive strips.
Between the sentiment banner and the squares I added mini-dimensionals.
Next, I adhered the white cardstock to the adhesive strips on the frame.
Using multipurpose liquid glue, I adhered the white cardstock to the base of the card.
Then, I used liquid glue to adhere the adorable bows to the monkeys.
After dry-fitting the monkeys, I carefully added liquid glue to the pieces of the monkeys that would be on the outside of the frame.
I added two mini-dimensionals under each monkey to adhere it to the white cardstock.
With that, I’d finished this coordinated card, envelope, and envelope seal set.
In addition, there’s a great promotion going on during Sale-a-Bration for joining the Stampin’ UP! community!
Customers who join our fun crafting community as a new demonstrator can get $125 USD | $165 CAD worth of product PLUS our Stampin’ Glass Mat Studio* (a $60 USD | $82 CAD value) for just $99 USD | $135 CAD!
STAMPIN’ GLASS MAT STUDIO
The Stampin’ Glass Mat Studio is a paper crafter’s dream! The heavy-duty glass mat comes printed with a ruler and grid lines for easy measuring, while the large surface space gives ample room for spreading out while paper crafting. The safety-tempered glass has a heat and scratch resistant surface that wipes clean with the included cloth and water—no chemicals needed. The reusable cloth also cleans ink off your stamps! The nonslip, heat resistant, waterproof silicone mat features four palette squares for mixing custom ink colors or for holding small ink spots in place while crafting. Each component can be used separately or you can use all three items together for a multipurpose paper crafting studio that’s both functional and elegant.
The Stampin’ Glass Mat Studio includes:
GLASS MAT * 5 mm thick * 17″ x 14″ (43.2 x 35.6 cm) * Safety-tempered * Heat and scratch resistant * Wipes clean with water or alcohol
SILICONE MAT * 8-3/8″ x 6″ (21.3 x 15.2 cm) * Multiuse, nonslip * Waterproof, heat resistant * 4 palette squares for custom-color mixing or holding Stampin’ Spots * Product color: white
CLEANING CLOTH * 8-1/4″ x 8-1/4″ (21 x 21 cm) * Durable, reusable * Lint free * Cleans stamps and other surfaces with only water * Product color: dark gray
If you live in the U.S. and don’t already have a Stampin’ UP! demo from whom you order, I would be honored to work with you.
When prompted, please enter the following HOST CODE:
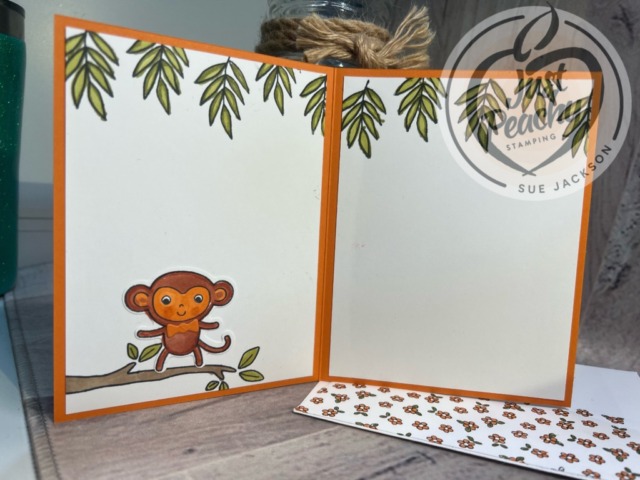
Welcome to InKing Royalty’s September Blog Hop! The leaves are changing, Halloween is around the corner, and we are playing with orange tones that are sure to get you in the mood for Fall. We are excited to share our creations and hope you love them! After you read my post, I hope you’ll hop over to the next person on the list at the base of this post.
When we were kids, we loved the knock, knock joke with the punchline “Orange you glad I didn’t say banana?” The title of this post is a throwback to my childhood, corny as it may be. The orange colors I chose for this card are Pumpkin Pie and Cajun Craze.
I’ve been seeing fractured cards a lot lately, which look much more complicated than they are to create. While it would’ve been possible to figure out the math for all the pieces, I really didn’t want to do that. Then, I came across a faux fractured card and I realized how easy it is to create this card without all kinds of measurements and shaped cuts. By using the black cardstock strips to surround the focal image, the result looks like you cut the DSP (designer series paper) into pieces. I need a card in which a “bunch” of people could write well wishes, and I thought this would bring a bit of sunshine to the recipient’s day.
Here’s my Little Monkey faux fractured card:
Little Monkey Card Measurements:
The Pumpkin Pie base measures 5-1/2 by 8-1/2 inches, scored at 4-1/4 inches.
The flower DSP measures 4-1/8 by 5-3/8 inches.
I also trimmed a piece of the DSP to 6 inches by 2 and 1/2 inches for the envelope flap. Then, I punched a 1-inch circle of Pumpkin Pie 6 x 6-inch DSP for the envelope seal. After I ran the circle through my XYRON create-a-sticker, I was set for the seal.
After I ran a piece of Pumpkin Pie cardstock through the Cut & Emboss machine, I cropped it using the largest square die from the Stylish Shapes set.
I used the next smaller square die for the white inside the Pumpkin Pie square.
The black cardstock strips were trimmed to 3/16 x 6 inches.
As an afterthought, I cropped two Pumpkin Pie bowties using the Playing in the Rain die. I added one to each monkey.
Finally, I trimmed two pieces of white cardstock to 4 by 5-1/4 inches for the inside of the card..
Stamping, Coloring, and Cutting:
The flowered DSP actually started out as black-outlined flowers on a white background. I use my Pumpkin Pie Stamping Write Marker to color the petals. Then, I used Old Olive to color the leaves.
The centers of the flowers are colored with the clear Wink of Stella pen.
Then, I repeated the whole process for the envelope flap DSP piece.
Stamp the two monkeys on scraps of white cardstock using Tuxedo Black ink.
Color the monkeys using Pumpkin Pie and Cajun Craze blends combos in keeping with the orange theme.
Punch the inside monkey and fussy cut the monkey for the front. Add dimensionals to the back of the monkey on the front.
Stamp the branches and leaves on the white cardstock square for the front and the white cardstock pieces on the inside.
Color the branches using the dark Crumb Cake blend. Add texture to the branches using the Crumb Cake Stamping Write Marker.
Color the leaves using the Old Olive blends combo.
Adhere the white cardstock pieces to the inside of the card.
Adhere the monkeys to the branches using dimensionals for the front monkey and liquid glue for the inside.
Creating the Faux Fractured Card Front:
Adhere the Pumpkin Pie square to the center of the front of the card so it creates a diamond.
After coloring the stamps on the white square, use multipurpose liquid glue to adhere it to the Pumpkin Pie square.
Add the black strips to the front of the card, making sure to align them directly against the Pumpkin Pie square.
Trim the excess black strips from the ends of the DSP.
Adhere the DSP to the base of the card using multipurpose liquid glue.
With that, I’d finished this faux fractured card, coordinated envelope, and envelope seal.
Back to the InKing Royalty Blog Hop:
Thank you for stopping by today. I hope you’ll hop along to the next stop on the blog hop, Brian King at Stamp with Brian There’s lots of inspiration to be found in this group – and you don’t want to miss it!
InKing Royalty Blog Hop:
Thank you for hopping along with us. If you get stuck during the Blog Hop, please use this line-up as a guide:
You can download the following catalog, or find the link on the Stampin’ UP! website. Not surprisingly, some items have already gone on backorder. Now is the time to order your Halloween and some of your Autumn supplies.
Don’t Forget Online Exclusive DSP!
If you live in the U.S. and don’t already have a Stampin’ UP! demo from whom you order, I would be honored to work with you.
When prompted, please enter September’s HOST CODE:
FZTABBN
Again, thank you for stopping by! I’d love to hear your comments or thoughts. Sue
Welcome to my post for the cutest little monkey just swinging by to say hi. i must admit, while not difficult, this card did evolve. Connie Stewart’s video showed me how to create the card and how to mask off the Countryside Corners stamp. You can find her video here. I’ve already created a card using this fun fold for my husband, and you can find the link here. When my husband got this card in the mail, he thought it was an easel card and it looks create standing that way. Therefore, I decided to purposely do that for this monkey card.
I used Berry Burst, Granny Apple Green, and Flirty Flamingo to meet the generic colors of this challenge. In addition, I added Early Espresso and Crumb Cake for the neutrals.
Measurements:
Connie’s video has all the necessary measurements for the flap part of the card.
I needed some Flirty Flamingo on the front of the card, so I trimmed a piece of the 6 x 6 DSP to 3/4 by 5-3/8 inches.
After I finished the Gone Fishing card for my husband, I found that the card would lay flatter if I trimmed less than 1/8 of an inch off the front flap. It’s not even noticeable, but it does help with the bulk of the card.
The plain Berry Burst cardstock on the front looked too blah. So, I ran a piece of Berry Burst cardstock through my Cut & Emboss machine using one of the Basics embossing folders. Then, I trimmed the embossed piece to 4-1/4 by 5-3/8 inches.
These folders are online exclusives, and the link will be below with the rest of the products used on this project.
I trimmed another piece of 6 x 6 Flirty Flamingo DSP to 4-1/4 by 5-3/8 inches for the top of the inside flap.
I cropped three pieces of Basic White cardstock using the largest Countryside die. Since I used blends combos to color the front flap, I needed to add another piece of cardstock to the back to cover the ugly back. To cut down on bulk, I trimmed the back die cut to a length of 4 inches.
Stamping, Coloring, and Gluing:
This adorable monkey can be fussy cut, but I decided to try cutting it out using my Scan & Cut. I wasn’t sure how much I would actually use it so I got it for a steal on Facebook Marketplace. I am still a novice and learning as I go. There are a couple of things I found out with this monkey:
After stamping the monkey using Early Espresso ink, I needed to outline it with an Early Espresso Stamping Write Marker. There are parts that just don’t get recognized at all for some strange and unknown (to me) reason.
Stamp, outline, and cut twice as many as you think you will need, at least if you are a novice.
Don’t be surprised if you have to go back and outline the monkey again.
Thankfully, the curly tail cuts fairly well if it’s outlined enough.
I used Early Espresso to stamp all the leaves, branches, sentiments, and the Countryside borders.
Then, I colored the leaves with the Granny Apple Green blends combos.
The monkey is a combination of the dark and light Crumb Cake blends.
Finally, I added pink to the cheeks and ears using SU1000 pink-ish blend.
I didn’t add any dimensions because there was already so many layers. This card will definitely need extra postage. In the U.S., two Forever stamps will cover it.
I used the multipurpose liquid glue to adhere everything together.
Finally, I added a small Velcro dot to the flap to help hold it down. When the card is open to it’s easel form, the Velcro dot won’t even show.
It sounds much more complicated than it actually was to create this card. Connie Stewart’s video explains how to do everything. I love her videos because they are meant for quickly created cards.
The new mini catalog goes live on Wednesday, 09/06/2023.
There’s also going to be a release of ONLINE EXCLUSIVE DSP! I’m especially thrilled with the Tartan DSP! You can see previews below:
If you live in the U.S. and don’t already have a SU! demo from whom you order, I would be honored to work with you.
When prompted, please enter September’s HOST CODE:
FZTABBN
Again, thank you for stopping by! I’d love to hear your comments or thoughts. Sue
About Me
Welcome to Just Peachy Stamping by Sue Jackson: an independent Stampin' Up demonstrator.
Through Stampin' Up!, I happily share my love of papercrafting through sales, classes, small stamping group meet-ups and workshops. I think that being a teacher in my "real life", I have a unique approach to sharing my fantastic hobby. I look forward to connecting with you!