Hey Chuck for TSOT 614 and ctd751
Welcome to Just Peachy Stamping! I feel like it’s been forever since I’ve participated in a challenge for which I am not on the design team. I just got this truly funny stamp and die bundle the other day and HAD to start playing with it right away! I am so stinking thrilled that I was able to combine these two challenges and come up with one card.
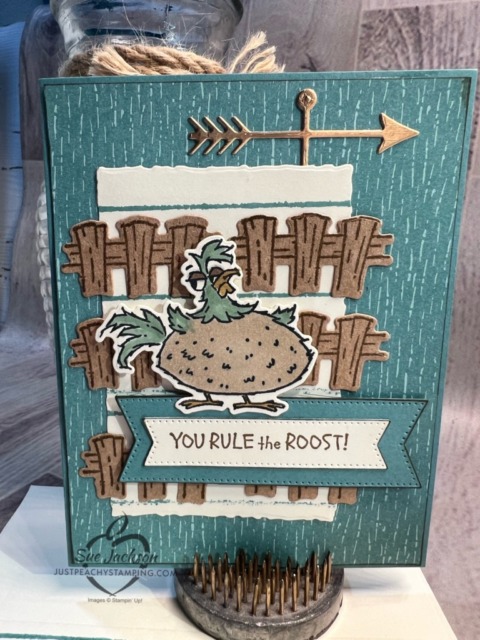
Here’s my Hey Chuck card:
Here are the two challenge banners:


Measurements:
- Trim a piece of Lost Lagoon cardstock to 5-1/2 by 8-1/2 inches. Score it at 4-1/4 inches.
- The background DSP comes from the Inked Botanicals 6 x 6″ DSP pack. Trim it to 4-1/8 by 5-3/8 inches.
- Trim another piece to 1/2 by 4 inches for the inside of the card.
- Punch a 1-inch circle for the envelope seal and run it through your XYRON createasticker.
- Trim a piece of Very Vanilla to 4 by 5-1/4 inches for the inside of the card.
- I cropped the two sentiment banners from Very Vanilla and Lost Lagoon leftovers (read: scraps).
- Crop a piece of Very Vanilla cardstock using one of the Deckled Rectangle dies. Mine measures 3-7/8 by 2-1/2 inches.
Stamping and Assembly:
- Stamp Chuck onto Very Vanilla cardstock using Momento Tuxedo Black ink. This ink will allow you to color using the blends marker combos.
- Stamp the fence piece 6 times onto Crumb Cake cardstock using Sort Suede ink.
- Outline the background DSP using a Soft Suede marker.
- Stamp the sentiment onto a piece of leftover Very Vanilla cardstock using Soft Suede ink.
- Using the same ink, stamp the inside sentiment on the inside piece of Very Vanilla cardstock.
- The ink for Chuck should be completely dry by now, so he can be colored. I used the Crumb Cake and Lost Lagoon blends combo sets.
- Chuck needed his eyelids to stand out, so I used a Soft Suede marker to color them.
- Next, I used a gold Wink of Stella pen to color Chuck’s beak and feet.
- I cropped all the pieces at the same time, including the gold foil weather vane.
- Outline both banners for the sentiment using the Soft Suede marker.
- For the Lost Lagoon lines, I used the long edge of the “H” acrylic block. I stamped the edge in the Lost Lagoon ink and then stamped the double lines in rows on the cropped Very Vanilla. Jackie Beers of Blue Line Stamping first posted a card using this technique and I just fell in love with the idea. Thank you, Jackie! Please visit her site because she is an amazingly inspiring artist!
- I added dimensionals under Chuck and the Lost Lagoon piece of the sentiment banner. Everything else was adhered using multipurpose liquid glue.
- Add the 1/2 by 4-1/8 inch strip of DSP to the bottom of the inside card panel.
- Adhere the inside panel using liquid glue.
- Instead of using DSP on the envelope flap, I repeated the double lines using the “H” acrylic block.
- With that, I’d finished this coordinated card, envelope, and envelope seal set.
Thank you for stopping by my blog today!
Have a Peachy Day!
Sue
Colors Used:
Supplies Used:
Want to earn coupons for FREE product in August?
You are saying “of course I do”, right? Take a look at the following informational flyer!

What’s New to Order? Online Exclusives!

The HOST CODE for July is QXMZMSQC.
If you live in the U.S. and don’t already have a crafting relationship with a demonstrator, I would be honored to be your demonstrator!
Again, thank you for stopping by!


