Welcome to Team B’s turn for the Atlantic Hearts Sketch Challenge #650! Starting the creative process with a sketch invites individual takes on the sketch, and this one is no different. This challenge is a weekly event, and we’d all love for you to play along with the sketches and then post your creations to the challenge gallery.
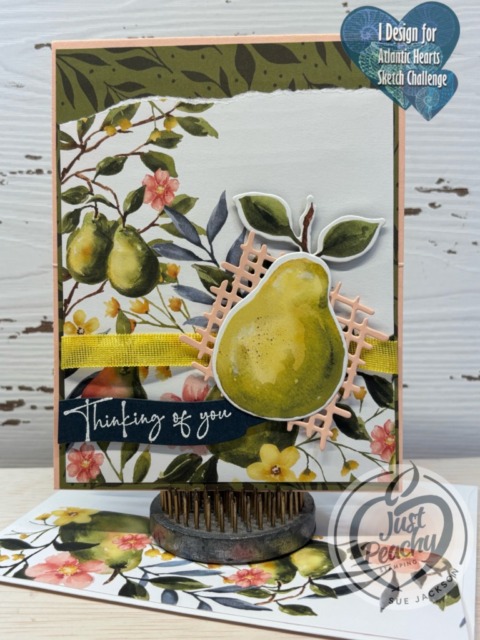
I needed a get well card that a group of people could sign, and I needed it fast. I used the Perfectly Pears bundle and DSP for my card.
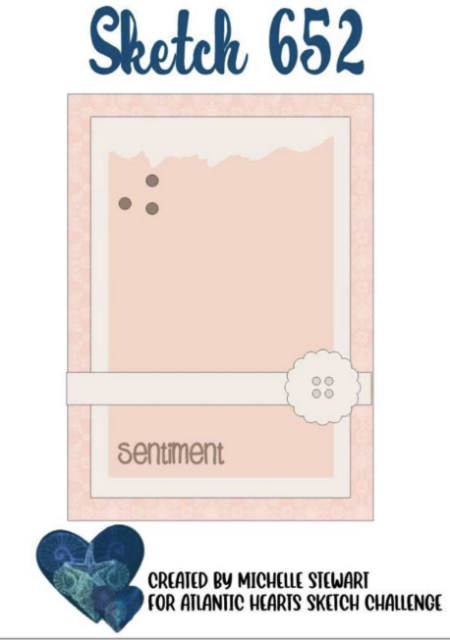
First, here’s the challenge sketch:
Here’s the card:
I did add another piece of white cardstock on the top of the inside of the card. However, since it’s blank, I didn’t take a picture of it.
At first, I wasn’t going to get this online exclusive product suite. Then I started seeing gorgeous cards and knew I absolutely needed to get it! I’m so glad I did!
Measurements:
The Petal Pink base measures 11 by 4-1/4 inches, scored at 5-1/2 inches to create a tent card
Trim a piece of the Mossy Meadow patterned DSP (designer series paper) to 4-1/8 by 5-3/8 inches
I trimmed a piece of the pears pattern DSP to 4 by 5-1/4 inches, then tore across the top to follow the sketch
Trim a piece of DSP to 6 by 2-1/2 inches for the envelope flap
Punch a 1-inch circle of coordinating DSP and run it through a XYRON create-a-sticker for the envelope seal
Since this card was used for a co-worker, a group of us needed to sign the card, so I used two pieces of white cardstock trimmed to 4 by 5-1/4 for the inside of the base
I used scraps of Secret Sea and Petal Pink for the sentiment banner and checkerboard-ish square embellishment
One of the fabulous things about this DSP is that the dies crop images from the DSP – love that feature
Letting the Suite Do the Work:
Once I had all my papers trimmed to size, and the embellishments for the front cropped, putting the card together was a cinch
Unless otherwise noted, I used multipurpose liquid glue to adhere pieces together
After wiping down a scrap of Secret Sea cardstock using my embossing buddy, I stamped the sentiment using VersaMark ink
Next, I covered the stamped sentiment using WOW! Basic White embossing powder and heat set it
Then, I trimmed the sentiment to size
After adhering the pears DSP to the Mossy Meadow patterned DSP, I wrapped a piece of Darling Duckling ribbon around the combined DSP and adhered it in the back using tear & tape
I adhered the large pear and leaves together, then adhered that to the Petal Pink cropped piece
I added dimensionals under the pear and under the sentiment banner and adhered them to the front of the card
The inside sentiment was stamped with Secret Sea ink
Then, I adhered the pair of pears to the bottom of the white cardstock, and adhered both white cardstock pieces to the inside of the card
With that, I’d completed this coordinated card, envelope, and envelope seal set
Two Joining Promotion Options for the Month of October!
Join Our Community
Become a Stampin’ Up! demonstrator when you choose one of these amazing Starter Kit offers. (And did we mention your Starter Kit comes with FREE shipping, FREE business supplies, AND a bonus, FREE Paper Pumpkin kit?) Join from October 1 to 31 and experience all the amazing benefits that come with being a demonstrator.
Honestly, I saw this promotion banner and was stunned in a very good way! This deal is amazing, and what’s more there are no other purchase requirements!
Welcome to InKing Royalty’s September Blog Hop! The leaves are changing, Halloween is around the corner, and we are playing with orange tones that are sure to get you in the mood for Fall. We are excited to share our creations and hope you love them! After you read my post, I hope you’ll hop over to the next person on the list at the base of this post.
When we were kids, we loved the knock, knock joke with the punchline “Orange you glad I didn’t say banana?” The title of this post is a throwback to my childhood, corny as it may be. The orange colors I chose for this card are Pumpkin Pie and Cajun Craze.
I’ve been seeing fractured cards a lot lately, which look much more complicated than they are to create. While it would’ve been possible to figure out the math for all the pieces, I really didn’t want to do that. Then, I came across a faux fractured card and I realized how easy it is to create this card without all kinds of measurements and shaped cuts. By using the black cardstock strips to surround the focal image, the result looks like you cut the DSP (designer series paper) into pieces. I need a card in which a “bunch” of people could write well wishes, and I thought this would bring a bit of sunshine to the recipient’s day.
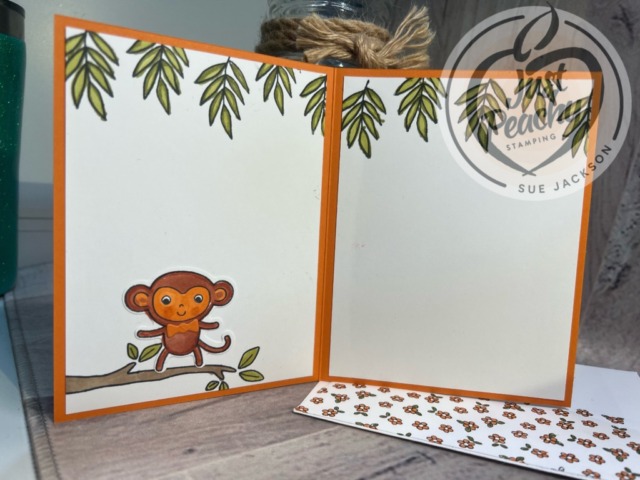
Here’s my Little Monkey faux fractured card:
Little Monkey Card Measurements:
The Pumpkin Pie base measures 5-1/2 by 8-1/2 inches, scored at 4-1/4 inches.
The flower DSP measures 4-1/8 by 5-3/8 inches.
I also trimmed a piece of the DSP to 6 inches by 2 and 1/2 inches for the envelope flap. Then, I punched a 1-inch circle of Pumpkin Pie 6 x 6-inch DSP for the envelope seal. After I ran the circle through my XYRON create-a-sticker, I was set for the seal.
After I ran a piece of Pumpkin Pie cardstock through the Cut & Emboss machine, I cropped it using the largest square die from the Stylish Shapes set.
I used the next smaller square die for the white inside the Pumpkin Pie square.
The black cardstock strips were trimmed to 3/16 x 6 inches.
As an afterthought, I cropped two Pumpkin Pie bowties using the Playing in the Rain die. I added one to each monkey.
Finally, I trimmed two pieces of white cardstock to 4 by 5-1/4 inches for the inside of the card..
Stamping, Coloring, and Cutting:
The flowered DSP actually started out as black-outlined flowers on a white background. I use my Pumpkin Pie Stamping Write Marker to color the petals. Then, I used Old Olive to color the leaves.
The centers of the flowers are colored with the clear Wink of Stella pen.
Then, I repeated the whole process for the envelope flap DSP piece.
Stamp the two monkeys on scraps of white cardstock using Tuxedo Black ink.
Color the monkeys using Pumpkin Pie and Cajun Craze blends combos in keeping with the orange theme.
Punch the inside monkey and fussy cut the monkey for the front. Add dimensionals to the back of the monkey on the front.
Stamp the branches and leaves on the white cardstock square for the front and the white cardstock pieces on the inside.
Color the branches using the dark Crumb Cake blend. Add texture to the branches using the Crumb Cake Stamping Write Marker.
Color the leaves using the Old Olive blends combo.
Adhere the white cardstock pieces to the inside of the card.
Adhere the monkeys to the branches using dimensionals for the front monkey and liquid glue for the inside.
Creating the Faux Fractured Card Front:
Adhere the Pumpkin Pie square to the center of the front of the card so it creates a diamond.
After coloring the stamps on the white square, use multipurpose liquid glue to adhere it to the Pumpkin Pie square.
Add the black strips to the front of the card, making sure to align them directly against the Pumpkin Pie square.
Trim the excess black strips from the ends of the DSP.
Adhere the DSP to the base of the card using multipurpose liquid glue.
With that, I’d finished this faux fractured card, coordinated envelope, and envelope seal.
Back to the InKing Royalty Blog Hop:
Thank you for stopping by today. I hope you’ll hop along to the next stop on the blog hop, Brian King at Stamp with Brian There’s lots of inspiration to be found in this group – and you don’t want to miss it!
InKing Royalty Blog Hop:
Thank you for hopping along with us. If you get stuck during the Blog Hop, please use this line-up as a guide:
You can download the following catalog, or find the link on the Stampin’ UP! website. Not surprisingly, some items have already gone on backorder. Now is the time to order your Halloween and some of your Autumn supplies.
Don’t Forget Online Exclusive DSP!
If you live in the U.S. and don’t already have a Stampin’ UP! demo from whom you order, I would be honored to work with you.
When prompted, please enter September’s HOST CODE:
FZTABBN
Again, thank you for stopping by! I’d love to hear your comments or thoughts. Sue
Welcome to another C4G biweekly challenge! The theme for this challenge is “thinking of you” but I put a little bit of a spin on it. I think that a get well card means I am thinking of you without actually coming out and saying it, so that’s what I did.
Here’s my card:
I’ve always loved this sloth from the Back on Your Feet cling stamp set. This set also includes a giraffe whose neck is tied in a knot and a turtle stuck on his back. Originally I thought I’d use a clean and simple card with the turtle. However, after I finished the sloth card, I decided I liked it better.
Here’s the alternate get well card using the turtle:
Originally, I used my blends to color another turtle, but I really wanted clean and simple. The black and white turtle fits the bill a bit better.
Both of these cards were easy-peasy cards, which makes them even cuter, in my opinion.
Colors and Measurements
Both of these cards start with a Night of Navy base. I trimmed one sheet of navy cardstock into two 5-1/2 by 8-1/2 inches, and scored them at 4-1/4.
The white mats for the fronts of the card measure 4-1/8 inches by 5-3/8 inches. I dry embossed the sloth one with the subtle embossing folder. I used the pinewood planks embossing folder for the turtle card.
The green DSP on the turtle card comes from the Oh So Ombre 6 x 6 inch DSP pack available for a few more days in the Sale-a-Bration catalog. This DSP is FREE with a $50 purchase!
Sometimes things just work out perfectly, and for these cards that’s exactly what happened. I already had colored the sloth for a previous project, but didn’t use it. I’d also embossed Granny Apple Green and Crumb Cake cardstock using the pinewood planks embossing folder. That previous project was also supposed to use the sloth sentiment. Winner! Winner! All this just reinforces the fact that I need to keep all these unused parts for a future project!
The leaves behind the sloth come from the Forever Fern bundle. Thankfully, they match the details on the sloth’s attached leaves.
I thought the Early Espresso faux suede ribbon just finished off the sloth card.
After I thought I’d finished the turtle card, I realized I needed to add something. Therefore, I added three of the black matte dots which draw your eyes to the center of the card with the focal image and sentiment.
I trimmed a piece of Old Olive DSP to 6 inches by 2-1/2 inches for each envelope flap. After adhering and trimming both flaps, I’d finished this pair of card/envelope sets.
Thank you so much for stopping by today.
I’d love to hear what you think, and greatly appreciate every comment.
Do you live in the U.S. and need a demonstrator? If so, I’d love to talk to you!
Do You Want to Place an Order?
Of course you do!
If you are ordering less than $150.00, please use the host code shown. If you are ordering more than $150.00, please contact me first so you can get your stamping rewards! Any order over $50 will earn a little surprise from me.
The HOST CODE for FEBRUARY is 7EUAPNKA.
It’s Sale-a-Bration! Sale-a-Bration ends on February 28, 2021!
Here’s a look at the items I’ve already gotten from the Sale-a-Bration catalog!
Again, thank you for stopping by my blog today! I appreciate your comments and your time.
When I first saw the Honey Bee cling stamp set and dies, which are retiring, and the coordinating Sale-a-Bration DSP (Designer Series Paper), Golden Honey, I knew I must have it! I even earned a second set of the DSP papers knowing I would put everything to very good use!
How did I know this? Because the school’s colors where I teach are Black and Gold, and the mascot is a hornet. Perfection! This is one of the retiring bundles which I will keep long after they have retired.
Hornets for a Sick Student
As if virtual learning isn’t enough of a change, one of my “kids” has been seriously ill during this time. I created this card tolet her know that I am thinking about her and I wish her a speedy recovery.
Here’s my card:
I didn’t want to cover up any of the DSP with a sentiment. However, I wanted to use a beehive, so I decided to combine the two elements. Using a gold Wink of Stella pen to outline the hive created a very subtle barrier between the hive and the white DSP.
I already had the large and small bees in my stash for this set. At first, I thought that I would use a strip of coordinating DSP for the border between the stripes and bees. After I used dimensionals to pop all the elements up, I realized that I had four elements on the card. My sense of balance kept telling me I needed something else.
Enter the Bow Easy
In order to appease my out of balance feeling, I grabbed the black shimmer ribbon and used my Bow-Easy to create a small bow. There are times I can make a pretty decent bow, and there are times I truly can not. This card was a can not make a bow card.
I’ve had the Bow-Easy for a few years, but am finally getting the hang of it. Mary Deatherage with Stamps-n-Lingers, used it on a card for her Saturday night live fb a couple of weeks ago. I’ve been practicing. If you are left-handed, this tool is pretty tricky. I really have to think about what I am doing because the directions and Mary’s demo are both right-handed. When I created this bow, I was very thankful to be alone in my “blue room” aka craft room. Anyone listening would’ve thought that I had someone else in here because I was talking up a storm.
Finishing Up
The base of my card is Basic Black folded to a traditional A2 card size. I added a piece of white cardstock to the inside of the card, shown below:
Since I want to have more than enough room to write a note, I place the sentiment towards the top.
Next, I had to figure out what to do about my name stamp and the SU! copyright statement because I knew ink wasn’t going to show on the black. I came up with a pretty good idea, at least I think so, and you can see it below:
This stamp is just one of the ones I have gotten from Bossy Joscie at Joscie.com. I love the font she uses for my name and a girl just has to have different stamps for different cards.
After I added some black and gold striped DSP to the envelope flap, this coordinating set was complete.
As always, thank you so much for stopping by my blog today. I’d love to hear what you think, and greatly appreciate every comment.
Please stay safe, healthy, and isolated as much as possible. I miss my high school kids and the relationships we’ve formed. My heart breaks for my seniors. But, by working together and following the CDC guidelines, we can all help to flatten the curve.
Of course you are! Even more so because of the products in the mini-catalog and the Sale-a-Bration FREE items! The HOST CODE for APRIL is WW6HSM6A. If you are ordering less than $150.00, please use the host code shown. If you are ordering more than $150.00, please contact me first so you can get your stamping rewards!
Remember, any order over $50 qualifies for a FREE gift from me AND a free catalog for the 2020 – 2021 calendar year! I’ve seen it, and it is fabulous! Ask me how you can see it NOW as well!
Just an FYI ~~
I included the two links to the stores just because I’ve been pleased with the products. I am not recieving any compensation for these referrals.
Again, thank you for stopping by my blog today! I appreciate your time.
About Me
Welcome to Just Peachy Stamping by Sue Jackson: an independent Stampin' Up demonstrator.
Through Stampin' Up!, I happily share my love of papercrafting through sales, classes, small stamping group meet-ups and workshops. I think that being a teacher in my "real life", I have a unique approach to sharing my fantastic hobby. I look forward to connecting with you!