Welcome to the Pals’ Blog Hop! While the COVID 19 pandemic is adding stress to our lives, we Pals hope this blog hop will help to lift your spirits. Let us inspire you to take a creative break and relax for a little while. This month our theme is “Special Occasions” where we have made a project for just about any occasion you can think of! You’ll find the full line-up below to help you “hop” along from Pal to Pal.
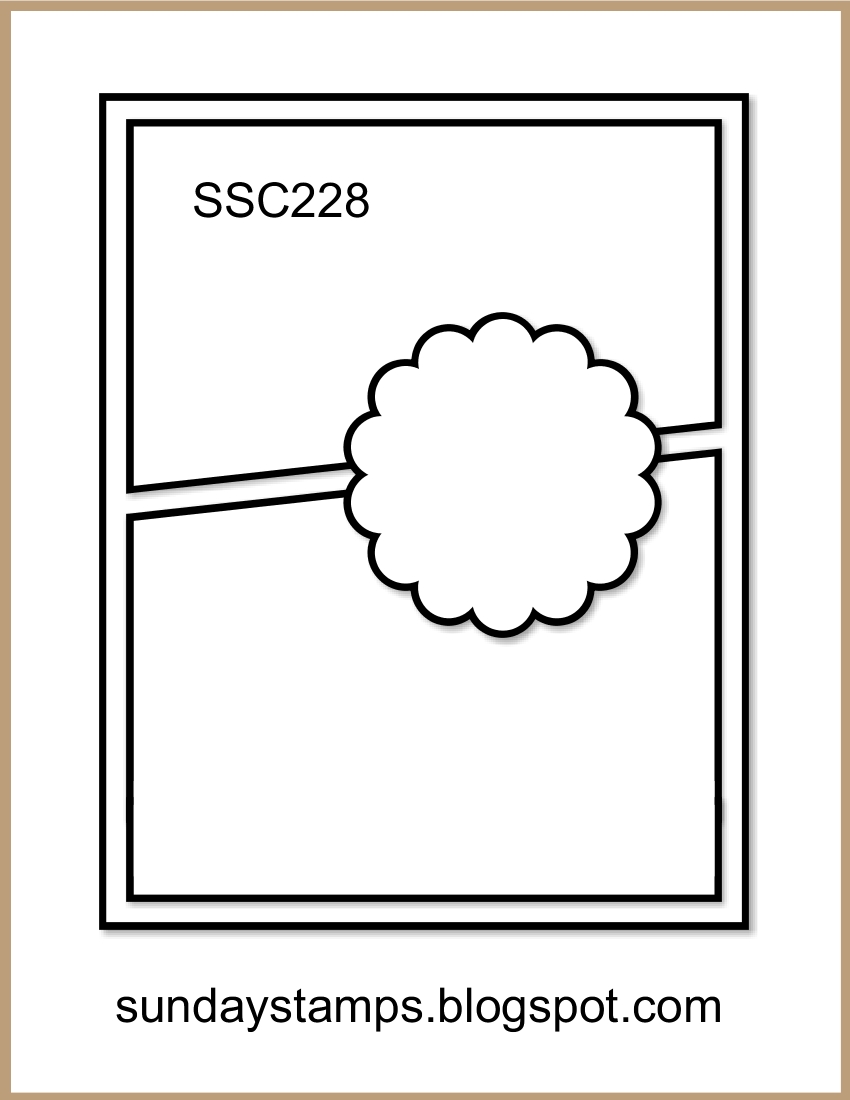
Sunday Stamps Challenge 228
I have to say, I really needed inspiration for the card layout for this hop. I thought I was ready to go a week ago. Then, about a week ago, I realized the graduation card I made wouldn’t work. That card will be blogged at a later date.
Anyway, Sunday Stamps saved me.
Here’s the challenge banner:
Two Cards, One Layout, Two Very Different Insides
Once again, I created two cards for the Pals Blog Hop. The first card is easy and fast.
Here’s that card:
Hopefully, I will remember to figure out how to get the inside and outside showing side-by-side.
Both levels of this card make use of the new Ornate Garden Suite! The DSP is stunning, and it contains a preview of a new In Color, Bumblebee. All the stamps in the corners and the flower stamps are from the new Ornate Style cling stamp set. Gorgeous!!!
Here’s the same layout, but the inside is “over the top” according to my DH.
The outside is the same layout with the DSP pieces reversed.
This is a twist and pop fun fold card.
It’s difficult to film this and try to open it at the same time. So, please excuse the quality of the short video.
It’s Not as Difficult as It Looks, Truly
If we break the card down to chunks, we can see that it truly isn’t as difficult as it looks to create this card.
Chunks:
Front layout – we all do those.
Inside DSP mats – It’s just a matter of cutting the angles.
The “book” for the lack of a better word: stamping and coloring, and we all do that.
The popping mechanism: Ok, that requires some practice, but it truly isn’t difficult.
I learned how to do this card from Mary Deatherage with Stamps-n-Lingers, and you can find the video here. Mary makes the whole process for the mechanism, and the card, look easier than you would think. Please view her video, and you will see what I mean. The video contains all of the measurements, and step-by-step directions for the mechanism. I like watching it while making the mechanism, and I can stop the video as much as I want. If the mechanism is causing you problems, Mary demonstates it again at the end.
Please give this card a try. You will be so happy you did and you will create a stunning card!
Let’s Get Back to the Pals Blog Hop!
More inspiration awaits! Use the Blog Hop Line-up below to visit the rest of this month’s Design Team. My fellow Pals are excited to show you what they’ve created! Mark your calendars for Wednesday, May 13th, when we will say “Goodbye to January Mini and 2019 Annual Catalog and/or Hello to 2020 Annual Catalog.” The Design Team will showcase their favorites from the retiring catalogs or new products from the new catalog. Don’t miss the fun! And, until then, please stay safe.
As always, thank you so much for stopping by my blog today. I’d love to hear what you think, and every comment is greatly appreciated!
Welcome to the Pals’ Blog Hop! We’re so glad you’re here. You may be starting the hop here or coming from a previous Pal’s blog. Either way, you’ve come to the right place. This month we are celebrating the 10th anniversary of the Pals Blog Hop with “Critters” from the Stampin’ Pretty Pals. Many of the design team members are offering “Mystery Blog Candy” of their choice to 1 lucky winner. To play along, just leave a comment on as many blog posts as desired. A random winner will be announced on a subsequent blog post by each participating design team member. You’ll find the full line-up below to help you “hop” along from Pal to Pal.
Adorable Bunny Baby Cards
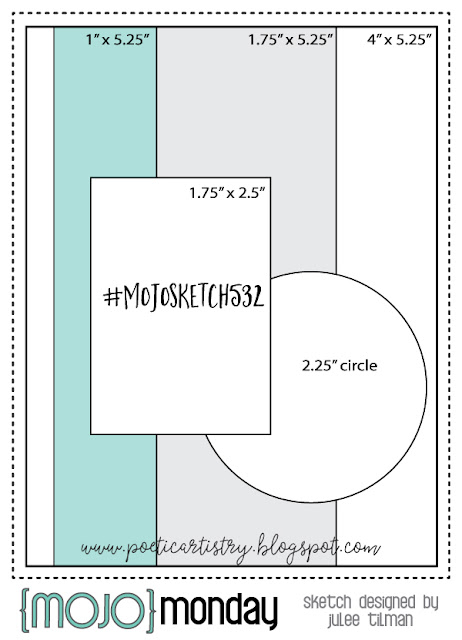
As I have done for both the InKing Royalty and/or the Pals blog hops for the past few months, I once again have two experience levels using the same layout. The first card is for a baby girl, the second more advanced card is for a baby boy, simply because a friend asked for a baby boy card. I used the sketch for Poetry Artistry’s Mojo Monday.
The Sketch and My Cards
First, here’s the challenge banner from Mojo Monday:
Now for my baby girl card:
Next picture is the inside of the baby girl’s card:
Finally, here’s my baby boy card for a casual or advanced stamper:
I’ve been sharing fun folds on these blog hops, and today is no different. The baby boy card is an easel fold, so the following picture is of the card when standing up. I’ve also included a close-up of the easel stop, for which each rectangle is popped up on dimensionals. Yes, this card would require extra postage, but it’s so worth it, don’t you think?
I used Rococo Rose for the girl card and Seaside Spray for the boy card. Both cards also have Smoky Slate as well. Once I had my colors chosen, I got started with my blends for the bunnies. All three bunnies were colored using the dark Petal Pink blends for the ears and pads of the feet. Then, I colored all the bunnies using the Smoky Slate blends combo. Since I wanted contrast between the face and body with the tuft of fur right under the face, I first colored it with the Smoky Slate. Then, I went back with the color lifter blend to make it even lighter.
When I colored the baby boy bunny, I found that I liked the white chest fur. Therefore, I had to go back to the baby girl bunny and use the lifter to get the chest fur as close to white as I could.
Finally, I decided that the Whisper White layer, the Smoky Slate base, and the bunny circles all needed some sort of border. Adding more layers didn’t seem like a good option. Therefore, I outlined all of them using the Basic Black marker. Border accomplished.
It’s all about the DSP and the Sketch
The In Color 2019 – 2021 and the Neutrals 6 x 6 DSP made this card easy to create and the sketch and measurements brought it together quickly. I used the Stitched Shapes dies for the bunny circles, and the Stitched Rectangle dies for the sentiment block and the Smoky Slate mat. I really tried to stay true to the sketch measurements. The slight change I made was to put the focal circle over the sentiment rectangle block. The sentiment for the fronts, insides, and front of the envelope all came from the Wildly Happy stamp set.
While I was running everything through the Big Shot, I saw my Detailed Bee dies on the desk with the cute little hearts die. A lightbulb went off over my head, so I cropped a set of Rococo Rose hearts and the Seaside Spray hearts. The resulting embossed large and small hearts fit perfectly where I wanted to use them. Score!
I did add the Polka Dot Tulle ribbon to each of the cards, even though there wasn’t ribbon on the challenge sketch. This is one of my favorite ribbons and the card seemed to be begging for me to use it. So cute!
Back to the Blog Hop, and Blog Candy
I am participating in the Mystery Blog Candy giveaway. Make sure to leave a comment below in order to be entered in the random drawing determined by a number generator.
More inspiration awaits! Use the Blog Hop Line-up below to visit the rest of this month’s Design Team. My fellow Pals are excited to show you what they’ve created! Mark your calendars for Wednesday, April 8th, for our “Special Occasions” blog hop when our Design Team showcase projects for weddings, graduation, anniversary, baby, Mother’s/Father’s Day or any special occasion. Don’t miss the fun!
Welcome to the Pals’ Blog Hop! We’re so glad you’re here because this month’s theme is “Art from the Heart” and we think you’re going to love it! You may be starting the hop here or coming from a previous Pal’s blog. Either way, you’ve come to the right place. You’ll find the full line-up below to help you “hop” along from Pal to Pal.
Art from the Heart
My nephew and his wife are expecting a baby boy in April. This means my 2 year-old great-niece will have a baby brother, and we are all excited! My sister hosted a family shower for Mom and baby this past weekend. I was more than happy to create a card and matching card book for Baby.
Here are my pieces of Art from the Heart:
The shower card
The outside of the card booklet. I used 3 inch rings so a bunch of cards will fit inside.
The inside of the card book.
As soon as I saw the argyle DSP from the Country Club DSP, found in the mini-catalog, I just knew I had to use it for these projects! I used the blue argyle pattern, which gave me my color palette of Garden Green, Night of Navy, and Whisper White.
A Past Card Book in Pictures:
Stamps, Dies, and Blends, Oh My!
The baby’s bedroom theme is “Jungle Book” so I decided to use the elephant mom and baby from the Wildly Happy cling stamp set. I stamped this image on Whisper White twice to accomodate the card and the card book.
Next, I used my Smoky Slate blends combo to color the two elephants. I created a seperation between the mom and baby using the dark stamping blend. Then I used the light blend to color in and blend out the ink to the whole image.
I thought the Stitched Nested Label dies would be perfect for the layout I wanted to use. On the card, I only used a Whisper White stamped label, and a Garden Green mat label. Since I had more space on the card booklet covers, I used Garden Green and Night of Navy labels.
Since I really wanted a pop of white connecting the elephant image and the sentiment, I grabbed my Whisper White Flax Ribbon. It really does pop off the argyle DSP.
My Art from the Heart
While the card is made from my heart specifically for this occasion, it’s the card book covers that really seals the deal from my heart.
It’s really simple to create, and I have been creating them for wedding and baby showers for years now. My daughter has some as well and she does appreciate them.
This particular book cover is 8.5 inches by 5 inches. Any cardboard (cereal boxes, gift boxes, etc) will do. I just cut it down to the size I wanted and got started. Since I only had one full and one half sheet of DSP left, I very carefully measured and cut the DSP to the size I needed. I used a sponge to evenly distribute multipurpose liquid adhesive to one side of each cover and very, very carefully adhered the DSP so I would be able to wrap the cardboard.
I always use coordinating cardstock for the inside of the cover, and this time was no different. After dry-fitting Night of Navy and then Garden Green, I decided the Night of Navy looked better for this project. I simply cut the cardstock down to 8 inches by 5 inches and very carefully lined up the cardstock so it would form an even border.
My nephew’s wife has asked for card book covers before, so I know this one will be a hit as well. This truly is a gift of Art from My Heart!
More inspiration awaits! Use the Blog Hop Line-up below to visit the rest of this month’s Design Team. My fellow Pals are excited to show you what they’ve created! Mark your calendars for Wednesday, March 11th, for our “Critter Card” blog hop when our Design Team showcase projects with animals, birds, butterflies or insects. Don’t miss the fun!
Welcome to the Pals’ Blog Hop! We’re so glad you’re here because it’s “Time to Sale-A-Brate”! We’re showcasing our favorite new products from 2020 Sale-A-Bration brochure. You may be starting the hop here or coming from a previous Pal’s blog. Either way, you’ve come to the right place. You’ll find the full line-up below to help you move, or “hop” along from Pal to Pal.
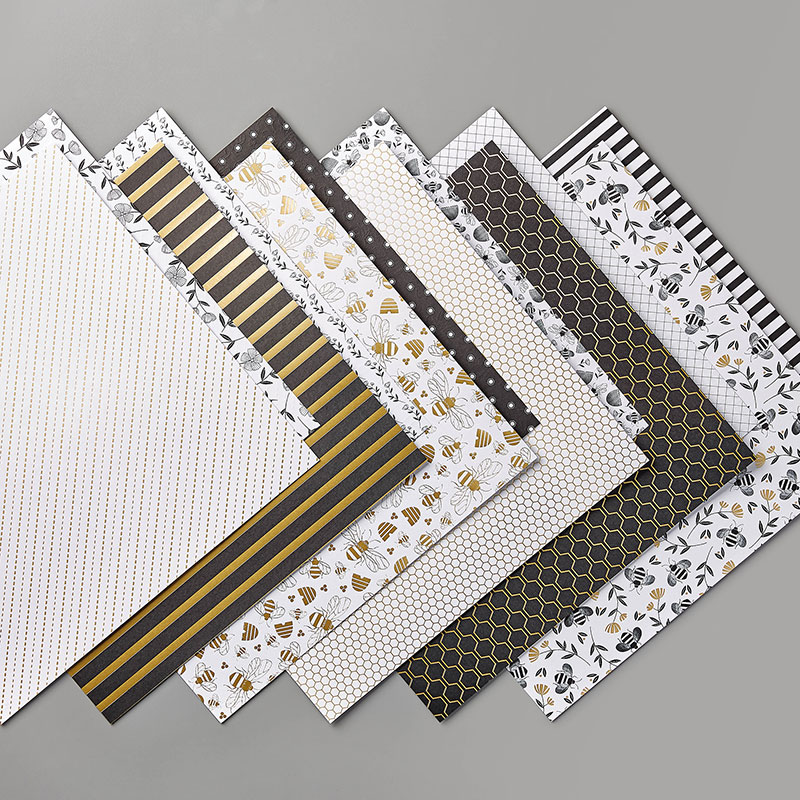
Sale-a-Brate with Golden Honey DSP
If you haven’t seen the Sale-a-Bration catalog, especially the Golden Honey DSP, which coordinates with the Honey Bee Bundle in the January to June mini-catalog. Take a look at this gorgeous paper:
All the gold paper and accents are gorgeous! What’s even better is that the dies from the bundle cut out bees from the gold and Whisper White DSP! Winner, winner!
I created two cards for this blog hop. The first is for a beginning stamper and the second is for a casual or avid stamper. Both cards have the same basic layout, it’s just all the other “stuff” that goes along with creating the cards.
Here’s the first card:
Here’s the second card:
Using the Bundle and DSP
Once I picked the DSP, it seemed like the rest just fell into place using the Paper Players #353 sketch, as seen below:
I used the same DSP for the background matted by gold foil. In addition, I used the flax ribbon and large bees on both cards. Isn’t it great that these dies will work with both the stamp set and the gold and Whisper White DSP? Both cards have the oval shape cropped using layering ovals die set.
Both of the sentiments came front the Honey Bee cling stamp set. For the beginner card, I cropped the sentiment and gold mat using the same layering ovals die set. The “hello” sentiment was cropped using the Stitched Shapes die set. I outlined the oval using gold ink because I thought I had enough going on with the card without an extra mat for the sentiment.
The first card turned out clean and simple, which follows the CTS #353 sketch. Both the card and the sketch are minimalist formats. My upline, Brian King, designed the sketch, and his cards are usually beautifully clean and simple.
While following the same sketch, I added more embellishments for the more involved card using the Honey Bee bundle. The honeycomb gold foil pieces came from the honeycomb die. I stamped the beehive on Whisper White cardstock that I ran through the Big Shot using the subtle 3D embossing folder. Originally, I thought that the texture would be enough for the behive. When I was dry-fitting the card elements, I decided that I needed something more. I pulled out my clear wink of stella pen and drew lines across the beehive horizontally. I cropped both bees out of the Golden Honey DSP using the dies from the bundle.
As always,
Thank you so very much for stopping by my blog today. I appreciate your the time you take to read, and comment, on my blog.
Keep on hopping!
More inspiration awaits! Use the Blog Hop Line-up below to visit the rest of this month’s Design Team. My fellow Pals are excited to show you what they’ve created! Don’t forget to show us some love by commenting on our creations. Mark your calendars for Wednesday, February 12th, for our Art From The Heart blog hop when our Design Team showcase projects made from the heart for any occasion. Don’t miss the fun!
Welcome to Just Peachy Stamping by Sue Jackson: an independent Stampin' Up demonstrator.
Through Stampin' Up!, I happily share my love of papercrafting through sales, classes, small stamping group meet-ups and workshops. I think that being a teacher in my "real life", I have a unique approach to sharing my fantastic hobby. I look forward to connecting with you!