Easter’s on the Way with the March SU! Demos Fun Fold Blog Hop

Welcome back to the monthly Stampin’ UP! Demonstrators Fun Fold Blog Hop. If you love fun folds, you’ve come to a hop filled with really great projects by some very talented fellow demonstrators. When you finish here, I hope you will hop along with the rest of the demos using the links below.

I was inspired by Lisa Bernard’s Easter Basket Bundle card, which you can see here. I’m so glad I saw her card! A friend asked me to make his parents’ Easter card using this bundle, and Lisa’s card really got my. mojo going.

Here’s my card:

It’s just a given that fun fold cards also post to the Creative Creases Challenge. Debbie Mageed at Secret Stamper coordinates the challenge along with this Demos’ Blog Hop, and it’s one of my favorite challenges. Hopefully, you will be inspired to upload your own fun fold project to the challenge! I love this hidden flap fun fold and have already posted a number of them, some of which you can see here, here, and here.
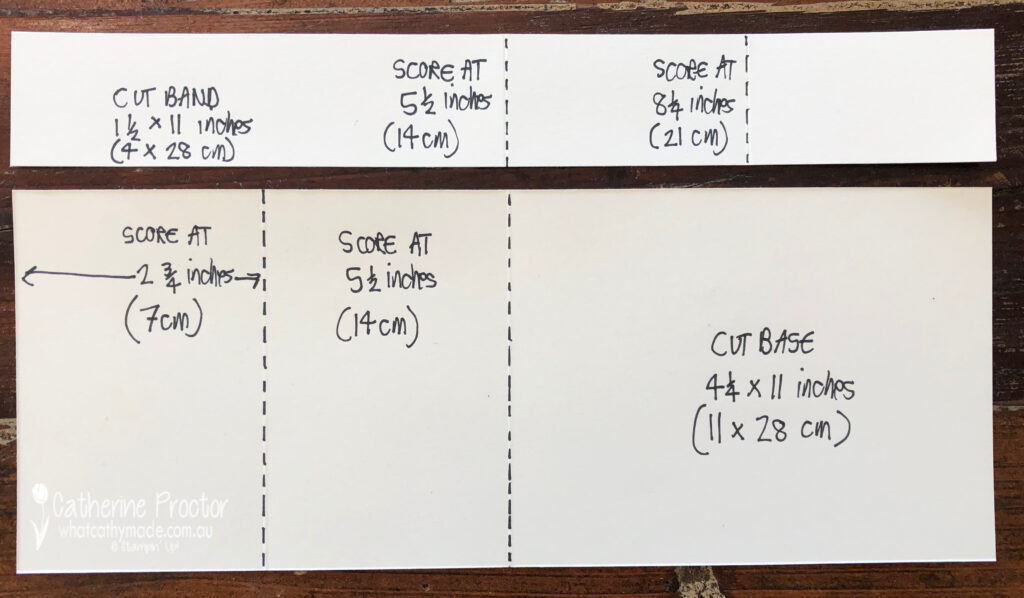
Measurements:

  • The Shy Shamrock base measures 11by 4-1/4 inches, scored at 2-1/4 and 5-1/2 inches
  • I trimmed a second piece of Shy Shamrock to 1-1/2 ” by 11″, scored at 2-3/4 and 5-1/2 inches for the double z-fold mechanism
  • There are two pieces for the inside of the z-fold and each measures 3/4 by 4 inches, scored at 1/2 inch & 3-3/4 inches
  • The white cardstock for the back sentiment measures 4-1/8 by 5-3/8 inches
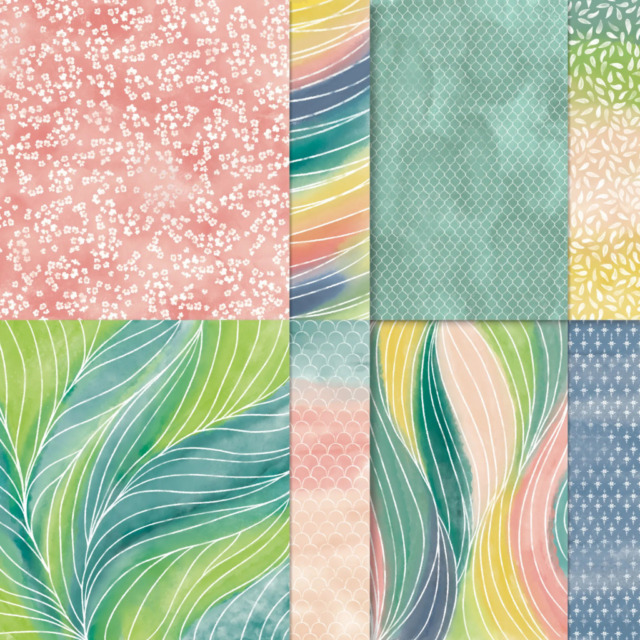
  • I used some different patterns from the Easter Joy 12″ by 12″ DSP
    • The egg and flower piece on the front flap measures 2-3/8 by 4-1/8 inches
    • The striped DSP pieces measure 1-3/8 by 5-3/8 inches, and two pieces each measuring 1-3/8 by 2-5/8 inches
    • The DSP scene with the sky and the clouds needed to be trimmed down to 5-3/8 by 4 inches
  • I cropped the basket from a scrap piece of Crumb Cake cardstock
  • This card won’t fit in a medium envelope, so I didn’t trim DSP for the envelope flap

Pieces Used:

  • All the pieces were stamped using Momento Tuxedo Black ink, then colored with blends
  • There are four rabbits: 2 for the pop-up pieces, 1 for the inside of the base, and one on the back panel
  • I used one chocolate bunny for the front basket
  • There are two chicks, two flower bunches, and three single flowers
  • I used four carrots and six eggs
  • There are 5 cropped grass pieces in Shy Shamrock
  • The basket was cropped from Crumb Cake cardstock
  • Thankfully, the basket “ribbon” is from one of the Easter Basket dies
  • The basket “ribbon” woven in the bottom of the basket and the top bow were cropped from Balmy Blue cardstock
  • The basket was cropped from Crumb Cake cardstock, then I used the dark Crumb Cake blend to outline the handle
  • The fabric for the top of the basket comes from the Easter DSP
  • I used the following blends for coloring: Early Espresso, Crumb Cake, Shy Shamrock, Darling Duckling, Timid Tiger, Balmy Blue, and Pretty in Pink

Putting the Card Together:

  • I went overboard with all the additional pieces and layers for this card because once I got started I just couldn’t stop myself
    • Of course, you can easily scale this down so that you only have a z-fold card using the DSP, the Easter basket, one or two rabbits, and some carrots
  • Unless otherwise noted, I used multipurpose liquid glue to adhere the pieces together
  • Start by adhering the DSP to the front flap and the inside of the base of the card
  • Adhere the pieces of the striped DSP to the z-fold mechanism
  • The double z-fold mechanism gets adhered in the opposite direction from the folded base
    • Adhere the short outside end to the bottom of the inside base of the card
    • Adhere the long outside end to the bottom of the front flap of the card
    • Here’s a template showing the placement of the double z-fold mechanism, which I found at What Cathy Made

  • I would strongly suggest using the reverse craft tweezers found in the Embossing Additions kit to adhere the interior pieces to the inside of the z-fold piece of cardstock
    • I used multipurpose liquid glue because I was concerned that I’d make a mess of the placement if I used tear & tape
  • I used dimensionals to adhere the basket, rabbit, duckling, and carrot on the front flap

Back to the Stampin’ Up! Demos Fun Fold Blog Hop:

We all hope you will follow the links below and hop along with us. There’s so much inspiration to be found here. We’d love to see what inspires you to create a fun fold as well. Don’t forget to upload it to the Creative Creases challenge!

If you get lost along the way, you can always come back here to find the next demo in line.

SU Demo Fun Fold Blog Hop Lineup

  1. Su Mohr
  2. Debbie Mageed
  3. Lisa Ann Bernard
  4. Karen Finkle
  5. Peggy Noe
  6. Rae Burnet
  7. Sue Jackson. <<— YOU ARE HERE!
  8. Tara Carpenter
  9. Mary Deatherage
  10. Michele Deschenes

Thank you for stopping by today!

Have a Peachy Day!

Sue

Colors Used:

Supplies Used:


New March Product of the Month!

PRODUCT DETAIL:

Spring into stamping with the Notes of Spring Stamp Set! Featuring adorable springtime animals like a deer, bunny, and duck, plus some delicate river plants, this stamp set makes it easy to create layered, watercolor-style images. Includes a few all-occasion sentiments to complete your handmade cards for birthdays, thank-yous, and more.

PRODUCT OF THE MONTH:
– Is a new exclusive product released each month!
– Can be unlocked for just $5 with orders over $75 (after discounts and rewards).
– Is only available while supplies last—they can sell out quickly!
– Is limited to one per customer (including language versions).

An Online Exclusive Kit: The Happy Happenings Kit

Retails for $24.00 USD.

This kit is already in my cart waiting for the preorder opportunity for the upcoming catalog. I need a new baby and wedding stamp, and this all-inclusive kit will give me both!

Product detail

Have cards ready for life’s happiest events. With the Happy Happenings Kit, you can quickly craft cards to welcome a new baby, celebrate a wedding, or say thank you. These oval cards feature layered designs and pearlized details. Create them as shown or customize each one for the occasion.

DETAILS
– Makes 9 cards: 3 each of 3 designs
– Folded card size: 4-1/4″ x 5-1/2″ (10.8 x 14 cm)
– Colors: Cloud Cover, Daffodil Delight, Mossy Meadow, Old Olive, Petal Pink, Timid Tiger
– Also available in French

Kit includes one of each item listed below.
– Happy Happenings Photopolymer Stamp Set
– Clear stamp block
– Mossy Meadow Classic Stampin’ Spot
– Step-by-step instructions
– 9 printed envelopes
– Precut paper pieces
– Clear self-adhesive dewdrop embellishments
– Adhesive

KITS COLLECTION
– Includes designed projects that come in a range of project types.
– Is perfect for new crafters, busy crafters, or crafters who want quick and easy projects.

If you live in the U.S. and don’t already have a Stampin’ UP! demo from whom you order, I would be honored to work with you.

You can reach me at  justpeachystamping@gmail.com, and you can find me in the Find A Demonstrator index for Sue Jackson, Florida.

Just click on this link to be directed to my store 24/7.

Again, thank you for stopping by today!

Easter Bundle Z-Fold for the Atlantic Hearts Sketch Challenge # 672

Welcome to the Atlantic Hearts Sketch Challenge #672!

I used the Easter Basket bundle along with the Stampin’ Up! February Product of the Month, Painted Illusions DSP, which is still available for $5.00 with a $75.00 qualifying purchase.

Please check out the challenge’s page for the creations by the other very talented design team members. When you’ve created your own card for our challenge, please don’t forget to upload them to our gallery. We’d love for you to play along.

I wasn’t going to get this Easter Bunny bundle, but I am so incredibly happy I did! You can see two other cards using this bundle here and here.

Here’s my card:

Here’s the Atlantic Hearts Sketch Challenge banner:

I flipped the bottom two pieces so that the floral DSP and white cardstock so I could put the bunny on the right on the top.

I’m also going to be entering this in the Critter Crazy Challenge

Of course, since this is a fun fold, I’m also including it in the Creative Creases Challenge #113, where I am a guest designer for this month’s challenge.

Measurements:

  • The Flirty Flamingo base measures 8-1/2 by 5-1/2 inches, scored at 2-1/8 and 4-1/4 inches to create a z-fold card
  • The Flirty Flamingo mat for the front measures 4-1/8 by 5-3/8 inches
  • I trimmed two pieces of Painted Illusions DSP (designer series paper) for the front of the card measuring 2-7/8 by 1-3/8 inches and 1-7/8 by 2-3/8 inches
  • Trim another piece of DSP to 6 by 2-1/2 inches for the envelope flap
  • Punch a 1-inch circle from coordinating DSP and run it through the XYRON create-a-sticker for the envelope seal
  • The white pieces of cardstock for the front measure 1-7/8 by 2-3/8 inches, 1-3/8 by 3-7/8 inches and 1-1/8 by 1-3/8 inches
  • The white cardstock for the inside measures 3-7/8 by 5 inches
  • I used scraps of cardstock for the Flirty Flamingo bows, the critters, the Granny Apple Green and white cardstock sentiment pieces

What I Did:

  • I used dimensionals to adhere the bows and the sentiment panels
  • For the rest of the card I used multipurpose liquid glue
  • The flowers, bunny, and duck were stamped in Momento Tuxedo Black ink and colored with light and dark blends combos
  • I used the Stone and Vine embossing folder for the three pieces of white cardstock on the front, and used the debossed (reverse) side
    • I did all the coloring for the flowers before embossing since it wouldn’t be possible to do afterwards
  • All the white cardstock and DSP pieces on the front were outlined using the brush end of the dark Flirty Flamingo blend
  • I stamped the sentiment, carrot, and flowers on the inside using Momento Tuxedo Black ink
  • Then, I colored in the flowers and carrot using the blends combos

With that, I’d finished this coordinated card, envelope, and envelope seal set.

Thank you for stopping by today!

Have a Peachy Day!

Sue

.

Colors Used:


Supplies Used:

New March Products!

New March OnLine Exclusives:

If you live in the U.S. and don’t already have a Stampin’ UP! demo from whom you order, I would be honored to work with you.

Just click on this link to be directed to my store 24/7.

Again, thank you for stopping by today!

Birthday Wishes for the Creative Creases Challenge # 113

Once again, I am honored to be a guest designer for the December Creative Creases Challenge #113. As always, the theme for the challenge is Anything Goes with a Fun Fold, and if you’ve been following my blog you already know I love finding new fun folds! Here’s the link to the Creative Creases Challenge # 113! I hope you will play along with the challenge, then upload your creations to the challenge site.

The Lovely Blossoms DSP is absolutely stunning! I’ve already posted another fun fold card using this paper, and you can see that here. I used another floral pattern for the majority of this collar pocket fun fold. Connie and her friends chat at the beginning of the video, which is always fun. The tutorial part starts at 7:25 and for the rest of the video Connie creates two of these cards.

Here’s my collar pocket fun fold card:

I strongly recommend using a DSP with two sides that will match your vision. The back side of the paper I used is Petal Pink. However, someone with whom I work asked for a birthday card for his wife, and her favorite color is green. I needed to add a number of additional steps in order to use the front of this gorgeous DSP.

He wanted me to leave the inside blank so he could write his own personal message.

This card is bulky and will definitely require additional postage if mailed, but it does still fit inside a medium Stampin’ Up! envelope.

I also strongly recommend that you follow Connie’s tutorial for at least the first time you create a card of your own. Trust me on this one.

Connie’s tutorial contains all the measurements needed, as does her blog post for the same card, which you can see here.

Don’t forget that you will need to trim a piece of coordinating DSP to 6 by 2-1/2 inches for the envelope flap. I then punched a 1-inch circle of DSP and ran it through my XYRON create-a-sticker to make an envelope seal.

The next time I make one of these cards, which will probably be this weekend, I’m going to try to figure out how to add a base that will allow the card to stand up on it’s own. I do like the way the smaller card stands up in front of the propped up base though.

Thank you for stopping by today!

Have a Peachy Day!

Sue

Colors Used:

Supplies Used:

New March Products!

New March OnLine Exclusives:

If you live in the U.S. and don’t already have a Stampin’ UP! demo from whom you order, I would be honored to work with you.

Just click on this link to be directed to my store 24/7.

Again, thank you for stopping by today!

A Sneak Peek for the AHSC #670 & the February SU! Demos Fun Fold Blog Hop

Welcome back to the monthly Stampin’ UP! Demonstrators Fun Fold Blog Hop. If you love fun folds, you’ve come to a hop filled with really great projects by some very talented fellow demonstrators. When you finish here, I hope you will hop along with the rest of the demos using the links below.

Here’s the sketch from the Atlantic Hearts Sketch Challenge:

As always with a fun fold card, I will be adding this to the Creative Creases Challenge where the theme is always Anything Goes with a Fun Fold.

The Inspiration:

I used a video tutorial from Susan Campfield to create this card. I did need to make some adjustments to her measurements on the inside so that about 12 people can sign it for a colleague who has been recovering from an injury. Sue gives all the measurements for this card, and other versions of it, in the video.

The major changes I made are on the inside of the card. I trimmed two pieces of white cardstock to 4-1/4 by 5-3/8 for the inside. I stamped the inside sentiment, from the Lovely Arrangements stamp set, using Secret Sea ink. Then, I used a Stylish Shapes banner die to crop the sentiment and two pieces of the Delightful Wishes DSP.

The SNEAK PEEK for this card will be available on the March Online Exclusives. The colors and DSP (designer series paper) patterns are stunning! The colors in this suite of products are Gray Granite, Secret Sea, Mossy Meadow, Crumb Cake, Bronze, and Hydrangea Hue. (HINT!)

Take a look at this gorgeous suite of products:

Back to the SU! Demos Fun Fold Blog Hop:

We all hope you will follow the links below and hop along with us. There’s so much inspiration to be found here. We’d love to see what inspires you to create a fun fold as well. Don’t forget to upload it to the Creative Creases challenge!

If you get lost along the way, you can always come back here to find the next demo in line.

SU Demo Fun Fold Blog Hop Lineup

  1. Debbie Mageed
  2. Su Mohr
  3. Rae Burnet
  4. Beth McCullough
  5. Karen Finkle
  6. Lisa Ann Bernard
  7. Peggy Noe
  8. Michele Deschenes
  9. Mary Deatherage
  10. Sue Jackson. <<<—YOU ARE HERE!
  11. Tara Carpenter

Thank you for stopping by today!

Have a Peachy Day!

Sue

Colors Used:

Supplies Used:

Time to Redeem Your Bonus Day Coupons!

It’s time to redeem the coupons you earned in January! Make sure you place your order before time runs out!

It’s Time for a Joining Bonus!

Crafting is even more fun with community, and there’s never been a better time to join Stampin’ Up! as a demonstrator. There’s no commitment beyond the initial joining quarter and you get to enjoy all the perks that come with that, like a 20–25% product discount, early access to the latest products and catalogs, the opportunity to earn a modest supplemental income, the chance to attend incredible training and crafting events, and so much more. And for a limited time, new demonstrators will receive our new Stampin’ Positioner tool FREE along with their Starter Kit!

It’s Time for the February Product of the Month!

Painted Illusions 12″ x 12″ (30.5 x 30.5 cm) Designer Series Paper

Beautiful watercolors and whimsical patterns make up this one-of-a-kind paper. Make a wide variety of projects with this paper that is sure to dazzle!

If you live in the U.S. and don’t already have a Stampin’ UP! demo from whom you order, I would be honored to work with you.

Just click on this link to be directed to my store 24/7.

Again, thank you for stopping by today!

Hello Spring Z-fold Card for the Make My Monday # 272

Welcome to the newest Make My Monday bi-weekly challenge #272. I’m hosting this challenge and chose For a Guy of Any Age for the theme. I used the Easter Basket bundle from the current mini-catalog. It will be back in stock the week of March 2, 2026, so get ready to order it next week.

When you finish here, please visit the challenge site to see what the rest of the very talented design team members created. Then, don’t forget to upload your creations to both galleries. We look forward to seeing your creations there!

Here’s my card:

This card is for my great-nephew for Easter. I used the February Product of the Month DSP (designer series paper) for this card. I plan to use it for both the cards for both of my great-nieces as well.

As always with a fun fold card, I will be adding this to the Creative Creases Challenge where the theme is always Anything Goes with a Fun Fold.

Measurements and Such:

  • The Pretty Peacock base measures 5-1/2 by 8-1/2 inches, scored at 2-1/8 and 4-1/4 inches
  • The DSP for the front measures 4-1/8 by 5-3/8 inches
  • Since I didn’t want the back of the DSP showing, I trimmed a piece of Pretty Peacock cardstock to the same size and adhered them together
  • I cropped two arches from white cardstock and one from Pretty Peacock cardstock
  • I cropped the basket from Crumb Cake cardstock and used a blending brush to add Crumb Cake ink
  • Then, I used a Crumb Cake marker to outline the basket and added subtle lines to the basket handle
  • The grass was cropped from Lost Lagoon cardstock and adhered to the bottom of the basket
    • Both the grass and the scalloped layer on the basket have a mild arch to allow them to fit the shape of the basket perfectly
  • Add the grass and scalloped layer using multipurpose liquid glue
  • I stamped the duckling, rabbit, and carrot on scraps of white cardstock, then colored them with blends
  • Finally, I cropped the eggs from the same DSP as the background panel on the front
  • After adhering the DSP to the front panel, I adhered the layered arches
  • I added dimensionals to the back of the basket, rabbit, and eggs to adhered them to the white arch
  • I stamped the inside sentiment using Pretty Peacock ink and adhered the colored carrot and duckling and the Lost Lagoon grass

Thank you for stopping by today!

Have a Peachy Day!

Sue

Colors Used:

Supplies Used:

Time to Redeem Your Bonus Day Coupons!

It’s time to redeem the coupons you earned in January! Make sure you place your order before time runs out!

It’s Time for a Joining Bonus!

Crafting is even more fun with community, and there’s never been a better time to join Stampin’ Up! as a demonstrator. There’s no commitment beyond the initial joining quarter and you get to enjoy all the perks that come with that, like a 20–25% product discount, early access to the latest products and catalogs, the opportunity to earn a modest supplemental income, the chance to attend incredible training and crafting events, and so much more. And for a limited time, new demonstrators will receive our new Stampin’ Positioner tool FREE along with their Starter Kit!

It’s Time for the February Product of the Month!

Painted Illusions 12″ x 12″ (30.5 x 30.5 cm) Designer Series Paper

Beautiful watercolors and whimsical patterns make up this one-of-a-kind paper. Make a wide variety of projects with this paper that is sure to dazzle!

If you live in the U.S. and don’t already have a Stampin’ UP! demo from whom you order, I would be honored to work with you.

Just click on this link to be directed to my store 24/7.

Again, thank you for stopping by today!

Monochromatic Color Combination for Cardz 4 Guyz #383

Welcome to the February Cardz 4 Guyz challenge for 2026! Our host for this month’s challenge, Melanie, chose Monochromatic Color Combination for the theme. When you finish here, please visit the challenge site to see what the rest of the talented design team members created. Then, don’t forget to upload your creations to our gallery. We look forward to seeing your creations there!

Here’s my fun fold card:

It’s just a given that fun fold cards also post to the Creative Creases Challenge. Debbie Mageed at Secret Stamper coordinates the challenge, and it’s one of my favorite challenges. Hopefully, you will be inspired to upload your own fun fold project to the challenge! I love this hidden flap fun fold and have already posted a number of them, some of which you can see here, here, here, and here.

Measurements:

They say that a picture is worth 1,000 words. I have three pictures of the template I use to create this simple but stunning fun fold card:

  • I used Basic Beige for the base and the flap pieces
  • Trim a piece of 6 x 6 inch Beautiful Gallery DSP (designer series paper) to 5-1/4 inches from top to bottom
  • Then trim the DSP in half so you have two pieces of 5-1/4 by 3 inches
  • The Early Espresso cardstock mats each measure 5-3/8 by 3-1/8 inches
  • There’s a piece of Basic Beige cardstock in the center of the inside and it measures 3 by 5-3/8 inches
  • After running a piece of Early Espresso through the Cut & Emboss machine using the Bark embossing folder, I trimmed it to 1-1/2 by 5-3/8 inches
  • I trimmed a piece of the Beautiful Gallery DSP to 6 by 2-1/2 inches for the envelope flap
  • Then, i punched a 1-inch circle out of coordinating DSP and ran it through the XYRON create-a-sticker to create the envelope seal

Clean & Simple:

  • These sentiments from Nature’s Symphony fit this card perfectly
  • After wiping down the DSP with my embossing buddy, I stamped the sentiment using VersaMark ink
  • Then, I covered the ink with bronze WOW! embossing powder and heat set it with the heat tool
  • I stamped the inside sentiment using Early Espresso ink
  • I have learned that I need to do all my stamping before adhering pieces together
  • I used multipurpose liquid glue to adhere all the layers together
  • Staying with the CAS look for the card, I didn’t add any additional embellishments

With that, I’d finished this coordinated card, envelope, and envelope seal set.

Thank you for stopping by today!

Have a Peachy Day!

Sue

Colors Used:

Supplies Used:

Time to Redeem Your Bonus Day Coupons!

It’s time to redeem the coupons you earned in January! Make sure you place your order before time runs out!

It’s Time for a Joining Bonus!

Crafting is even more fun with community, and there’s never been a better time to join Stampin’ Up! as a demonstrator. There’s no commitment beyond the initial joining quarter and you get to enjoy all the perks that come with that, like a 20–25% product discount, early access to the latest products and catalogs, the opportunity to earn a modest supplemental income, the chance to attend incredible training and crafting events, and so much more. And for a limited time, new demonstrators will receive our new Stampin’ Positioner tool FREE along with their Starter Kit!

It’s Time for the February Product of the Month!

Painted Illusions 12″ x 12″ (30.5 x 30.5 cm) Designer Series Paper

Beautiful watercolors and whimsical patterns make up this one-of-a-kind paper. Make a wide variety of projects with this paper that is sure to dazzle!

If you live in the U.S. and don’t already have a Stampin’ UP! demo from whom you order, I would be honored to work with you.

Just click on this link to be directed to my store 24/7.

Again, thank you for stopping by today!