Welcome back to the monthly Stampin’ UP! Demonstrators Fun Fold Blog Hop. If you love fun folds, you’ve come to a hop filled with really great projects by some very talented fellow demonstrators. When you finish here, I hope you will hop along with the rest of the demos using the links below.
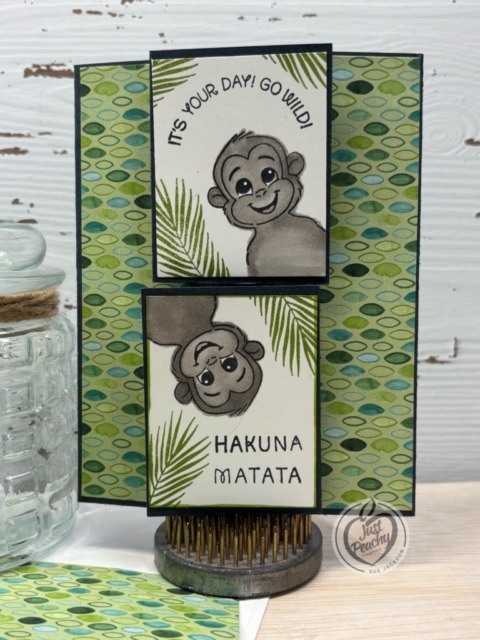
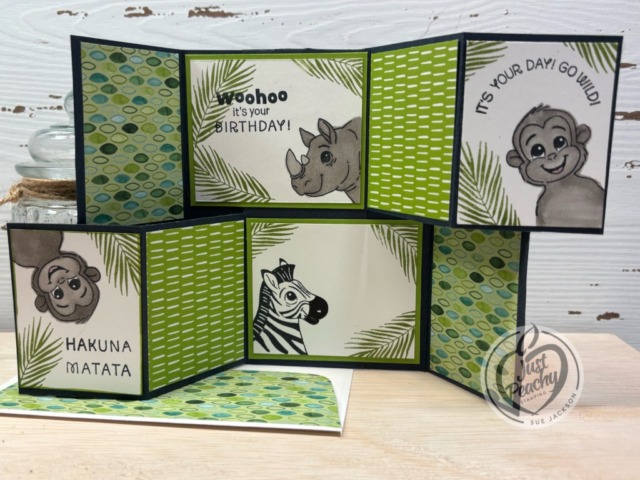
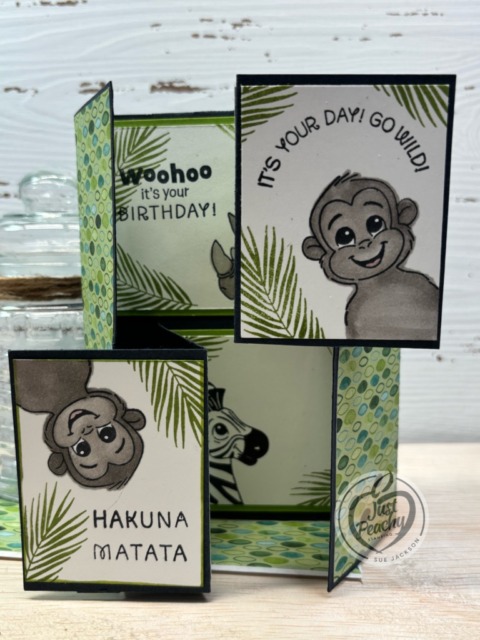
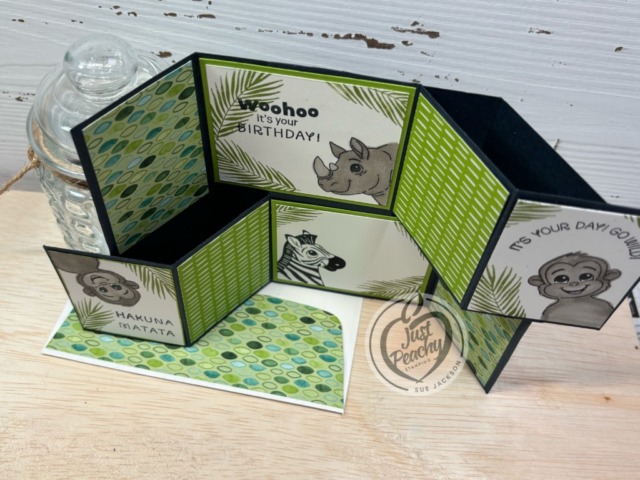
Here’s my Silly Safari birthday card:
I found this card on Pinterest and just thought it was so stinking cute that I needed to CASe (Copy And Share everything) it.
Annemarie Wetzel posted the card and included a link to her YouTube channel, which you can find here. I’ve included her measurements below, but I didn’t make a template. I do want to make this card again, but will definitely have to go back and follow along with the video while making more of these cards.
It’s just a given that fun fold cards also post to the Creative Creases Challenge. Debbie Mageed at Secret Stamper coordinates the challenge along with this Demos’ Blog Hop, and it’s one of my favorite challenges. Hopefully, you will be inspired to upload your own fun fold project to the challenge!
Since this card contains these sweet safari animals, I will be adding it to the Crazy Critters Challenge.
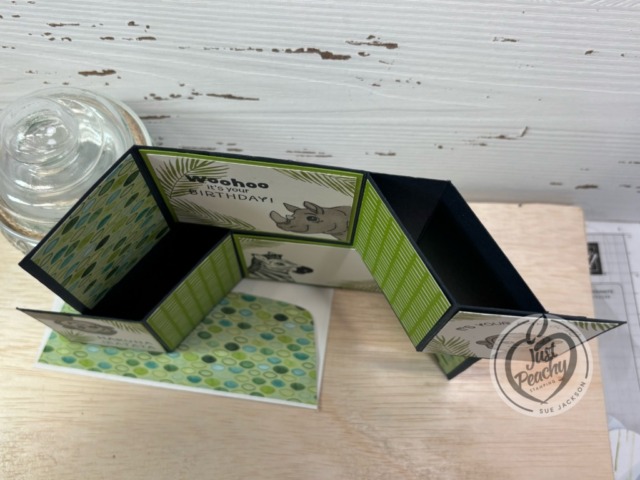
The first piece of cardstock for the base measures 5-1/2 by 9-1/2 inches, scored at 1/2, 2-5/8, 6-7/8 and 9 inches
The second piece of cardstock for the base measures 10-1/2 by 5-1/2 inches, scored at 2-1/8, 4-1/4, 6-3/8, and 8-1/2 inches
`You will need to follow along with the video to finish the scoring and snipping for these pieces
You will need two of each of the following pieces of DSP (designer series paper): 1-7/8 by 5-1/4 inches, 1-7/8 by 3-1/4 inches, and 1-7/8 by 2-1/2 inches
For the front of the card, you will be need two pieces of cardstock the same color as the base measuring 3 by 2-1/2 inches
The will need two of each of the following pieces of white cardstock: 2-3/4 by 2-1/2 and 1-7/8 by 2-1/2 inches
If you want to add white cardstock to the back of the card for your handwritten note, you will need a piece measuring 4 by 5-1/4 inches
As always, you will need a piece of DSP measuring 6 by 2-1/2 inches for the envelope flap
Punch a 1-inch circle of coordinating DSP and run it through your XYRON create-a-sticker for the envelope seal
For assembly, please go back and watch the video. Once you get the base pieces together, you can add the DSP to the different parts
Coloring the Silly Safari animals was so much fun! I used the blends combos for Basic Gray, a touch of Flirty Flamingo for the monkey tongues, and the light Basic Black blend. The sentiments were stamped in Momento Tuxedo Black ink, and the I stamped the leaves in Old Olive.
Back to the Stampin’ Up! Demos Fun Fold Blog Hop:
We all hope you will follow the links below and hop along with us. There’s so much inspiration to be found here. We’d love to see what inspires you to create a fun fold as well. Don’t forget to upload it to the Creative Creases challenge!
If you get lost along the way, you can always come back here to find the next demo in line.
If you love exclusive products, you’re going to love Product of the Month, a promotion centered around a special product release every month. The Product of the Month items are specially designed to be some of the best items Stampin’ Up! has to offer that aren’t available in any of our catalogs or our Online Exclusives. Every month we’ll release a new item that is only available for purchase once per account. These items will be limited quantity and are likely to sell out quickly—once they’re sold out, they’re gone for good!
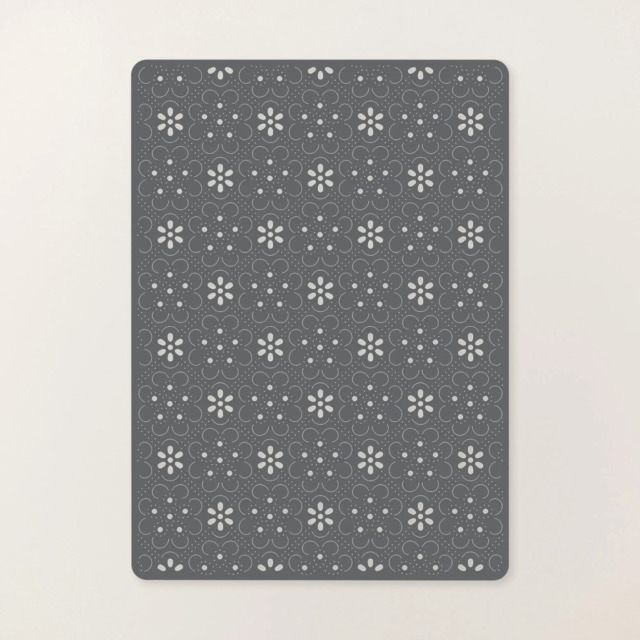
Eyelet Blooms Die for April!
The Eyelet Blooms Die is the finishing touch you didn’t know you needed. Whether you’re crafting a card or creating a scrapbook page, it transforms the space with soft texture and refined detail. Its intricate pattern creates a full background that fills large areas beautifully for a polished, handcrafted look in one easy cut.
The Painted Skies Kit:
Retails for $18.00 USD
Product detail
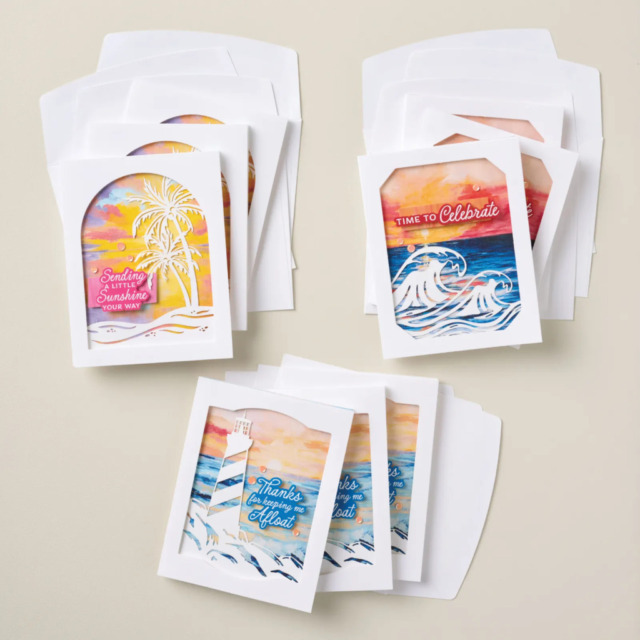
If beautiful sunsets are your thing, the Painted Skies Kit is calling your name. Create vibrant, hand-painted–style skies with scenes featuring lighthouses, palm trees, and rolling ocean waves as your artistic focal points. Friendly greetings, gratitude themes, and celebratory sentiments add just the right finishing touch.
DETAILS – Makes 9 cards: 3 each of 3 designs – Folded card size: 4-1/4″ x 5-1/2″ (10.8 x 14 cm) – Colors: Balmy Blue, Blueberry Bushel, Crushed Curry, Flirty Flamingo, Gorgeous Grape, Highland Heather, Hydrangea Hue, Melon Mambo, Night of Navy, Petal Pink, Poppy Parade, Pumpkin Pie, Real Red, Strawberry Slush, white – Sentiments printed in Dutch, English, French, and German
Kit includes the items listed below. – Step-by-step instructions – 9 printed envelopes – Precut paper pieces, printed labels – Sequins – Adhesive
KITS COLLECTION – Includes designed projects that come in a range of project types. – Is perfect for new crafters, busy crafters, or crafters who want quick and easy projects
If you live in the U.S. and don’t already have a Stampin’ UP! demo from whom you order, I would be honored to work with you.
This month’s Stampin’ Pretty Pals Blog Hop is all about the Male Room theme—because the men in our lives deserve handmade cards too! Whether you’re creating for a dad, husband, son, grandson, brother, or friend, this hop is packed with ideas to help you craft something special. Today, the Pals are sharing male-themed card designs using Stampin’ Up! products, from bright and playful styles to classic looks and quick-and-easy layouts. If you’re looking for fresh inspiration (or just a good reason to dive into your craft room), you’re in the perfect place.
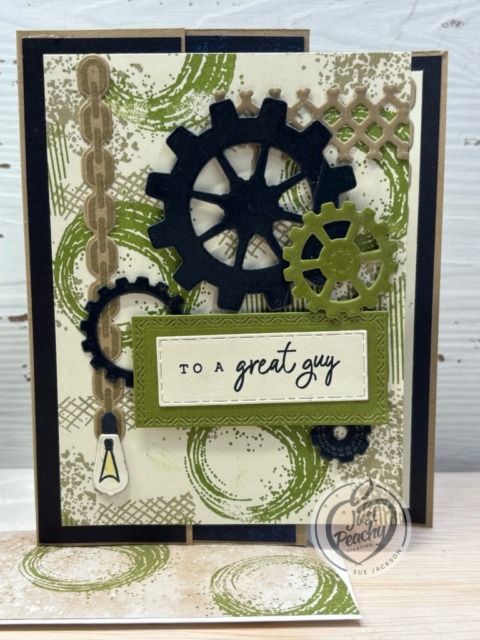
Here’s my card:
I’ve already posted two other 4-panel accordion fold cards. You can see those posts here, here and here. I am looking forward to making many more cards using fun fold since it’s quickly become one of my absolute favorite fun folds.
As always with a fun fold card, I will be adding this to the Creative Creases Challenge where the theme is always Anything Goes with a Fun Fold. I know I’ve already posted cards using this fold to Creative Creases, but it’s such an easy fold and it makes very good use of the 12 x 12 inch DSP (designer series paper).
I’ve been introduced to a new-to-me card challenge, the Never-Before-Used-Schtuff challenge. Since this is the first time I am using the Textures & Gears bundle, this card qualifies!
Measurements:
When trimming and scoring the DSP I wanted to use, I completely forgot that I needed to score on the opposite side of the DSP I wanted to use. Therefore, I used a piece of Crumb Cake cardstock and followed the template. Then, I trimmed the DSP to the appropriate measurements.
Here’s the template:
Trim the Secret Sea DSP to the following measurements:
5-3/8 by 1-5/8 inches
2 pieces at 5-3/8 by 2-7/8 inches
5-3/8 by 4-1/8 inches
Trim two pieces of Very Vanilla cardstock to 4 by 5-1/4 inches, one for the front and one for the inside
I used the Textures & Gears stamp set and Crumb Cake and Granny Apple Green ink to create my own DSP
Trim a piece of Crumb Cake 6 x 6 inch DSP to 6 by 2-1/2 inches for the envelope flap
I stamped the Granny Apple Green circles on the Crumb Cake DSP
I love the way that turned out so I will be doing more of that for envelope flaps
Punch a 1-inch circle from the Secret Sea DSP and run it through your XYRON create-a-sticker for the envelope seal
I wanted shiny gears and lattice on the front of the card, so I added packing tape to pieces of cardstock before cropping the shapes
HINT: You will need to run the dies/cardstock through the Cut & Emboss machine two or three times
BIG HINT: Don’t try to crop out the gears through more than one layer of packing tape – trust me on this
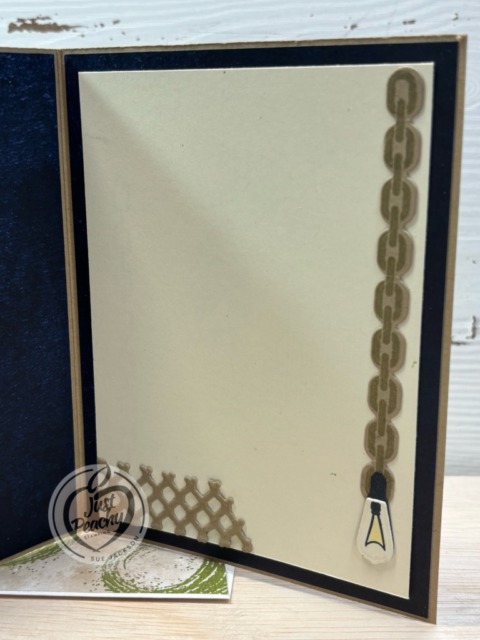
I cropped the chains for the inside and outside from Crumb Cake cardstock after stamping with the same ink
Stamp the Edison light on a scrap of Very Vanilla cardstock and crop using the die
Crop the background for the light from a scrap of Secret Sea cardstock
What I Did:
Unless otherwise noted, I used multipurpose liquid glue to adhere pieces together
Adhere the Secret Sea DSP to the Crumb Cake cardstock
Adhere the first flap of cardstock to the second flap (optional)
Stamp one piece of the Very Vanilla cardstock using Granny Apple Green and Crumb Cake ink
Crop the gears from the packing tape/cardstock layers
Adhere the lattice, chains & Edison lights, and smaller Secret Sea circles to the Very Vanilla cardstock
Add dimensionals to the large Secret Sea and the Granny Apple Green gears and adhere to the front
Stamp the sentiment, from the Nature’s Symphony in Secret Sea ink on Very Vanilla cardstock, and crop
Crop a piece of Granny Apple Green cardstock and adhere it to the sentiment banner
Add dimensionals to the Granny Apple Green layer and adhere to the front of the card
Adhere the completed Very Vanilla front to the base of the card
Adhere the inside Very Vanilla cardstock so that it matches up with the cardstock layer on the front
I didn’t stamp a sentiment on the inside yet since the outside sentiment can be used for many ocassions
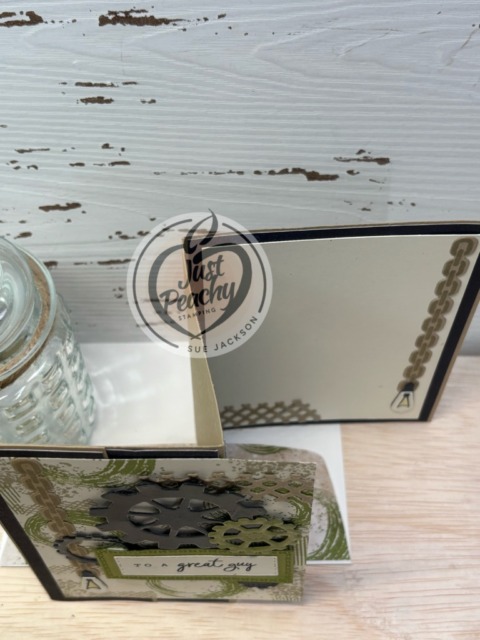
With that, I’d finished this coordinated card, envelope, and envelope seal set.
Back to the Pals’ Blog Hop:
Thanks so much for stopping by today! Keep the inspiration going! I hope my project inspired you to create something special for the guys in your life. Be sure to continue along the hop for even more Male Room inspiration from the Stampin’ Pretty Pals. Next month will be Flowers in Bloom, so mark your calendars!
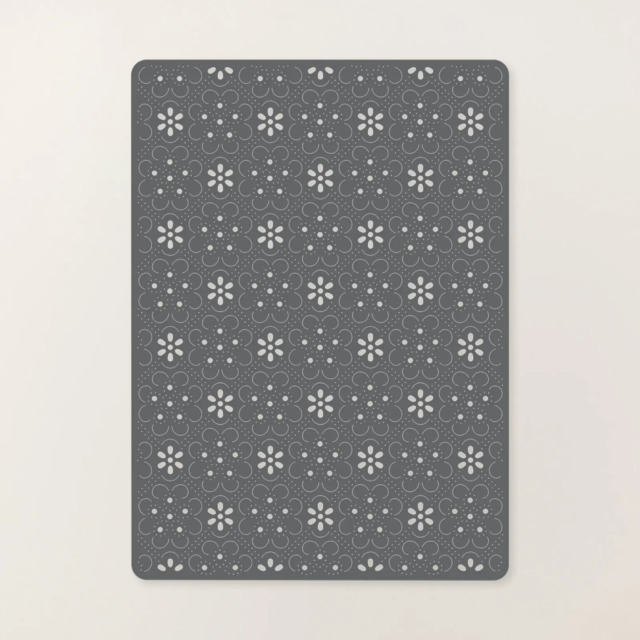
Give your card fronts and crafts a dainty touch with the Eyelet Blooms Die. Create delicate backgrounds with a hand-stitched look or layer pieces for a classic finish that works for any occasion. It’s eyelet magic for every card.
The Eyelet Blooms Die is the exclusive Product of the Month for April 2026! Only available until stock runs out—don’t wait to get yours!
DETAILS – April 2026 Product of the Month – 1 die – Largest die: 4-3/8″ x 6″ (11.1 x 15.2 cm) – Use with a Stampin’ Cut & Emboss Machine (sold separately)
PRODUCT OF THE MONTH – Is a new exclusive product released each month! – Can be unlocked for just $5 with orders over $75 (after discounts and rewards). – Is only available while supplies last—they can sell out quickly! – Is limited to one per customer (including language versions).
Last Chance Products include retiring products from both catalogs and online releases, excluding Paper Pumpkin.
Last Chance Products in this category are available while supplies last and will be discontinued when they sell out. Items will be automatically removed from the category and the online store when they are discontinued.
Discounts vary and are subject to change. Also, depending on inventory, these products may or may not have discounts.
Once again, I am honored to be a guest designer for the April Creative Creases Challenge #114. As always, the theme for the challenge is Anything Goes with a Fun Fold, and if you’ve been following my blog you already know I love finding new fun folds! Here’s the link to the Creative Creases Challenge # 114! I hope you will play along with the challenge, then upload your creations to the challenge site.
The Lovely Blossoms DSP is absolutely stunning! I’ve already posted another fun fold card using this paper, and you can see those here and here. I just realized that I used the same DSP (designer series paper) pattern for parts of both #113 and #114 challenges.
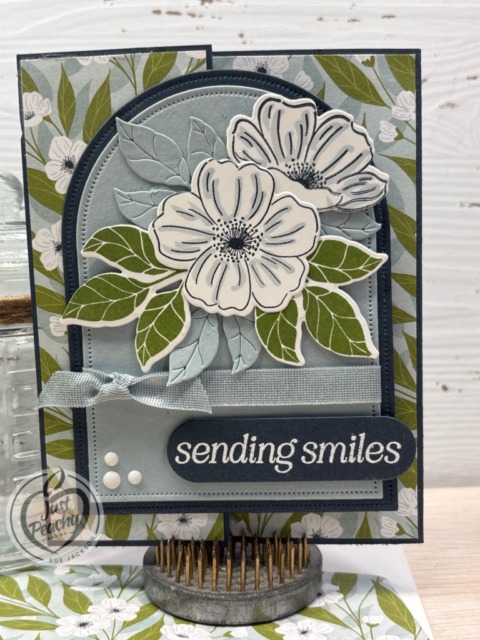
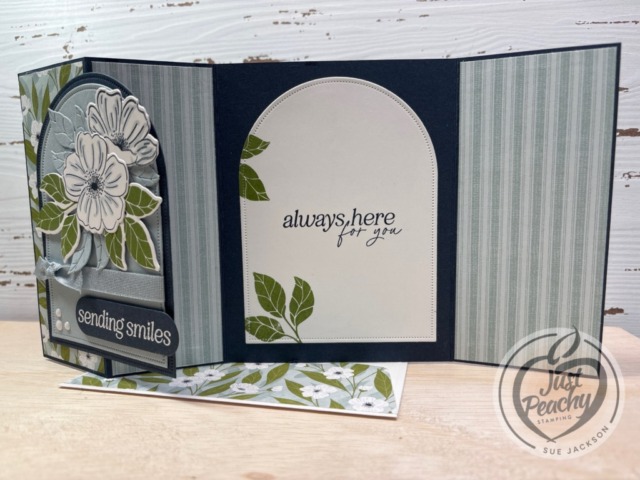
Here’s my card:
I found a card on Pinterest created by Bette Manning, and had to figure out measurements to recreate it. My desk is an absolute disaster with different DSP pattern pieces, some unused arches, and two different colors of cardstock all trimmed and scored. I guess that means I just have to make another one of these cards.
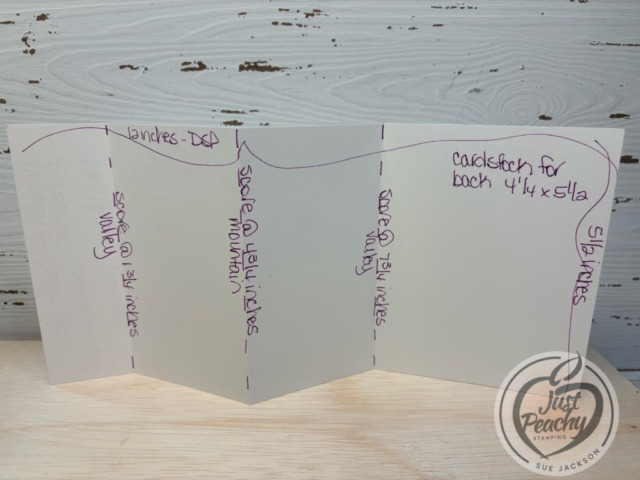
Measurements:
The Secret Sea base measures 5-1/2 by 11 inches, scored at 2-1/8, 4-1/4 and 8-1/2 inches
When burnishing the scored lines, it will help the card to lay flatter if you burnish all the score lines as both a valley and a mountain
The two pieces of floral DSP measure 2 by 5-3/8 and 2-3/8 by 5-3/8 inches
I used the striped Cloud Cover DSP pattern for the inside flaps, and they also measure 2 by 5-3/8 inches and 2-3/8 by 5-3/8 inches
I cropped a white and a Secret Sea arch using the second largest Everyday Arches die
Using the third largest Everyday Arches die, I cropped one from Cloud Cover
I cropped the sentiment banner and the Cloud Cover leaves from scraps of cardstock
I trimmed a piece of DSP to 6 by 2-1/2 inches for the envelope flap
Then, I punched a 1-inch circle from coordinating DSP and ran it through the XYRON create-a-sticker for the envelope seal
What I Did:
Unless otherwise noted, I used multipurpose liquid glue to adhere pieces together
I started by adhering the floral and striped DSP pieces to the flaps of the Secret Sea cardstock
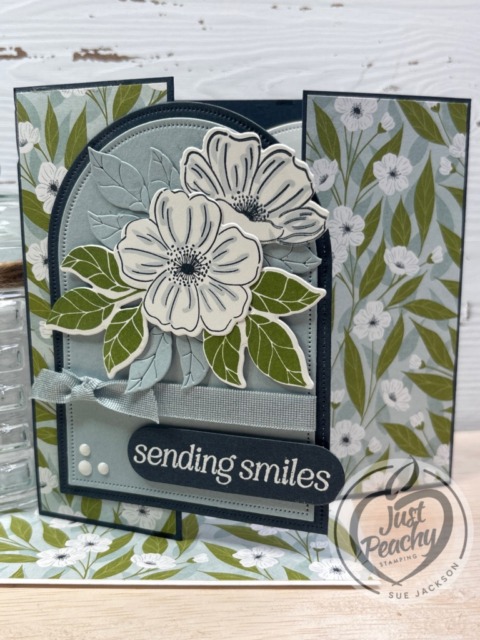
I wrapped a piece of Cloud Cover ribbon around the front of the Cloud Cover arch and tied it in a square knot
I added a glue dot to secure the knot to the cardstock arch
Next, I stamped the flowers using Secret Sea ink and outlined the inside lines using the light Cloud Cover blend
I stamped the leaves in Old Olive ink
After using an embossing buddy on a scrap of Secret Sea cardstock, I stamped the sentiment using VersaMark ink
Then, I covered the ink with white embossing powder and then heat set it with my heat tool
Then I cropped the flowers, Old Olive leaves, the Cloud Cover leaves, and the sentiment using dies from the Lovely Arrangements die set
I adhered the Cloud Cover arch to the Secret Sea arch
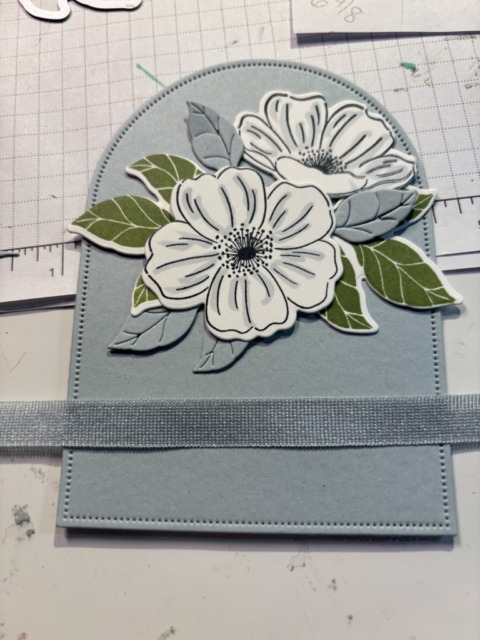
After dry-fitting the cropped pieces on the front of the Cloud Cover arch, I took a picture of the arrangement so I could recreate the arrangement
Here’s the picture:
The picture allowed me to figure out where to add the mini-dimensionals to the back of each of the pieces of the arrangement
I used dimensionals for the flowers and Old Olive leaves and multipurpose liquid glue to adhere the Cloud Cover leaves
I added
After stamping the inside sentiment in Secret Sea, and the leaves in Old Olive, I adhered the white cardstock arch to the inside of the base
I added dimensionals to the front sentiment and adhered it to the Cloud Cover arch
Next, I added three white glossy dots to the corner of the arch
Finally, I adhered the left side of the Secret Sea arch to the front flap
With that, I’d finished this coordinated card, envelope, and envelope seal.
Even though March is over, the April product of the month hasn’t dropped yet, and will do so on Tuesday, April 7th. However, the March Product of the Month is still available for purchase if you haven’t gotten it already!
Here’s the March product of the month:
Here’s a sneak peak of an upcoming project I made as a design team member using both the February and March products of the month:
Both the fussy cut duck and the grass behind it come from the March stamp set. The DSP squares come from the February product of the month, both of which are available.
An Online Exclusive Kit: The Happy Happenings Kit
Retails for $24.00 USD.
This kit is already in my cart waiting for the preorder opportunity for the upcoming catalog. I need a new baby and wedding stamp, and this all-inclusive kit will give me both!
Product detail
Have cards ready for life’s happiest events. With the Happy Happenings Kit, you can quickly craft cards to welcome a new baby, celebrate a wedding, or say thank you. These oval cards feature layered designs and pearlized details. Create them as shown or customize each one for the occasion.
DETAILS – Makes 9 cards: 3 each of 3 designs – Folded card size: 4-1/4″ x 5-1/2″ (10.8 x 14 cm) – Colors: Cloud Cover, Daffodil Delight, Mossy Meadow, Old Olive, Petal Pink, Timid Tiger – Also available in French
Kit includes one of each item listed below. – Happy Happenings Photopolymer Stamp Set – Clear stamp block – Mossy Meadow Classic Stampin’ Spot – Step-by-step instructions – 9 printed envelopes – Precut paper pieces – Clear self-adhesive dewdrop embellishments – Adhesive
KITS COLLECTION – Includes designed projects that come in a range of project types. – Is perfect for new crafters, busy crafters, or crafters who want quick and easy projects.
If you live in the U.S. and don’t already have a Stampin’ UP! demo from whom you order, I would be honored to work with you.
Welcome back to the monthly Stampin’ UP! Demonstrators Fun Fold Blog Hop. If you love fun folds, you’ve come to a hop filled with really great projects by some very talented fellow demonstrators. When you finish here, I hope you will hop along with the rest of the demos using the links below.
I was inspired by Lisa Bernard’s Easter Basket Bundle card, which you can see here. I’m so glad I saw her card! A friend asked me to make his parents’ Easter card using this bundle, and Lisa’s card really got my. mojo going.
Here’s my card:
It’s just a given that fun fold cards also post to the Creative Creases Challenge. Debbie Mageed at Secret Stamper coordinates the challenge along with this Demos’ Blog Hop, and it’s one of my favorite challenges. Hopefully, you will be inspired to upload your own fun fold project to the challenge! I love this hidden flap fun fold and have already posted a number of them, some of which you can see here, here, and here.
Measurements:
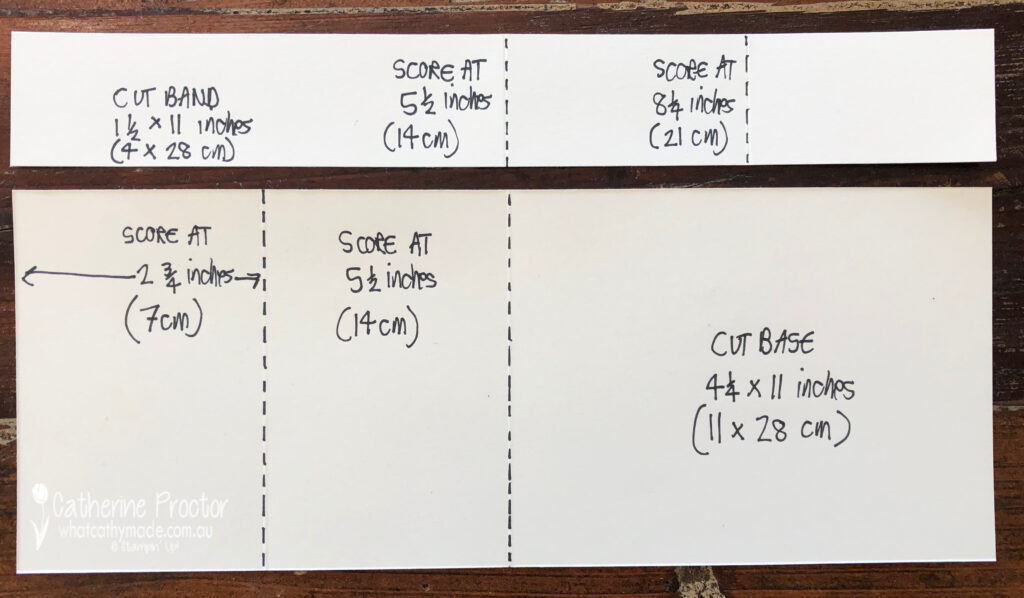
The Shy Shamrock base measures 11by 4-1/4 inches, scored at 2-1/4 and 5-1/2 inches
I trimmed a second piece of Shy Shamrock to 1-1/2 ” by 11″, scored at 2-3/4 and 5-1/2 inches for the double z-fold mechanism
There are two pieces for the inside of the z-fold and each measures 3/4 by 4 inches, scored at 1/2 inch & 3-3/4 inches
The white cardstock for the back sentiment measures 4-1/8 by 5-3/8 inches
I used some different patterns from the Easter Joy 12″ by 12″ DSP
The egg and flower piece on the front flap measures 2-3/8 by 4-1/8 inches
The striped DSP pieces measure 1-3/8 by 5-3/8 inches, and two pieces each measuring 1-3/8 by 2-5/8 inches
The DSP scene with the sky and the clouds needed to be trimmed down to 5-3/8 by 4 inches
I cropped the basket from a scrap piece of Crumb Cake cardstock
This card won’t fit in a medium envelope, so I didn’t trim DSP for the envelope flap
Pieces Used:
All the pieces were stamped using Momento Tuxedo Black ink, then colored with blends
There are four rabbits: 2 for the pop-up pieces, 1 for the inside of the base, and one on the back panel
I used one chocolate bunny for the front basket
There are two chicks, two flower bunches, and three single flowers
I used four carrots and six eggs
There are 5 cropped grass pieces in Shy Shamrock
The basket was cropped from Crumb Cake cardstock
Thankfully, the basket “ribbon” is from one of the Easter Basket dies
The basket “ribbon” woven in the bottom of the basket and the top bow were cropped from Balmy Blue cardstock
The basket was cropped from Crumb Cake cardstock, then I used the dark Crumb Cake blend to outline the handle
The fabric for the top of the basket comes from the Easter DSP
I used the following blends for coloring: Early Espresso, Crumb Cake, Shy Shamrock, Darling Duckling, Timid Tiger, Balmy Blue, and Pretty in Pink
Putting the Card Together:
I went overboard with all the additional pieces and layers for this card because once I got started I just couldn’t stop myself
Of course, you can easily scale this down so that you only have a z-fold card using the DSP, the Easter basket, one or two rabbits, and some carrots
Unless otherwise noted, I used multipurpose liquid glue to adhere the pieces together
Start by adhering the DSP to the front flap and the inside of the base of the card
Adhere the pieces of the striped DSP to the z-fold mechanism
The double z-fold mechanism gets adhered in the opposite direction from the folded base
Adhere the short outside end to the bottom of the inside base of the card
Adhere the long outside end to the bottom of the front flap of the card
Here’s a template showing the placement of the double z-fold mechanism, which I found at What Cathy Made
I would strongly suggest using the reverse craft tweezers found in the Embossing Additions kit to adhere the interior pieces to the inside of the z-fold piece of cardstock
I used multipurpose liquid glue because I was concerned that I’d make a mess of the placement if I used tear & tape
I used dimensionals to adhere the basket, rabbit, duckling, and carrot on the front flap
Back to the Stampin’ Up! Demos Fun Fold Blog Hop:
We all hope you will follow the links below and hop along with us. There’s so much inspiration to be found here. We’d love to see what inspires you to create a fun fold as well. Don’t forget to upload it to the Creative Creases challenge!
If you get lost along the way, you can always come back here to find the next demo in line.
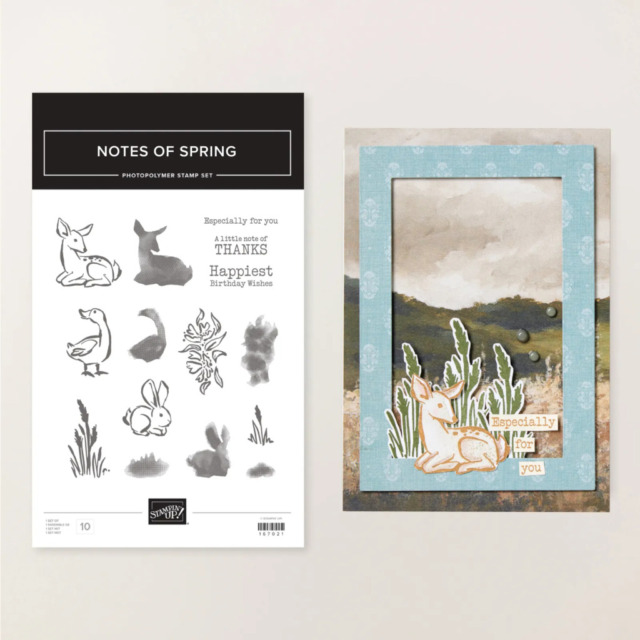
Spring into stamping with the Notes of Spring Stamp Set! Featuring adorable springtime animals like a deer, bunny, and duck, plus some delicate river plants, this stamp set makes it easy to create layered, watercolor-style images. Includes a few all-occasion sentiments to complete your handmade cards for birthdays, thank-yous, and more.
PRODUCT OF THE MONTH: – Is a new exclusive product released each month! – Can be unlocked for just $5 with orders over $75 (after discounts and rewards). – Is only available while supplies last—they can sell out quickly! – Is limited to one per customer (including language versions).
An Online Exclusive Kit: The Happy Happenings Kit
Retails for $24.00 USD.
This kit is already in my cart waiting for the preorder opportunity for the upcoming catalog. I need a new baby and wedding stamp, and this all-inclusive kit will give me both!
Product detail
Have cards ready for life’s happiest events. With the Happy Happenings Kit, you can quickly craft cards to welcome a new baby, celebrate a wedding, or say thank you. These oval cards feature layered designs and pearlized details. Create them as shown or customize each one for the occasion.
DETAILS – Makes 9 cards: 3 each of 3 designs – Folded card size: 4-1/4″ x 5-1/2″ (10.8 x 14 cm) – Colors: Cloud Cover, Daffodil Delight, Mossy Meadow, Old Olive, Petal Pink, Timid Tiger – Also available in French
Kit includes one of each item listed below. – Happy Happenings Photopolymer Stamp Set – Clear stamp block – Mossy Meadow Classic Stampin’ Spot – Step-by-step instructions – 9 printed envelopes – Precut paper pieces – Clear self-adhesive dewdrop embellishments – Adhesive
KITS COLLECTION – Includes designed projects that come in a range of project types. – Is perfect for new crafters, busy crafters, or crafters who want quick and easy projects.
If you live in the U.S. and don’t already have a Stampin’ UP! demo from whom you order, I would be honored to work with you.
I used the Easter Basket bundle along with the Stampin’ Up! February Product of the Month, Painted Illusions DSP, which is still available for $5.00 with a $75.00 qualifying purchase.
Please check out the challenge’s page for the creations by the other very talented design team members. When you’ve created your own card for our challenge, please don’t forget to upload them to our gallery. We’d love for you to play along.
I wasn’t going to get this Easter Bunny bundle, but I am so incredibly happy I did! You can see two other cards using this bundle here and here.
Here’s my card:
Here’s the Atlantic Hearts Sketch Challenge banner:
I flipped the bottom two pieces so that the floral DSP and white cardstock so I could put the bunny on the right on the top.
Of course, since this is a fun fold, I’m also including it in the Creative Creases Challenge #113, where I am a guest designer for this month’s challenge.
Measurements:
The Flirty Flamingo base measures 8-1/2 by 5-1/2 inches, scored at 2-1/8 and 4-1/4 inches to create a z-fold card
The Flirty Flamingo mat for the front measures 4-1/8 by 5-3/8 inches
I trimmed two pieces of Painted Illusions DSP (designer series paper) for the front of the card measuring 2-7/8 by 1-3/8 inches and 1-7/8 by 2-3/8 inches
Trim another piece of DSP to 6 by 2-1/2 inches for the envelope flap
Punch a 1-inch circle from coordinating DSP and run it through the XYRON create-a-sticker for the envelope seal
The white pieces of cardstock for the front measure 1-7/8 by 2-3/8 inches, 1-3/8 by 3-7/8 inches and 1-1/8 by 1-3/8 inches
The white cardstock for the inside measures 3-7/8 by 5 inches
I used scraps of cardstock for the Flirty Flamingo bows, the critters, the Granny Apple Green and white cardstock sentiment pieces
What I Did:
I used dimensionals to adhere the bows and the sentiment panels
For the rest of the card I used multipurpose liquid glue
The flowers, bunny, and duck were stamped in Momento Tuxedo Black ink and colored with light and dark blends combos
I used the Stone and Vine embossing folder for the three pieces of white cardstock on the front, and used the debossed (reverse) side
I did all the coloring for the flowers before embossing since it wouldn’t be possible to do afterwards
All the white cardstock and DSP pieces on the front were outlined using the brush end of the dark Flirty Flamingo blend
I stamped the sentiment, carrot, and flowers on the inside using Momento Tuxedo Black ink
Then, I colored in the flowers and carrot using the blends combos
With that, I’d finished this coordinated card, envelope, and envelope seal set.
Once again, I am honored to be a guest designer for the December Creative Creases Challenge #113. As always, the theme for the challenge is Anything Goes with a Fun Fold, and if you’ve been following my blog you already know I love finding new fun folds! Here’s the link to the Creative Creases Challenge # 113! I hope you will play along with the challenge, then upload your creations to the challenge site.
The Lovely Blossoms DSP is absolutely stunning! I’ve already posted another fun fold card using this paper, and you can see that here. I used another floral pattern for the majority of this collar pocket fun fold. Connie and her friends chat at the beginning of the video, which is always fun. The tutorial part starts at 7:25 and for the rest of the video Connie creates two of these cards.
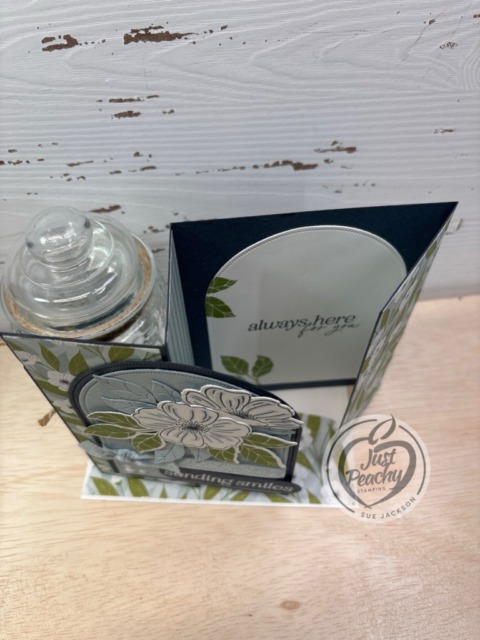
Here’s my collar pocket fun fold card:
I strongly recommend using a DSP with two sides that will match your vision. The back side of the paper I used is Petal Pink. However, someone with whom I work asked for a birthday card for his wife, and her favorite color is green. I needed to add a number of additional steps in order to use the front of this gorgeous DSP.
He wanted me to leave the inside blank so he could write his own personal message.
This card is bulky and will definitely require additional postage if mailed, but it does still fit inside a medium Stampin’ Up! envelope.
I also strongly recommend that you follow Connie’s tutorial for at least the first time you create a card of your own. Trust me on this one.
Connie’s tutorial contains all the measurements needed, as does her blog post for the same card, which you can see here.
Don’t forget that you will need to trim a piece of coordinating DSP to 6 by 2-1/2 inches for the envelope flap. I then punched a 1-inch circle of DSP and ran it through my XYRON create-a-sticker to make an envelope seal.
The next time I make one of these cards, which will probably be this weekend, I’m going to try to figure out how to add a base that will allow the card to stand up on it’s own. I do like the way the smaller card stands up in front of the propped up base though.
Welcome to Just Peachy Stamping by Sue Jackson: an independent Stampin' Up demonstrator.
Through Stampin' Up!, I happily share my love of papercrafting through sales, classes, small stamping group meet-ups and workshops. I think that being a teacher in my "real life", I have a unique approach to sharing my fantastic hobby. I look forward to connecting with you!