Using Seashells for Cardz 4 Guyz # 374

Welcome to the Cardz 4 Guyz #374 challenge! Deb H., our host for this challenge, chose Seashells for the theme. When you finish here, please visit the challenge site to see what the rest of the talented design team members created. Then, don’t forget to upload your creations to our gallery. We look forward to seeing your creations there!
I’m still working on getting my creative mojo back after knee replacement surgery, so I used the very recently retired A Beach Day for my all-occasion card. I haven’t stamped a sentiment on the inside yet, but will do so when I decide to whom I will send the card.
Here’s my Seashells card, which uses the new 2025 – 2027 In Colors along with some neutral colors:
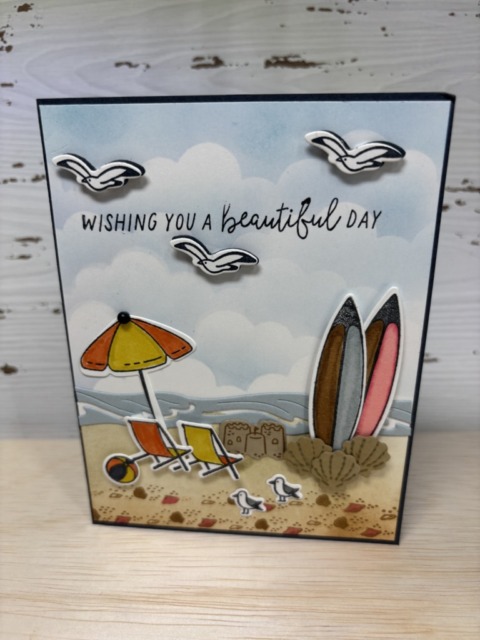
I was very limited on the seashell stamp set or papers that I have, but I think I made it work. After stamping the shell and sand stamp along the bottom of the card, I colored the shells. Adding the three scalloped seashells in front of the surfboards helped as well.
We start our family beach week on Saturday on the Atlantic coast of Florida. We’ve been doing this, in the same condo complex, for so long we have four generations going. The coast has so many sandpipers and seagulls that I had to add them to the front of this card. There are also two generations of surfboarders, so I needed to include them as well.
Measurements:
- The Secret Sea base measures 8-1/2 by 5-1/2 inches, scored at 4-1/4 inches
- I trimmed a piece of white cardstock to 4-1/8 by 5-3/8 inches for the front and another piece to 4 by 5-1/4 for the inside
- I was able to use scraps for all the Beach Day pieces
- HINT: I readily admit that I probably keep too many scraps. My cardstock colors are in individual file folders and each file folder has an 8 x 8 inch page protector for scraps. I have cardstock scraps of all colors and grab them before cutting a new piece of cardstock.
- That’s it for measurements
What I Did:
- I used a clouds stencil, a blending brush, and Balmy Blue ink to create the cloud section of the card
- Next, I used Crumb Cake ink and a blending brush to create the sand on the bottom of the card
- Then, I stamped the sand/shells stamp from the Beach Day stamp set and Crumb Cake ink for the bottom of the white cardstock
- Then I colored the shells in using the light Crumb Cake and light Strawberry Slush blends
- The waves die cut comes from the Sunrise Sailing die set, which I cropped out of Cloud Cover cardstock and adhered using multipurpose liquid glue
- With the exception of the sandcastle and shells, I stamped everything else on white cardstock and then colored them before cropping using the Beach Day dies
- I wanted to have the seagulls stand out from the clouds, so I cropped a Secret Sea layer for each
- With the exception of the sandcastles, I adhered all the pieces using dimensionals
- Then I adhere the white cardstock to the front of the base of the card using multipurpose liquid glue
- If you enjoy coloring as much as I do, this kind of card is for you
Thanks for stopping by today!
Have a Peachy Day!
Sue
Colors Used:
Currently Available Supplies Used:
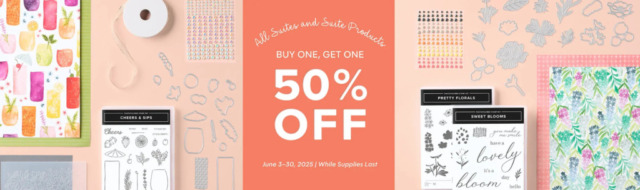
Buy One, Get One 50% Off
Our suite collections are known (and loved!) for their coordination, quality, and style. With stamps, tools, patterned paper, and embellishments in stunning colors and unique designs, suites make creativity simple and fun. Shop the individual products or buy as a full collection!
I already have my next order ready to go, and I’m definitely taking advantage of the sale!
Promotion Details
Sales Period: June 3–30, 2025
Ordering Deadlines
- Phone: June 30, 2025, at 6:59 p.m. (MT)
- Online: June 30, 2025, at 11:59 p.m. (MT)
- All available suites and suite products from the 2025–2026 Annual Catalog and Online Exclusives are buy one, get one 50% off.
- When you shop the sale, the 50% off discount will apply to the lower-priced item (for example, if you buy a suite collection and a stamp set from a suite, the suite would be full price, and the stamp set would be 50% off).
- Suite collections are available if all items are in stock; if all items are not in stock, you can still shop the available suite products.
- You don’t have to buy a suite and suite products all from the same suite collection for the discount to apply. You can buy any suite products from any suite.
- The discount will appear in your cart once you’ve added two items within the sale parameters to your cart.
- Products are available only while supplies last.
If you live in the U.S. and don’t already have a Stampin’ UP! demo from whom you order, I would be honored to work with you.
Just click on this link to be directed to my store 24/7.
Again, thank you for stopping by!
Shades of Blue for the Cardz 4 Guyz # 373
Welcome to the Cardz 4 Guyz #273 challenge! Melanie, our host for this challenge, chose Shades of Blue for the theme. When you finish here, please visit the challenge site to see what the rest of the talented design team members created. Then, don’t forget to upload your creations to our gallery. We look forward to seeing your creations there!
I’m still working on getting my creative mojo back after knee replacement surgery, so I used the very recently retired Take to the Sky DSP for my all-occasion card. I haven’t stamped a sentiment on the inside yet, but will do so when I decide to whom I will send the card.
Here’s my card:

I used Night of Navy for the base of the card and the focal image mat.
The colors of both DSP (designer series paper) patterns include Night of Navy, Boho Blue, and Copper Clay. This DSP (product # 163436) is still available, but is on the low inventory list. Here’s a close-up on this fabulous DSP, which lends itself beautifully to masculine cards.

While the Copper Clay ribbon is no longer available, the 2023 – 2025 In Color jute trim (product # 161637) is on the last chance list. Here’s a close-up for the trim:

Either the Copper Clay or the Boho Blue jute trim would work with this card.
This is the first of two posts for this morning, so this one is short but sweet.
Thank you for stopping by today!
Have a Peachy Day!
Sue
Fun & Games with Cardz 4 Guyz # 369
Welcome to the Cardz 4 Guyz #369 challenge! Caz, our fearless challenge leader and host this challenge, chose Fun & Games for the theme. When you finish here, please visit the challenge site to see what the rest of the talented design team members created. Then, don’t forget to upload your creations to our gallery. We look forward to seeing your creations there!
My husband loves to fish and has a standing fishing day with a friend. Fishing is his fun, so I created this card with that in mind.
Here’s my card:


Over Spring Break a couple of weeks ago, I found this fun fold from Terri Gaines with Create with Terri Gaines . Since then, I’ve made a number of this cards because I am completely hooked (obsessed?). You can find the first card I posted using this layout here.
Here’s the template I made for the card showing the measurements and the scoring lines:


I used Terri’s directions for assembly as she created her own card on the video.
Since this is the first of two posts today, I’ll leave this one here.
Thank you for stopping by today!
Have a Peachy Day!
Sue
If you like the idea of quick and easy cards but don’t know where to start, try our KITS COLLECTION!
Here are three examples of the all-inclusive kits available now!
First, this PAINTED WISHES KIT retails for $14.00 (USD) and contains enough supplies to create NINE cards!
The second kit I’m showcasing is the ALPINE AIR KIT which retails for $22.00 (USD) and it also contains enough supplies for NINE cards! I’ve already posted some cards I’ve made using this kit, which you can see here.
Finally, this BY YOUR SIDE KIT retails for $22.00 (USD) and contains enough supplies for EIGHT cards. I love this kit and have posted cards using it which you can see here, here and here.
If you live in the U.S. and don’t already have a Stampin’ UP! demo from whom you order, I would be honored to work with you.
When ordering, please enter the following HOST CODE when prompted:
4226UWUE
Thanks again for stopping by!
Again, thank you for stopping by!
S is for …Seagulls, Sunday Stamps #356, and Cardz 4 Guyz # 348
Welcome to the Cardz 4 Guyz #368 challenge! Pamela, our host this challenge, chose S is for ….. for the theme. When you finish here, please visit the challenge site to see what the rest of the talented design team members created. Then, don’t forget to upload your creations to our gallery. We look forward to seeing your creations there!
I combined this C4G challenge with the SSC356 challenge for my card.
Here’s what I created:


Here’s the Sunday Stamps Challenge Sketch:

I used Boho Blue & Pebbled Path cardstock and blends combos for this card as my main colors, with a pop of Pumpkin Pie color for the beaks and feet. These adorable Friendly Seagulls are from the Sale-a-Bration promotion which ended at the end of February. As with everyone, life happened, and this is the first time I was able to play with this set.
My daughter is coming home from San Francisco for her school’s Spring Break in two weeks. To say I am thrilled to see her in an understatement!
What I Did:
- The Pebbled Path base measures 8-1/2 by 5-1/2 inches, scored at 4-1/4 inches to create a tent fold card
- I knew I wanted a piece of ribbon around the front of the card, I needed to trim another piece of Pebbled Path cardstock to 5-3/8 by 4-1/8 inches
- you can’t see it because it is covered by Boho Blue cardstock, but it does allow the ribbon ends to be hidden
- I dry-embossed a piece of Boho Blue cardstock using the So Swirly embossing folder,
- I trimmed it down to two pieces: 5-3/8 by 3-7/8 inches and 5-3/8 by 1-1/4 inches
- The gap I created between the two pieces of cardstock allowed me to adhere the ribbon flat between the pieces and helped me follow the sketch
- I trimmed it down to two pieces: 5-3/8 by 3-7/8 inches and 5-3/8 by 1-1/4 inches
- I colored a length of the white diagonal ribbon using the dark Pebbled Path blend
- This has become one of my favorite things to do with white ribbon because I can use any dark blend color I need to coordinate with my card colors
- I used small pieces of tear-&-tape to adhere the ends of the ribbon behind the front layer
- I trimmed a piece of the 2023-2025 6 x 6 inch InColor Boho Blue DSP (designer series paper) to 6 by 2-1/2 inches for the envelope flap
- Then, I punched a 1-inch circle of Pebbled Path DSP and ran it through my XYRON create-a-sticker for the envelope seal
- Stamp the seagulls using Tuxedo Black ink and crop using circles from the Stylish Shapes die set
- I colored the wings using the light and dark Pebbled Path blends for all three seagulls
- I colored the beaks using the dark Pumpkin Pie blend
- I first colored the french fries using the dark Lemon Lolly blend and added a layer of light Pumpkin Pie blend
- The white cardstock on the inside measures 5-1/4 by 4 inches
- Since the embossed sentiment will resist the color of the inked shells, I stamped it in VersaMark ink, added the white embossing powder and heat set it
- When I stamped the seashells on the cropped sentiment banner, I added some shells on the inside of the card as well
- While it may look like a totally followed the circle theme of the sketch for the inside, I didn’t start out to do that
- I needed to cover a smudge of black ink, so I cropped a circle using the Stylish Shapes dies, trimmed it to fit, re-stamped and colored the seagull and fries
- With the exception of the top seagull circle and the sentiment banner on the front, I used multipurpose liquid glue to adhere all the pieces of the card together
- After adding the irregular river stones (from the Otterly Amazing suite) to the front of the card, I’d finished this coordinated card, envelope, and envelope seal set
Thank you for stopping by today!
Have a Peachy Day!
Sue
Mens’ Clothes for Cardz 4 Guyz # 367
Welcome to the Cardz 4 Guyz #367 challenge! Dawn, our host this challenge, chose Men’s Clothes for the theme. When you finish here, please visit the challenge site to see what the rest of the very talented design team members created. Then, don’t forget to upload your creations to our gallery. We look forward to seeing your creations there!
Here’s my Men’s Clothes card:

When I sat down to work on this card, I realized the only men’s clothes products I have are the Playing in the Rain characters, Therefore, I needed to think outside of the box, especially since I wanted to keep the card relatively simple. I googled men’s clothes templates and found one for the pocket and tie I used for this card. I traced the template for the pocket and two tie pieces onto DSP and trimmed each piece.
Measurements & Assembly:
- The Night of Navy base measures 8-1/2 by 5-1/2 inches, scored at 4-1/4 inches
- I trimmed a piece of the Nature’s Lace DSP (Designer Series Paper) to 4-18/ by 5-3/8 inches
- I used small pieces of two other Nature’s Lace patterns for the tie and pocket
- Then, I trimmed another piece of 6 by 2-1/2 inches for the envelope flap
- Punch a 1-inch circle of DSP and run it through a XYRON create-a-sticker for the envelope seal
- The final piece for the pocket trim comes from the 6 x 6 inch DSP for 2023 – 2025 In Color DSP
- Trim a piece of Very Vanilla cardstock to 5-1/4 by 4 inches for the inside of the card
- Unless otherwise stated, I used multipurpose liquid glue to adhere pieces together
- Adhere the Nature’s Lace DSP to the base
- After snipping the pocket, I used the Night of Navy Stamping Write marker to add faux stitching along the border of the pocket
- Then I outlined the the pocket with the Night of Navy marker
- Outline the InColor DSP using a Boho Blue marker and adhere to the top of the pocket
- After snipping the tie, I used a ruler and added stripes to both pieces for some dimension
- I stamped the sentiment, from last year’s May Paper Pumpkin, in Night of Navy directly on the pocket
- I adhered the tie to the back of the pocket, then added dimensionals to the back of the pocket and adhered it to the Nature’s Lace DSP
- Easy Peasy, at least once I found a simple template
- With that, I’d completed this coordinated card, envelope, and envelope seal set
Thank you for stopping by today!
Have a Peachy Day!
Sue
Two New Kits Now Available!
The Too Much to Celebrate kit retails for $14.00 and contains enough supplies for 9 cards.

DETAILS
– Makes 9 cards: 3 each of 3 designs
– 2 folded card sizes
– 4-1/4″ x 5-1/2″ (10.5 x 14.9 cm): 6 cards
– 6″ x 3″ (15.2 x 7.6 cm): 3 cards
– Sentiments printed in Dutch, English, French, and German
– Colors: Balmy Blue, Old Olive, Pecan Pie, Petal Pink, Pumpkin Pie
Kit includes one of each item listed below.
– Step-by-step instructions
– 9 printed envelopes
– Puffy stickers
– Gold foil
– Adhesive
– A 9-7/8″ x 6-1/2″ x 2-3/4″ (25.1 x 16.5 x 7 cm) printed box for storage or crafting on the go
KITS COLLECTION
– Includes predesigned projects that come in a range of project types.
– Is perfect for new crafters, busy crafters, or crafters who want quick and easy projects.
The second kit collection is the Heirloom Arrangements Kit, which retails for $23 and creates 8 cards.
– Makes 8 cards: 1 each of 8 designs
– Folded card size: 4-1/4″ x 5-1/2″ (10.5 x 14.9 cm)
– Colors: Basic Black, Blueberry Bushel, Cajun Craze, Cherry Cobbler, Crumb Cake, Daffodil Delight, Garden Green, Old Olive, Pecan Pie, Pretty in Pink, Pretty Peacock
– Also available in French
Kit includes one of each item listed below.
– Heirloom Arrangements Photopolymer Stamp Set
– Clear stamp block
– Pecan Pie Classic Stampin’ Spot
– Basic instructions
– 8 printed envelopes
– Precut elements
– Specialty vellum
– Adhesive
– A 9-7/8″ x 6-1/2″ x 2-3/4″ (25.1 x 16.5 x 7 cm) printed box for storage or crafting on the go
Again, thank you for stopping by!
Keeping it Clean & Simple for C4G 3 365
Welcome to the newest Cardz 4 Guyz challenge #365!Helen is hosting this two-week challenge and chose Clean & Simple for the theme. When you finish here, please visit the challenge site to see what the rest of the very talented design team members created. Then, don’t forget to upload your creations to our gallery. We look forward to seeing your creations there!
Here’s my CAS card:

Once again, I combined some retired with some current products for my card. The stamp and die set is the retired Smooth Sailing. The corner sentiment is from the current mini-catalog called Spring Corners.
Clean & Simple:
- The Early Espresso base measures 8-1/2 by 5-1/2, scored at 4-1/4 inches
- The white cardstock for the outside measured 4-1/8 by 5-3/8 inches
- After trimming, I decided the front needed a little something, so I used the retired Bark embossing folder
- HINT: If you are using an embossing folder, make sure you stamp the sentiment before embossing.
- The white cardstock for the inside measures 4 by 5-1/4 inches. I left it blank until I decide the occasion for which I will use this card
- Trim a piece of Crumb Cake 6 x 6 inch DSP (designer series paper) to 6 by 2-1/2 inches for the envelope flap
- Punch a 1-inch circle from Early Espresso 6 x 6 inch DSP for the envelope seal and run it through the XYRON create-a-sticker
- Stamp the sentiment from Spring Corners in Early Espresso
- Using the sand stamp from the (retired) Oceanfront stamp set, stamp sand in Crumb Cake
- For some reason, my Crumb Cake ink pad came out with a greenish hint to it
- Stamp the lighthouse in Early Espresso Ink on a scrap piece of Crumb Cake card stock and crop it out
- Crop the ship’s wheel from scrap Early Espresso
- I used multipurpose liquid adhesive to adhere pieces together, with the exception of the lighthouse
- Add mini-dimensionals to the back of the lighthouse and adhere to the front of the card
- That’s it – clean & simple
- With that, I’d finished this coordinated card, envelope, and envelope seal set
Thank you for stopping by today!
Have a Peachy Day!
Sue
Colors Used:
Close-up of Spring Corners:
Have you checked out the Otterly Amazing Online Exclusive Suite of Products?
I finally had the opportunity to play around with this set! You can see that card here
However, in case you haven’t seen this amazingly adorable suite, here’s a photo and the SU! video introducing this suite.

Of course, I need to include SALE-a-BRATION!
For every $60 and $120 you spend, you’ll earn an exclusive Sale-A-Bration item for FREE! Depending on the amount you spend, you’ll be able to mix and match the Sale-A-Bration items you earn, and we have a stunning variety of stamp sets and Designer Series Paper for you to choose from! Shop now through February 28.
There’s also a new JOIN PROMOTION:
If you live in the U.S. and don’t already have a Stampin’ UP! demo from whom you order, I would be honored to work with you.
When ordering, please enter the following HOST CODE when prompted:
72TSBFM4
Again, thank you for stopping by!
Current Catalogs

My Favorites
![]()
Design Team Member:


![]()
Challenge Picks:


![]()
![]()
![]()

![]()