I’ve said a few times before that I live in Central Florida, about halfway between Orlando and Daytona Beach. It has snowed, if you call flurries snow, a few times but not in many years. Winter for us is normally about 3 weeks long in December/January. We had near freezing temperatures a few nights ago, but the days have been in the 60s and low 70s I love this weather. My Southern California transplanted husband absolutely can not stand it.
Anyway, here’s my card for the Cardz 4 Guys # 262 challenge:
The snowflake background might look a bit familiar since I used it for another design team card, which you can see here. When I created the first one, I thought it would be good to create a second one to use at another time.
A Bit of a Repeat
I think the subtle variations of color in the Balmy Blue background show up better in person. Since I did not want a solid piece of colored cardstock, I used a sponge brayer. The brayer allowed me to create a very subtle texture using the Balmy Blue ink.
Once the ink completely dried, I had some fun with the snowflake stamp from Snowman Season and some VersaMark ink. First, and foremost, I made sure to use my embossing buddy all over the background. The buddy lifts oils from fingerprints, which creates cleaner images. Next, I randomly stamped the snowflakes all over the blue background. Make sure to turn the snowflake stamp so you don’t create a uniform pattern. Then I covered the snowflakes with white embossing powder, and heat set it all. Don’t you just love watching the magic happen?
I used glossy white cardstock and the fabulous curvy dies to create the snow drifts. The curvy die made the whole process so easy since I wanted to have different shaped drifts.
The Snowman and the Layout
Since I didn’t want to use the punched out snowman, I need to figure out what I was going to do. I finally decided that I would use the snowball juggling snowman. After stamping and coloring him, I loosely fussy cut him out so I could put him on top of the snow drift. Then, I added five elegant faceted gems for the snowballs.
The layout is from a sketch challenge. Of course, I didn’t write down what challenge it was. I used the reverse side of scraps from the First Frost DSP for the shiny diagonal pieces at the top.
Thank you so much for stopping by today.
I’d love to hear what you think, and greatly appreciate every comment.
Do you live in the U.S. and need a demonstrator? If so, I’d love to talk to you!
Do You Want to Place an Order?
Of course you do!
If you are ordering less than $150.00, please use the host code shown. If you are ordering more than $150.00, please contact me first so you can get your stamping rewards! Any order over $50 will earn a little surprise from me.
The HOST CODE for JANUARY is 7EUAPNKA.
It’s Sale-a-Bration!
It’s Mini-Catalog Time!
Mini-catalog + Sale-a-Bration = FREE Products!
Here are pictures of some of the FREE items I’ve already earned!
Again, thank you for stopping by my blog today! I appreciate your time.
Welcome to another Cardz 4 Guys challenge. It’s my turn to pick the theme, and I chose black and gold or black and silver. I thought those two options lent themselves to New Year’s Eve cards, so that’s what I did.
Here’s my card:
Here’s the inside:
Yes! It’s a twist and pop card!
I haven’t made one of these since May, so I needed to go back to my go-to for a twist and pop card. Mary Deatherage from Stamps-n-Lingers has a fabulous step-by-step video, which you can find here.
I do need to figure out how to use my phone stand before I go back to work in a week so I can make my own videos. My first three tries haven’t turned out well at all so I need to practice more.
What I Did
I used Basic Black for the base, cut to 4-1/4 by 11 inches, scored at 5-1/2 inches.
The DSP papers all come from retired sets, but you can use any kind of paper. I trimmed the front gold and white piece to 4 inches by 5-1/4 inches.
After I decided to use the silver glitter ribbon, I thought I really needed to use some silver on the front. Therefore, I trimmed a piece of the silver foil DSP to 4-1/8 inches by 5-3/8 inches. In order to keep the bulk of the card down at least a little, I cropped a rectangle out of the middle of the silver. Every little bit helps with this bulky card.
To give you an idea of the bulk, when I took this card to the post office this afternoon, the clerk at the counter did not believe me at all that there was only a card in the envelope. She must have asked me at least 4 times if I only had a card in it. I almost pulled out my phone to show her the pictures.
I used the Playful Alphabet dies for the “HAPPY” on the top of the inside. The black and gold striped paper is retired, and it’s from the Golden Honey DSP from the last Sale-a-Bration.
What I Won’t Do Again!
When I first started this card, I decided to use a template from Pinterest using the rectangular shapes instead of squares. However, I realized the rectangle panels cause a problem. The left rectangle rubs as the card opens and then needed to be helped a bit to close. I’d already put the whole card together when I saw that there was an issue. I couldn’t get it apart to start the center panels off the working mechanism. I really loved the DSP pattern combinations for this card, and I wouldn’t have had enough to start over again.
My advice: use the measurements Mary Deatherage used. I’ve used those five or six times and the whole card works wonderfully.
Finishing Up
After adhering a piece of the gold and white checked DSP to the envelope flap, I’d finished this coordinated card/envelope set.
For about nine months, I’ve been sealing envelopes with adhesive because of that which shall not be named. Then I needed to write “no saliva was used to seal this envelope” on the back of the envelope.
However, when trying to seal the Thanksgiving cards I’d made, I figured out a trick to seal the envelopes. I’ve been using my 1 inch circle punch to punch coordinating DSP circles. The 1 inch size means I can run them through my XYRON create a sticker 150 little contraption. I really like sealing envelopes with the circles, and it looks so much better than me writing about saliva on the back.
I’d love to hear what you think, and greatly appreciate and respond to comments.
Do you live in the U.S. and need a demonstrator? If so, I’d love to talk to you!
Do You Want to Place an Order?
Of course you do!
If you are ordering less than $150.00, please use the host code shown. If you are ordering more than $150.00, please contact me first so you can get your stamping rewards! Any order over $50 will earn a little surprise from me.
The HOST CODE for DECEMBER is 7Y27249U.
It’s Time to Order the January Paper Pumpkin Kit!
January? Paper Pumpkin? Order the January kit now?
YES! The order window is from now until January 10th, 2021. Here’s a small sneak peek:
Again, thank you for stopping by my blog today! I appreciate your time.
Welcome to the C4G #259 theme challenge, which is traditional Christmas. For me, that means reds and greens, Christmas trees, and maybe a plaid blanket thrown in for good measure. Therefore, that’s just what I did for my card.
Here’s my card:
Cherry Cobbler, Mossy Meadow, Whisper White and Plaid
The Christmas Means More stamp set, available now in the July – December mini-catalog, has four quotes from traditional Christmas movies. I chose the quote from ELF for the front of this card. So, let’s get started!
I used Mossy Meadow cardstock for the base and it measures 5-1/2 inches by 8-1/2 inches. I scored it at 4-1/4 inches to create a landscape tent card.
Next, I trimmed the Cherry Cobbler cardstock mat to 4-1/8 inches by 5-3/8 inches.
Then I trimmed the plaid DSP, from the Plaid Tidings 6 x 6 inch DSP stack, to 4 inches by 5-1/4 inches.
I used a 1 inch by 5-1/4 inches strip of Cherry Cobbler DSP for the banner under the sentiment. To accomodate the linen thread wrapped around this strip, I adhered it to the plaid DSP using dimensionals.
I stamped the sentiment on Mossy Meadow cardstock using VersaMark so I could add white embossing powder, which I then heat set. After I cropped the sentiment using a square die from the Stitched Shapes set, I adhered it to the card using a double layer of dimensionals.
The Christmas trees, stamped in Mossy Meadow on white cardstock, come from the Rooted in Nature stamp set. I cropped them out using the coordinating die set. While I had those supplies handy, I also stamped and cropped another double tree and a single tree stamp for the inside.
Time to move on to the inside!
The Inside
Here’s a picture of the inside of the card:
I trimmed the white cardstock to 4 inches by 5-1/4 inches, as always.
The inside sentiment is from the Perfectly Plaid stamp set, and I stamped it in Cherry Cobbler.
Finally, I adhered the Christmas trees in the bottom corners using the multipurpose liquid glue.
I trimmed another piece of the Cherry Cobbler DSP for the envelope flap. Once I had adhered and trimmed the flap, I’d completed this easy-peasy card/envelope set.
Thank you so much for stopping by today.
I’d love to hear what you think, and greatly appreciate every comment.
Do you live in the U.S. and need a demonstrator? If so, I’d love to talk to you!
Of course you do! Even more so because you are now moving on to create Thanksgiving and holiday cards, right? There’s more information about the August – December 2020 mini-catalog below!
If you are ordering less than $150.00, please use the host code shown. If you are ordering more than $150.00, please contact me first so you can get your stamping rewards! Any order over $50 will earn a little surprise from me.
The HOST CODE for DECEMBER is 7Y27249U.
Today is the DAY! January – June Mini-Catalog Preorder for Demos!
I can show you the cover, but not the insides, YET! I will be able to show you what I purchased as soon as it comes in though!
Hello, and welcome back for another Cardz 4 Guyz challenge. The theme for C4G #268 is Thanks/Thanksgiving. Since I am American, and because I still need a few Thanksgiving cards for next week, I went with that part of the theme.
Here’s my card:
I used a sketch from a recent challenge, but can not remember which challenge. However, I do remember that it closed before this post went live.
What I Did:
The base of the card is Early Espresso trimmed to 5-1/2 inches x 8-1/2 inches, scored at 4-1/4 inches.
I chose two patterns from the Gilded Autumn DSP for the larger two squares, which I cropped using the Stitched Rectangle square dies. There’s a very, very thin Early Espresso border around the largest gourd DSP. The middle square has a wider Cajun Craze border. The smallest square has a set of wider borders of Cajun Craze and Early Espresso. I stamped the sentiment, from the Autumn Greetings stamp set, before cropping out the Very Vanilla square. This sentiment just fit inside the smallest square, but the two borders makes this sentiment block a real focal point of the card.
Once I had my DSP patterns for the squares, I started the process of trying to find a background DSP in wood tones. I picked this one because it picks up the Early Espresso from the base and sentiments. It very subtly picks up the slight orange-y Cajun Craze color. I trimmed the background paper to 4-1/8 inches by 5-3/8 inches.
After finishing the inside of the card, I adhered a piece of the wood tone DSP to the envelope flap. With that, I’d completed this card/envelope set. Another Thanksgiving card finished, about 6 more to go.
Thank you so much for stopping by today.
I’d love to hear what you think, and greatly appreciate every comment.
Do you live in the U.S. and need a demonstrator? If so, I’d love to talk to you!
Of course you do! Even more so because you are now moving on to create Thanksgiving and holiday cards, right? There’s more information about the August – December 2020 mini-catalog below!
If you are ordering less than $150.00, please use the host code shown. If you are ordering more than $150.00, please contact me first so you can get your stamping rewards! Any order over $50 will earn a little surprise from me.
The HOST CODE for NOVEMBER is CBDP2DQT.
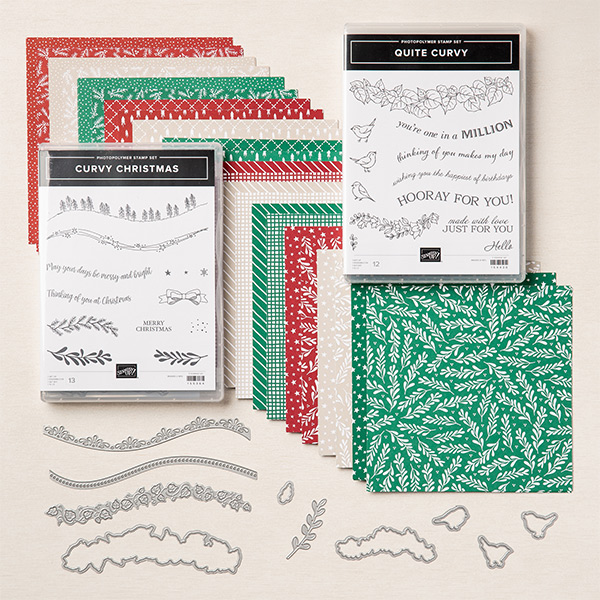
This absolutely gorgeous bundle is now available! I already have one of the bundles and used it this past weekend. You can see that card here.
Here are some fabulous images from Stampin’ Up! Each bundle is available separately, but if you want it all, the whole variety bundle is pictured below:
158396 – QUITE CURVY VARIETY BUNDLE
Again, thank you for stopping by my blog today! I appreciate your time.
Welcome to C4G # 257, which is to create a birthday card for an adult guy. I do have some stamp sets that will work for both male and female birthdays, depending on the design. For this challenge, I chose the Sailing Home cling stamp set and the coordinating Smooth Sailing die set.
I really wanted to also create a fun fold card. Recently, I’ve seen a number of cards with side panels and the middle opens up. Mary Deatherage, of Stamps-n-Lingers, has a video on this fun fold with a twist. She made an easel card out of the center. You can see that video here. I’ve gotten my camera stand, and have made a few test videos, but need to get better before I post one of them. Anyway, Mary’s video explains how to create the whole card. I really enjoy her videos and Facebook Live videos.
Here’s my card:
Here’s the outside of the card:
Now for the back of the card:
Stamps, Colors, and Dies. Oh my!
The card base is a piece of Seaside Spray trimmed to 8-1/2 inches by 5-1/2 inches, scored at 4-1/4 inches to create a tent card.
I really wanted to use DSP to mimic ocean waves. The picture I had in my head was a clean and simple card. Therefore, I didn’t want to stamp the whole front of the card. I thought the woodgrain pattern in Seaside Spray would give me the movement and white color intertwined with each other.
Next, I used Misty Moonlight to mat the Seaside Spray DSP.
The outside sentiment and the boat are from the Sailing Home stamp set, as are the lighthouse and the anchor.
I used the birthday sentiments, for the front and back, from Peaceful Moments and stamped it in Night of Navy as well. The stitched sentiment label is from the Sailing Home die set.
I stamped all of the elements in Night of Navy and then cropped them. I knew that I wanted to have the very front sentiment circle, cropped using the Stitched Shapes die, hanging off the side of the center panel. In order to have a finished look on the back, I cropped another circle from the Misty Moonlight 6″ x 6″ DSP and glued it on the back.
Since I put the lighthouse on the left panel, I needed something on the right side. Therefore, I cropped the underwater plants from a piece of Night of Navy wood grain DSP.
I finally settled on using the rope die for the piece that holds up the easel. I cropped it from a scrap piece of the distressed Night of Navy 6″ x 6″ DSP. Next, I cropped a piece of an adhesive sheet using the same rope die. After I cropped it, I pulled off one side of the cover of the adhesive sheet. This things are very, very sticky so be careful when using them. However, this adhesive sheet made it so much easier to get the whole rope piece adhered at once. Easy peasy.
I really wanted to use DSP to mimic ocean waves. The picture I had in my head was a clean and simple card. Therefore, I didn’t want to stamp the whole front of the card. I thought the woodgrain pattern in Seaside Spray would give me the movement and white color intertwined with each other.
Finishing Up
After I adhered a piece of the woodgrain Night of Navy DSP for the envelope flap, I had finished this card and envelope card set.
Thank you so much for stopping by today.
I’d love to hear what you think, and greatly appreciate every comment.
Do you live in the U.S. and need a demonstrator? If so, I’d love to talk to you!
Of course you do! Even more so because you are now moving on to create Thanksgiving and holiday cards, right? There’s more information about the August – December 2020 mini-catalog below!
If you are ordering less than $150.00, please use the host code shown. If you are ordering more than $150.00, please contact me first so you can get your stamping rewards! Any order over $50 will earn a little surprise from me.
The HOST CODE for NOVEMBER is CBDP2DQT.
This absolutely gorgeous bundle is available tomorrow, November 3, 2020! I already have one of the bundles and used it this past weekend. I’ll post that next!
In the meantime, here’s a little sneak peek:
Again, thank you for stopping by my blog today! I appreciate your time.
I live in Central Florida, about halfway between Orlando and Daytona Beach. I haven’t seen a real fall/autumn season since my youngest sister was in college. She had a swim meet in North Carolina and my parents and middle sister and I went to it. That was quite a while ago.
My daughter recently moved to northern California and will have a real autumn this year. If it wasn’t for one big problem (that which I don’t want to name tonight), I would go out there for a long weekend to see the leaves. As it is, I will just have to enjoy creating Thanksgiving cards for now.
Here’s my card for the #256 challenge:
The stamp sets I used were the Rooted in Nature and Autumn Greetings.
If you think there might be a difference between this card and the one on the Design Team page for C4G, you are correct. I knew something was off with the first card and couldn’t figure out what. As I was typing the measurements below, I realized I should have used Very Vanilla for the background on the front of the card. I’ll show you how I fixed that accident below.
Measurements
The card base is Cajun Craze trimmed to 4-1/4 inches by 11 inches, scored at 5-1/2 inches.
I trimmed a piece of Crushed Curry to 4-1/8 inches by 5-3/8 inches for the mat.
Next, I trimmed two pieces of the speckled DSP. The one on the front of the card measures 1-7/8 inches by 5 inches. I trimmed another piece for the envelope flap to 2-1/2 inches by 6 inches.
The Very Vanilla piece on the top background measures 3-1/8 inches by 5 inches. Originally, I had a piece of Whisper White for the background. Since I didn’t want to recreate the card, I had to figure out how to fix my mistake without starting over. Here’s a picture showing how I did that:
TA-DA! Problem solved. After cropping out the tree, I ran the vanilla cardstock through the Big Shot in the Subtle 3D embossing folder.
I also used Very Vanilla on the inside and that piece measures 4 inches by 5-1/4 inches.
The acorn and two leaves next to the sentiment were punched out of the Gilded Autumn DSP. The Autumn Punch Pack of mini punches makes this a very simple task. Best of all – no fussy cutting! I just LOVE when punches and/or dies work on the DSP perfectly!
In order to have a border between the top and the bottom, and without getting girly, I used linen thread wrapped around the speckled DSP three times and tied it in a square knot.
The Stamp-aratus allowed me to be able to repeatedly stamp the greeting on the speckled DSP until I achieved the depth of color I wanted.
The Tree
Instead of using ink pads to color the tree, I used Stamping Write Markers and my trusty Stamp-aratus. I could not have done it without that tool.
First, I used Crumb Cake and Early Espresso to color the trunk of the tree on the stamp, then stamped it.
I used the Crushed Curry marker to color the whole canopy of the tree for the first stamping.
Next, I used the thin end of the Early Espresso marker and traced in the branched in the canopy. Using the yellow first really made it easier to see the branches.
Then I used Pumpkin Pie andCajun Craze markers and randomly colored on the stamp, then pressed it down. I repeated that step and wound up with the colors you see on the front of the card. It reminds me of autumn trees from my childhood. The only thing missing is the big pile of raked leaves under the tree, just waiting for us to jump in it and then start raking again.
I put dimensionals under the tree so it stands off the background. The Crushed Curry bottom mat peeks through under the tree.
The Inside
I used another sentiment from Autumn Greetings for the inside of the card.
Since I didn’t want just a plain piece of cardstock, I used the speckle stamp from Forever Fern. I stamped it using Crumb Cake, and each time I inked, I stamped it three times. This really gives dimension to the speckles.
Finishing Up
Finally, I adhered the speckled DSP to the envelope flap and trimmed it down. With that, I’d finished this card/envelope set.
By the time I finished typing all the directions, I’d decided that I needed to try this card again. I really think I can create a much better version, but know I can’t do that tonight.
Thank you so much for stopping by today.
I’d love to hear what you think, and greatly appreciate every comment.
Of course you do! Even more so because of the DSP sale, right?
If you are ordering less than $150.00, please use the host code shown. If you are ordering more than $150.00, please contact me first so you can get your stamping rewards!
The HOST CODE for OCTOBER is CBDP2DQT.
Just Look at This DSP Special!
If you LOVE DSP and love to buy it, the special this month is just for you!
Here’s the DSP that’s included in the 15% off sale!
ARTISTRY BLOOMS DESIGNER SERIES PAPER TIS THE SEASON 6″ X 6″ (15.2 X 15.2 CM) DESIGNER SERIES PAPER
FOREVER GREENERY DESIGNER SERIES PAPER
POINSETTIA PLACE DESIGNER SERIES PAPER
TRIMMING THE TOWN DESIGNER SERIES PAPER
PLAID TIDINGS 6″ X 6″ (15.2 X 15.2 CM) DESIGNER SERIES PAPER
TOILE TIDINGS DESIGNER SERIES PAPER
PEONY GARDEN DESIGNERS SERIES PAPER
WHALE OF A TIME 6″ X 6″ (15.2 X 15.2 CM) DESIGNER SERIES PAPER
HEARTWARMING HUGS DESIGNER SERIES PAPER
MAGIC IN THIS NIGHT DESIGNER SERIES PAPER
SNOWFLAKE SPLENDOR DESIGNER SERIES PAPER
IN GOOD TASTE DESIGNER SERIES PAPER
PLAYING WITH PATTERNS 6″ X 6″ (15.2 X 15.2 CM) DESIGNER SERIES PAPER
PLAYFUL PETS DESIGNER SERIES PAPER
Don’t Forget About the Holiday Catalog Available Now!!
Again, thank you for stopping by my blog today! I appreciate your time.
Welcome to Just Peachy Stamping by Sue Jackson: an independent Stampin' Up demonstrator.
Through Stampin' Up!, I happily share my love of papercrafting through sales, classes, small stamping group meet-ups and workshops. I think that being a teacher in my "real life", I have a unique approach to sharing my fantastic hobby. I look forward to connecting with you!