Welcome back to the bi-weekly Cardz 4 Galz # 247. Our host for this edition of the challenge, Dawn, chose Stripes for the theme. When you finish here, please visit the challenge site to see what the rest of the very talented design team members created. Then, don’t forget to upload your creations to our gallery. We look forward to seeing your creations there!
I let the gorgeous daisy DSP (designer series paper) do all the work for my card.
Here it is:
Measurements:
The Pretty Peacock base measures 5-1/2 by 8-1/2 inches, scored at 4-1/4 inches
I trimmed a piece of Cheerful Daisies DSP to 3-3/4 by 5-3/8 inches, then trimmed it down to 3/4 by 5-3/8 stripes
Make sure you keep the stripes in order or you will need to figure it out when you put the pieces together
I outlined the stripes using a Pretty Peacock marker to make them pop
I also trimmed a piece of the daisy DSP to 5-1/4 by 1/2 inches for the inside of the card
The final piece of DSP I trimmed measures 2-1/2 by 6 inches for the envelope flap
I punched a coordinating piece of DSP using a 1-inch circle punch and ran it through my XYRON create-a-sticker for the envelope seal
The Crushed Curry mat under the DSP strips measures 5-3/8 by 4-1/8 inches
Trim a piece of white cardstock to 5-1/4 by 4 inches for the inside of the card
I used pieces of scrap cardstock for the sentiment banner on the front of the card
Stamping & Assembly:
Unless otherwise noted, I used multipurpose liquid glue to adhere the pieces together
I did a dry-fit of the stripes to place them on the Crushed Curry cardstock using my AdTech removable tape to guarantee my spacing
I removed one stripe at a time in order to add liquid glue and adhere the pieces to the cardstock
I stamped the outside sentiment using the Happy & Heartfelt sentiment in Pretty Peacock ink on a scrap piece of white cardstock
Next, I cropped the sentiment and a mat of Pretty Peacock cardstock using two of the deckled rectangle dies
Then, I tied a piece of the Copper Clay ribbon around the Crushed Curry mat using the ribbon saving technique shown below:
I adhered the white sentiment banner to the Pretty Peacock mat and added dimensionals to the back of it
Make sure you place your dimensionals so that they will straddle the ribbon to prevent an uneven layer
The last thing for the front was the addition of three Wild Wheat enamel dots in a triangle pattern
After adhering the stripe of DSP to the inside white cardstock panel, I stamped the sentiment using Pretty Peacock ink
With that, I’d finished this coordinated card, envelope, and envelope seal set
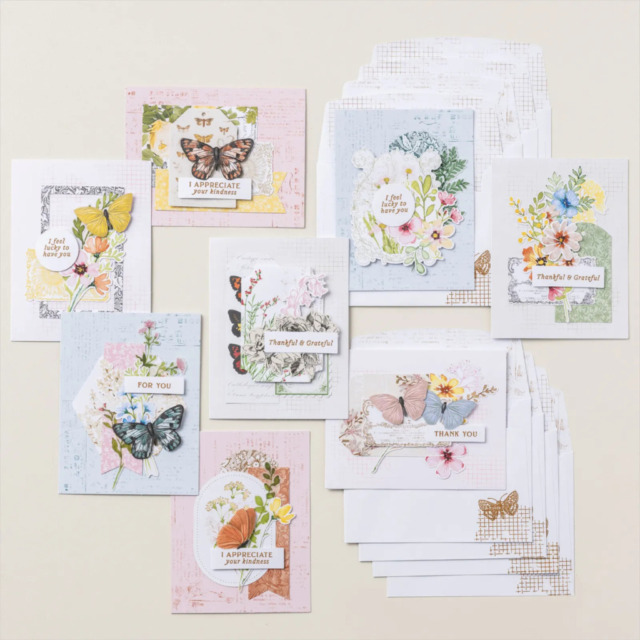
If you like the idea of quick and easy cards but don’t know where to start, try our KITS COLLECTION, especially the three new kits added on April 1st!
The first kit showcased is the Essential Occasions kit, retailing for $13.
Always have a card on hand with this oh-so essential kit! With hand-illustrated elements, die cut sentiments, and six card designs, the Essential Occasions Kit comes with everything you need to celebrate birthdays, share well wishes, or send a thank-you message. From graduations to anniversaries—and everything in between—celebrate the most important moments in your life with this kit!
This next kit is called Paper Bouquet, retailing for $22 USD. Since the U.S. celebrates Mother’s Day in May, I am going to get this kit and put it together for my mom.
With the Paper Bouquet Kit, you’ll bring the beauty of fresh flowers into your home. And the best part is, they’ll never wilt! This kit comes with precut leaf and flower pieces, floral wire, and pony beads. You’ll layer and curl the paper pieces, forming a vibrant bouquet with 23 flowers and 11 leaves. Place the paper bouquet in a vase to give your décor a timeless touch or gift it to a loved one as a heartfelt keepsake!
Finally, this new Loveliest Wishes kit, retailing for $14 USD, creates nine gorgeous cards!
Elevate your birthday cards with the Loveliest Wishes Kit! Craft cards that speak volumes through sophisticated simplicity. With precut images and gold foil sentiments, you can create nine stunning cards that lend an air of elegance to every, “Happy birthday!”
If you live in the U.S. and don’t already have a Stampin’ UP! demo from whom you order, I would be honored to work with you.
When ordering, please enter the following HOST CODE when prompted:
Welcome back to the bi-weekly Cardz 4 Galz # 246. I’m hosting this edition of the challenge and I chose Springtime for the theme. I don’t even know if I realized that today is the first day of spring when I chose the theme. However, I did know that I’d be on Spring Break for this week.
When you finish here, please visit the challenge site to see what the rest of the very talented design team members created. Then, don’t forget to upload your creations to our gallery. We look forward to seeing your creations there!
Here’s my Easy-Peasy (truly!) Springtime card:
Since I used the Mixed Media Florals Memories & More Card Pack, this card truly was easy-peasy!
Easy-Peasy Proof:
Trim a piece of Petal Pink cardstock to 8-1/2 by 5-1/2 inches, & score at 4-1/4 inches
Trim two pieces of Poppy Parade cardstock to 4-1/8 inches by 5-3/8 inches, one for the inside and one for the outside
Pick a 4 x 6 inch Memories & More panel and trim it to 4 by 5-1/4 inches for the front
Trim a piece of white cardstock to 4 by 5-1/4 inches for the inside of the card
I only used multipurpose liquid glue to adhere the layers together
Using some of the self-adhesive stickers from the pack, add three ladybugs to the outside of the card
The sentiment on the inside, the floral spray, and the ladybug on the inside also come from the Memories & More pack
I used the new Painted Stripes background stamp and Poppy Parade ink for the envelope flap
I already had a 1-inch circle punched from retired Petal Pink DSP (designer series paper), so all I had to do was run it through my XYRON create-a-sticker for the envelope seal
With that, I’d finished this easy-peasy coordinated Springtime card, envelope, and envelope seal set
This might be my shortest current supply list ever!
If you like the idea of quick and easy cards but don’t know where to start, try our KITS COLLECTION!
Here are three examples of the all-inclusive kits available now!
First, this PAINTED WISHES KIT retails for $14.00 (USD) and contains enough supplies to create NINE cards!
The second kit I’m showcasing is the ALPINE AIR KIT which retails for $22.00 (USD) and it also contains enough supplies for NINE cards! I’ve already posted some cards I’ve made using this kit, which you can see here.
Finally, this BY YOUR SIDE KIT retails for $22.00 (USD) and contains enough supplies for EIGHT cards. I love this kit and have posted cards using it which you can see here, here and here.
If you live in the U.S. and don’t already have a Stampin’ UP! demo from whom you order, I would be honored to work with you.
When ordering, please enter the following HOST CODE when prompted:
Welcome back to the bi-weekly Cardz 4 Galz # 245. Our host for this edition of the challenge, our host, Caz , chose for Mother’s Day or a Special Lady for the theme. When you finish here, please visit the challenge site to see what the rest of the very talented design team members created. Then, don’t forget to upload your creations to our gallery. We look forward to seeing your creations there!
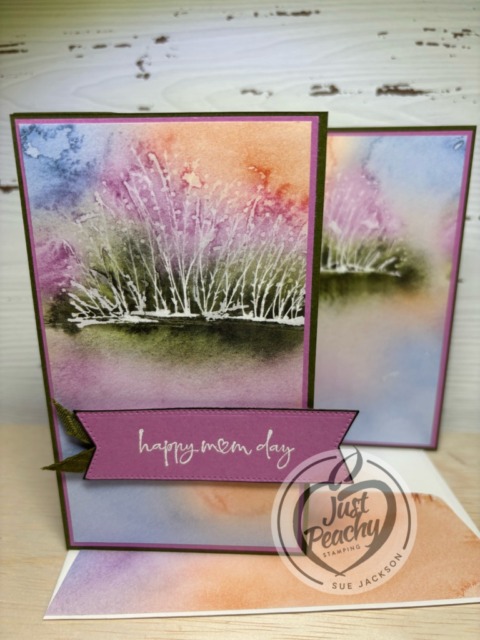
Here’s my Mother’s Day card:
Even though Mother’s Day in the U.S. isn’t until May, I wanted to get this card made early. This DSP (designer series paper) has to be one of my all time favorites! I love the watercolor images and the 6 x 6 inch paper works beautifully with this fun fold card. You can see some of my other cards using this fun fold here, here, and here. I still can’t find the original poster’s video for this fun fold. If it looks familiar to you, please let me know so I can give you credit.
As I’m very prone to do, I will also be posting this card to the Creative Creases Challenge # 100. What a milestone and I’m so happy for my fellow Pal, Debbie Mageed and her design team. Way to go, ladies!
Hidden Flap Fun Fold:
Since I’ve used this hidden flap fold quite often, I’ve made myself a template so I don’t have to keep figuring out the measurements.
They say that a picture is worth 1,ooo words. I have three pictures of the template I use to create this simple but stunning fun fold card:
Unless otherwise noted, I used multipurpose liquid glue to adhere the pieces together
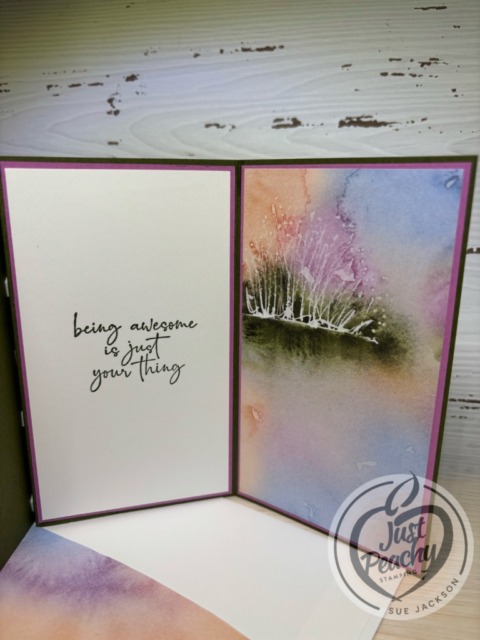
The base of the card and the piece of black cardstock in the template have all been made with Mossy Meadow cardstock
The two DSP pieces measure 5-1/4 by 3 inches which is accomplished by trimming down 1/4 on the horizontal side of the DSP and then trimming the remaining DSP in half. Easy Peasy.
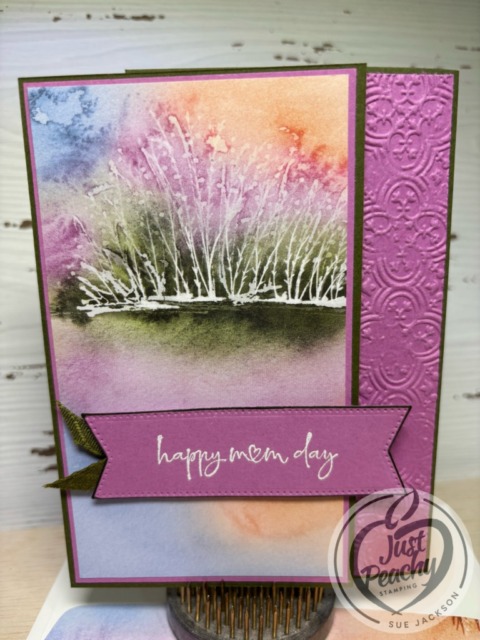
The Petunia Pop mats each measure 5-3/8 by 3-1/8 inches
After running a piece of Petunia Pop through the Cut & Emboss machine using the Distressed Tile 3D embossing folder, I trimmed it to 1-1/4 by 5-3/8 inches
I trimmed a piece of coordinating DSP to 6 by 2-1/2 inches for the envelope flap
Then, i punched a 1-inch circle out of another piece of DSP and ran it through the XYRON create-a-sticker to create the envelope seal
The sentiment, from the retired Happy & Heatrfelt stamp set, was stamped in VersaMark ink, covered in white embossing powder and heat set.
Next, I cropped the sentiment using a die from the Stylish Shapes die set and added dimensionals to the back of it but only on the part that will be adhered to the front flap of the card
You might be asking yourself where I got the green ribbon ~ it’s actually the white diagonal trim from the Petal Pink & White diagonal trim combo pack which I colored multiple times using the dark Old Olive blend
Using tear-&-tape, adhere the ribbon to the back of the sentiment banner
Adhere the layers together to assemble
Finish by adding the sentiment to the front flap of the
With that, I’d finished this coordinated card, envelope, and envelope seal set
Thank you for stopping by today!
Have a Peachy Day!
Sue
Two New Kits Now Available!
The Too Much to Celebrate kit retails for $14.00 and contains enough supplies for 9 cards.
DETAILS – Makes 9 cards: 3 each of 3 designs – 2 folded card sizes – 4-1/4″ x 5-1/2″ (10.5 x 14.9 cm): 6 cards – 6″ x 3″ (15.2 x 7.6 cm): 3 cards – Sentiments printed in Dutch, English, French, and German – Colors: Balmy Blue, Old Olive, Pecan Pie, Petal Pink, Pumpkin Pie
Kit includes one of each item listed below. – Step-by-step instructions – 9 printed envelopes – Puffy stickers – Gold foil – Adhesive – A 9-7/8″ x 6-1/2″ x 2-3/4″ (25.1 x 16.5 x 7 cm) printed box for storage or crafting on the go
KITS COLLECTION – Includes predesigned projects that come in a range of project types. – Is perfect for new crafters, busy crafters, or crafters who want quick and easy projects.
The second kit collection is the Heirloom Arrangements Kit, which retails for $23 and creates 8 cards.
– Makes 8 cards: 1 each of 8 designs – Folded card size: 4-1/4″ x 5-1/2″ (10.5 x 14.9 cm) – Colors: Basic Black, Blueberry Bushel, Cajun Craze, Cherry Cobbler, Crumb Cake, Daffodil Delight, Garden Green, Old Olive, Pecan Pie, Pretty in Pink, Pretty Peacock – Also available in French
Kit includes one of each item listed below. – Heirloom Arrangements Photopolymer Stamp Set – Clear stamp block – Pecan Pie Classic Stampin’ Spot – Basic instructions – 8 printed envelopes – Precut elements – Specialty vellum – Adhesive – A 9-7/8″ x 6-1/2″ x 2-3/4″ (25.1 x 16.5 x 7 cm) printed box for storage or crafting on the go
Welcome back to the bi-weekly Cardz 4 Galz # 242! Our host, __, chose Anything But a Square for the theme. When you finish here, please visit the challenge site to see what the rest of the very talented design team members created. Then, don’t forget to upload your creations to our gallery. We look forward to seeing your creations there!
I’ve made so many of these cards, and you can find some of them here, here, and here. The 6 x 6 DSP (designer series paper) is just made for this fun fold.. Start with the 6 x 6 inch DSP, trim off 1/4 inch from the top, or bottom. Then, trim the the DSP down to two 3 by 5-1/4 inches.
I have no earthly idea why I didn’t save the tutorial video for this card, but I have searched my Pinterest and saved video tutorials on YouTube for more than 30 minutes and can’t find it. If you recognize the fold, please let me know so I can give credit to the original designer. I will be using this fold for many 6 x 6 inch DSP pages! The paper absolutely does all the work here!
Here are some pictures of the template I’ve made for this fun fold card:
The two DSP pieces measure 5-1/4 by 3 inches
The Crushed Curry mats each measure 5-3/8 by 3-1/8 inches
After running a piece of Crushed Curry through the Cut & Emboss machine an embossing folder, I trimmed it to 1-1/8 by 5-3/8 inches for the strip next to the front DSP
I trimmed a piece of DSP to 6 by 2-1/2 inches for the envelope flap
Then, i punched a 1-inch circle out of coordinating DSP and ran it through the XYRON create-a-sticker to create the envelope seal
Welcome back to the bi-weekly Cardz 4 Galz # 241, our first challenge for the New Year. Our host, Lynda, chose Use Stencils for the theme. When you finish here, please visit the challenge site to see what the rest of the very talented design team members created. Then, don’t forget to upload your creations to our gallery. We look forward to seeing your creations there!
Here’s my card:
Here are the die cut stencils I used:
I’ve used the circle for other cards, but you can see the Petunia Pop blending on the outer edges of the circle. I used the flower spray stencil on the inside of the card and the front of the envelope. The blending brushes made this process relatively easy.
Measurements:
The Petunia Pop base measures 8-1/2 by 5-1/2 inches, scored at 4-1/4 inches
The Thoughtful Designs DSP mat measures 4-1/8 by 5-3/8 inches
Trim another piece of this DSP to 6 by 2-1/2 inches for the envelope flap
Punch a 1-inch circle of DSP to coordinate with the Thoughtful Designs DSP for the envelope seal and run it through your XYRON create-a-sticker
The white top layer measures 3-3/4 by 5 inches, which I trimmed after I had blended Petunia Pop circle on it
Trim a second piece of white cardstock to 5-1/4 by 4 inches for the inside of the card
I used scraps to crop out the layers of the floral spray on the front
Blending:
Unless otherwise noted, I used multipurpose liquid glue to adhere the pieces of the card together
I started with a 5-3/8 by 4 -1/8 inch piece of white cardstock and lined the circle die cut up in the middle of the white cardstock
HINT: It is much easier to blend when using stencils if you use removable adhesive tape on the stencil to hold it in place while blending, in this case the removable tape is on the reverse of the circle stencil
Using a blending brush and Petunia Pop ink, blend layers of color onto the white cardstock
HINT: Make sure you start with a light layer of ink and add more as you blend since you can always add more ink
After I tap the blending brush in the ink two or three times, I lightly tap off ink on a scrap piece of paper so I don’t get blotches
I wanted to bring some silver into the circle, so I used a Clear Wink of Stella brush and tapped the brush onto the lid to get some splatters before I removed the die cut circle stencil
HINT: This technique will splatter much further off the cardstock than you ever thought possible, so remove anything you don’t want splattered from your work surface
I usually clear off space equal to the size of the SU! grid paper, which is 10 x 16 inches
Remove the stencil and trim down the white cardstock to 3-3/4 by 5 inches making sure that your inked circle is relatively centered
Embossing & Assembly:
Use your embossing buddy to wipe down the front of the white cardstock, then stamp your sentiment using VersaMark ink
Cover the ink with silver embossing powder and heat set it
Using the Thoughtful Wishes die set, crop two Petunia Pop and one white floral spray
HINT: There is a die which includes the flowers and another one with just the branches
I used two Petunia Pop floral sprays with the flowers and one white spray of just branches
Adhere the two Petunia Pop layers and top with the white layer, which will give you dimension without having to try to add dimensionals
Use the Clear Wink of Stella brush to add a layer of sparkle to the top of the floral spray layers
Adhere the spray to the front of the card
Add a bow using a length of the silver Simply Elegant rope and adhere with a glue dot
Adhere the DSP to the base of the card
Add dimensionals to the back of the top white cardstock layer and adhere to the DSP
Using the floral spray cropped stencil, blend some Petunia Pop ink on the bottom of the inside cardstock and on the front of the envelope
Stamp your inside sentiment using Petunia Pop ink
Adhere the white cardstock to the inside of the card
With that, I’d finished this coordinated card, envelope, and envelope seal set.
The January – April 2025 mini-catalog, the Sale-a-Bration, and the joining promotion all went live on January 7, 2025. Take a peek at some of the new products:
Welcome back to the bi-weekly Cardz 4 Galz challenge # 238. Our host, Dawn, chose Adding Texture for the theme. When you finish here, please visit the challenge site to see what the rest of the very talented design team members created. Then, don’t forget to upload your creations to our gallery. We look forward to seeing your creations there!
Here’s my card:
I didn’t get the Nests of Winter Suite Collection from the current mini-catalog, and am now thinking I need to order it! I used the November Paper Pumpkin kit for the birds and branches, but the same card can be created using the Winterly Tree Tops bundle. Take a closer look at the bundle below:
If the bundle doesn’t convince you that this set is a must have, take a look at the Nests of Winter 12 x 12 inch DSP (designer series paper):
I also used the gold mercury vellum 12 x 12 inch specialty paper as pictured below:
I can almost hear you thinking that there isn’t any gold on my card. Surprise! I used the back of the vellum paper! I wanted the texture of the vellum, but wanted the birds to be the focal point of the card. I’m thrilled with the result!
Measurements:
The Read Red base measures 8-1/2 by 5-1/2 inches, scored at 4-1/4 inches
Trim a piece of Shaded Spruce cardstock to 4-1/8 by 5-3/8 inches for the mat under the vellum
The vellum piece measures 4 by 5-1/4 inches
I had the circle already embossed with the retired pine branches embossing folder
The white cardstock for the inside measures 4 by 5-1/4 inches
Since I am using an envelope included in the Paper Pumpkin kit, I don’t need to trim paper for the envelope flap
However, if you are using the Nests of Winter suite, trim a piece of DSP to 6 by 2-1/2 inches for the envelope flap
Stamping & Assembly:
The Paper Pumpkin kit pieces allowed this card to come together rather quickly. That’s part of the beauty of the kits!
Unless otherwise noted, I used multipurpose liquid glue to adhere pieces together
Stamp the sentiment using Real Red onto the cropped circle
HINT: It’s much easier to stamp your sentiment first, then emboss the cardstock before cropping it using a Stylish Shapes die
I outlined the circle using my Real Red marker
Stamp the inside sentiment in Real Red
Use Shaded Spruce ink to stamp the pine needle branches in the corner
HINT: In order to get the graduated colors using just Shaded Spruce ink, I stamped the pine needles on the right side first
Then, I pivoted the stamp to do the one on the left, and pivoted again to stamp the one in the center
Adhere the completed inside panel to the base of the card
Adhere the vellum to the Shaded Spruce cardstock, then adhere those layers to the Real Red base
HINT: I used multipurpose liquid glue added to the gold side of the vellum to adhere it to the Shaded Spruce layer
You can see some of the liquid glue through the vellum,, but it adds to the texture of the card
Add the ribbon to the back of the circle using mini-glue dots or tear-&-tape
Add dimensionals to the back of the circle and adhere to the front layers
Adhere the first bird to the circle using liquid glue and add two dimensionals to the part of the bird that doesn’t attach to the circle
Adhere the pine needle branches and the top bird using liquid glue and dimensionals as needed
Add three opal rounds to the front of the circle
With that, I’d finished this coordinated card and envelope set
I already know that I am going to use this sale to reorder drying out Stampin’ Blends, order some cardstock I missed on my last order, and probably some DSP. With the 10% discount, it’s like getting free shipping!
Here are all the details:
From the 2024–2025Annual Catalog:
10% off ink, including pads, refills, markers, and Stampin’ Blends. Ink pad bundles and third-party ink pads are NOT included.
10% off cardstock. Close To My Heart cardstock is NOT included.
20% total off all stamp and die bundles and stamp and punch bundles. (Stamp bundles are normally 10% off. With this sale you get an additional 10% off.)
20% off all Designer Series Paper.
Important Information:
Shop online to see the full selection of discounted products available; this is a limited time offer.
Products are available while supplies last.
Discounts are automatically applied when sale items are added to any order, including Starter Kits.
Another Fabulous New Kit:
This new Layered Landscapes kit is absolutely fabulous! Just take a look:
Here’s the unboxing video:
Of course, this kit comes with step-by-step instructions, as seen below:
Welcome to Just Peachy Stamping by Sue Jackson: an independent Stampin' Up demonstrator.
Through Stampin' Up!, I happily share my love of papercrafting through sales, classes, small stamping group meet-ups and workshops. I think that being a teacher in my "real life", I have a unique approach to sharing my fantastic hobby. I look forward to connecting with you!