Delicate Wishes with the May Stampin’ Up! Demos Fun Fold Blog Hop
Welcome back to the monthly Stampin’ UP! Demonstrators Fun Fold Blog Hop. If you love fun folds, you’ve come to a hop filled with really great projects by some very talented fellow demonstrators. When you finish here, I hope you will hop along with the rest of the demos using the links below.
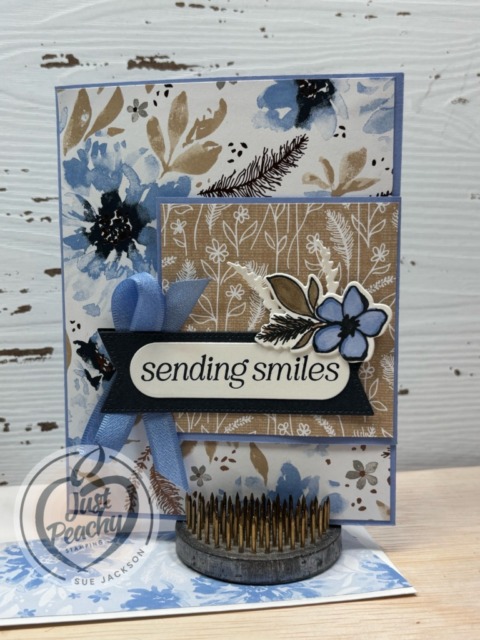
Here’s my Delicate Wishes Triple Reveal Card (or an easy card within a card):


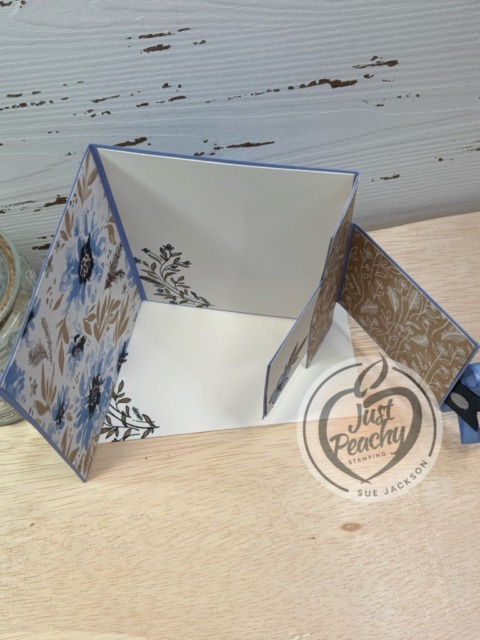
Since the card is rather thick, and will require additional postage, it didn’t quite stay closed no matter how much I burnished the folds. Therefore, I added a set of clear Velcro circles to the back of the label and to the inside of the DSP. The following pictures show the Velcro circles, which you can barely see on the DSP.

Connie Stewart from Simply Simple Stamping posted this card on her blog on May 21, 2026. You can find her video tutorial here. Connie creates fabulous fun fold cards that look much more complicated than they are to create. This card within a card is no exception! Connie’s measurements include a 1/4 inch mat, but I’d rather use 1/8 inch so that’s what I’ve included in my measurements.
Of course, since this is a fun fold, I will be uploading it in the Creative Creases Challenge gallery as a design team member.

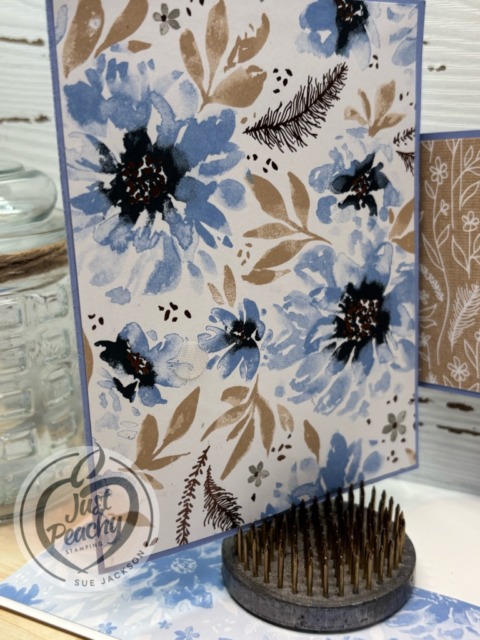
This stunningly gorgeous DSP definitely qualifies for the Love Those Pretty Papers Challenge Blog!
Measurements:
- The Hydrangea Hue base measures 9-1/4 by 5-1/2 inches, scored at 1-1/4 and 5-1/2 inches
- The mini card measures 6″ by 3 inches, scored at 3 inches
- I used the Crumb Cake DSP from Delicate Wishes for the layers on the mini card
- Trim two pieces to 2-7/8 by 2-7/8 inches
- The floral DSP pieces for the front and inside measure 4-1/8 by 5-3/8 inches
- Trim two pieces of the Crumb Cake DSP pattern to 1-1/8 by 5-3/8 inches
- The piece of DSP for the envelope flap measures 2-1/2 by 6 inches
- I punched a 1-inch circle from coordinating DSP and ran it through the XYRON create-a-sticker for the envelope seal
- Trim a piece of white cardstock to 4-1/8 by 5-3/8 inches for the inside
- Trim another piece of white cardstock to 1-5/8 by 2-7/8 inches for the inside part of the mini card
- I used scraps of white to stamp and die cut the flower/leaf for the outside of the card
- Scraps were also used to crop the two branches on the front of the card and the front sentiment
- The banner for the front sentiment came from scraps of Secret Sea cardstock
What I Did:
BIG HINT: I thought that once I had all my pieces trimmed I could just start putting pieces where they belonged. Big mistake. While the card is easier to make than it looks, I would strongly suggest following along with the video when putting the card together. Trust me.
Here are some things I learned along the way:
- Follow the video, pausing when needed
- I used the oval die from the Impressions Abloom die set to crop the sentiment
- Since I was adding a Hydrangea Hue loopy loop bow (link below) I cropped two Secret Sea banners so i’d have one over and under the bow
- I stamped the flowers and foliage sprays using Momento Tuxedo Black ink
- I used the Hydrangea Hue, and Crumb Cake blends combos, and the Bronze blend to color all the stamped images
- As long as you follow Connie’s video the first time you create this card, you will be able to make future cards using just the measurements
Most of all, have fun and don’t tell anyone else how uncomplicated the card is to create.
Loopy Loop Bow:
I was able to watch Mary Deatherage’s, from Stamps -n- Lingers, Perfectly Pears tutorial. In that video, she showed her loopy-loop bow. That’s what I used for the front of my card. I’m bow-challenged and this technique allows me to relatively easily add ribbon without adding the bulk of a tied bow. If you’ve never seen her videos, you owe it to yourself to watch them. I think she’s the Queen of the Collage. Gorgeous cards!!
Back to the Stampin’ Up! Demos Fun Fold Blog Hop:
We all hope you will follow the links below and hop along with us. There’s so much inspiration to be found here. We’d love to see what inspires you to create a fun fold as well. Don’t forget to upload it to the Creative Creases challenge!
If you get lost along the way, you can always come back here to find the next demo in line.
SU Demo Fun Fold Blog Hop Lineup
- Su Mohr
- Mary Deatherage
- Debbie Mageed
- Karen Finkle
- Sue Jackson <<<— YOU ARE HERE!
- Beth McCullough
- Lisa Ann Bernard
- Rae Burnet
- Michele Deschenes
Thank you for stopping by today!
Have a Peachy Day!
Sue
Colors Used:
Supplies Used:
New Starter Kit Offers now available!
Details:
- New team members who purchase their Starter Kit from May 5–31 will be able to choose between these two offers:
- Free 2026–2028 In Color Stampin’ Pads with Starter Kit
- $160 USD | $215 CAD worth of products in their Starter Kit for just $99 USD | $135 CAD (that’s an extra $35 USD | $50 CAD value!)
- New demonstrators who submit their Independent Demonstrator Agreement (IDA) before May 5 or after May 31 will not be eligible for these offers.

If you love exclusive products, you’re going to love Product of the Month, a promotion centered around a special product release every month. The Product of the Month items are specially designed to be some of the best items Stampin’ Up! has to offer that aren’t available in any of our catalogs or our Online Exclusives. Every month we’ll release a new item that is only available for purchase once per account. These items will be limited quantity and are likely to sell out quickly—once they’re sold out, they’re gone for good!
May’s Product of the Month: BERRY BOTANICAL VELLUM 12″ X 12″ (30.5 X 30.5 CM) SPECIALTY DESIGNER SERIES PAPER
Mine arrived today and I am so looking forward to using it ASAP!

Product detail
Enhance your paper crafting and card making with Berry Botanical Vellum 12″ x 12″ (30.5 x 30.5 cm) Specialty Designer Series Paper. This paper includes four sheets: two sheets of florals and two versatile designs that coordinate with the florals or stand alone. Use as backgrounds or cut out individual elements to use as accents.
The Berry Botanical Vellum 12″ x 12″ (30.5 x 30.5 cm) Designer Series Paper is the exclusive Product of the Month for May 2026! Only available until stocks run out—don’t wait to get yours!
DETAILS
– May 2026 Product of the Month
– 12 sheets: 3 each of 4 single-sided designs
– 12″ x 12″ (30.5 x 30.5 cm)
– Acid and lignin free (this product is photo-safe)
– Colors: Bubble Bath, Flirty Flamingo, Fresh Freesia, Golden Glow, Hydrangea Hue, Misty Moonlight, Peaceful Pine, Soft Sea Foam, Strawberry Slush
DESIGNER SERIES PAPER
– Can be used for card making, scrapbooking, and other paper crafts!
– Features exclusive designs by in-house Stampin’ Up! artists.
– Complements other Stampin’ Up! products and colors.
PRODUCT OF THE MONTH
– Is a new exclusive product released each month!
– Can be unlocked for just $5 with orders over $75 (after discounts and rewards).
– Is only available while supplies last—they can sell out quickly!
– Is limited to one per customer (including language versions).
Click here for the Last Chance Products
Browse our selection of Last Chance paper crafting products. Additional items are added every other month. These products are available only while supplies last so be sure to buy them before they are discontinued! Discounts vary and are subject to change.


