Use a Stencil for Make My Monday # 280

Welcome to the newest Make My Monday bi-weekly challenge #280. Our host, Helen, chose Use a Stencil for the theme. I used a die cut Everyday Arch for my stencil, then use it for the inside of the card
When you finish here, please visit the challenge site to see what the rest of the very talented design team members created. Then, don’t forget to upload your creations to our gallery. We look forward to seeing your creations there!
Here’s my card:
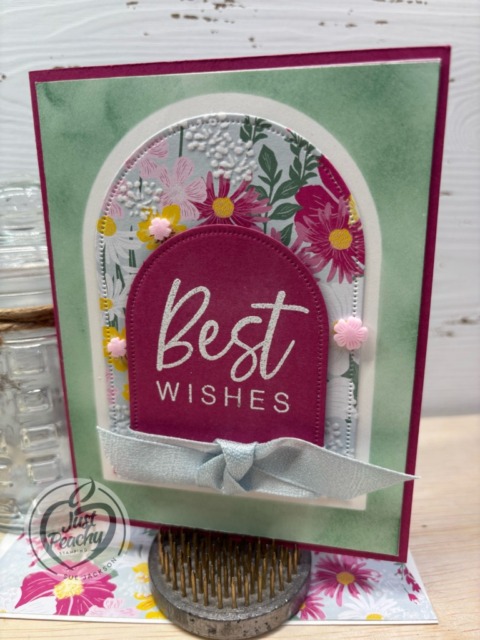

I am in love with the Velvet Meadow DSP (designer series paper) and am probably going to have to order another pack of it and am glad I have a new pack of Berry Burst cardstock. Gorgeous! I’ve already posted some cards using this paper and you can see them here, and here, Since I will be having surgery soon and out of commission, I already have posts using this suite of products scheduled to post. Stay tuned for more cards!
Measurements:
- The Berry Burst base measures 8-1/2 by 5-1/2 inches, scored at 4-1/4 inches
- Trim two pieces of Bubble Bath cardstock to 4-1/8 by 5-3/8 inches outside mat and the inside mat to 4 by 5-1/4 inches
- Trim two pieces of white cardstock to 4 by 5-1/4 inches, and crop one piece using an Everyday Arches die
- This will become your stencil
- Die cut a piece of the Velvet Meadow DSP using a smaller Everyday Arches die
- Since I have scraps of cardstock of varying sizes for every cardstock color, I cropped a smaller arch from Berry Burst scrap cardstock
- Trim a piece of Velvet Meadow DSP to 6 by 2-1/2 inches for the envelope flap
- Don’t forget to punch a 1-inch circle of coordinating cardstock and run it through the XYRON create-a-sticker for the envelope seal
What I Did:
- Unless otherwise noted, I used multipurpose liquid glue to adhere pieces together
- Removal tape is always your friend, but especially so when trying to use a stencil, in this case use the tape to temporarily adhere the cropped large arch to a piece of white cardstock
- Using the blending brush and Peaceful Pine ink, blend color around the arch stencil
- I started on the die cut arch so I didn’t get blobs of ink on the colored piece of white cardstock
- Adhere the layers for the front of the card starting with the Bubble Bath mat, then the colored white cardstock, then the Velvet Meadow DSP arch
- After wiping down the Berry Burst arch with the embossing buddy, stamp the sentiment using VersaMark ink
- Cover the ink with white embossing powder and heat set it
- Wrap a piece of Cloud Cover ribbon to the bottom of the arch and tie it in a square knot, adhering the knot to the sentiment arch using a glue dot
- Add dimensionals to the back of the sentiment arch and adhere to the front of the card
- Using three of the Dreamy Meadow flowers, adhere them to the DSP
- Adhere the Bubble Bath cardstock mat to the inside of the card
- I decided that I didn’t want to waste the arch I’d used as a stencil, so I used it for the inside of the card
- I haven’t stamped an inside sentiment yet because the front sentiment is very versatile and I’ll wait until I figure out the purpose of this card
With that, I’d finished this coordinated card, envelope, and envelope seal set.
Thank you for stopping by today!
Have a Peachy Day!
Sue
Colors Used:
Supplies Used:

June’s Product of the Month is the WILD BUNCH PHOTOPOLYMER STAMP SET!

Send smiles with the Wild Bunch Stamp Set! With hand-drawn animals like a koala, penguin, snail, and highland cow, plus versatile sentiments for birthdays, thank-yous, or just because, this set can help brighten anyone’s day. Add hearts, party hats, presents, or scribbled patterns to make each card or scrapbook page even more fun.
The Wild Bunch Stamp Set is the exclusive Product of the Month for June 2026! Only available until stocks run out—don’t wait to get yours! I ordered mine last night and am so looking forward to getting it next week! Stay tuned for some cuteness!
What’s New?
The Shaded Petals Kit, which retails for $26.00
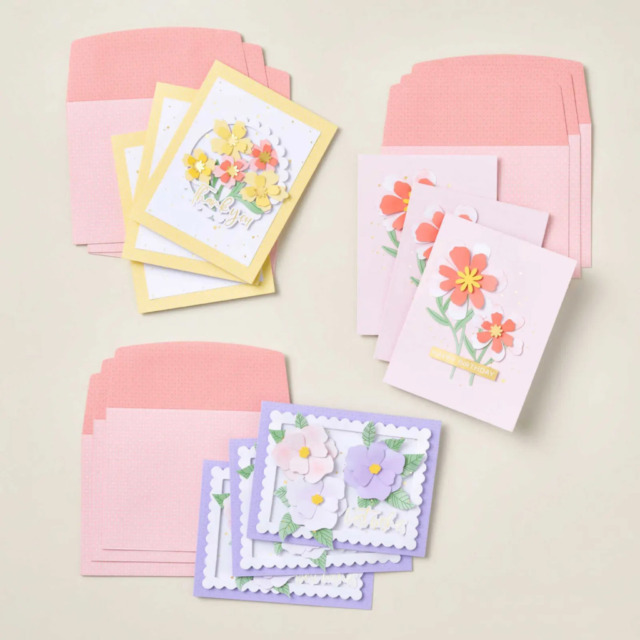
Product detail
Want your floral projects to look effortlessly hand-painted? The Shaded Petals Kit is ready to work its magic! Layer precut petals, add soft shaded color with Sponge Daubers, and finish with coordinating sentiments that pull everything together. From cards to tags to sweet giftables, it turns simple ink blending into petals that look beautifully handcrafted.
DETAILS
– Makes 9 cards: 3 each of 3 designs
– Folded card size: 4-1/4″ x 5-1/2″ (10.8 x 14 cm)
– Colors: Calypso Coral, Daffodil Delight, Garden Green, gold, Highland Heather
– Sentiments printed in Dutch, English, French, and German
Kit includes
– Calypso Coral and Highland Heather Stampin’ Spots
– Step-by-step instructions
– 9 printed envelopes
– Precut paper pieces
– Foil sentiments
– Embellishments
– Sponge Daubers
– Adhesive
KITS COLLECTION
– Includes designed projects that come in a range of project types.
– Is perfect for new crafters, busy crafters, or crafters who want quick and easy projects


