Beautiful Gallery DSP for Father’s Day and the June Creative Crafters # 101

Welcome to the April Creative Crafters Challenge #100, where the theme is always Anything Goes. Challenge # 100! That’s 100 months of gorgeous creations from our design team and all the gallery submissions! Thank you for playing along with us!
When you finish here, please visit our challenge site to see what the rest of the very talented design team members created. Then, don’t forget to upload your creations to our gallery. We look forward to seeing your creations there!
Here’s my Z-fold Father’s Day card:
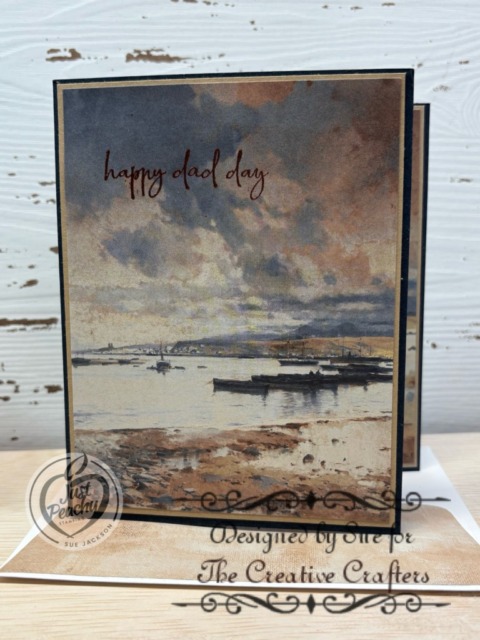
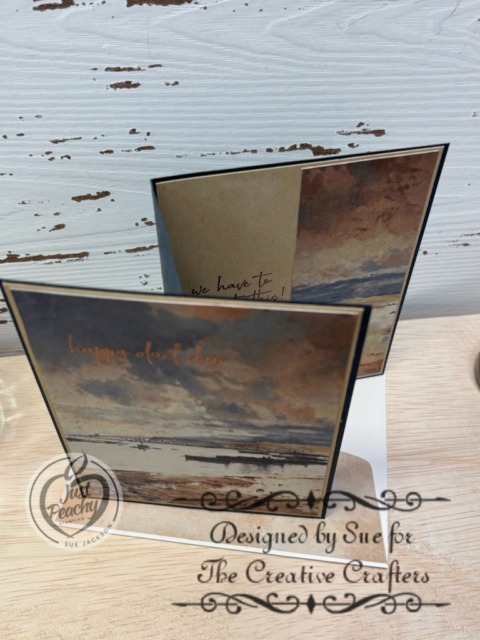
I absolutely love fun fold cards, but I think one of my favorites is a Z-fold card! This 6″ by 6″ inch Beautiful Gallery DSP (designer series paper) is especially perfect for this card because it lends itself to trimming to a 4 inch and a 2 inch wide piece.
It’s just a given that fun fold cards also post to the Creative Creases Challenge. Debbie Mageed at Secret Stamper coordinates the challenge, and I’m honored to be on the design team. Hopefully, you will be inspired to upload your own fun fold project to the challenge!

Measurements:
- The Secret Sea base measures 8-1/2 by 5-1/2 inches, scored at 2-1/8 and 4-1/4 inches
- Trim another piece of Secret Sea to 4-1/4 by 5-1/2 inches for the front flap
- Trim two pieces of Crumb Cake to 4-1/8 by 5-3/8 inches, one for the front flap and one for the inside mat
- Using the boat pattern of DSP, trim it down to 5-1/4 inches high
- Then trim it down to a 4 inch and a 2 inch wide piece
- Trim a Crumb Cake DSP (from the 6″ by 6″ Neutrals DSP) to 6 by 2-1/2 inches for the envelope flap
- Don’t forget to punch a 1-inch circle from coordinating DSP and run it through the XYRON create-a-sticker for the envelope seal
What I Did:
- I used multipurpose glue to adhere all the pieces together
- Adhere one of the pieces of Crumb Cake cardstock to the 4-1/4 by 5-1/2 inch Secret Sea cardstock for the front of the card
- Adhere the front piece to the front flap of the Z-fold card making sure to only add multipurpose liquid adhesive to the flap
- HINT: If you add adhesive to the whole front piece, you won’t be able to open the card
- After wiping down the front piece of DSP with the embossing buddy, stamp the sentiment using VersaMark ink
- Then cover the ink with copper embossing powder and heat set with your heat tool
- After letting the DSP cool, adhere it to the Crumb Cake mat for the front of the card
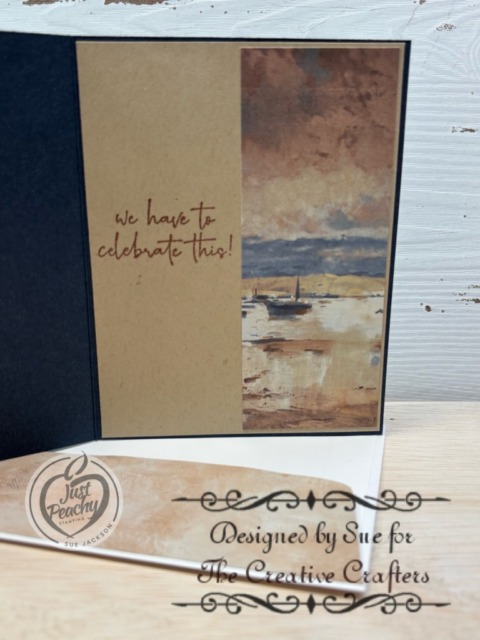
- Adhere the 2 inch wide piece of DSP to the Crumb Cake cardstock mat for the inside of the card
- Wipe the inside piece of Crumb Cake cardstock down with the embossing buddy
- Stamp the inside sentiment using VersaMark ink and cover it with the copper embossing powder
- Heat set the embossing powder using your heat tool and let it cool for a minute to ensure that the powder is set
- Adhere the Crumb Cake mat to the inside of the card
With that, I’d finished this very clean and simple Father’s Day coordinated card, envelope, and envelope seal set.
Thank you for stopping by today!
Have a Peachy Day!
Sue
Colors Used:
Supplies Used:

June’s Product of the Month is the WILD BUNCH PHOTOPOLYMER STAMP SET!

Send smiles with the Wild Bunch Stamp Set! With hand-drawn animals like a koala, penguin, snail, and highland cow, plus versatile sentiments for birthdays, thank-yous, or just because, this set can help brighten anyone’s day. Add hearts, party hats, presents, or scribbled patterns to make each card or scrapbook page even more fun.
The Wild Bunch Stamp Set is the exclusive Product of the Month for June 2026! Only available until stocks run out—don’t wait to get yours! I ordered mine last night and am so looking forward to getting it next week! Stay tuned for some cuteness!
What’s New?
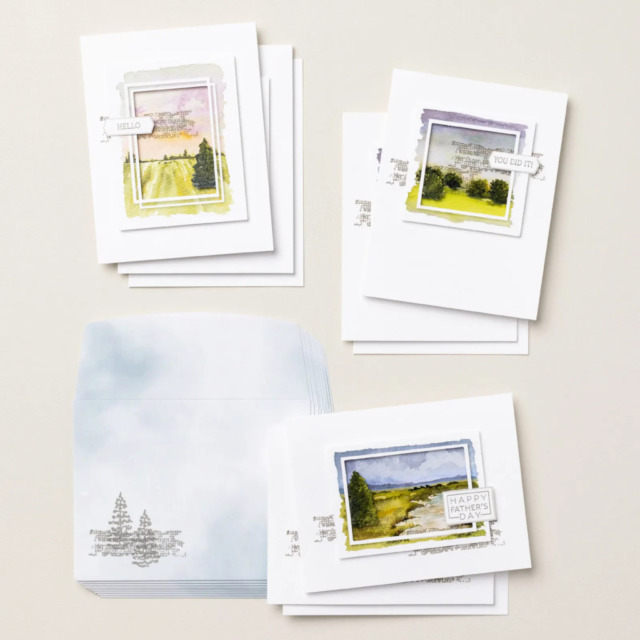
The Serene Scenes Kit, which retails for $25.00
Product detail
Have a card ready when an occasion comes up, whether it’s for Father’s Day, a quick congrats, or a simple thank-you. The Serene Scenes Kit includes coordinating card making materials and a stamp set with sentiments for both the inside and outside, making it easy to pull together something heartfelt. Create clean, simple cards that feature inviting watercolor-feel landscape scenes.
DETAILS
– Makes 9 cards: 3 each of 3 designs
– Folded card size: 4-1/4″ x 5-1/2″ (10.8 x 14 cm)
– Colors: Cloud Cover, Fresh Freesia, Gray Granite, Misty Moonlight, Mossy Meadow, Old Olive, Petal Pink, Secret Sea
– Also available in French
Kit includes one of each item listed below.
– Serene Scenes Stamp Set
– Clear stamp block
– Gray Granite Classic Stampin’ Spot
– Step-by-step instructions
– 9 printed envelopes
– Precut paper pieces
– Adhesive
KITS COLLECTION
– Includes designed projects that come in a range of project types.
– Is perfect for new crafters, busy crafters, or crafters who want quick and easy projects.