Welcome to my one card for two challenges! The Paper Craft Crew #427 calls for a clean and simple card with a minimum of layers. The Paper Players #542 provided the sketch for my two-fer card.
Let me say here that creating this card took as about as much time as it did to figure out how to get the banners and links to show up. When did that get so difficult?
#simplestamping
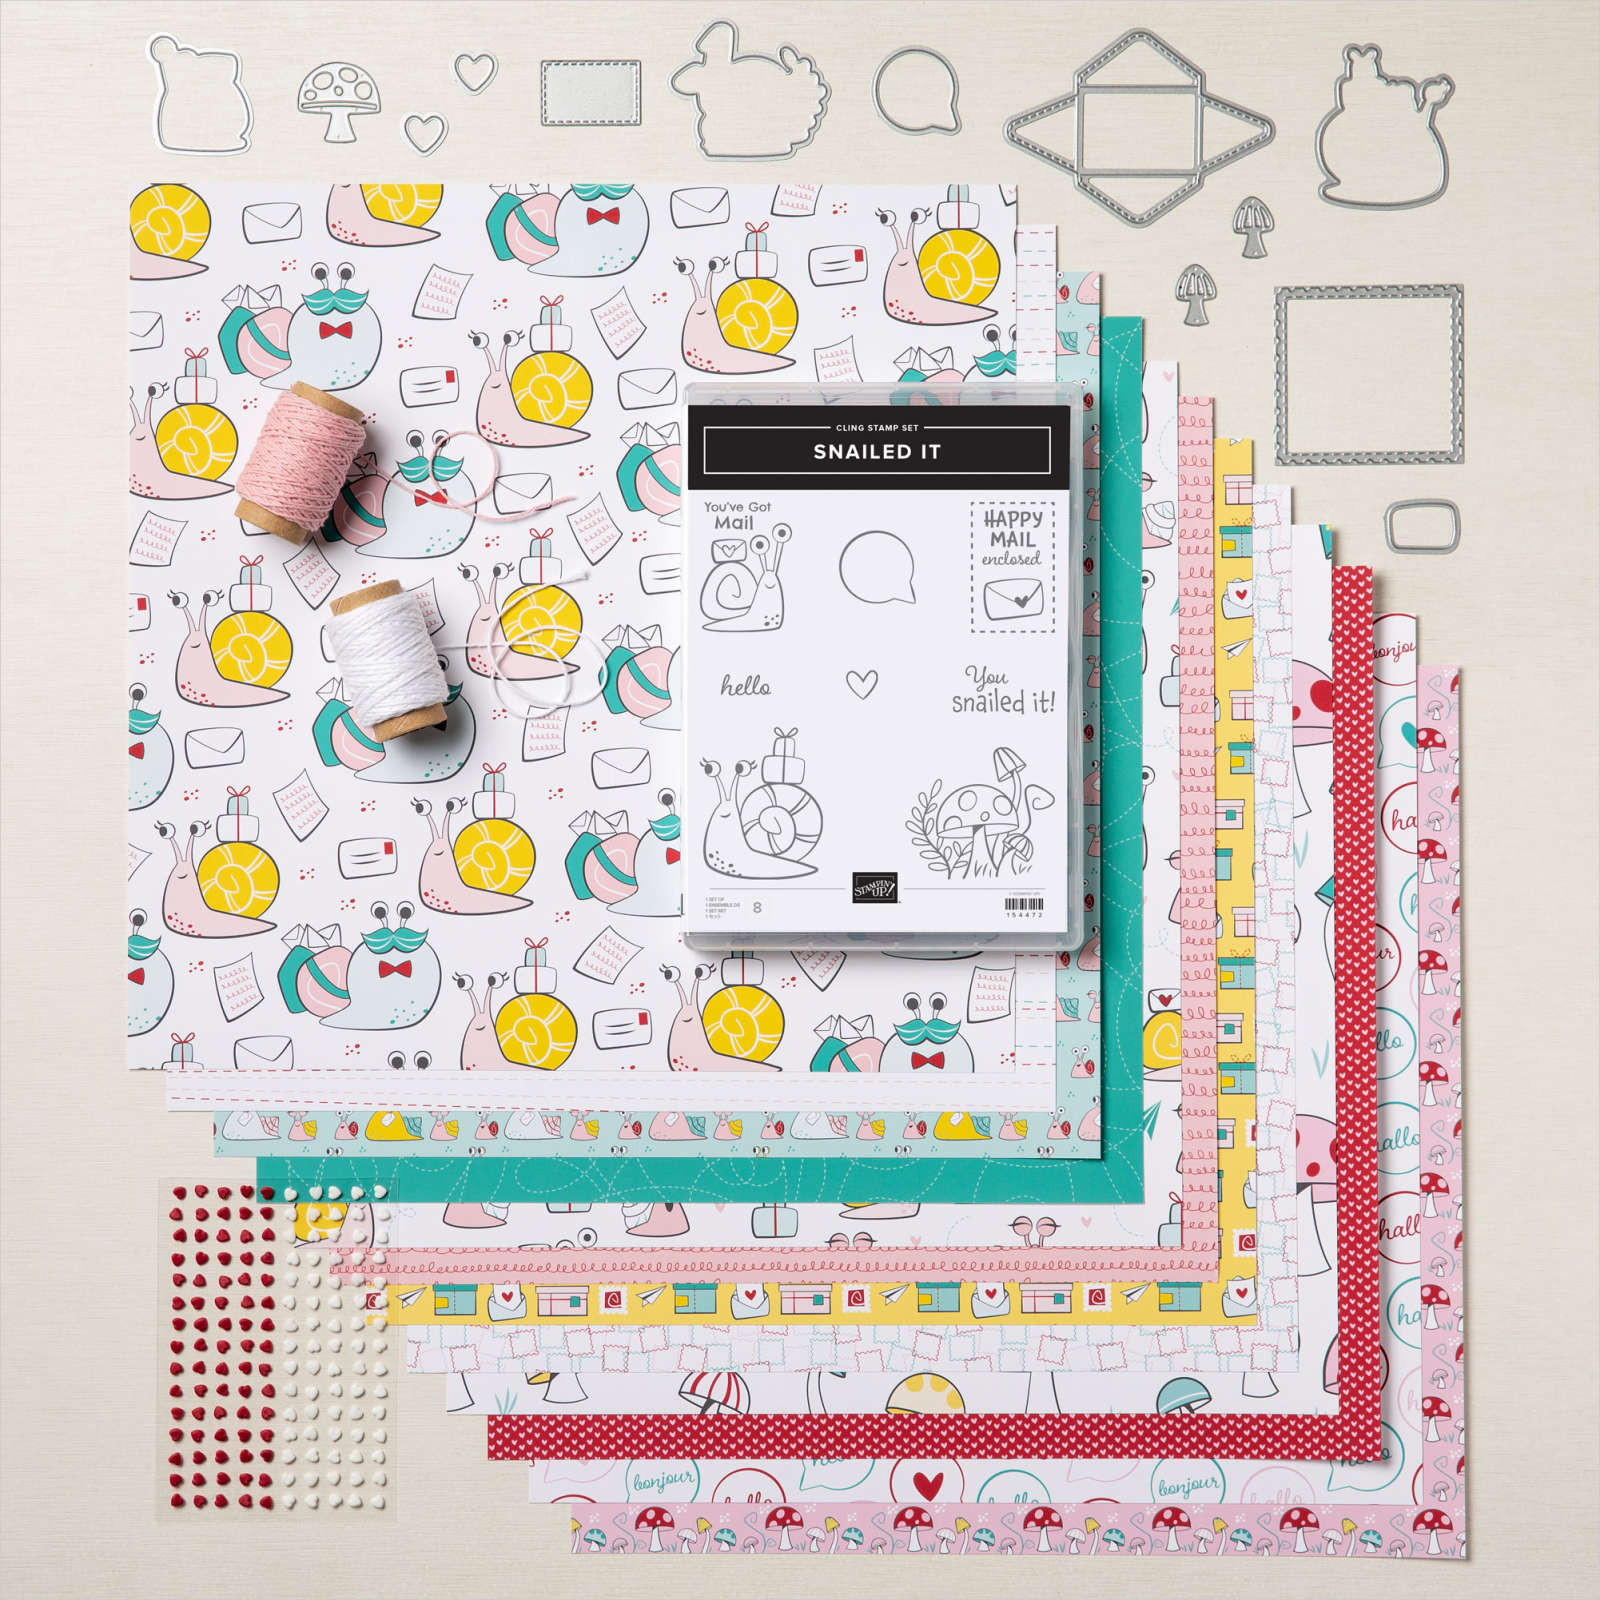
#simplestamping kind of doesn’t fit this card because there isn’t any stamping involved. Literally. I used some Snail Mail DSP, the Snail Dies, 6 mini-dimensionals, white cardstock, the Bark 3D embossing folder, 3 glue dots, and some multipurpose glue.
Confession time: I really had a hard time looking at the plain envelope on the front of the card. Therefore, I went back and add a little, tiny red resin heart to the seam of the flaps. I just had to do it. It’s not noticeable, really. However, in keeping with the clean and simple theme, I didn’t take another picture.
What I Did:
The base of the card is white cardstock. I trimmed it to 4-1/4 inches by 11 inches, scored at 5-1/2 inches to create a tent card.
The embossed layer originally measured 4-1/4 by 5-1/2 inches. After I ran it through the bark embossing folder, I trimmed it to 4-1/8 inches by 5-3/8 inches.
The bottom piece of Bermuda Bay DSP measures 1-1/2 inches by 4-1/8 inches. While I had the DSP out, I trimmed a piece to 6 inches by 2-1/2 inches for the envelope flap. Then I adhered the DSP to the flap and fussy cut it down.
The hearts DSP also comes from Snail Mail, as does the adorable snail and the cute little bubble greeting. I used three of the dies from the snail dies set to crop out these shapes.
I used two glue dots to seal down the little envelope flaps and one glue dot to secure the snail inside the envelope.
There’s multipurpose glue on the bottom part of the envelope to adhere to the Bermuda Bay DSP. There are 3 mini-dimensionals behind the top part so it would lay flat.
There are three dimensionals behind the cute little bubble sentiment.
Finally, I used multipurpose adhesive to adhere the card front to the base. I could’ve used dimensionals, but I really needed to give the appearance of one layer for the base.
That’s it. Truly! Done! I wanted to put a piece of ribbon where the DSP ended under the snail/envelope but I held myself back from doing so.
Do You Love Fun Folds?
I always enjoy finding and learning how to do a new fun fold card! If you do as well, please stop by a new challenge, Creative Creases from Debbie Mageed at The Secret Stamper! I am having a blast with her challenges and have learned some new fun folds! Join the fun at her website! My card for the current challenge is made and will be blogged before the end of the challenge this week. Here’s a sneak peek of my twist and pop graduation card for the current challenge:
Thank you so much for stopping by today.
I’d love to hear what you think, and greatly appreciate every comment.
The January – June mini-catalog will be live for 5 more weeks!
The mini-catalog contains many, many gorgeous, fun, and whimsical products. Snail Mail just happens to be in the mini-catalog as well. Here’s a look at the whole suite:
All the products are available now, but when they are all gone, they are gone for good. Don’t miss out!
Join the Fun!
It’s a fabulous time to join Stampin’ Up! New team members get even MORE FREE products in their customizable Starter Kit. From 4–31 May, new team members can get $155 USD worth of products for only $99 USD + free business supplies + free shipping + all the fun being a part of Stampin’ Up!
Do you live in the U.S. and need a demonstrator? If so, I’d love to talk to you!
Do You Want to Place an Order?
Of course you do!
If you are ordering less than $150.00, please use the host code shown. If you are ordering more than $150.00, please contact me first so you can get your stamping rewards! Any order over $50 will earn a little surprise from me.
The HOST CODE for May is ZM63ASKZ.
Again, thank you for stopping by my blog today! I appreciate your comments and your time.
While I have been playing along with a variety of challenges, I haven’t been meeting deadlines. Today is different. Today I can meet three (!!) deadlines with one card. The inspiration for this card came from Ann Murray at Murray Stamps Ink. She’s been making some fabulous cards using the Whale of a Time Suite of products, so I followed her lead. Now I have two other cards in the works using the same suite.
Here’s my card:
Here are the three challenge banners:
Measurements
The layout for this card meets the Freshly Made Sketches #477 challenge. Using a lot of white space and animals meets The Paper Players challenge. Finally, the fish and turtles meet the Paper Craft Crew challenge.
After deciding what DSP pattern I wanted to use for the focal point, I cropped the paper down using the largest square die from the Stitched Shapes die set. Then I trimmed down a piece of Calypso Coral cardstock to 2-7/8 inches square for the mat.
Then, I went back to the basics, starting with the card base. I used Granny Apple Green for the base. It measures 4-1/4 inches by 8-1/2 inches, scored at 4-1/4 inches forming a square card.
Next, I trimmed a Calypso Coral piece of DSP from the Whale of a Time 6 x 6 inch DSP for the bottom mat. This mat measures 4-1/8 inches by 4-1/8 inches.
I needed to have a bunch of white space, so I ran white cardstock through the Big Shot with the Seabed embossing folder. Then, I trimmed the paper down to 3-7/8 inches square, the cut it diagonally in half.
While I had the white cardstock handy, I trimmed a piece to 4 inches square for the inside sentiment panel.
The Evolution
When I started this card, I really thought I would just stamp the greeting on a piece of Bumblebee cardstock and trim it with a Stitched So Sweetly Die, and that would be that. Things didn’t wind up working quite the way I envisioned. Enter a shaker card, which I haven’t done since Christmas.
The clear medium envelopes are essential when making shaker cards. However, making a very small shaker turned out stickier than I thought. Here are a few tips I learned along the way:
Trim the clear envelope down to a manageable size before trying to use the tear and tape on the back of the cardstock.
Don’t pull the tear and tape strip covers off until you have your cardstock piece in the corner.
While it is necessary to fold the ends of the clear envelope back, make sure you have some give in the front so the shaker part works easily.
Using my opposable tweezer to add the fish to the front of the shaker works very well.
Using the fish die from the Shark dies, I cropped Calypso Coral and Bumblebee fish. Both are inside the shaker.
Then, I used glue dots to adhere the greeting to the center of the outside of the clear envelope.
I stamped some Calypso Coral fish all along the bottom of the inside sentiment panel. The inside “happy birthday” comes from the Woodland Wonder stamp set.
Finishing Up
Since the USPS charges extra postage for square cards, I used a standard medium card envelope. Therefore, I adhered and trimmed a piece of the Whale of a Time DSP to the envelope flap. Then, I punched out a circle of Granny Apple Green DSP for the seal. I have not been using anything wet to seal envelopes and have been writing “no saliva has been used to seal this envelope” on the backs. A few months ago, I realized I could create coordinating circle seals for the envelopes. I ran the seal through my little Xyron create a sticker 150. After running the circle seal through the Xyron, I just slip it into the envelope so I have everything together when I am ready to use the card.
With that, I’d completed this card/envelope/seal set.
Thank you so much for stopping by today.
I’d love to hear what you think, and greatly appreciate every comment.
Just look at all that gorgeousness! The butterfly stamp is all one piece, as is the coordinating die. The die will also perfectly crop out butterflies on the coordinating DSP! No coloring needed, unless you want to do so.
Do you live in the U.S. and need a demonstrator? If so, I’d love to talk to you!
Do You Want to Place an Order?
Of course you do!
If you are ordering less than $150.00, please use the host code shown. If you are ordering more than $150.00, please contact me first so you can get your stamping rewards! Any order over $50 will earn a little surprise from me.
The HOST CODE for MARCH is 7EUAPNKA.
Again, thank you for stopping by my blog today! I appreciate your comments and your time.
Sundays are usually the day during which I am supposed to be working on lesson plans. I did get that done, but I also got to relax by creating two cards. This card meets Color Throwdown #619 for aqua, red, and silver, which ends tomorrow at 6 pm.. It also meets The Paper Players #517 for a clean-and-simple holiday card.
Without further ado, here’s my card:
Here are the ctd619 and PPT517 challenge banners:
Measurements and More
I used Real Red for the card base, trimmed to 5-1/2 inches by 8-1/2 inches, scored at 4-1/4 inches.
The Pool Party mat is 4-1/8 inches by 5-3/8 inches. I cropped the square out of the middle of the mat layer using the largest Stitched Shapes square.
I used two pieces of Whisper White, one for the inside and one for the outside. Before trimming the outside piece, I ran it through the Big Shot using the brick and mortar 3D embossing folder. Then I trimmed it to 4 inches by 5-1/4 inches, which is the same size as the inside piece.
A third piece of white cardstock was enough to stamp the bells and the sentiment. I used Versamark to stamp the bells using my Stamp-aratus, then added silver embossing powder and heat set it. The Stamp-aratus also helped trememdously when I stamped the sentiment in Real Red. Then I added clear embossing powder and heat set the sentiment. I trimmed the sentiment block to 2-1/4 inches square.
By the way — do you recognize the sentiment on the front? Yes, it’s from It’s a Wonderful Life and is just one of four movie quotes in the Christmas Means More stamp set.
Elements
The Sounds of the Seasons die set contains a die for the single bell. However, I had to fussy cut the pair of bells, which wasn’t difficult at all and only took a few minutes.
I used the Pool Party sheer ribbon to thread through the holes I made in the bell rings.
Next, I put dimensionals under the sentiment block and the bells. I had to be careful with the placement under the pair of bells so it would overlap the sentiment block. There’s multipurpose liquid adhesive in the corner of the sentiment block to adhere the bells.
After putting everything together on the front, I decided that it needed something, but I had to keep it clean and simple. Therefore, I used the clear Wink of Stella pen to paint random bricks.
There are times that i don’t want a lot of white space on the inside of the card, and this was one of those times. I used the snowflakes, stamped in Pool Party, from Frosted Foliage to form a frame around the Merry Christmas sentiment on the inside. The sentiment is stamped in Real Red to coordinate with the front sentiment.
Next, I stamped some Pool Party snowflakes on the front, bottom, left corner of the envelope. I also stamped snowflakes on the envelope flap.
With that, I’d finished this card/envelope set.
Thank you so much for stopping by today.
I’d love to hear what you think, and greatly appreciate every comment.
Do you live in the U.S. and need a demonstrator? If so, I’d love to talk to you!
Of course you do! Even more so because you are now moving on to create Thanksgiving and holiday cards, right? There’s more information about the August – December 2020 mini-catalog below!
If you are ordering less than $150.00, please use the host code shown. If you are ordering more than $150.00, please contact me first so you can get your stamping rewards! Any order over $50 will earn a little surprise from me.
The HOST CODE for NOVEMBER is CBDP2DQT.
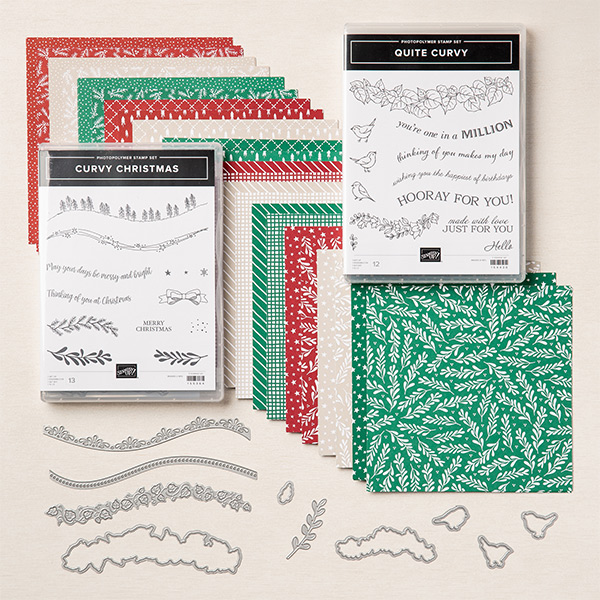
This absolutely gorgeous bundle is now available! I already have one of the bundles and used it this past weekend. You can see that card here.
Here are some fabulous images from Stampin’ Up! Each bundle is available separately, but if you want it all, the whole variety bundle is pictured below:
158396 – QUITE CURVY VARIETY BUNDLE
Again, thank you for stopping by my blog today! I appreciate your time.
The Paper Players challenge for this week is a tic-tac-toe challenge. Three elements in a row, meaning eight options for a card. I picked the top row across of ribbon, rhinestones, and patterned paper.
Here’s my card:
Here’s the challenge banner:
Parisian Blossoms DSP
I purchased a DSP share from my upline in February, which means that I recieved 6 x 12 sheets of all the DSP packs available in the mini-catalog. Thankfully, this design was in that share. When I pulled it out, I thought that this DSP for this challenge seems made for each other. Patterned paper – check. Part of my attration to this paper is the amount of open space in the Pool Party background. Once again, the Stampin” Up! designers have hit it out of the park with this DSP.
The ribbon is the Petal Pink Organdy Striped Ribbon, and the impact of the bow on the paper is striking, in my humble opinion. While this bow isn’t as pretty as the one I created earlier in the week, it still has a positive impact on the card. Ribbon – check.
Here’s a close-up of a section of the card:
I wanted to make sure that I provided an adequate picture of the rhinestone, as required by the challenge. There are eleven rhinestones on this card, with one on the center of each flower. They add bling to the card without being obtrusive. Rhinestones – check.
All three requirements for the top row – check.
Second Option for This Card
While I didn’t try to fulfill a second line on the tic-tac-toe board, I actually did just that. The card also satisfies the left-hand column of ribbon, die-cut, and pink.
The center of the flowers and the ribbon are pink. Two requirements – done.
For the sentiment circle, I actually used three die cuts from the Layering Circles die set. I really wanted more of the popped up die cut circle showing, especially since I have the circle lined up with the rest of the DSP. It’s not important that I did that, it just helps to keep me from having an issue with the sense of order with the card.
I used a very thin border of Basic Black cropped using a scalloped die from the same die set. Since I only wanted a touch of the black border, this worked out the way I wanted it. The black mini-dimensionals worked perfectly to add dimension to the sentiment circle.
I used a Pool Party base for the card. On the inside of the card, I adhered a piece of Whisper White and stamped the sentiment “Life is better with a friend like you”. I also put a half-inch strip of the DSP on the bottom of the inside.
After that, all I needed to do was to add a piece of the DSP to the envelope flap, and this card set was done. Truly, an easy-peasy card. From the time that I chose the DSP to the final cutting of the DSP on the envelope flap, the card took less than thirty minutes. If I wanted to mass produce these, I am quite certain that I could get 10 of these done in less than forty-five minutes. That is, if the ribbon cooperates so I would have pretty bows.
As always, thank you so much for stopping by my blog today. I’d love to hear what you think, and every comment is greatly appreciated!
Please stay safe, healthy, and isolated as much as possible. We were on Spring Break two weeks ago, and should have gone back this past Monday. Instead, we transitioned to virtual learning and our “kids” started with that format on Monday. Florida starts a stay-at-home order so we will be home for at least a month. I have one daughter, but many hundreds of “kids” and I miss this year’s kids greatly.
Have a Peachy Day!
Sue
Supplies Used:
Click on the images below to be directed to my store 24/7.
While Sale-a-Bration ended at midnight on March 31, there’s more to love! The Ornate Garden Suite is now available as a pre-order from the new 2020 – 2021 catalog. Just look at all this gorgeousness!
Again, thank you very much for stopping by my blog today!
I am so happy that this petit flower punch is back with a coordinating stamp set! The best part ~~ each part of this fun set is FREE with a qualifying order during Sale-a-Bration, which runs through the end of March.
But First, Blog Candy Winner!
Each and every comment left on my cards for the Pals Critters Blog Hop gave me a big smile! I greatly appreciate the time you all took to comment! You can see those cards here. Now, drum roll, please: The randomly generated number is 17! Jeanie Stark, you are the winner! Please email me your mailing information so I can get your blog candy in the mail!
Paper Players 481 is a Color Challenge
Color challenges are fun, and sometimes challenging! This one, however, was simple for me. I’d previously earned the punch for these fabulous flowers, and I recently earned the Thoughtful Blooms stamp set. I wanted to use the pair ASAP, and this challenge seemed to be a perfect match!
Here’s the challenge banner:
Here’s my card:
Bermuda Bay, Calypso Coral, and Coastal Cabana is such a calming color combination. Therefore, I wanted to keep the card clean to highlight just the colors.
I took layout inspiration from the current Fusion challenge, but made some adjustments. I think I am going to have to use the Thoughtful Blooms set to create a card without adjusting the layout and using the posted color scheme.
In order to get the branches and leaves I wanted, I used both the branches with leaves and the leaf trio stamps. I stamped all of these leaves and branches using Coastal Cabana. After stamping going up the left side, I stamped some leaves behind where the sentiment square would be placed.
I popped each of the seven flowers on dimensionals. Then I put some colored pearls on the center of each. At that point, I thought that I really needed something else, some sparkle. However, I didn’t want to clutter up the clean card. Wink of Stella to the rescue. It’s so difficult take a photo of the Wink of Stella, but I think you can see the sparkles on the flowers in the picture below:
As Always,
Thank you so very much for stopping by my blog today. I appreciate your the time you take to read, and comment, on my blog.
Have a Peachy Day!
Sue
SUPPLIES USED:
Thinking About Placing an Order?
Of course you are! Even more so because of the products in the mini-catalog and the Sale-a-Bration FREE items! The HOST CODE for March is WW6HSM6A . If you are ordering less than $150.00, please use the host code shown. If you are ordering more than $150.00, please contact me first so you can get your stamping rewards and FREE SAB items!
Remember, any order over $50 qualifies for at least one FREE SAB item AND some blog candy from me.
Don’t do what I have done, and put off ordering from my wish list. I seem to miss out because when these items run out, they are gone!
Sale-a-Bration and the Mini-Catalog are in Full Swing
Who doesn’t like FREE Stampin’ Up! products? FREE items start with a $50 qualifying purchase! Just look at some of these must-haves!
These gorgeous papers can be colored with the Stampin’ Write Markers!
Please feel free to make my day and leave a comment.
You can follow my blog by entering your email address in the space provided in the sidebar.
Two-fer: Global Design Project Color Challenge and Paper Players Sketch Challeng
I love playing along with challenges, and really love when I can combine two challenges. This week’s #GDP213’s color challenge calls for Lovely Lipstick, Old Olive, and Smoky Slate. The Paper Players sketch challenge seemed to be designed just for these colors.
My upline and member of the GDP design team, Brian King, created this holiday card using the color challenge. It’s so perfect, and used his card as an inspiration for my holiday card with these three colors.
Here are the challenge banners:
Here’s my two-fer challenge holiday card:
I’m not quite sure why the bottom mercury glass appears lighter than the top. I tried photographing it from multiple angles and OttLite positions and it kept coming out that way.
Mercury Glass Shines
I knew I wanted to use just Lovely Lipstick cardstock for the base of this card. While trying to figure out which embossing folder I should use, I remembered I had an unopened pack of mercury glass sheets. I enthusiastically pulled out the paper and cut a piece down to 4- 1/8 x 5-1/4. Next, I pulled out and cut an identically sized piece of Lovely Lipstick cardstock, paired them up and was immediately thrilled with the results. Somewhere in the back of my mind, I remembered hearing that the mercury glass has a clear film on the front which needed to be removed for use. Thankfully, I did that before gluing all the components down.
In order to incorporate the Smoky Slate, I tried using a piece of that cardstock for the base. It didn’t work at all because Smoky Slate is basically the same as the mercury glass. I decided the Smoky Slate banner for the sentiment would be enough of the color. Since I used a piece of scrap already embossed with the Subtle 3D folder, I needed to use the Stamparatus for the sentiment. The Stamparatus allowed me to stamp the sentiment over and over until I felt satisfied without having to worry about perfectly lining up the stamp each time.
Here’s a picture showing the similarity between the mercury glass and Smoky Slate:
The Perfectly Plaid Bundle
This photopolymer stamp set and coordinating punch provided all the elements for this card. I used the In Color DSP for the strip behind the sentiment. The punch easily cropped Old Olive DSP and cardstock to create the trees. I simply stamped the focal tree in the front with Lovely Lipstick needles (berries?? decorations??) on Old Olive cardstock and popped it up on dimensionals. In order to achieve some depth and separation between the trees, I used the brush side of the Old Olive marker to outline all three trees. I decided to use the dark Smoky Slate blend to color the stump of the trees.
Finishing Touches
I really struggled with the finishing touches. I couldn’t decide if I wanted to use ribbon, and if so, where would I put it. After trying a few different placements, I decided I didn’t need ribbon after all.
This is where the Wink of Stella came into play. I wanted to have something else, without adding bulk or clutter so the card could remain clean. I sed the Wink of Stella on dots, alternate stripes, and red needles on the trees. It adds just enough sparkle without adding clutter.
I used more Lovely Lipstick DSP for the envelope flap and also stamped an Old Olive tree with Lovely Lipstick needles on the front of the envelope. Another card set completed. All is well. Life is good.
Thanks so much for stopping by my blog today. A big thanks, in advance, for taking the time to leave a comment.
Have a Peachy Day!
Sue
If you don’t already have a Stampin’ Up! demonstrator, I would be honored to work with you. Please contact me or visit my shop to order the supplies for this card.
If you are ordering $150 or more, please contact me first so you earn all the Stamping Rewards for your order.
If you are ordering less than $150, please use the host code, 49KJF94R when prompted. I use the combined rewards for gifts for customers.
I am super excited about the October and November Paper Pumpkin coordinating kits! I recieved my October Paper Pumpkin card kit and it is fabulous!! The November kit will be the coordinating gift tags. So excited! In order to recieve the November kit, you will need to sign up by November 10th. Here’s the link for you to sign up for these kits as well: https://www.paperpumpkin.com/en-us/sign-up/?demoid=2155072
Welcome to Just Peachy Stamping by Sue Jackson: an independent Stampin' Up demonstrator.
Through Stampin' Up!, I happily share my love of papercrafting through sales, classes, small stamping group meet-ups and workshops. I think that being a teacher in my "real life", I have a unique approach to sharing my fantastic hobby. I look forward to connecting with you!