Welcome to the August, 2024 SU! Demos Fun Fold Blog Hop! Each month, a group of demos share fun fold cards for a blog hop. I always learn something new and thoroughly enjoy seeing the creations of the other demos. We hope that you will use the line-up below to hop along with us.
Here’s my Thoughtful Journey Joy Fold card:
As always with this Hop, I will be entering my card to the Creative Creases Challenge gallery. If you enjoy fun folds as much as we do, you really need to join this bi-weekly challenge, which was founded and organized by the leader of this Hop, Debbie Mageed with Secret Stamper.
Last year I found this card fold around Thanksgiving and wound up making so many Christmas cards using this video from Rachel Tessman. Once you make a couple of them, it’s just so easy to keep right on going.. Just this past week I made three using the Thoughtful Journey 6 x 6 inch DSP and they are beautiful, even if I do say so myself. The DSP does all the work. It’s a gorgeous layout and makes a big impact. Here’s her video:
Rachel’s blog post for this card also has a printable tutorial. I can pretty much guarantee you can follow along with her video and just start creating stunning cards with cardstock and some 6 x 6 inch DSP! You can see some of the cards I made here and here.
For the inside of my card, I used blending brushes and Petunia Pop, Wild Wheat, and Calypso Coral ink to lightly surround the sentiment with color. I just didn’t want plain white cardstock on the inside, so I used the DSP as inspiration. I hope I’ve done it justice.
Back to the Blog Hop:
Please play along with us, and don’t forget to upload your fun folds to the Creative Creases Challenge. We hope you will hop along with us. You can use the following links as a guide:
Welcome to the July, 2024 SU! Demos Fun Fold Blog Hop! Each month, a group of demos share fun fold cards for a blog hop. I always learn something new and thoroughly enjoy seeing the creations of the other demos. We hope that you will use the line-up below to hop along with us.
The inspiration, and directions for my card comes from Susie Wood from Stamp with Susie, Click here to get to her Pinterest post. I’ve already made this card twice and have the third one cut and ready to assemble. If you can score cardstock, you can totally do this impressive fun fold, which will fit in a medium SU! envelope.
Since I am hand-delivering this card, I don’t have to worry about additional postage.
I have a notebook in which I keep templates for fun fold cards. It makes it so much easier to recreate fun folds if I have all the measurements in one place. Here’s my template and measurements for this card:
PLEASE NOTE: I MADE A MISTAKE ON THE LAST SCORE LINE ON THE TEMPLATE. YOU NEED TO SCORE AT 9-5/16 INCHES. I REALIZED MY MISTAKE TODAY WHEN I MADE ANOTHER LATCH FOLD CARD.
I used the Mediterranean Blooms suite of products for this card. The colors are spectacularly bright and sunny. It’s the first suite I ordered from the 2024-2025 annual catalog and I absolutely love it.
Take a look at all this fabulous-ness:
Cropping:
Using the Citrus Blooms die set, crop a Night of Navy and a two Basic White frames
Using both the frame and the large leaf, crop two Daffodil Delight leaf frames
HINT: You need to line up the frame and the leaf dies to get just the inside leaf section. If you don’t use the frame, you will just get the leaves in your paper. Trying to get the frame and the leaf dies lined up is not fun, believe me.
Use the Countryside Corners die set to crop two Night of Navy pieces for the front. You will adhere these together for more stability to hold the latch fold.
Using a smaller Countryside Corner die, crop two Basic White pieces, and adhere them together
Using another Countryside Corners die, crop a Night of Navy piece for the inside sentiment
Crop six leaf sprays from Garden Green cardstock
Assembly:
Unless otherwise noted, I adhered all pieces with multipurpose liquid glue
Adhere the extra piece of Night of Navy cardstock to the front flap of the base
Next, adhere the DSP to the front and the flap of the base
Adhere one set of Daffodil Delight leaves to the Night of Navy frame and adhere to the front of the cqrd
Then adhere the other set of leaves to the Basic White frame and adhere it to the inside of the card
Adhere the last Basic White frame to the back of the base, which will give you space to write your note
Stamp the outside sentiment on the white Cropped Countryside Corner layers using Night of Navy ink and adhere to the Night of Navy cropped layers
Add dimensionals to the left two-thirds of the Night of Navy cropped layers
HINT: Before removing the adhesive covers of the dimensionals, dry fit it on the front flap of the card to make sure your latch fold will fit under the sentiment panels
The inside sentiment is actually one long stamp, which I stamped in Night of Navy then trimmed so it would fit on the cropped Countryside Corners piece
Finally, adhere the Garden Green leaf sprays
With that, I’d finished this coordinated fun fold card, envelope, and envelope seal
I hope you will try this card. I add so many more layers than necessary to make this card. The next one I am making will be more clean and simple, so I will update this post with the link to that card when I post it.
Back to the Blog Hop:
Please play along with us, and don’t forget to upload your fun folds to the Creative Creases Challenge. We hope you will hop along with us. You can use the following links as a guide:
Welcome to the February Stampin” UP! Demo Blog Hop. Each month, this group of SU! Demos create fun fold cards to share with you. As always, fun fold cards can also be uploaded to the Creative Creases Challlenge!
Here’s my birthday accordion fun fold card:
When I saw the pictures accompanying this video from Stamp With Tami, I knew I had to create it for this hop. At the beginning of her video, Tami said it was a pretty easy fun fold since it’s created with 4 score lines, and I was hooked. You can find the link to her video here
For this card I used a number of the current Sale-a-Bration FREE items with a qualifying purchase. Here’s the Sale-a-Bration items I used:
I did make a three small changes to Tami’s directions. First, I’d rather have a smaller border, so I used a 1/8 inch border instead of a 1/4 border. In addition, I didn’t want the sentiment on the last fold to show when closed, so I made an adjustment to the piece of white cardstock for that flap. Finally, I didn’t want plain white cardstock showing on the back of the flaps. Therefore, I used one of the Basics Embossing Folders from the Online Exclusives. Only 1/8 inch shows around each piece of DSP, but it’s enough to have the DSP pop off the Poppy Parade cardstock.
Measurements I used combining Tami’s directions with my 1/8 inch borders:
The Poppy Parade base measures 11 by 4-1/4 inches, scored at 2-1/2, 3-3/4, 6-3/4, and 8-1/4 inches.
After embossing white cardstock using the basics embossing folder, trim white cardstock mats to 4 by 4 inches, 4 by 3-1/2 inches, and 4 – 2-1/4 inches.
The three DSP pieces measure 3-7/8 by 3-7/8 inches, 3-7/8 by 3-1/8 inches, and 3-7/8 by 2-1/8 inches.
I also trimmed a piece of the DSP to 6 by 2-1/2 inches for the envelope flap. Then, I punched a 1-inch circle from the same DSP and used the reverse side for the envelope seal.
Assembly:
I used Tami’s directions for assembly – easy peasy.
I did add the Pool Party crinkled ribbon on the front panel and used the ribbon saver technique for it.
Cut a piece of ribbon to approximately 6 inches, and another piece to two inches.
Add the ribbon to the front of the card and adhere in the back as shown below.
Using the shorter length of ribbon, tie a knot around the ribbon on the front of the card.
The finishing touch was to add some Sale-a-Bration Pool Party opaque faceted dots.
Back to the Fun Fold Blog Hop:
We hope you will hop along with us! I always learn a new-to-me fun fold. When you create your own fun fold, please remember to upload it to the Creative Creases Challenge.
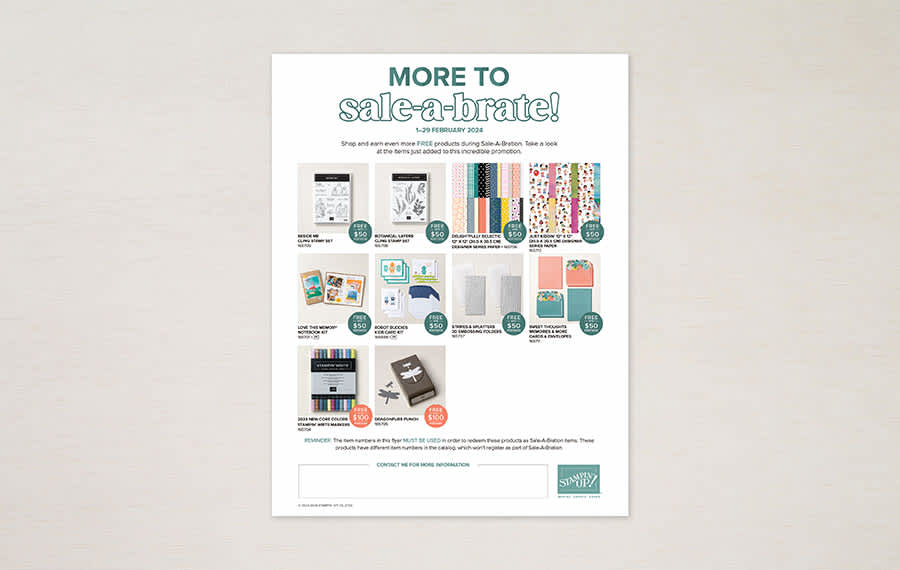
It’s Still Time to Sale-a-Brate until February 29,2024!
Now there’s more to Sale-a-Brate!
The dragonfly punch is in the current catalog, but I thoroughly enjoyed getting it for free!
My next Sale-a-Bration item will be the set of the new colors markers. I already have that set of markers but I want an extra set of them. Getting them for FREE with a qualifying purchase is a WIN-WIN!
The Sale-a-Bration Jungle Pals dies and stamp set are fabulous! I’ve already posted cards for which I’ve used those items and you can see them here and here. Of course, there are other fabulous items as well!
Shopping in the current mini-catalog is a wonderful way to earn FREE products!
Click on the image/link below to browse and download the mini-catalog!
In addition, there’s a great promotion going on during Sale-a-Bration for joining the Stampin’ UP! community!
Customers who join our fun crafting community as a new demonstrator can get $125 USD | $165 CAD worth of product PLUS our Stampin’ Glass Mat Studio* (a $60 USD | $82 CAD value) for just $99 USD | $135 CAD!
STAMPIN’ GLASS MAT STUDIO:
The Stampin’ Glass Mat Studio is a paper crafter’s dream! The heavy-duty glass mat comes printed with a ruler and grid lines for easy measuring, while the large surface space gives ample room for spreading out while paper crafting. The safety-tempered glass has a heat and scratch resistant surface that wipes clean with the included cloth and water—no chemicals needed. The reusable cloth also cleans ink off your stamps! The nonslip, heat resistant, waterproof silicone mat features four palette squares for mixing custom ink colors or for holding small ink spots in place while crafting. Each component can be used separately or you can use all three items together for a multipurpose paper crafting studio that’s both functional and elegant.
The Stampin’ Glass Mat Studio includes:
GLASS MAT * 5 mm thick * 17″ x 14″ (43.2 x 35.6 cm) * Safety-tempered * Heat and scratch resistant * Wipes clean with water or alcohol
SILICONE MAT * 8-3/8″ x 6″ (21.3 x 15.2 cm) * Multiuse, nonslip * Waterproof, heat resistant * 4 palette squares for custom-color mixing or holding Stampin’ Spots * Product color: white
CLEANING CLOTH * 8-1/4″ x 8-1/4″ (21 x 21 cm) * Durable, reusable * Lint free * Cleans stamps and other surfaces with only water * Product color: dark gray
If you live in the U.S. and don’t already have a Stampin’ UP! demo from whom you order, I would be honored to work with you.
When prompted, please enter the following HOST CODE:
Welcome to the January Stampin’ UP! Demo Fun Fold Blog Hop! As you probably already know, I love fun folds and am always looking for something new. This blog hop always provides me with new folds to try. When you finish here, I hope you will hop along using the lineup below my post. There’s always loads of inspiration here, and don’t forget to upload your own fun folds to the Creative Creases challenge, which is always anything goes with a fun fold.
I have two versions of a vertical freestanding fun fold card. The second version is an extended version. Please keep in mind that, while these cards will fit in a medium envelope (I promise!) they will require extra postage.
Here are my cards:
Here’s the extended version:
I found my fun fold on Susan Campfield’s YouTube channel. You can find her video tutorial here. Her video includes examples of both the vertical and horizontal layouts. I’m going to have to try the horizontal .layout next!
Jungle Pals:
This Sale-a-Bration stamp set and coordinating dies are available for FREE with qualifying purchases. The stamp set is FREE with a $50 purchase (US) and the die set is FREE with a $100 purchase (US).
I stamped all the animals using Momento Tuxedo Black ink.
The stamping blends combos made coloring these cuties easy:
The Smoky Slate blends combos were used for all the sloths and the lemurs.
I used the Cajun Craze and Pumpkin Pie blends for the tiger.
I colored the toucans using the Daffodil Delight, Pumpkin Pie, and Smoky Slate dark of Basic Black light blends. One toucan is colored with the light Daffodil Delight, Pumpkin Pie, and dark Smoky Slate blends. I colored the other one using the dark Daffodil Delight, Pumpkin Pie, and light Basic Black blends.
I cropped the tree trunks from Pecan Pie cardstock.
All the vines and leaves were cropped from Garden Green and Granny Apple Green cardstock.
I used embossing folders for the Garden Green outside strips.
I stamped all the sentiments in Momento Tuxedo Black ink using the Charming Sentiments stamp set and cropped using the coordinating dies.
I didn’t use dimensionals on the extended card version. For that card, I only used multipurpose liquid glue because the extra cardstock added more thickness.
Back to the Blog Hop:
Each month I am completely inspired by the rest of the members of this hop! I hope you will visit each of the demos linked below. Don’t forget to upload your own fun folds to the Creative Creases Challenge! See you in the gallery!
In addition, there’s a great promotion going on during Sale-a-Bration for joining the Stampin’ UP! community!
In addition, there’s a great promotion going on during Sale-a-Bration for joining the Stampin’ UP! community!
Customers who join our fun crafting community as a new demonstrator can get $125 USD | $165 CAD worth of product PLUS our Stampin’ Glass Mat Studio* (a $60 USD | $82 CAD value) for just $99 USD | $135 CAD!
STAMPIN’ GLASS MAT STUDIO:
The Stampin’ Glass Mat Studio is a paper crafter’s dream! The heavy-duty glass mat comes printed with a ruler and grid lines for easy measuring, while the large surface space gives ample room for spreading out while paper crafting. The safety-tempered glass has a heat and scratch resistant surface that wipes clean with the included cloth and water—no chemicals needed. The reusable cloth also cleans ink off your stamps! The nonslip, heat resistant, waterproof silicone mat features four palette squares for mixing custom ink colors or for holding small ink spots in place while crafting. Each component can be used separately or you can use all three items together for a multipurpose paper crafting studio that’s both functional and elegant.
The Stampin’ Glass Mat Studio includes:
GLASS MAT * 5 mm thick * 17″ x 14″ (43.2 x 35.6 cm) * Safety-tempered * Heat and scratch resistant * Wipes clean with water or alcohol
SILICONE MAT * 8-3/8″ x 6″ (21.3 x 15.2 cm) * Multiuse, nonslip * Waterproof, heat resistant * 4 palette squares for custom-color mixing or holding Stampin’ Spots * Product color: white
CLEANING CLOTH * 8-1/4″ x 8-1/4″ (21 x 21 cm) * Durable, reusable * Lint free * Cleans stamps and other surfaces with only water * Product color: dark gray
If you live in the U.S. and don’t already have a Stampin’ UP! demo from whom you order, I would be honored to work with you.
When prompted, please enter the following HOST CODE:
Welcome back to the monthly Stampin’ UP! Demonstrators Fun Fold Blog Hop. If you love fun folds, you’ve come to a hop filled with really great projects by some very talented fellow demonstrators. When you finish here, I hope you will hop along with the rest of the demos using the links below.
It’s just a given that fun fold cards also post to the Creative Creases challenge. Debbie Mageed at Secret Stamper coordinates both this hop and the challenge. Hopefully, you will be inspired to upload your own fun fold project to the challenge!
Here’s my pop-up polar bear card:
MayMay, from MayMay Made It, has two videos for this fun fold. You can find the links for the step-by-step tutorial videos here and here. The first one explains the mechanism made with one sheet of cardstock and some scoring. The second one explains how to create the snowman. She even included a pattern for the mittens which can be printed from her blog post..
Please note that the snowman card will fit inside a medium envelope and can be mailed with additional postage. However, both the snowman and polar bear cards will be hand-delivered to my great-nieces. Now, I just need to create one for my great-nephew. I’m trying to figure out how to make a Santa card next, so stay tuned.
Measurements:
Inside:
Please refer to MayMay’s videos for the full set of measurements for the pop-and-twist inside of the card. Here’s a picture of the prototype that I kept so I have them handy when I create these cards:
Outside:
The Night of Navy base measures 11 by 4-1/4 inches, scored at 5-1/2 inches to create a tent fold.
The Real Red cardstock mat for the front measures 4-1/8 by 5-3/8 inches.
The DSP pieces on the front of the card come from the Beary Christmas DSP, which is retiring soon. You can find the links to this set below in the supplies used section.
The pawprint piece of DSP measure 5-1/4 by 2-3/8 inches.
The two polar bear pieces of DSP measure 1-1/4 by 1-1/2 inches.
The gift piece of DSP measures 1-1/2 by 2-5/8 inches.
I trimmed a coordinating piece of DSP to 6 by 2-1/2 inches for the envelope flap.
Punch a 1-inch circle from coordinating DSP for the envelope seal, which will need to be run through your XYRON create-a-sticker.
I used a piece of scrap Real Red cardstock for the sentiment panel.
Assembly:
Dimensionals were used under the sentiment. Since I am hand-delivering this card, I can make it thicker than if it needed to be mailed.
I used multipurpose liquid glue to adhere all the paper pieces.
There’s a glue dot under the bow to hold it in place.
Adhere the DSP pieces to the Real Red mat.
Wrap a length of Real Red ribbon around the card so that it covers the space between the pawprint DSP and the other pieces. Secure with a mini glue dot.
Then, adhere the mat to the front of the card base.
After rubbing down a scrap piece of Real Red DSP with an embossing buddy, stamp the sentiment using VersaMark ink. The sentiment comes from the Stars at Night stamp set.
Cover the VersaMark ink with white embossing powder and heat set with a heat tool.
Crop the sentiment using the Stars at Night label die and adhere to the front of the card so it straddles the ribbon.
This card isn’t a quick and simple card by any means. However, MayMay’s tutorials prove that if you can trim and score cardstock, the twist-&-pop card is very doable! I hope you will give it a try!
Back to the Blog Hop:
We all hope you will follow the links below and hop along with us. There’s so much inspiration to be found here. We’d love to see what inspires you to create a fun fold as well. Don’t forget to upload it to the Creative Creases challenge!
Welcome to the October Stampin’ UP! Demonstrators Fun Fold Blog Hop! We hope our projects will inspire you to create a fun fold card that you can upload to the gallery in the Creative Creases challenge. I just love learning and creating new fun folds. For the most part, if you can trim paper and score it according to the directions, you can create a fun fold. When you finish here, we hope you will hop along with us using the Blog Hop line-up below.
One of my go-to demonstrators for fun folds is JanB from England. I found a card she demonstrated on YouTube two years ago and thought it would be perfect for a wedding card and a birthday card I needed. Click here for the link to her video.
Here’s the most current card using this fun fold. I haven’t decided who will be getting this card, or for what occasion, so it looks incomplete.
Here’s a video showing the birthday card I already created using this fun fold
Here’s the wedding card, and the video is the one I sent to my friend who ordered it. The video is a bit out of focus, but you get the idea. I can’t go back and redo it because the wedding has passed.
Measurements for the Basic Black and Crushed Curry Card:
Trim a piece of black cardstock to 10-1/4 by 5-1/2 inches, and score at 4-1/4 and 8-1/2 inches.
Trim a second piece of black cardstock to 7-1/2 by 4-1/2 inches, and score at 3, 3-1/2, 4, and 7 inches.
Trim 3 pieces of white cardstock to 5-1/4 by 4 inches.
You need another 2 pieces trimmed to 4-1/2 by 2-3/4 inches.
Trim 3 pieces of white cardstock to 3-5/8 by 2-1/4 inches. *You only need two of these is you are going to have a little pocket for a gift card, like I did.
The other white cardstock pieces you will need measure 1-1/2 by 5-1/4 inches and4-3/8 by 1-1/2 inches,
I used the Crushed Curry dotted DSP (designer series paper) to trim 3 pieces to 5-1/8 by 3-7/8 inches.
I used the Balmy Blue 6 x 6 inch DSP and trimmed 3 pieces to 3-15/16 by 2-5/8 inches.
I needed another piece of Balmy Blue DSP measuring 5-1./4 by 1-3/8 inches.
I need scraps of black and Crush Curry cardstock for the branch and beehive on the front.
I used scraps of Parakeet Party 6 x 6 inch DSP for the leaves.
Then, I used a scrap of Parakeet Party cardstock for the grass under the rabbit.
Assembly:
The first time I created this fun fold, which was the birthday card, I followed JanB’s video step-by-step for the directions.
Once I got all the pieces cut for the wedding card, I followed her directions step-by-step for the folding pop-up part of the card.
The third time I made this card using the Fluffiest Friends bundle, I was able to do it on my own.
Truly, if you can trim and score paper, and follow JanB’s video, you will be able to create one of these cards as well.
Stamping, Coloring, and Cropping:
The Fluffiest Friends bundle will be available as an online exclusive on November 6, 2023. One of the perks of being a demonstrator is having the ability to pre-order new products. Of course, another perk is the discount on products.
I stamped all the Friends using Momento Tuxedo Black ink on white cardstock.
I used blends to color just parts of the Friends because I wanted a black and white animals so I wouldn’t have to worry about getting the colors of the animals to go with the DSP colors and patterns.
I used the Daffodil Delight, Petal Pink, Balmy Blue, Parakeet Party, and natural tone blends combos to color the selected parts of the Friends and accessories.
The cherry on the cupcake which is being held by the rabbit, is colored with the dark Flirty Flamingo blend.
HINT: I didn’t add any extra embellishments or ribbon because the card is already bulky. It will fit in a medium envelope, but won’t if you add all those extras. This card will require extra postage to mail.
I’m so stinking happy that the die set includes a die for the beaver’s dam and grass pieces. There are so many other dies in the set as well.
Here’s a peek at the bundle, most of which is included in my card:
Back to the SU! Demos Blog Hop:
We hope you will hop along from one demo to the next. I am always blown away by the projects of all the demos involved, so please enjoy the hop! Don’t forget to upload your fun fold to the Creative Creases challenge as well.
The current online exclusives will be updated with new products available to customers on November 6, 2023. You can get the Fluffiest Friends bundle at that time!
Of course, you can see for yourself if you join now! Especially since there’s currently a joining bonus promotion!
Welcome to Just Peachy Stamping by Sue Jackson: an independent Stampin' Up demonstrator.
Through Stampin' Up!, I happily share my love of papercrafting through sales, classes, small stamping group meet-ups and workshops. I think that being a teacher in my "real life", I have a unique approach to sharing my fantastic hobby. I look forward to connecting with you!