Welcome to the April, 2022 Sparkles Christmas Buddies Challenge # 135. I am hosting this month, and chose fun folds for the theme. When you finish here, I hope you will visit the challenge website. The other design team members really hit it out of the park (baseball reference) with their cards!
Once again, I chose to work with the Santa’s Suit stamp set and coordinating dies. I know I used the extra pieces I had leftover from some previous Christmas cards for March, and you can see that card here. However, since I created the March card, I was able to purchase the retired stamp set and coordinating dies and I couldn’t be happier!
Here’s my fun fold Christmas card:
I just posted another double easel card, with a link to the video from Mary Deatherage of Stamps-n-Lingers I used for directions. You can find that post here. The measurements for the bases of this card are the same as my previous double easel card and Mary’s card.
What I Did:
I used Cherry Cobbler for the major base and Sahara Sand for the easel base. Then, I used coordinating DSP for the layers.
To create the mounds of snow, I used the layering diorama dies. Who knew, right? But they worked perfectly, at least in my humble opinion.
To create the shadows on the layers of snow, I used a very dry blending brush and Smoky Slate ink.
I adhered the bottom snow mounds directly to the DSP layers. The top layers of snow mounds are popped up on dimensionals. Santa, the front sentiment, and the suit pieces also got popped up on dimensionals.
The suit pieces were all stamped in Momento Tuxedo Black ink and then again using the coordinating stamps in Cherry Cobbler.
I used two very thin strips of black cardstock for the laundry poles and black baker’s twine for the laundry line. Those cute little clothespins are from the Santa’s Suit stamp and die sets.
I hope you like this stamp and die set because I will, in all probability be using it again as I work my way through making Christmas cards.
As a demonstrator, I’ve already seen the new 2022 – 2023 catalog and it’s fabulous! I am thrilled to be able to pre-order products on Friday, April 1st (no fooling!). While I can’t show you the inside pages of the catalog, I can share the new 2022 – 2024 In Colors with you! Get ready!
Do you live in the U.S. and need a demonstrator? If so, I’d love to talk to you!
Do You Want to Place an Order?
Of course you do!
If you are ordering less than $150.00, please use the host code shown. If you are ordering more than $150.00, please contact me first so you can get your stamping rewards! Any order over $50 will earn a little surprise from me.
The HOST CODE through April 30, 2022 is VRBF62NN.
Again, thank you for stopping by my blog today! I appreciate your comments and your time.
Welcome to the March Sparkles Christmas Buddies challenge #134! Helen chose “Santa Comes to Town” for the theme. Oh, what fun! When you finish here, I hope you hop over to the challenge forum to see what all the other of the design team members created!
Here’s my Santa Comes to Town card:
When I first checked my stamp sets for this card, I found I didn’t have anything with a Santa! The closest I have is the two sentiments on this card from the Perfectly Plaid stamp set. After struggling with ideas, it dawned on me that I had kept three sets of these Santa pieces, and that I knew exactly where they were. Score! Bonus – they were already stamped in Momento Tuxedo Black and Cherry Cobbler, which became the color combination.
The layout for this card comes from the Paper Players #580 sketch challenge.
Here’s the challenge banner:
What I Did:
The Cherry Cobbler card base measures 5-1/2 inches by 8-1/2 inches, scored at 4-1/4 inches.
I used the Buffalo Check DSP (designer series paper) from the host DSP set Pattern Party. I just love a black and white Buffalo check and trimmed it to 4-1/8 inches by 5-3/8 inches.
The black DSP banner measures 5-3/8 inches by 1-3/8 inches.
Using the scalloped contour die set, I cropped the white focal panel. It needed something to make it pop, so I trimmed a piece of Cherry Cobbler DSP to 3-3/8 inches by 4-1/2 inches.
Next, I stamped the sentiments and added the black baker’s twine for a clothesline. I attached the knotted ends using mini glue dots.
Then came the fun part! I added Santa and his clothes. All these pieces are popped up on dimensionals and attached to the baker’s twine using retired mini paperclips. For added interest, I let Santa and his coat hang off the sides of the white scalloped panel.
Finally, I stamped another sentiment from Perfectly Plaid on the white cardstock for the inside of the card.
After trimming the DSP on the envelope flap, and punching a 1 inch circle for the envelope seal, I’d finished this coordinated card, envelope, and envelope seal set.
Thank you very much for stopping by my blog today!
Click on the following image to view the mini catalog in all its glory!
My Favorite Things from the Current Mini Catalog
While the new mini catalog and the Sale-a-Bration catalog are both packed with great products, here are some of my personal favorites.
Do you live in the U.S. and need a demonstrator? If so, I’d love to talk to you!
Do You Want to Place an Order?
Of course you do!
If you are ordering less than $150.00, please use the host code shown. If you are ordering more than $150.00, please contact me first so you can get your stamping rewards! Any order over $50 will earn a little surprise from me.
The HOST CODE through March 31, 2022 is KNS7N3KP.
Again, thank you for stopping by my blog today! I appreciate your comments and your time.
I have seen a number of bay window videos recently, and they all have excellent directions. Special shout-out to Debbie Henderson, Dawn Griffith, and Connie Stewart for their great step-by-step directions. Please visit any, or all, of the links above for easy-to-follow directions.
I used the Whimsy and Wonder suite of products for my card. This is actually a special-order card for a friend at work. She wanted to really personalize the card, so I used a stamp I’ve had for quite a while with the Bible verse on it. After using VersaMark to stamp on a piece of white cardstock. Next, I covered it in silver embossing powder and heat set it. I know it’s difficult to see in the pictures, but it is embossed and it’s gorgeous in person.
This Love, Santa Tag Kit is adorable and an easy way to make your own gift tags! Take a look at this video!
Do you live in the U.S. and need a demonstrator? If so, I’d love to talk to you!
Do You Want to Place an Order?
Of course you do!
If you are ordering less than $150.00, please use the host code shown. If you are ordering more than $150.00, please contact me first so you can get your stamping rewards! Any order over $50 will earn a little surprise from me.
The HOST CODE through December 31, 2021 is K4HSXP94.
Again, thank you for stopping by my blog today! I appreciate your comments and your time.
Welcome to the November Sprinkles Christmas Buddies challenge! This month’s challenge theme, chosen by Dawn, is presents. I hope you will visit the challenge page to find some inspiration so you can play along with the challenge.
Here’s my card:
My card for this challenge was inspired by Jackie Beers of Blue Line Stamping, a fellow InKing Royal Stampin’ Up! demonstrator. I saw the blog post for this card and was intrigued. While I chose to use a ribbon to keep the card closed, Jackie used a sentiment panel and two rectangles on dimensionals to keep hers closed. I think I like hers more than mine. However, I do absolutely love this DSP from the Whimsical Trees suite, partially because it’s non-traditional colors and partly because it all reminds me of Dr. Seuss, especially the mistletoe DSP I used on this card.
Measurements:
I can’t begin to tell you how grateful I am that Jackie included all the measurements on her blog!! Once you have the pieces trimmed down, it’s just a matter of folding. HINT: My card uses mats for all the layers. DON’T do that. I learned the hard way. It makes the card too thick and more difficult to close. Therefore, I am giving the measurements of the card for which I tried to make a video, except I broke my phone instead. OOPS!
The Misty Moonlight base measure 4-1/4 by 11 inches. Then, score the base at 1-1/4 inches, 5-1/2 inches (halfway), and 9-3/8 inches.
Trimming your paper for this card is made a bit easier because all the pieces are 4-1/8 inches tall.
You will need a piece of white cardstock for the inside measuring 3-3/4 inches by 4-1/8 inches.
In my card below, there are two pieces of the presents DSP (designer series paper):
The first piece measures 1-1/8 by 4-1/8 inches.
The second piece measures 3-3/4 inches by 4-1/8 inches.
While you have that DSP out, trim a piece to 2-1/2 inches by 6 inches for the envelope flap.
I also have two pieces of the mistletoe DSP:
The first piece measures 1-1/2 inches by 4-1/8 inches.
The second piece measures 3-3/4 inches by 4-1/8 inches.
Measurements and Directions:
I used ribbon to tie this card, but the next one will have tabs just like Jackie’s. I trimmed two of the presents to 1 inch square pieces. Since these would be the tabs holding the card closed, I also trimmed two pieces of cardstock to 1 inch squares. Then, I simply glued the layers together.
The greeting I used on this version comes from the Whimsical Trees stamp set.
For my next version of the card (just like Jackie’s), I used the Stitched So Sweetly dies to crop out a sentiment panel. I also trimmed an additional piece of cardstock to attach to this sentiment panel for stability.
From the pictures below, you can see how the pieces get attached. If my pictures don’t help you, please visit Jackie’s page. I was able to follow her pictures relatively easily.
This Love, Santa Tag Kit is adorable and an easy way to make your own gift tags! Take a look at this video!
Do you live in the U.S. and need a demonstrator? If so, I’d love to talk to you!
Do You Want to Place an Order?
Of course you do!
If you are ordering less than $150.00, please use the host code shown. If you are ordering more than $150.00, please contact me first so you can get your stamping rewards! Any order over $50 will earn a little surprise from me.
The HOST CODE through October 31, 2021 is HZH2AENJ.
Again, thank you for stopping by my blog today! I appreciate your comments and your time.
Welcome to the Sparkles Christmas Buddies challenge #128. Heather chose a Stockings theme for the challenge starting today, September 1, 2021. I’ve seen the design team projects and they are phenomenal! I hope you will pop over to the challenge blog to see what the rest of the design team created. We all look forward to seeing what you create in our gallery!
Here’s my card:
I used one of my absolute favorite color combinations: Cherry Cobbler, black, and white. The snowflake DSP (designer series paper) comes from the Peaceful Prints DSP. This Sale-a-Bration item is FREE with a $50 qualifying purchase. I have to admit, I really didn’t think I would choose this FREE DSP, but am so glad I did! There’s three different plaid patterns using these classic colors, and I couldn’t be happier!
This challenge would’ve been a lot easier if I actually had stockings in my product stash. Imagine my surprise when I realized I didn’t have a single stocking! Never fear ~ the internet came to the rescue. I searched for a stocking sewing pattern, resized it to what I needed, and printed it out. After fussy cutting, I had a template for my Christmas Snowflake Stocking, which I traced onto the DSP. After fussy cutting the stocking, I traced another stocking on white cardstock so I could trim down pieces for the top, heel, and toe sections.
Measurements:
The Cherry Cobbler card base measures 5-1/2 inches by 8-1/2 inches, scored at 4-1/4 inches.
The white mat measures 4-1/8 inches by 5-3/8 inches. I cropped the middle out using one of the stitched rectangle dies for the background under the stocking. Then, I ran the cropped rectangle through my new Cut and Emboss Machine using the brick and mortar 3D embossing folder. I really like how the stitched part of the rectangle is still evident after the embossing.
The black mat measures 4 inches by 5-1/4 inches.
I used another stitched rectangle die to crop the Cherry Cobbler panel.
The DSP for the envelope flap measures 6 inches by 2-1/2 inches, which I adhered to the flap right away, then trimmed.
While I had the DSP out, I punched a circle from the Cherry Cobbler and Black small checked pattern. After running the circle through my XYRON sticker maker, I had my envelope seal.
Finally, I trimmed some white cardstock to 4 inches by 5-1/4 inches for the inside panel.
What I Did:
It all started with the stocking, of course. After adhering the white pieces, I decided that I needed to outline the whole stocking in black to make it stand out. Then, I decided that I needed something to make the white parts special, so I colored them with my clear Wink of Stella. Big mistake. The black marker outline got caught up in the Wink of Stella and I wound up with grey sparkly paper. In order to “fix” this, I used my VersaMark marker (Did you know VersaMark comes in a marker? LOVE!) and white embossing powder to cover the Wink of Stella mess. I did have to heat set two layers of powder to cover the mess I made.
Next, I decided that I would clear emboss some snowflakes on the Cherry Cobbler and black mats. I used the repositionable tape to temporarily adhere the two pieces of cardstock. Then, I stamped three different snowflakes from the Merry Snowflakes stamp set in VersaMark around the borders. Finally, I covered the stamps with clear embossing powder and heat set it.
I adhered a small length of the black gingham ribbon to the top of the stocking using glue dots.
The “merry everything” sentiment also comes from the Merry Snowflakes stamp set. It’s stamped using Momento tuxedo black ink on white cardstock. Then, I cropped the sentiment down using a third stitched rectangle die.
Time for Assembly:
The white, black and Cherry Cobbler cardstock are adhered with multipurpose liquid glue.
I used dimensionals under the stocking and sentiment panel.
I used another sentiment from the same stamp set for the inside greeting.
After adhering the white sentiment panel to the cardstock, I thought it needed something subtle. So, I stamped 3 snowflakes around the sentiment using Versamark, then clear embossing powder, which I heat set. The result is subtle and just what I wanted.
With that, I’d finished this coordinating card/envelope/seal set.
Thanks so much for stopping by my blog today. I’d love to hear your thoughts on this card.
What’s better than getting a delivery from Stampin’ Up!? Getting a delivery with FREE products inside the box! I have a box en route right now and am hoping it’s here this afternoon when I get home from work! Check out the FREE items from the Sale-a-Bration catalog!
Sale-a-Bration FREE items with a $50 purchase:
Sale-a-Bration FREE items with a $100 purchase:
Do you live in the U.S. and need a demonstrator? If so, I’d love to talk to you!
Do You Want to Place an Order?
Of course you do!
If you are ordering less than $150.00, please use the host code shown. If you are ordering more than $150.00, please contact me first so you can get your stamping rewards! Any order over $50 will earn a little surprise from me.
The HOST CODE through September 30, 2021 is W3N4C22K.
Again, thank you for stopping by my blog today! I appreciate your comments and your time.
Welcome to the monthly Sparkles Christmas Challenge, #127. Debbie chose a trees theme for the challenge starting today, August 1, 2021. I hope you will pop over to the challenge blog to see what the rest of the design team created as well. We all look forward to seeing what you create in our gallery!
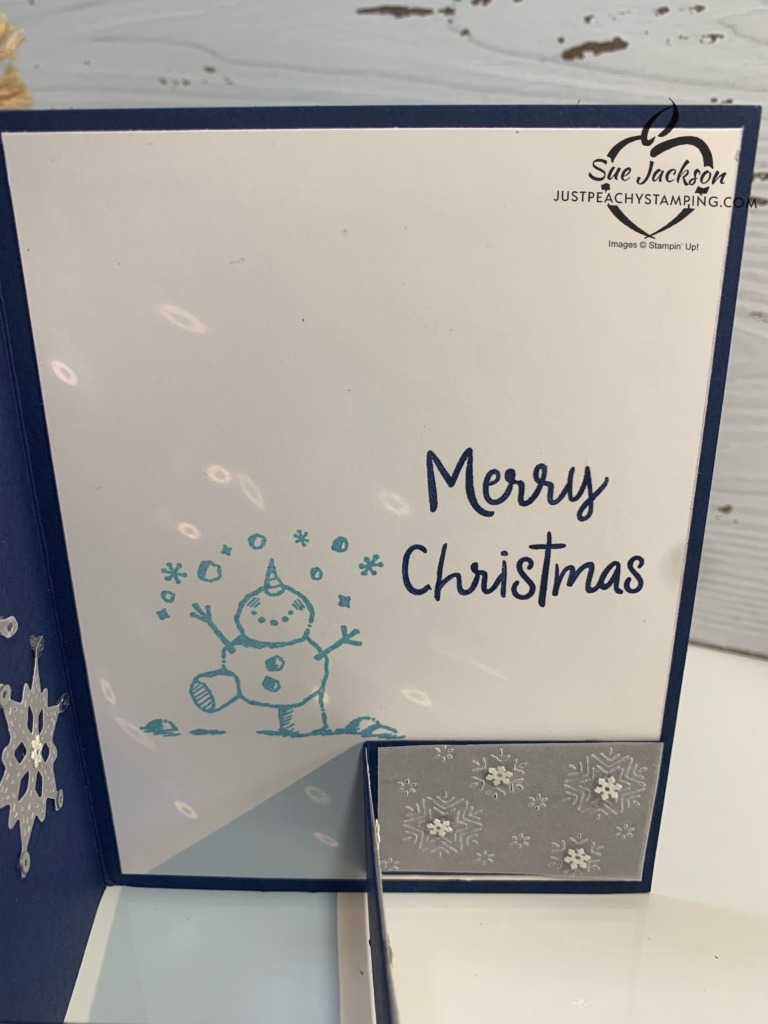
I made a double z-fold card using the Snowman Season photopolymer stamp set. Here’s my Christmas music card:
Measurements:
The Night of Navy base measures 8-1/2 inches by 5-1/2 inches. To create the Z-fold, score at 4-1/4 inches and 2-1/8 inches.
The Night of Navy strip at the bottom measures 8-1/2 inches by 1-1/4 inches. This piece is also scored at 4-1/4 inches and 2-1/8 inches.
I trimmed the Balmy Blue piece to 5-3/8 inches by 2 inches.
Next, I trimmed the white cardstock for the inside panel to 4-1/8 inches by 5-3/8 inches.
Finally, I trimmed all the vellum pieces 1-1/4 inches high. Two of the pieces measures 2 inches long, and the third piece measures 4 inches long.
Assembly:
I started with the Balmy Blue panel and stamped it with the snowflake trio from the Snowman Season stamp set using StazOn white ink.
Next, I worked on the line from the song, Let it Snow, Let it Snow, Let it Snow. In order to make the placement of the sentiments easier, I used the Stamparatus.
First, I figured out the placement of the strip on the bottom.
Next, I figure out the middle of the area above the strip and hinge-stepped it up and down to make sure all three would fit.
Then, I stamped all three using Night of Navy ink starting at the top and hinge-stepping down one notch on the Stamparatus.
Next, I cleaned the stamp without (!!) removing it from the Stamparatus plate. Then, I grabbed my VersaMark and restamped all three sentiments using clear Stampin’ emboss powder.
Finally, I heat set the sentiments using my heat tool.
The snowman and the sentiment on the inside both come from the Snowman Season. I stamped the sentiment based on what the card looks closed.
Then, I stamped the snowman in Balmy Blue on the inside so it is mostly covered when the card is closed.
Now for the Vellum:
I didn’t want just vellum on the strip, so I embossed it using the Stitched Snowflakes die set. This gorgeous die set can be found in the new mini-catalog, which starts on Tuesday!!! YEAH!!
Then, I had to figure out how to attach the vellum to the Night of Navy cardstock. I used some retired snowflake sequins and mini-glue dots. The glue dots are holding the snowflakes on the sequins. There are also glue dots under the vellum as well. There are new sequins that are gorgeous coming in the mini-catalog!!
Here’s the only “hard” thing about making a double Z-fold card – the strip goes opposite of the fold of the card. Therefore, the long piece attaches to the very front Balmy Blue piece. The other end attaches to the inside of the card. Boom, you are done!
I couldn’t leave the middle Night of Navy panel empty. So, I cropped three snowflakes from the same die set. Again, I used glue dots under the sequins to attach the snowflakes to the cardstock.
Finally, I trimmed a piece of Night of Navy 6 x 6″ DSP to 6 inches by 2-1/2 inches for the envelope flap.
I also stamped the snowman on the front, bottom, left-hand corner on the envelope.
Thank you very much for stopping by my blog. I appreciate every visit and comment.
It’s Almost Time for the Mini-Catalog and Sale-a-Bration launch!
Tuesday, August 3, 2021!!!
Catalog Cover Images for a Sneak Peek:
I already have this set and LOVE it! Check my sheep slimline card on Make My Monday challenge, August 02,2021!
Do you live in the U.S. and need a demonstrator? If so, I’d love to talk to you!
Do You Want to Place an Order?
Of course you do!
If you are ordering less than $150.00, please use the host code shown. If you are ordering more than $150.00, please contact me first so you can get your stamping rewards! Any order over $50 will earn a little surprise from me.
The HOST CODE through August 31, 2021 is CJQW69XN.
Again, thank you for stopping by my blog today! I appreciate your comments and your time.
Welcome to Just Peachy Stamping by Sue Jackson: an independent Stampin' Up demonstrator.
Through Stampin' Up!, I happily share my love of papercrafting through sales, classes, small stamping group meet-ups and workshops. I think that being a teacher in my "real life", I have a unique approach to sharing my fantastic hobby. I look forward to connecting with you!