Welcome to the newest Make My Monday bi-weekly challenge #223. Our host for this challenge, Caz, chose National Picture of a Bird Day as the theme. When you finish here, please visit the challenge site to see what the rest of the very talented design team members created. Then, don’t forget to upload your creations to our gallery. We look forward to seeing your creations there!
Here’s my card:
I must confess that, since I live in the U.S., I’d never heard of this celebration day, but I went with it. The new Stampin’ UP! catalog goes live in just a few weeks, and I’m looking forward to sharing more of the inside of the catalog with you. Today’s layout comes from a set of 22 card sketches found on page 22 of the new catalog. Over the course of the next few months, I am going to post a card from each of these sketches. The one I used for this card can be found on page 22, albeit with a slight change. The original sketch calls for 10 strips of paper. I used 7 strips from the Nature’s Sweetness 12 x 12 inch DSP (designer series paper).
This Waves of Inspiration stamp set and coordinating Waves die set are being retired. If you want this gorgeous set, you will need to get it before the current catalog retires on April 30, 2024.
Measurements:
The Night of Navy base measures 8-1/2 by 5-1/2 inches, scored at 4-1/4 inches.
I trimmed 7 pieces of the DSP to 3/4 by 3-3/4 inches for the front.
Trim a piece of the DSP to 6 by 2-1/2 inches for the envelope flap.
Next, punch a 1-inch circle of coordinating DSP and run it through the XYRON create-a-sticker for the envelope seal.
Trim a piece of white cardstock to 4 by 5-1/4 inches for the inside of the card.
Stamping & Cropping:
On a piece of white cardstock, stamp the wave in Pebbled Path ink.
Crop the wave using one of the Countryside Corners dies.
On scrap pieces of white cardstock, stamp the pelican on the pier and the sentiment.
Crop the sentiment and pelican piece using dies from the Waves die set.
Crop three clouds and the white accent part of the wave from more scraps of white cardstock.
Finally, crop the birds from Pebbled Path cardstock.
Using a dry blending brush that was previously used with gray ink, lightly rub the white cloud pieces.
Color the pier pieces using the Pebbled Path blends.
I used the Ivory blend on the beak, but you really can’t see it.
using a Pebbled Path marker, outline the sentiment banner and the Countryside Corners piece.
Assembly:
Add dimensionals under the sentiment and the pelican piece.
Adhere everything else using multipurpose glue.
After deciding on the pattern for your DSP strips, adhere them to the base of the card.
Adhere the wave accent piece and trim to size.
Next, adhere the Countryside Corners die cut piece.
Randomly add the clouds and the birds to the die cut front.
Finally, adhere the sentiment and then the pelican piece to the front.
Stamp your sentiment for the inside using Pebbled Path ink.
Adhere the inside cardstock to the inside of the base of the card.
With that, I’d finished this coordinated card, envelope, and envelope seal set.
There’s always something new at Stampin’ UP! Check out the KITS COLLECTION! New additions and favorite kits are available now! Check out the showcase below!
If you live in the U.S. and don’t already have a Stampin’ UP! demo from whom you order, I would be honored to work with you.
When prompted, please enter the following HOST CODE:
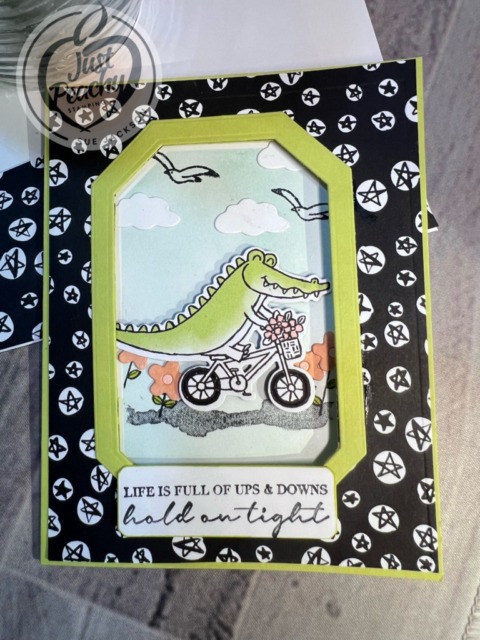
Welcome to the newest Make My Monday bi-weekly challenge #222. Our host for this challenge, Dawn, chose Transport as the theme. When you finish here, please visit the challenge site to see what the rest of the very talented design team members created. Then, don’t forget to upload your creations to our gallery. We look forward to seeing your creations there!
Let me start by saying that one night last week, I went down the rabbit hole of the internet by clicking, then clicking again, and again. Then, I had no way back to the video tutorial for this card, but thankfully I wrote down the dimensions of the inside, smaller card. Therefore, I am dividing the measurements and directions into Part 1 for the outside card, and Part 2 for the inside card.
Part 1 – the basic card
The Lemon Lime Twist base measures 8-1/2 by 5-1/2, scored at 4-1/4 inches.
The Zoo Crew DSP (designer series paper measures 4-1/8 by 5-3/8 inches. I also trimmed a piece to 6 by 2-1/2 inches for the envelope flap. Then, I punched a 1-inch circle from the DSP and ran it through my XYRON create-a-sticker backside up for the envelope seal.
Use multipurpose liquid glue to adhere all the front cardstock and DSP pieces together.
Stamp the sentiment on the front using Momento Tuxedo Black ink.
Crop the sentiment using the second smallest Countryside Corners die. Outline the sentiment in Lemon Lime Twist ink.
Using a Countryside Corner die, crop out an opening in the middle (or as close as possible) of the front of the card. Crop another cut using the same die out of scrap cardstock to use in Part 2.
Next, use the same size die and the next larger die to cut out a frame, as pictured below.
Adhere the frame and sentiment to the front of the card.
That’s it for the basic card front.
Part 2 – Masking and coloring the “inside” card:
Trim a piece of white cardstock to 7-3/4 by 5-1/8, scored at 3-7/8.
Use removable tape to temporarily adhere the inner card in place making sure that the fold side is on the right hand side of the card.
Use a pencil and a very light touch to add tick marks showing where the cropped center of the front of the card appears on the inner card.
Remove the inner card so you can work on it without making a mess on the outer card.
Use the negative of the extra cropped die from part 1 as a mask on the inner card by lining up the sides of the mask with the tick marks you lightly drew.
I used Post-It note tape to adhere the mask to the front of the inner card.
Using a blending brush, add layers of color to the front of the inner card using Pool Party ink. When you get the color intensity you want, remove the mask and decorate
Part 2 continued: Decorating
Unless otherwise noted, I used liquid glue to adhere the pieces together when decorating.
The bike riding alligator was cropped from the Zoo Crew DSP using the coordinating dies. I love when the DSP images match up with the coordinating dies.
Add dimensionals to the back of the alligator.
Using the cropped mask again, I stamped the ground in Tuxedo Black ink. This stamp came from the Wildlife Wonder stamp set.
Using the flower stamp and coordinating dies from Fluffiest Friends, I stamped and cropped flowers from a scrap of Petal Pink cardstock.
The bird stamp comes from the Beach Day Bundle.
The cloud die cuts were made using the cloud die from the Zany Zoo dies.
Then, I stamped the sentiment on the inside of the card and added the trio of flowers from Fluffiest Friends stamp set.
Finally, line up your blended ink-masked area so it lines up with the cropped middle of the Lemon Lime Twist/DSP card front. Then adhere the inside card to the back of the base of the card.
With that, I’d finished this Zany Zoo fun fold coordinated card, envelope, and envelope seal set.
Welcome to the newest Make My Monday bi-weekly challenge #221. Our host for this challenge, Meg, chose Spring – animals, weather, flowers, etc as the theme. When you finish here, please visit the challenge site to see what the rest of the very talented design team members created. Then, don’t forget to upload your creations to our gallery. We look forward to seeing all of your posts there!
Here’s my Sweet Sorbet Cheerful Daisy card:
In the past few months, I’ve really come to love using Sweet Sorbet in my projects. Sadly, this color will be retiring when the 2024 – 2025 Annual Catalog comes out. Never fear though as there will be a new set of In Colors coming out!
Measurements:
The Sweet Sorbet base measures 8-1/2 by 5-1/2 inches, scored at 4-1/4 inches and I used the card in the landscape orientation.
The white cardstock for the front started out at 5-1/2 by 4-1/4 inches. Then, I cropped it using the largest die from the Scalloped Contours die set.
I trimmed the Sweet Sorbet 6 x 6 inch DSP (designer series paper) to fit inside the scalloped die. It measures 4-7/8 x 3-1/4 inches.
Next, I trimmed a piece of Sweet Sorbet DSP to 6 by 2-1/2 inches for the envelope flap. I punched a 1-inch circle from the same DSP. However, I turned it over when I ran it through my XYRON create-a-sticker for the envelope seal.
I needed to use a 5-1/2 by 4-1/4 inch piece of white cardstock to crop the daisy cluster and the second layer of the flowers.
The white cardstock for the inside of the card measures 4 by 5-1/4 inches.
I used a scrap of Sweet Sorbet for the inside of the card.
What I Did:
Unless otherwise noted, I used liquid glue to adhere elements of the card together.
After cropping the white scalloped contours cardstock, I adhered it to the front of the card base.
Then, I adhered the Sweet Sorbet DSP to the scalloped white cardstock.
Next, I wiped down a piece of scrap Sweet Sorbet cardstock using my embossing buddy.
This gorgeously scripted sentiment in one of the new online exclusive products, and every sentiment is beautiful. Take a closer look at this stamp set:
Stamp the sentiment using VersaMark ink. Cover it with white embossing powder and heat set with a heat tool.
Trim the sentiment to the desired width, and trim the ends into a banner.
Crop the daisies from white cardstock and adhere the layers together.
Add dimensionals to the back of the daisies and adhere to the front of the card.
Adhere the sentiment banner using dimensionals.
Finish by adding Sweet Sorbet enamel dots.
With that, I’d finished this coordinated card, envelope, and envelope seal set.
I’ve already ordered some of these products and have more on the way. I can’t wait to start playing with them! Take a look at just some of the new products available!
I love the script used for these sentiments. I’ve used the birthday one, and it fits so well on a landscape 5-1/2 by 4-1/4 inch card!
The stamps for these adorable critters are two sided stamps: the outline image is on one side and the animal is on the other. The sample card uses the animal stamp.
Personally, I think this background stamp is gorgeous! Don’t delay in ordering as it just came back in stock. I’ve got an order on its way to me, but this stamp might just be worth paying shipping for just this item.
I had previously ordered the natural polka dot ribbon, and now have the rest of the suite of products on the way. This suite would be suitable to masculine or feminine cards, and I can’t wait to get my hands on it!
Shopping in the current mini-catalog is a wonderful way to shop!
Click on the image/link below to browse and download the mini-catalog!
Welcome to the newest Make My Monday bi-weekly challenge #220. Our host for this challenge, Johanna, chose Any Theme Fun Fold as the theme. When you finish here, please visit the challenge site to see what the rest of the very talented design team members created. Then, don’t forget to upload your creations to our gallery. We look forward to seeing your creations there!
Here’s my fishing fun fold card:
I’ve posted one of these flap fun folds before and you can find that here. Connie Stewart’s videos are fabulous and I used this video for both flap cards. All of the measurements and directions are on the video and are much easier to follow than my step-by-step. Connie always makes cards so easy to recreate.
I used the Let’s Go Fishing 12 x 12 inch DSP (designer series paper) and Countryside Corners die set. The sentiments come from the Sentiments Silhouettes stamp and die set.
Thank you for stopping by today!
Have a Peachy Day!
Sue
Supplies Used:
It’s Still Time to Sale-a-Brate until February 29,2024!
Now there’s more to Sale-a-Brate!
The dragonfly punch is in the current catalog, but I thoroughly enjoyed getting it for free!
My next Sale-a-Bration item will be the set of the new colors markers. I already have that set of markers but I want an extra set of them. Getting them for FREE with a qualifying purchase is a WIN-WIN!
The Sale-a-Bration Jungle Pals dies and stamp set are fabulous! I’ve already posted cards for which I’ve used those items and you can see them here and here. Of course, there are other fabulous items as well!
Shopping in the current mini-catalog is a wonderful way to earn FREE products!
Click on the image/link below to browse and download the mini-catalog!
In addition, there’s a great promotion going on during Sale-a-Bration for joining the Stampin’ UP! community!
Customers who join our fun crafting community as a new demonstrator can get $125 USD | $165 CAD worth of product PLUS our Stampin’ Glass Mat Studio* (a $60 USD | $82 CAD value) for just $99 USD | $135 CAD!
STAMPIN’ GLASS MAT STUDIO:
The Stampin’ Glass Mat Studio is a paper crafter’s dream! The heavy-duty glass mat comes printed with a ruler and grid lines for easy measuring, while the large surface space gives ample room for spreading out while paper crafting. The safety-tempered glass has a heat and scratch resistant surface that wipes clean with the included cloth and water—no chemicals needed. The reusable cloth also cleans ink off your stamps! The nonslip, heat resistant, waterproof silicone mat features four palette squares for mixing custom ink colors or for holding small ink spots in place while crafting. Each component can be used separately or you can use all three items together for a multipurpose paper crafting studio that’s both functional and elegant.
The Stampin’ Glass Mat Studio includes:
GLASS MAT * 5 mm thick * 17″ x 14″ (43.2 x 35.6 cm) * Safety-tempered * Heat and scratch resistant * Wipes clean with water or alcohol
SILICONE MAT * 8-3/8″ x 6″ (21.3 x 15.2 cm) * Multiuse, nonslip * Waterproof, heat resistant * 4 palette squares for custom-color mixing or holding Stampin’ Spots * Product color: white
CLEANING CLOTH * 8-1/4″ x 8-1/4″ (21 x 21 cm) * Durable, reusable * Lint free * Cleans stamps and other surfaces with only water * Product color: dark gray
If you live in the U.S. and don’t already have a Stampin’ UP! demo from whom you order, I would be honored to work with you.
When prompted, please enter the following HOST CODE:
Welcome to the newest Make My Monday bi-weekly challenge #219. Our host for this challenge, Heather, chose Love as the theme. When you finish here, please visit the challenge site to see what the rest of the very talented design team members created. Then, don’t forget to upload your creations to our gallery. We look forward to seeing your creations there!
Here are my two challenge Valentines:
I made these Valentine’s Day cards for my kindergarten great niece and my pre-k3 great nephew. I made 14 of the bear card and 18 of the bumblebee Flirty Flamingo card. They were so much fun to make! I’m really looking forward to getting pictures of the two of them writing out the cards.
When I am mass-producing cards, I get all my pieces done first, then color, stamp, and assemble. I used the Bee Mine suite of products and the Fluffiest Friends stamp and die set.
Flirty Flamingo Bumblebee:
The Flirty Flamingo base measures 3-1/4 by 5 inches.
The DSP measures 3-1/8 by 4-7/8 inches.
I used the dark Flirty Flamingo blend to color the Black & White Gingham Ribbon. Easy peasy.
I punched out the Flirty Flamingo sentiment panel using the Heartfelt Hexagon punch..
Stamp the dotted line for the flying bee using Momento Tuxedo Black ink.
I punched a piece of black cardstock using the bee punch so I would have a template for stamping.
For stamping the body of the bee I used Daffodil Delight and black, the antenna pieces, and then stamped the wings using Flirty Flamingo ink.
Then I punched the pieces and used multipurpose liquid glue to adhere them to the DSP.
Bee Mine:
The layers are Daffodil Delight, black, and white cardstock. I used three consecutive deckled rectangle dies to crop the layers.
The strip of DSP at the bottom is one of the patterns from the Bee Mine 12 x 12″ DSP. I added a thin piece of retired washi tape to the top of the DSP.
The Fluffiest Friends bear is colored using the blends combo sets for Smoky Slate, Daffodil Delight, and Sweet Sorbet.
I punched the hearts using the Bee Mine punch from another Bee Mine pattern.
The bee mine sentiment fit perfectly in the retired classic label punch.
The adorable trios of bees randomly stamped on the white cardstock using black ink and colored the bees using a Daffodil Delight marker.
All the pieces are adhered using multipurpose liquid glue.
The following items are FREE with a qualifying $50 purchase (before tax and shipping). The top row are some new additions to the Sale-a-Brate FREE items.
The following items are FREE with a qualifying $100 purchase (before tax and shipping.
The Jungle Pals dies and stamp set are fabulous! I’ve already posted cards for which I’ve used those items and you can see them here and here. Of course, there are other fabulous items as well!
Shopping in the current mini-catalog is a wonderful way to earn FREE products!
Click on the image/link below to browse and download the mini-catalog!
In addition, there’s a great promotion going on during Sale-a-Bration for joining the Stampin’ UP! community!
In addition, there’s a great promotion going on during Sale-a-Bration for joining the Stampin’ UP! community!
Customers who join our fun crafting community as a new demonstrator can get $125 USD | $165 CAD worth of product PLUS our Stampin’ Glass Mat Studio* (a $60 USD | $82 CAD value) for just $99 USD | $135 CAD!
STAMPIN’ GLASS MAT STUDIO:
The Stampin’ Glass Mat Studio is a paper crafter’s dream! The heavy-duty glass mat comes printed with a ruler and grid lines for easy measuring, while the large surface space gives ample room for spreading out while paper crafting. The safety-tempered glass has a heat and scratch resistant surface that wipes clean with the included cloth and water—no chemicals needed. The reusable cloth also cleans ink off your stamps! The nonslip, heat resistant, waterproof silicone mat features four palette squares for mixing custom ink colors or for holding small ink spots in place while crafting. Each component can be used separately or you can use all three items together for a multipurpose paper crafting studio that’s both functional and elegant.
The Stampin’ Glass Mat Studio includes:
GLASS MAT * 5 mm thick * 17″ x 14″ (43.2 x 35.6 cm) * Safety-tempered * Heat and scratch resistant * Wipes clean with water or alcohol
SILICONE MAT * 8-3/8″ x 6″ (21.3 x 15.2 cm) * Multiuse, nonslip * Waterproof, heat resistant * 4 palette squares for custom-color mixing or holding Stampin’ Spots * Product color: white
CLEANING CLOTH * 8-1/4″ x 8-1/4″ (21 x 21 cm) * Durable, reusable * Lint free * Cleans stamps and other surfaces with only water * Product color: dark gray
If you live in the U.S. and don’t already have a Stampin’ UP! demo from whom you order, I would be honored to work with you.
When prompted, please enter the following HOST CODE:
Welcome back to the bi-weekly Make My Monday #217. Our host for this challenge, Billie A., chose Happy Birthday as the theme for this challenge. When you finish here, I hope you will visit the challenge site to see the creations from the rest of the design team. Birthday cards are always fun, and we’d love to see your creations in our gallery!
Here’s my birthday shaker card:
I used the Bright and Beautiful bundle and coordinating DSP (designer series paper) for my card. I knew I wanted to use the different size balloons in white for the background but needed to add something more. That’s when I thought about using the iridescent shaker circles for a shaker card. Fun!
Measurements:
The Berry Burst base measures 5-1/2 by 8-1/2 inches, scored at 4-1/4 inches.
The Bright and Beautiful DSP piece measures 4-1/4 by 5-3/8 inches.
The white cardstock for the background of the shaker card measures 4-1/8 by 5-3/8 inches.
Trim a piece of white cardstock to 4 by 5-1/4 inches for the inside of the card.
I used white cardstock to crop a variety of balloon sizes and the sentiment banner.
A scrap piece of Berry Burst formed the bottom piece of the birthday sentiment.
The DSP for the envelope flap measures 6 by 2-1/2 inches. I picked a coordinating piece DSP to punch a 1-inch circle for the envelope seal. I ran it through the XYRON create-a-sticker to finish the seal.
Assembly Process:
Using a deckled rectangle die, crop the center of the DSP to create the frame.
Stamp the sentiment using Berry Burst ink.
Stamp the inside sentiment with the same ink.
To create the dual color banners on the inside, I stamped it first in Berry Burst. Without re-inking, I stamped the second banner.
After cropping the sentiment banner using white and then Berry Burst cardstock, adhere the piece together using multipurpose liquid glue.
Add a piece of Lemon Lime Twist ribbon to the sentiment banner.
Use the balloon dies to crop a variety of sizes of balloons from white cardstock.
Dry-fit the balloons to create the background. Once you find a pleasing arrangement, adhere the balloons using multipurpose liquid glue.
Creating the Shaker:
The clear medium envelopes make creating a faux shaker card much easier than the previous ways to make shaker cards. Here’s a picture of these envelopes.
HINT: The most important thing to remember when using these clear envelopes for a faux shaker card is that the flap seal needs to be on the back of the shaker card.
Put the white cardstock background in the clear envelope, Make sure that you get the cardstock into the corner and bottom of the envelope.
Fold over the side of the clear envelope on the back of the background cardstock and adhere using tear-&-tape. There’s. no need to take off the top layer because you will use adhesive foam strips to adhere the shaker to the base.
Add the iridescent shaker circles in the envelope, making sure to keep as many as possible between the background cardstock and the front of the clear envelope.
Seal the envelope flap. I use more tear & tape.
Adhere the front of the shaker to the DSP frame using tear & tape.
Add foam adhesive strips to the back of the shaker and adhere to the base of the card.
HINT: Be careful when using the foam strips. Once they are down on the base, they are down for good.
Finishing Up:
I didn’t want to add any more bulk to the card, so I just adhered the left and bottom of the sentiment banner to the DSP using multipurpose liquid glue.
Adhere the white cardstock to the inside of the card using multipurpose glue.
With that, I’d finished this coordinated card, envelope, and envelope seal set.
In addition, there’s a great promotion going on during Sale-a-Bration for joining the Stampin’ UP! community!
In addition, there’s a great promotion going on during Sale-a-Bration for joining the Stampin’ UP! community!
Customers who join our fun crafting community as a new demonstrator can get $125 USD | $165 CAD worth of product PLUS our Stampin’ Glass Mat Studio* (a $60 USD | $82 CAD value) for just $99 USD | $135 CAD!
STAMPIN’ GLASS MAT STUDIO:
The Stampin’ Glass Mat Studio is a paper crafter’s dream! The heavy-duty glass mat comes printed with a ruler and grid lines for easy measuring, while the large surface space gives ample room for spreading out while paper crafting. The safety-tempered glass has a heat and scratch resistant surface that wipes clean with the included cloth and water—no chemicals needed. The reusable cloth also cleans ink off your stamps! The nonslip, heat resistant, waterproof silicone mat features four palette squares for mixing custom ink colors or for holding small ink spots in place while crafting. Each component can be used separately or you can use all three items together for a multipurpose paper crafting studio that’s both functional and elegant.
The Stampin’ Glass Mat Studio includes:
GLASS MAT * 5 mm thick * 17″ x 14″ (43.2 x 35.6 cm) * Safety-tempered * Heat and scratch resistant * Wipes clean with water or alcohol
SILICONE MAT * 8-3/8″ x 6″ (21.3 x 15.2 cm) * Multiuse, nonslip * Waterproof, heat resistant * 4 palette squares for custom-color mixing or holding Stampin’ Spots * Product color: white
CLEANING CLOTH * 8-1/4″ x 8-1/4″ (21 x 21 cm) * Durable, reusable * Lint free * Cleans stamps and other surfaces with only water * Product color: dark gray
If you live in the U.S. and don’t already have a Stampin’ UP! demo from whom you order, I would be honored to work with you.
When prompted, please enter the following HOST CODE:
Welcome to Just Peachy Stamping by Sue Jackson: an independent Stampin' Up demonstrator.
Through Stampin' Up!, I happily share my love of papercrafting through sales, classes, small stamping group meet-ups and workshops. I think that being a teacher in my "real life", I have a unique approach to sharing my fantastic hobby. I look forward to connecting with you!