Jul 13, 2018 | Fab Friday, The Library Challenge |
Many Thanks to the Librarian!
Before I jump into my blog for these two challenges, let me say how honored I was to be chosen as one of the Librarian’s Choices for The Library Challenge # 9 with a Where the Wild Things Are theme. You can see my z-fold card I created here. I didn’t even know I was chosen until I went in to make sure I didn’t miss the deadline for the current challenge. While I enjoy participating in challenges, I’ve missed more deadlines by just a few hours for a variety of challenges. Can you imagine my surprise?!?
Current Challenges
Fab Friday 114 sketch challenge for this week is simple, which I love. However, when combined with the Library Challenge # 10, it becomes very elegant. I chose to use the cover of the Rose Garden, written by Susanna Kearsley, as my inspiration. The gorgeous photographic Petal Promenade DSP is perfect, and I am very thankful for the DSP share in which I participated for this paper. More about DSP shares later.
Here’s my card:

Here are the posts for the challenges:

Petal Promenade is Beautiful!
When I first saw the DSP options in the 2018 – 2019 catalog, not all of them Wow’d me, including Petal Promenade. Therefore, I did what I always do when there are new DSP sets: participate in a paper share with my upline, Brian King. A paper share includes patterns from each of the DSP 12 x 12 (cut to 6 x 12) and 6 x 6 stacks. The shares allow me to hold in my hot little hands to see if I want to order ALL of it. This set of papers is gorgeous!!!! I didn’t think I would order it, but now it tops my list for the Buy 3, Get 1 Free shopping list.
Blushing Bride cardstock provides the bottom base, and I also used the Wood Textures DSP for the middle mat. I punched out the circle to go under the Share What You Love doille for some contrast. This suite also provided, the pearlized enamel dots, the metal flower, and the sentiment. After choosing my DSP from Wood Textures, I decided on Soft Suede ink. I thought the Whisper White label needed a little something – something. Therefore, I chose a flower stamp and stamped it off in Blushing Bride. The retired Crumb Cake ribbon seemed to fit this card, and the Fab Friday challenge, perfectly.
Thank you for stopping by my blog. I greatly appreciate your visits, and would love to hear from you, so please feel free to leave a comment.
Have a Peachy day!
Sue
Jun 28, 2018 | CAS(E) This Sketch, Fab Friday |
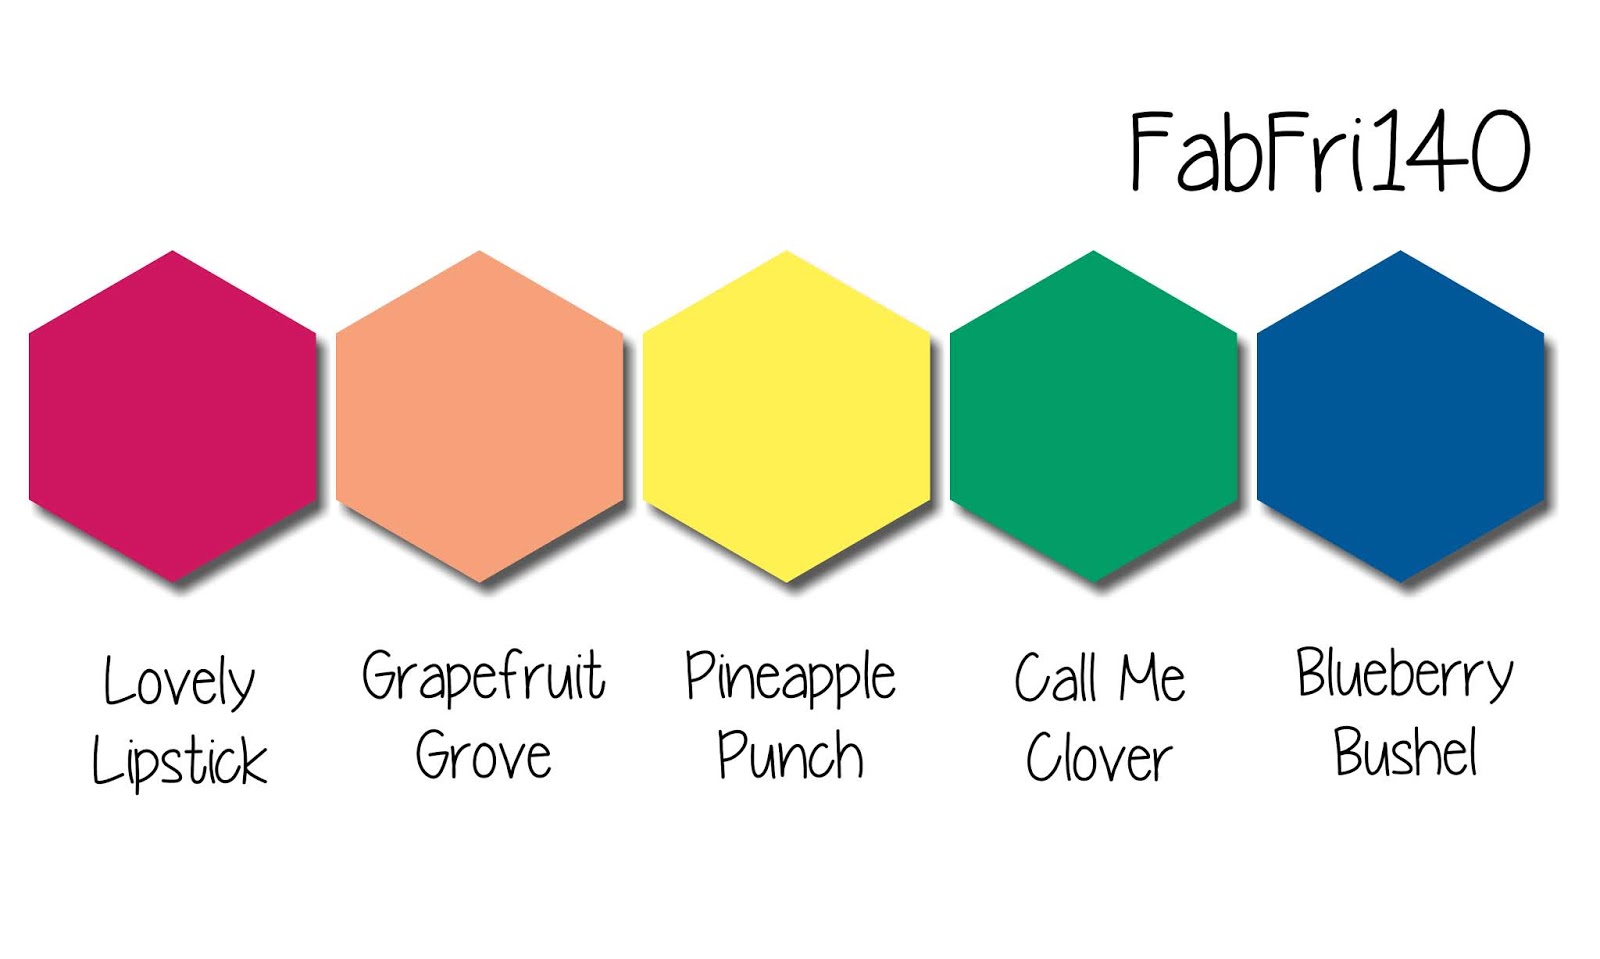
Fab Friday 140
Fab Friday bi-weekly challenges are always fun. The current challenge is to use all five new In-Colors 2018 – 2020. Blueberry Bushel, Call Me Clover, Grapefruit Grove, Lovely Lipstick, and Pineapple Punch are all brightly saturated and pure colors. At first I wasn’t sold on these new colors. However, since I now have them in my hot little hands, I am in love with them. The DSP is so much fun and is reminiscent of the In-Color DSP stacks of the past. LOVE!
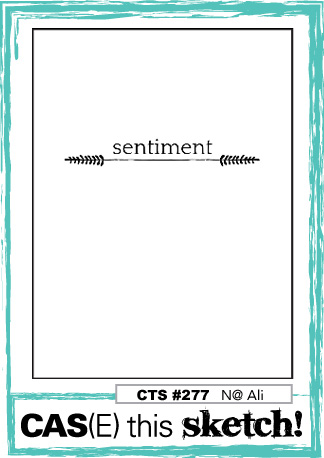
CAS(E) This Sketch #277
This weekly challenge always provides an interesting sketch from which inspiration can be drawn. Sketch # 277 is very clean and simple with just a sentiment and one horizontal element below the sentiment. Even though both of these challenges were rolling through my head for a few days, I did not necessarily try combine the two. Since I wanted my Fab Friday card to be clean while incorporating the 5 colors, I figured out that I wanted to use the “celebrate” die. That’s when I matched up the two challenges, which allowed me to use all the colors but still have a somewhat clean layout. I hope you will see the CAS(E) inspiration in my card.
The Result
Here’s my card:

Here are the challenge links:

The first thing I figured out was the pattern for the “celebrate” die cut. It was relatively easy to accomplish this look. I cropped it out of three of the In-Color DSP papers, stacked them on top of each other, and cut the letters apart. This allowed me to line up the letters exactly no matter the color. It also left me with letter for two additional cards. <Happy Dance>
In order to be able to line up all the letters again, I knew I would need a complete base on which to place the letters. Therefore, I cropped out the sentiment from Basic Black cardstock. I also used Basic Black as one of the mat layers to ground and unify all of the five other colors. Even though the blue “YOU” part of the sentiment is all one piece, I also layered it on top of a black base. Another product that allowed this piecing process to be relatively easy was my Xyron Sticker Maker. When using this sticker maker, I use the wrong end of the SU piercing tool to rub, rub, rub before taking off the cover layer of the Xyron sandwich.
Don’t even ask about the black base layer because I cropped both pieces of the sentiment out of it. Ugly part won’t show because with everything else layered on it.
In order to incorporate the horizontal element I simply used a knotted piece of Lovely Lipstick ribbon.
Thank you for visiting my blog I greatly appreciate each view.
Have a Peachy day!
Sue
Jun 20, 2018 | Fab Friday, InKing Royalty Blog Hop |

Welcome to InKing Royalty’s June Blog Hop! This year’s Blog Hop themes are inspired by popular songs – this month’s song is “Here Comes the Sun.” As you can guess, our Blog Hop today is filled with projects that are inspired by the joy of the summer sun. We are excited to share our creations with you today! After you read my post, I hope you’ll hop over to the next person on the list at the base of this post.
Here Comes the Sun for FabFriday 139
My DH’s (dear husband) favorite color has always been yellow because of the sunshine of sunny Southern California. He grew up and lived in the LA/Orange County area for more than 50 years. Now we live in sunny (read: humid) Central Florida.
Therefore, the new In-Color Pineapple Punch was the first color for which I reached. Of course, there has to be a sun represented on the card, and I achieved that by using the Layering Circles die set, the Stitched Shapes die set, and a Share What You Love doile. The scallops on the largest circle and the doile were my main homages to the sun.
Here’s my card:

I did change the orientation from the sketch, however the inspiration from the sketch is definitely there.
Here’s the Fab Friday 139 sketch:

Varied Vases Bundle
The Varied Vases bundle, designed by million dollar sale demo Mary Fish (in whose third level I am) is so much fun and very versatile. Hint: before trying to line the stamps up to try to get it to match the punch, it is much easier to first punch the vases on a scrap sheet of cardstock. Then you can lay the stamps into the punched areas and stamp with confidence knowing your results will line up with the punch.
The sentiment is also from this bundle, and it fit perfectly on the Petals and More thinlet banner. Next, I cropped a Blueberry Bushel frame for under the sentiment banner and punched the vases using Blueberry Bushel from the In-Color DSP stack. I just love this blue because it is so clear and pure, as are the rest of the 2018 – 2020 In Colors. That’s the main reason that I chose Call Me Clover for the background embossed with the Petal Burst folder. The Pineapple Punch Stamping Write marker was used to simply color the stamped flowers. I really wanted the colors to be the focus of this card, and I think I accomplished that goal.
Thank you for hopping with us today!
Thank you for stopping by today. I hope you’ll hop along to the next stop on the blog hop, Pam Morris from Tap, Tap, Stamp. There’s lots of inspiration to be found in this group – and you don’t want to miss it!
Have a Peachy Day!
Sue
Thank you for hopping along with us. If you get stuck during the Blog Hop, please use this line-up as a guide:
- Brian King at Stamp with Brian
- Shawn de Oliveira at Shawn Stamps
- Nina King at InkPaperSequins
- Imogene Thomas at MomoMakes.com
- Denise Hoepfner at The Mountain Magpie
- Robin Myren at Songbird Designs by Robin
- Candy Ford at Stamp Candy
- Jennifer Spiller at Westside Paper Creations
- Lynn Kolcun at Avery’s Owlery
- Julie DiMatteo at The Paper Pixie
- Sandra Cornejo at Madly Crafting
- Sheryl Sharp at Sharp Notes by Sheryl
- Sue Jackson at Just Peachy Stamping
- Pam Morris at Tap Tap Stamp
- Rachael Shedeed at Bluebonnet Stampin’
- Robbye Hamilton at Miss Hammie’s Crafts
- Jackie Beers at Blue Line Stamping
Apr 22, 2018 | Fab Friday |
If it’s possible to completely love a bundle and DSP…..
This would be one of my favs. Myths and Magic DSP, the Magical Day stamp set, and the Magical Mates thinlets. LOVE! I’ve used it for a number of challenge cards, and this Fab Friday entry is yet another one. The images are so much fun to color and coordinate with the fabulous DSP. I am thankful that, even though this set is retiring, I will be using it for my community service card club at the high school where I teach. So,much.fun!!
Here’s my card:

Here’s the challenge sketch:
Creative Liberties
The base of my card is Tranquil Tide with Lemon Lime Twist on top of it. Then there is a layer of the Bermuda Bay glitter paper from the SAB catalog. It was at this point that the card really started to evolve. I tried a number of different pieces of DSP for the top base piece and the rectangle piece on top of the banner as well. Good news is that, after I cut out all my tries, I have a number of pieces ready to go for another card. I finally decided on the cloud DSP. I thought it is much more subtle than other patterns and also adds interest.
If at first you don’t succeed, try, and try again and again and again.
After all my tries, I knew I couldn’t try to add another piece of paper on top of the banner, which is the Old Olive Glitter Paper from the same stack as the Bermuda Bay. I knew I wanted to use the dragon I colored, and also knew the sentiment I wanted to use. After discarding more choices, I finally decided on the two ovals in place of the layer on top of the banner. The Stitched Shapes thinlits cropped the ovals. Then I used the Tranquil Tide marker to outline the ditch of the stitches in the white oval. The Myths and Magic thinlets make cropping the dragon a snap.
The Tranquil Tide oval was adhered directly to the DSP while mini-dimensionals popped up the dragon. I stamped the sentiment directly on the oval (which would have been a lot easier to stamp before I cropped), and that oval is popped up using regular dimensionals. Mini-dimensionals popped up the banner and the dragon. After I got everything dry fit, I thought the top of the banner HAD to have something small on it, so I grabbed the thinnest Bermuda Bay ribbon I had and tied a small knot. Next step was to adhere all the pieces on the card.
Bling and More
After squinting to look at the card (another nickel goes in the mail for Brian King), I knew two things: 1.) something definitely had to go on the top left corner, and 2.) the dragon looked blah next to all the glitter paper. I grabbed the Tutti-Fruitti adhesive backed sequins in Lemon Lime Twist for the top left corner. I thought I had them on straight until I looked at the close-up of the card. Then I added a few layers of the clear Wink of Stella to the dragon. It’s so difficult to get the Wink of Stella to show on a picture, but it’s there, I promise.
I enjoy reading your comments, so please feel free to leave one.
Have a Peachy Day!
Mar 26, 2018 | Fab Friday |
Myths and Magic DSP is Magical!
I .love.this.bundle.and.DSP. I have a community service card club at the high school where I teach, and I originally bought this bundle for that club. Then I bought the DSP, and I have many a number of cards using the paper or stamp set. It’s fabulous, the bundle is from the Occassions catalog, and is only available until the end of the month. We will find out if the bundle and DSP carries over when the new catalog is released. Fingers crossed!!
I love playing along with Fab Friday
I have been fortunate and very honored to have been chosen for a Fab Five twice with this challenge. Fab Friday is a bi-weekly challenge, and they accept more than one submission, so if I change my mind, or come up with another idea, I can always submit it.
Here’s my card for FabFri133:

Here’s the Fab Friday sketch:

Isn’t the DSP fabulous? The colors, the touches of glitter, the designs, and all the characters are spectacular! Have I mentioned all the magical color combinations, which create a truly magical impression?
For this card, I used Tranquil Tide and Pool Party to mat the DSP for the base of the card. The mat of the DSP is covered in tiny Lemon Lime Twist and Tranquil Tide scales. So cute! I love the sparkly bubbles on this paper and could kick myself for not ordering the coordinating glitter paper. All the mermaids on the paper are sparkly as well, and their scales have great definition. Like I said, I love this whole suite.
The sentiment is from the coordinating Magical Day clear-mount stamp set and is one of two versatile sentiments in the set. I stamped the sentiment in Fresh Fig to match the focal mermaid on a Whisper White banner. Instead of matting the banner, I chose to use my Stamping Write Marker to lightly outline the edges of the banner. This subtle coloring gives the impression of a mat without the bulk or added layer.
The end of SAB is near!
I used a Sale-a-Bration free item for the bow because the banner needed something. It’s a shimmery Basic Grey ribbon and coordinates perfectly with this DSP. The other colors in the three ribbon set are Calypso Coral and Bermuda Bay. If you love this ribbon as much as I do, your time to order is getting shorter by the day. SAB ends on March 31.
Comments are welcomed and I love hearing from you.
Have a Peachy Day!
Mar 12, 2018 | Fab Friday |
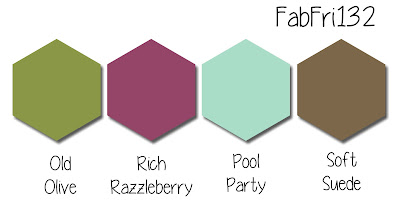
Fab Friday 132
I have been looking at this four color challenge for a little more than a week just waiting for inspiration to hit. I love each of these colors: Pool Party, Old Olive, Rich Razzleberry, and Soft Suede. I’ve looked at the cards from the Design Team a number of times, again waiting for inspiration to hit.
Tonight I was just browsing through Pinterest (that should be a hobby in and of itself) and saw a card using the Delightful Daisy stamp set and punch, and inspiration hit. Hard, like someone had literally smacked me up the side of my head.
Here’s the challenge:
My Challenge Card Creation

The three stamp sets I used were Daisy Delight (flowers), Dragonfly Dreams (sentiment), and Painted Harvest (leaves). All three sets are current photoplymer sets. When I stamped the daisies in Pool Party on Whisper White, I decided I didn’t want all the white showing, so I used an Aqua Blender to very lightly shade all the petals with Pool Party. After I shaded, I punched using the coordinating daisy punch. Two clear faceted gems added bling for the centers of the daisies.
The leaves are stamped in Old Olive on the Old Olive cardstock, then punched with the coordinating leaf punch.
The sentiment is in Rich Razzleberry and matted on Soft Suede. I decided I wanted just a touch of ribbon, so I made a very tight little knot using Rich Razzleberry ribbon and adhered it to the sentiment using a glue dot.
The background Rich Razzleberry cardstock was run through the Big Shot using the Leaves TIEF. If you haven’t tried any of the Textured Impressions Embossing Folders, you need to treat yourself to one, or two, or more. The textures on these folders are deep and detailed.
The Soft Suede DSP panel is out of one of my very favorite In Color stacks. I absolutely, positively adore these patterns and have been hoarding er, saving, all the scraps so I can continue to love them all. A mat of Soft Suede cardstock under the DSP adds depth to the panel.
When all was said and done….
While getting all the card elements stamped, punched, embossed, matted, I briefly thought that all the patterns would overwhelm each other. I don’t think that happened. The daisies really toned down the pattern on the DSP. The Rich Razzleberry background and sentiment give your eyes some place to rest. The softly colored daisies pair well with the leaves tucked under them so they just peek out. Mini-dimensionals provided a bit of additional dimension to the daisies and the leaves.
I wasn’t sure I would be inspired for this challenge, but it all worked out; at least I think so. What do you think? Comments are always welcome!
Have a Peachy day!