Welcome back to the bi-weekly Cardz 4 Galz bi-weekly challenge #254. Our fearless leader/admin for this challenge, Caz, chose Wedding or Anniversary for the theme. When you finish here, please visit the challenge site to see what the rest of the very talented design team members created. Then, don’t forget to upload your creations to our gallery. We look forward to seeing your creations there!
My wedding anniversary is coming up next week so I chose to create an anniversary fun fold card. My card uses current, last chance, and retired products.
Here’s my card:
I’ve already made at least 15 of the landscape criss-cross card using Terri Gaines’ tutorial. You can see a few of those posts here, here, and here (please ignore the typo in the title).. I knew I could figure out the measurements for the portrait version, but was so happy to find her video tutorial. Her measurements, with my papers, can be found below. Her video is wonderful for explaining how to put the card together. However, once you have the measurements and a picture for reference, you can pretty much put it together yourself.
I’m also going to be uploading this card to the Creative Creases Challenge, where the theme is always Anything Goes with a Fun Fold. I am honored to be a guest designer for the current edition of the challenge, and you can see that card here. I always find inspiration from the design team, and I’m sure you will as well. Please remember to upload your fun fold to the challenge.
Measurements:
Card base: 10-3/4 x 5-1/2 score at 1-5/8, 3-1/4, 7-1/2 & 9-1/8 (Pecan Pie cardstock)
Panel 1 Layer #1: 3 x 5 (Irresistible Designs DSP colored with Basic Gray ink and a blending brush)
Panel 1 Layer #2: 2-3/4 x 4-3/4 (Nature’s Sweetness DSP with the writing on it)
Panel 2 Layer #1: 2-1/2 x 4-1/2 ( another piece of the Irresistible Designs DSP colored with Basic Gray ink and a blending brush)
Inside Layer #1: 3 x 4-1/4 ( more of the Irresistible Designs DSP)
Inside Layer #2: 2-3/4 x 4 (white cardstock)
Optional: two panels for the sides of the front measuring 5-3/8 by 1-5/8 inches (mini-corrugated embossed Pecan Pie cardstock)
Trim a piece of DSP to 6 by 2-1/2 inches for the envelope flap
Punch a 1-inch circle of coordinating DSP for the envelope seal and run it through the XYRON create-a-sticker machine
Scraps of Pecan Pie for the sentiment banner
Pebbled Path cardstock for the floral spray
A length of white diagonal ribbon colored with the dark Pecan Pie dark blend
My Hints & Such:
Since I wanted the layers to really stand out, I outlined each piece with a Stamping Write Marker
The Irresistible Designs DSP comes already embossed and ready to be colored with a blending brush
I colored another piece of this DSP for this card using Secret Sea ink
After coloring ribbon using the blends it will be stiff, so you will need to do something to break down the stiff fibers
I used a bone folder and rubbed it back and forth on the ribbon so I could make it easier to use
I saw Mary Deatherage from Stamps-n-Lingers for a live video using the new Painterly Pears suite recently and she showed how to use a loop-d-loop bow, with which I fell in love
I linked the short video for the loop-d-loop bow
The sentiment on the front of the card comes from the Blooming Phrases stamp set, which I embossed using white powder and heat set it
The sentiment banner was cropped using a die from the Stylish Shapes die set
I used the retired Everyday Greetings stamp set for the inside sentiment
Finally, I added three Pecan Pie ribboned dots to help balance out the weight on the right side of the card
With that, I’d finished this coordinated card, envelope, and envelope seal set
I am honored to be a guest designer for the July, 2025 edition of the Creative Creases Challenge, where it’s always everything goes with a fun fold.
Here’s my Sunrise Sailing fun fold:
I found the instructions for this card on Pinterest (of course) from Linda Bauwin of Stamping with Linda. She does have a video tutorial on YouTube, which you can find here. I watched the video and used her measurements for this card.
This card may look complicated, but it really came together quite quickly. I already made a second card, which I will be posting on July 15 as a member of the Creative Crafters Design Team.
If you don’t have the arches die set, you can use a number of other die sets whether they are current or retired. I hope you have fun with this fun fold. Don’t forget to upload your creations to the Creative Creases Challenge! I would love to see what you create!
What I Did Differently:
I used a Balmy Blue base for the card, including the inside pull-out section
HINT: Make sure that your pull-out part comes out from the right-hand side of the card, which seems backwards at first
I didn’t use DSP on the front of the card, since I wanted to use the 3D embossing folder for the bundle
After embossing the front, I used Azure Afternoon ink and a blending brush to color the water section of the embossed image
Next, I lightly brushed on a few layers of white craft ink one the embossed part of the waves using a dauber and drops of ink I put on an acrylic block
Even after multiple layers I wasn’t getting the look I wanted, so I lightly added Wink of Stella to the waves
Using the same dauber, I added white ink to the clouds for just a touch of cloud color
Then, I cropped out the arch from the center of the card base
I stamped the sailboat and the sentiment on Basic White cardstock using Momento Tuxedo Black ink
Using Gray Granite light and dark blends, I colored the boat
I stamped Azure Afternoon on the sails and used Tuxedo Black ink to stamp the birds on the embossed birds
After stamping some water on the sentiment banner, I cropped it using a Stylish Shapes die
For the inside, I stamped the sentiment and the birds using black ink
Then, I added water on the bottom in Balmy Blue, and lightly added Wink of Stella
This card has a bit of bulk to it, so you might need to add additional postage
Adhere the sentiment to the cropped arch using dimensionals
Adhere the rest of the elements of the card using multipurpose liquid glue
Finally, I trimmed a piece of Balmy Blue 6″ by 6″ DSP to 6 by 2-1/2 inches for the envelope flap
With that, I’d finished this coordinated card and envelope set
Let your creativity set sail with the Maritime Moments Kit. Drift in the soothing watercolors and costal imagery of these cards that can be either feminine or masculine. With printed sentiments, twine, and a stamp set of nautical images, this kit comes with everything you need to make cards for your favorite sailors.
DETAILS – Makes 6 cards: 2 each of 3 designs – Folded card size: 4.3″ x 5.5″ (10.8 x 14 cm) – Colors: Balmy Blue, Cajun Craze, Garden Green, Granny Apple Green, Gray Granite, Night of Navy, Pecan Pie, Pool Party – Sentiments printed in Dutch, English, French, and German
Here’s the unboxing video:
Beautiful Blues Kit:
Product detail
Craft timeless handmade cards for sharing messages of friendship, support, and sympathy with the Beautiful Blues Kit. This all-inclusive crafting kit comes with everything you need to create nine lovely cards featuring hand-painted floral designs and a palette of soothing blues.
DETAILS – Makes 9 cards: 3 each of 3 designs – Folded card size: 5-1/2″ x 4-1/4″ (14 x 10.8 cm) – Colors: Basic White, Blueberry Bushel, Night of Navy – Also available in French
Welcome to the newest Make My Monday bi-weekly challenge #255. I’m hosting this challenge and chose Summer Fun for the theme. When you finish here, please visit the challenge site to see what the rest of the very talented design team members created. Then, don’t forget to upload your creations to our gallery. We look forward to seeing your creations there!
Summer Fun has a very individual interpretation, so I am looking forward to seeing your creations in our gallery. I chose flowers because I am hoping to do some productive gardening this summer. Cross your fingers that no plant is harmed in this endeavor because I do not have a green thumb.
Here’s my card:
Since the front sentiment is for an all-occasion card, I haven’t stamped an inside sentiment yet. Instead, I used removable tape to adhere the white cardstock. When I know the occasion, I can stamp the sentiment, and adhere it permanently using multipurpose liquid glue. I’ve already posted one of these cards for the last MMM challenge, and you can see that post here. I’d also posted a dinosaurs version, and you can see that one here. Once I got started making these fun folds, I couldn’t stop.
As with other fun fold card, I’m going to be adding this to the Creative Creases Challenge for which the theme is always Anything Goes with a Fun Fold. If you love fun folds as much as I do, please upload your creations to the gallery.
DSP and Templates:
I made myself a template to use for the measurements, and am adding the pictures in lieu of including measurements.
I used Timid Tiger for the base pieces of this card. The DSP (designer series paper) is a combination of the 2025 – 2027 6 x 6 inch In Color DSP and the Florals in Bloom 12 x 12 inch DSP. Both of these DSP packs can be found in the annual catalog.
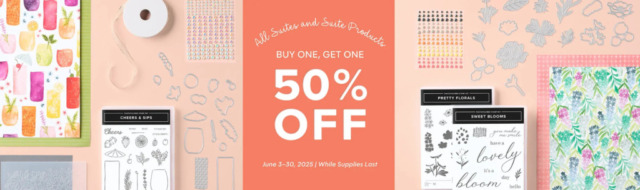
Today, June 30, 2025, is the LAST DAY for the Buy One, Get One 50% Off!
Our suite collections are known (and loved!) for their coordination, quality, and style. With stamps, tools, patterned paper, and embellishments in stunning colors and unique designs, suites make creativity simple and fun. Shop the individual products or buy as a full collection!
I have two orders making their way to me and I couldn’t be more excited! Some of the products are pre-orders for the upcoming additions to the Online Exclusives!
If you’d like some help getting the most out of your Buy One, Get One 50% OFF sale, please contact me for assistance.
Promotion Details
Sales Period: June 3–30, 2025
Ordering Deadlines
Phone: June 30, 2025, at 6:59 p.m. (MT)
Online: June 30, 2025, at 11:59 p.m. (MT)
All available suites and suite products from the 2025–2026 Annual Catalog and Online Exclusives are buy one, get one 50% off.
When you shop the sale, the 50% off discount will apply to the lower-priced item (for example, if you buy a suite collection and a stamp set from a suite, the suite would be full price, and the stamp set would be 50% off).
Suite collections are available if all items are in stock; if all items are not in stock, you can still shop the available suite products.
You don’t have to buy a suite and suite products all from the same suite collection for the discount to apply. You can buy any suite products from any suite.
The discount will appear in your cart once you’ve added two items within the sale parameters to your cart.
Products are available only while supplies last.
If you live in the U.S. and don’t already have a Stampin’ UP! demo from whom you order, I would be honored to work with you. If you’d like some help getting the most out of your Buy One, Get One 50% OFF sale, please contact me for assistance.
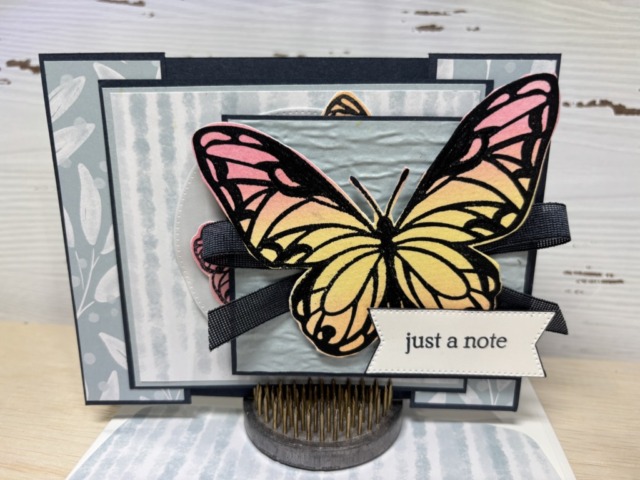
Welcome to the newest Make My Monday bi-weekly challenge #254. I’m hosting this challenge and the theme is Butterflies (1 or more) for the theme. When you finish here, please visit the challenge site to see what the rest of the very talented design team members created. Then, don’t forget to upload your creations to our gallery. We look forward to seeing your creations there!
The Beautiful Butterflies hybrid embossing folder, which includes the die set, has been unavailable. However, it’s now available and I’ve got my order in the picking stage. I’m so happy that I was able to take advantage of the Buy One, Get one 50% Off sale going until the end of June, but more about that later in this post. The Florals in Bloom 12 x 12 DSP and the In Color flat pearls are part of the Floral in Bloom Suite Collection, so those items individually also quality for the Buy One, Get one 50% Off.
Here’s my fun fold (single) fussy cut butterfly card:
Since the front sentiment is for an all-occasion card, I haven’t stamped an inside sentiment yet. Instead, I used removable tape to adhere the white cardstock. When I know the occasion, I can stamp the sentiment, and adhere it permanently using multipurpose liquid glue.
As with other fun fold card, I’m going to be adding this to the Creative Creases Challenge for which the theme is always Anything Goes with a Fun Fold. If you love fun folds as much as I do, please upload your creations to the gallery.
In Colors, Templates, and Sale Items:
The base of this card is Strawberry Slush, one of the 2025-2027 In Colors, as are the ribbon and dots.
I’ve already posted a Darling Dinos diagonal tri-fold card, which you can see here. At that time, I made myself a template so I can recreate this impressive fold.
Our suite collections are known (and loved!) for their coordination, quality, and style. With stamps, tools, patterned paper, and embellishments in stunning colors and unique designs, suites make creativity simple and fun. Shop the individual products or buy as a full collection!
I have two orders making their way to me and I couldn’t be more excited! Some of the products are pre-orders for the upcoming additions to the Online Exclusives!
If you’d like some help getting the most out of your Buy One, Get One 50% OFF sale, please contact me for assistance.
Promotion Details
Sales Period: June 3–30, 2025
Ordering Deadlines
Phone: June 30, 2025, at 6:59 p.m. (MT)
Online: June 30, 2025, at 11:59 p.m. (MT)
All available suites and suite products from the 2025–2026 Annual Catalog and Online Exclusives are buy one, get one 50% off.
When you shop the sale, the 50% off discount will apply to the lower-priced item (for example, if you buy a suite collection and a stamp set from a suite, the suite would be full price, and the stamp set would be 50% off).
Suite collections are available if all items are in stock; if all items are not in stock, you can still shop the available suite products.
You don’t have to buy a suite and suite products all from the same suite collection for the discount to apply. You can buy any suite products from any suite.
The discount will appear in your cart once you’ve added two items within the sale parameters to your cart.
Products are available only while supplies last.
If you live in the U.S. and don’t already have a Stampin’ UP! demo from whom you order, I would be honored to work with you. If you’d like some help getting the most out of your Buy One, Get One 50% OFF sale, please contact me for assistance.
Welcome back to the bi-weekly Cardz 4 Galz # 252. Our host for this edition of the challenge, Debbie , chose Easel Card for the theme. Since I am obsessed with all things fun fold I was so pleased to create a card with new products. When you finish here, please visit the challenge site to see what the rest of the very talented design team members created. Then, don’t forget to upload your creations to our gallery. We look forward to seeing your creations there!
Here’s my Coneflower Celebrations easel card:
I’m also going to enter this card in the Creative Creases Challenge, where it’s always Anything Goes with a Fun Fold.
Measurements:
The Secret Sea base measures 11 by 4-1/4 inches, scored at 2-3/4 and 5-1/2 inches
Trim a piece of the Cloud Cover 6 x 6 inch DSP (designer series paper) to 5-3/8 by 4-1/8 inches
Trim a piece of white cardstock to 4-1/8 by 5-3/8 inches
I have scraps of all sizes of white cardstock and was able to use scraps to stamp all of the images on the front from scraps
Punch a 1-inch circle from Secret Sea 6 x 6 inch DSP and run it through the XYRON create-a-sticker for the envelope seal
Trim a piece of Secret Sea cardstock to 4-1/8 by 3/4 inch for the inside easel stop piece
What I Did:
Stamping, Coloring, & Cropping:
I used the Coneflower Celebration bundle for all of the stamped images
After stamping all of the coneflower pieces, I colored them using the blends combos in Darling Duckling, Old Olive, and Pecan Pie
Stamp the on a scrap of white cardstock for the front and on the white cardstock piece for the inside
Using Secret Sea ink, randomly stamp splotches using first and second generation stamping around both sentiments
Stamp splotches using first and second generation stamping on the envelope flap
Crop the sentiment using a Nested Essentials die
Crop the coneflower pieces for the front
Trim and add a piece of the adhesive foam strip to the back of the Secret Sea cardstock for the easel stopper
Crop the stopper piece using the circles die from the Coneflower Celebration die set
HINT: When you poke out the circles from the cardstock/adhesive foam piece, keep the circles because they form perfectly sized dimensionals for the flower pieces
Assembly:
Use multipurpose liquid glue to adhere the flower pieces together
Add dimensionals to the back of the flower pieces
Add Secret Sea faux linen ribbon to the card
HINT: to save on ribbon and bulk, use the images below to help you adhere the ribbon using tear-&-tape
Adhere the Cloud Cover DSP to the bottom half of the base of the card
HINT: Do not adhere the top half of the DSP or you won’t be able to create the easel
Adhere the coneflower to the front of the card making sure the dimensionals straddle the ribbon
Adhere the sentiment making sure to straddle the coneflower
Add three Secret Sea flat pearls to the front of the card
Adhere the white cardstock to the inside of the card using multipurpose liquid glue
The placement of the easel stopper depends on your desired steepness of the front easel part
HINT: I usually like to place the stopper about an inch from the crease of the base
With that, I’d finished this coordinated card, envelope, and envelope seal set
Our suite collections are known (and loved!) for their coordination, quality, and style. With stamps, tools, patterned paper, and embellishments in stunning colors and unique designs, suites make creativity simple and fun. Shop the individual products or buy as a full collection!
I already have my next order ready to go, and I’m definitely taking advantage of the sale!
Here are All the Details:
Sales Period: June 3–30, 2025
Ordering Deadlines
Phone: June 30, 2025, at 6:59 p.m. (MT)
Online: June 30, 2025, at 11:59 p.m. (MT)
All available suites and suite products from the 2025–2026 Annual Catalog and Online Exclusives are buy one, get one 50% off.
When you shop the sale, the 50% off discount will apply to the lower-priced item (for example, if you buy a suite collection and a stamp set from a suite, the suite would be full price, and the stamp set would be 50% off).
Suite collections are available if all items are in stock; if all items are not in stock, you can still shop the available suite products.
You don’t have to buy a suite and suite products all from the same suite collection for the discount to apply. You can buy any suite products from any suite.
The discount will appear in your cart once you’ve added two items within the sale parameters to your cart.
Products are available only while supplies last.
If you live in the U.S. and don’t already have a Stampin’ UP! demo from whom you order, I would be honored to work with you.
This month, we’re diving into the beautiful and brand-new 2025-2027 Stampin’ Up! In Colors! Whether you’re a seasoned crafter or just starting on your stamping journey, these fresh hues are giving us all inspiration. Click through each link at the bottom of this post to “hop” along and see how our community is using these beautiful new shades in their projects. You’ll leave with inspirational ideas, and maybe a few new must-haves on your wishlist!
Since this is a fun fold, I’ll be adding it to the Creative Creases gallery. If you enjoy creating fun fold cards, this challenge is for you. The theme for every challenge is Anything Goes with a Fun Fold
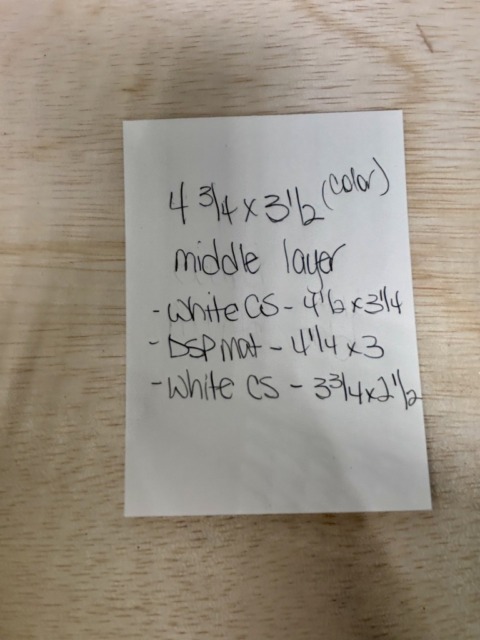
Measurements:
Here are my templates:
After making this template, I decided that I wanted to add DSP panels to the sides. Those panels measure 1-1/4 by 5-3/8 inches.
Once you get your pieces cut, follow Terri Gaines‘ video directions. Hopefully, you will be as hooked as I am.
Watercoloring:
I need to start by saying I am a beginner for watercoloring. Even so, I’m pretty happy with the results.
Things I learned for this card:
Definitely make sure you use the Fluid watercolor paper
The spritzer is definitely your friend – the colors will need to be placed on wet watercolor paper
Keep your empty Wink of Stella pens because you can use them to brush on color OR get some brushes with Amazon
I found these on Amazon, which are very similar to the retired waterpainter brushes and can be loaded with water to help spread color
Make sure the paper is completely dried before you try stamping on it
I used my heat tool to help dry the watercolor paper
The texture on the watercolor paper makes multiple stampings necessaryIf you have the discontinued Stamparatus, the Misty, or a similar stamping platform you will need it
I stamped the outlines of the butterflies using Secret Sea ink and it’s become my new alternative to Basic Black
The Loopy Loop Bow:
I was able to watch Mary Deatherage’s, from Stamps -n- Lingers, Perfectly Pears tutorial. In that video, she showed her loopy-loop bow. That’s what I used for the front of my card. I’m bow-challenged and this was a pretty easy way to add ribbon without adding the bulk of a tied bow. If you’ve never seen her videos, you owe it to yourself to watch them. I think she’s the Queen of the Collage. Gorgeous cards!!
Back to the Pals’ Blog Hop:
There’s a whole lineup of great inspiration waiting for you! Scroll down to hop through the rest of the Blog Hop Team’s creations and fill your crafty cup. And don’t miss next month’s theme: My Favorites in the New Catalog — because you know we’ve already picked our must-haves!
Our suite collections are known (and loved!) for their coordination, quality, and style. With stamps, tools, patterned paper, and embellishments in stunning colors and unique designs, suites make creativity simple and fun. Shop the individual products or buy as a full collection!
I already have my next order ready to go, and I’m definitely taking advantage of the sale!
Promotion Details
Sales Period: June 3–30, 2025
Ordering Deadlines
Phone: June 30, 2025, at 6:59 p.m. (MT)
Online: June 30, 2025, at 11:59 p.m. (MT)
All available suites and suite products from the 2025–2026 Annual Catalog and Online Exclusives are buy one, get one 50% off.
When you shop the sale, the 50% off discount will apply to the lower-priced item (for example, if you buy a suite collection and a stamp set from a suite, the suite would be full price, and the stamp set would be 50% off).
Suite collections are available if all items are in stock; if all items are not in stock, you can still shop the available suite products.
You don’t have to buy a suite and suite products all from the same suite collection for the discount to apply. You can buy any suite products from any suite.
The discount will appear in your cart once you’ve added two items within the sale parameters to your cart.
Products are available only while supplies last.
If you live in the U.S. and don’t already have a Stampin’ UP! demo from whom you order, I would be honored to work with you.
Welcome to Just Peachy Stamping by Sue Jackson: an independent Stampin' Up demonstrator.
Through Stampin' Up!, I happily share my love of papercrafting through sales, classes, small stamping group meet-ups and workshops. I think that being a teacher in my "real life", I have a unique approach to sharing my fantastic hobby. I look forward to connecting with you!