Oct 23, 2019 | Color Throwdown |
I’m Still Amazed
A week ago I was chosen as the Featured Stamper for the card I created for ctd564, which means I am now the guest star stamper for ctd566. Honored. Amazed.
Here’s the challenge banner for ctd566:

The colors for this week are orange, grey, and creme. While the challenge banner is clearly for fall, I needed a card for my great-niece’s second birthday. Here’s the card I created using Grapefruit Grove, Smoky Slate, Basic Gray, and Very Vanilla:

These colors really worked beautifully together, and the whole creative process for this fun fold card really evolved more than being planned.
Evolving Process
When I started, I only knew the colors, that I needed a cute card for my great-niece, and I wanted to create a fun fold card. After trying out a few different shades of orange, I decided on Grapefruit Grove mainly because of the DSP patterns for the 2018-2020 In Colors. I played around with the patterns until I decided on the random polka dots and large gingham pattern.
For my cute element, I chose this adorable elephant from A Little Wild stamp set and Little Loves die set. I combined the elephant with the retired, but forever a part of my SU! products, Number of Years stamp set and die. As luck would have it, I had a piece of the Grapefruit Grove cardstock already embossed using the basketweave 3D embossing folder. After running that piece through the Big Shot with the “2” die, I decided I needed a border. I then cropped a piece of Smoky Slate using the “2” die.
After stamping and cropping the elephant, I colored him using the Smoky Slate blends combo and the light Pumpkin Pie stamping blend for her toes and ears.
I used Smoky Slate for the base, and also for the sentiments on both the front and inside of the card. The border of the 2 is Smoky Slate attached directly to the number. I then popped the number up using dimensionals. I thought the 2 needed a little something else without adding another pattern into the mix. Therefore, I grabbed my clear Wink of Stella and went to town coloring the textured basketweave.
Ever Evolving Process
Here are pictures for the inside, fully open, and close-up of the Wink of Stella on the “2” parts of the card:


Wink of Stella is difficult to photograph, which explains the odd angle of the photo. There’s more Wink of Stella on the weave than shows in the photo, and I was pretty stinking pleased.
I knew from the beginning that I would be using Very Vanilla for the Stitched Nested Labels. The nested die set creates perfect borders every time. Love!
I found that I needed an outline so the Grapefruit Grove label would pop off the DSP. Therefore, I used the brush end of my Basic Gray marker to create an outline without adding bulk.
The New Wonders host stamp set provided the inside sentiments, which fit perfectly on this card. I adhered the outside label first, then lined up the label on the inside so the inside and outside lined up.
I tied a bow using the Smoky Slate stitched ribbon, and threaded it under the 2. Once I had the ribbon in place, I easily lined up my elephant so she didn’t float on the label.
When I opened the card so it laid flat, I realized the back of the elephant floated on the inside of the label. I needed something to anchor her, so I used the leaf garland die from the Little Loves die set. I adhered the Basic Gray leaf garland right under the elephant’s back feet, and hoped I’d completed the card.
Finishing Touches
As always, I decorated the envelope using another piece of the Grapefruit Grove DSP on the flap. Using Smoky Slate, I stamped “Happy birthday” on the front bottom left corner. I decided I needed some little enamel dots, which came from from the Happiness Blooms dot.
With that, I’d finished the card.
Thanks so much for stopping by my blog today. A big thanks, in advance, for taking the time to leave a comment.
Have a Peachy Day!
Sue
If you don’t already have a Stampin’ Up! demonstrator, I would be honored to work with you. Please contact me or visit my shop to order the supplies for this card.
If you are ordering $150 or more, please contact me first so you earn all the Stamping Rewards for your order.
If you are ordering less than $150, please use the host code, 49KJF94R when prompted. I use the combined rewards for gifts for customers.
Just in case you need another reason to place an order, here’s a bigger incentive:

Check out the full list by clicking here!
Supplies
A Little Wild stamp set, item # 144344
Little Loves die set, item # 143743
New Wonders host cling stamp set, item # 149426
Stitched Nested Labels Dies, item # 149638
2018 – 2020 In Color DSP, item # 149618
Whisper White cardstock, item # 100730
Smoky Slate cardstock, item # 131202
Basic Gray cardstock, item # 121044
Grapefruit Grove cardstock, item # 146972
Basket Weave 3D embossing folder, item # 151797
Memento Tuxedo Black stamp pad, item # 149617
Smoky Slate ink pad, item # 147113
Smoky Slate blends combo, item # 145058
Pumpkin Pie light blend, item # 144578
Happiness Blooms enamel dots, item # 148805
Medium Whisper White envelopes, item # 107301
Stamping Dimensionals, item # 104430
Tombow Liquid Adhesive (my fav!!), item # 110755
Paper Pumpkin Specials
I am super excited about the October and November Paper Pumpkin coordinating kits! I recieved my October Paper Pumpkin card kit on Friday!! The November kit will be the coordinating gift tags. So excited! In order to recieve the November kit, you will need to sign up by November 10th. Here’s the link for you to sign up for these kits as well: https://www.paperpumpkin.com/en-us/sign-up/?demoid=2155072

Oct 20, 2019 | Color Throwdown |
Feels like Frost DSP
This paper is absolutely stunning! One side of each 6″ x 6″ sheet has a gorgeous winter photo, the other side has different silver patterns on Whisper White. Both sides are fabulous. Here’s the photo from the SU! holiday catalog:
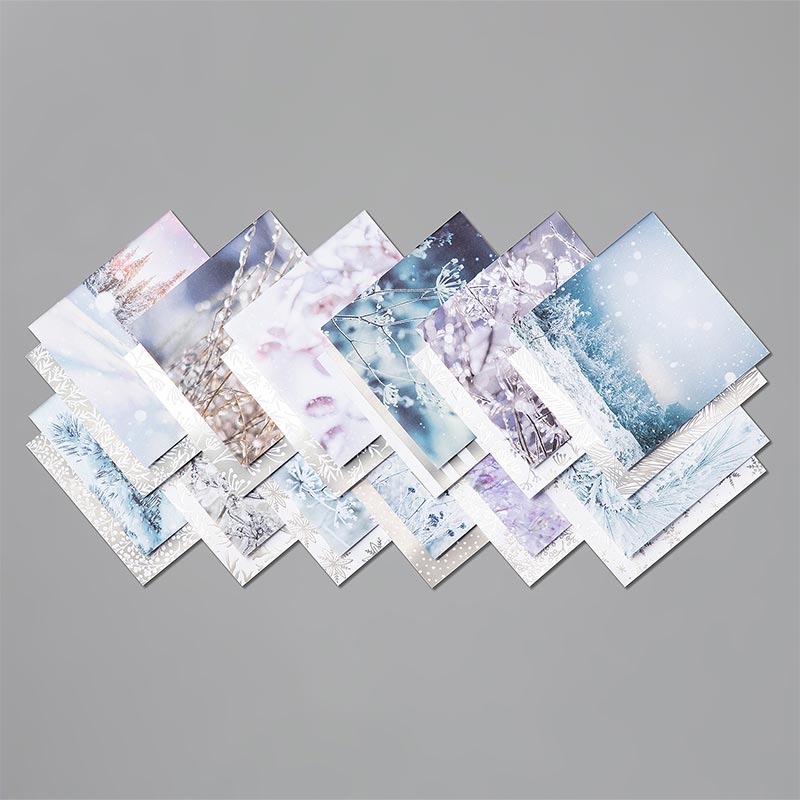
Click on the image in order to view it in all its glory! Small pictures don’t do it justice.
The paper is so gorgeous, it does all the work on this easy-peasy card, while meeting the ctd565 challenge: lavendar, grey, and black.
Here’s my card:

The DSP Does All the Work
I really did not want to cover up this gorgeous print. The Stampin Up! colors in this print are Purple Posy, Highland Heather, and Smoky Slate.
The sentiment is from the retired, but permanent stamp set on my shelves, Watercolor Christmas. I stamped it in Memento Tuxedo Black on vellum cardstock. It’s been quite a while since I had any luck using embossing powder, but I wanted to try for this card. Therefore, I used my embossing buddy on the vellum before I stamped the sentiment. While still wet, I covered the sentiment with clear embossing powder. I wasn’t sure how it would come out, but it worked. Score! I did need to use the heat gun from the top and bottom to help keep the vellum from warping. The embossing doesn’t show up well on the photo, but it does in person.
I cropped both the vellum and Purple Posy cardstock layer using the Layered Circles die set. Since there wasn’t a way to easily hide the adhesive behind the sentiment, I used a make-up wedge to spread Tombow liquid adhesive over the whole Purple Posy cardstock layer. Since the whole circle is covered with adhesive, it doesn’t show through. Next, I ran a piece of Smoky Slate cardstock through the Big Shot in the Subtles embossing folder, turned the paper 90 degrees and ran it through again. This gave the cardstock a hatched appearance. I used the Layered Circles die set for this circle as well.
Finishing Touches
Next, I matted the DSP on Basic Black cardstock to both coordinate with the sentiment and to provide a real pop against the DSP.
Finally, I tied a pieces of the black glittered organdy ribbon around the base/DSP, popped up the sentiment on dimensionals and attached it down. I used a piece of the DSP on the envelope flap, and I was done.
Easy-peasy!
Thanks so much for stopping by my blog today. A big thanks, in advance, for taking the time to leave a comment.
Have a Peachy Day!
Sue
If you don’t already have a Stampin’ Up! demonstrator, I would be honored to work with you. Please contact me or visit my shop to order the supplies for this card.
If you are ordering $150 or more, please contact me first so you earn all the Stamping Rewards for your order.
If you are ordering less than $150, please use the host code, 49KJF94R when prompted. I use the combined rewards for gifts for customers.

Supplies
Feels Like Frost 6″ x 6″ Specialty DSP, item # 15044
Whisper White cardstock, item # 100730
Smoky Slate cardstock, item # 131202
Purple Posy cardstock, item # 150881
Basic Black cardstock, item # 121045
Subtle 3D embossing folder, item # 151775
Layering Circles die set, item # 141075
Glittered Organdy Ribbon, item # 147897
Memento Tuxedo Black stamp pad, item # 149617
Embossing Buddy, item # 103083
Stampin’ Emboss powder clear, item # 109130
Medium Whisper White envelopes, item # 107301132708
Tombow Liquid Adhesive (my fav!!), item # 110755
Paper Pumpkin Specials
I am super excited about the October and November Paper Pumpkin coordinating kits! I recieved my October Paper Pumpkin card kit on Friday!! The November kit will be the coordinating gift tags. So excited! In order to recieve the November kit, you will need to sign up by November 10th. Here’s the link for you to sign up for these kits as well: https://www.paperpumpkin.com/en-us/sign-up/?demoid=2155072
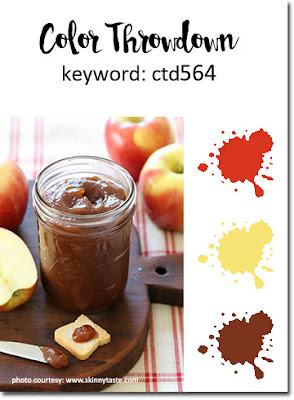
Oct 12, 2019 | Color Throwdown, FUSION |
Have to Love a Two-fer
As you know, I love being able to combine challenges. In this case, I combined the colors from ctd564 and sketch from Fusion-Dragonfly.
Here are the challenge banners:

Here’s my card:

Another Easy Peasy Card
Since the sketch and colors were pre-determined, this card came together so fast. All I had to do was pick out a stamp set and DSP. Everything else fell into place.
I used the Magnolia Lane DSP for the brown and white background. Just that fast, and I had the first color.
Crushed Curry seemed like a fall-ish yellow color, which seems to work with this color combination. I cropped the circle using the largest Stitched Shapes circle, then colored in the ditch using the Crushed Curry marker. From the start, I knew I wanted this to be a get well card and needed to figure out what to do about a flat Crushed Curry circle just plopped in the middle of the card. I decided to use the splatter stamp from Gather Together and stamped first and second generation stamps in Crushed Curry. The splatter gives the plain circle much needed texture, especially since the sentiment is small. Color two down, one to go.
I chose Real Red for the apple and the base of the card. I colored the apple using the Real Red blends combo. In order to achieve the look of the lighter spots, I simply used the color lifter blend. I popped up the apple using dimensionals. Since I’d already popped up the Crushed Curry circle using dimensionals, the left side of the apple has a double layer of them. I felt that some additions needed to be made to the card, even though I had used the third required color, .
Finishing Touches
After squinting to check for balance (Brian King, I owe you another nickle), I thought the apple and sentiment appeared to be floating on the Crushed Curry circle. Therefore, I went back to the Harvest Hellos stamp set and decided to use the apple seeds to anchor the apple. After stamping the seeds in Early Espresso, I colored them using Soft Suede.
I still thought the card needed some sort of embellishments, so I tied a piece of linen thread around the apple stem. Then I turned my attention to the apple seeds. I couldn’t think of anything 3D to put over them, so I made my own “epoxy” apple seeds using the fine-tip glue pen. Just by carefully applying glue to the seeds, and letting it thoroughly dry, I created my own seeds.
Here’s a close-up of the seeds:

After using the same DSP for the envelope flap, I stamped and colored half an apple and some seeds on the envelope front.
Easy-Peasy – truly easy and quick.
Thanks so much for stopping by my blog today. A big thanks, in advance, for taking the time to leave a comment.
Have a Peachy Day!
Sue
If you don’t already have a Stampin’ Up! demonstrator, I would be honored to work with you. Please contact me or visit my shop to order the supplies for this card.
If you are ordering $150 or more, please contact me first so you earn all the Stamping Rewards for your order.
If you are ordering less than $150, please use the host code, 49KJF94R when prompted. I use the combined rewards for gifts for customers.
Supplies
Magnolia Lane DSP, item # 149484
Harvest Hellos stamp set, item # 150581
Gather Together stamp set, item # 150589
Whisper White cardstock, item # 100730
Real Red cardstock, item # 102482
Crushed Curry cardstock, item # 131199
Soft Suede ink pad, item # 126978
Crushed Curry ink pad, item # 131173
Stitched Shapes die set, item # 145372
Real Red blends combo, item # 147935
Linen Thread, item # 104199
Memento Tuxedo Black stamp pad, item # 149617
Dimensionals, item # 104430
Fine-Tip glue pen, item # 138309
Medium Whisper White envelopes, item # 107301132708
Paper Pumpkin Specials
I am super excited about the October and November Paper Pumpkin coordinating kits! One kit is for cards, the other for coordinating gift tags. So excited! In order to recieve the November kit, you will need to sign up by November 10th. Here’s the link for you to sign up for these kits as well: https://www.paperpumpkin.com/en-us/sign-up/?demoid=2155072
Sep 16, 2019 | Color Throwdown |
Color Throwdown Challenge, #560
The challenge this week included red, green, brown, and yellow using generic colors. I wanted to make a Christmas card, so that took care of the red and green, for which I used Cherry Cobbler and Shaded Spruce. I picked this gorgeous plaid from the Wrapped in Plaid Specialty DSP, which can be found,in the holiday catalog. To me, this plaid pattern looks open with all the white space included in the gorgeous plaid.
So, let’s get to it. Here’s the challenge banner:

Normally, I would have gone with a floral card, but at this point in the year, I am working on holiday cards. I’ve created a few Christmas cards using the New Wonders host stamp set, am always pleased with how stinking cute these angels turn out.
Here’s my card:

Working within the Challenge Colors
I usually really like non-traditional Christmas colors. However, I also think that the Shaded Spruce and Cherry Cobbler combination is gorgeous, and this plaid is fabulous! I also colored the small angel hearts using Shaded Spruce. Her dress was colored using the Cherry Cobbler for the dress and Shaded Spruce for the slippers.
This beautiful sentiment is from the Perfectly Plaid stamp set, also in the holiday catalog. The Perfectly Plaid suite contains all the necessary accessories, including the Shaded Spruce and gold ribbon. Red and green – check.
I colored this angel’s hair using the Daffodil Delight blends combo and the Crumb Cake light blend. The three colors give the hair some depth so her hair isn’t just flat. Yellow – check.
I used the Crumb Cake blends combo for the angel’s fountain pen. The light and dark blends, along with the shading from the stamp, helps make the pen look dimensional. Brown – check.
This card wouldn’t be complete without some bling on the wings, fountain pen, hearts and stars, and her slippers. The Gold Wink of Stella works perfectly for the tip of the pen. I colored everything else with Clear Wink of Stella.
Once again, dimensionals provided depth for the main section of the card. I used the same piece of DSP for the envelope flap and then stamped a plaid Christmas tree on the bottom, right corner of the front of the envelope.
With that, I’d finished my card. Of course, I am cutting it down to the wire for the submission to the Color Throwdown gallery, which means it’s time to cut this off.
Thank you for stopping by today.
Have a Peachy day!
Sue
You Know You Want to…….
If you would like to order the bundle, stamp set, and/or punches, and live in the U.S., please use the icon above to be connected to my store. With just a few simple supplies, you, too, can create fabulous cards. I would be honored to help you do so. For example, check out this all-inclusive kit: Notes of Kindness Card Kit, item # 148266 ($35.00). The only thing you need to add is some Tombow liquid adhesive (item # 110755, $4.00) since the ink spot is included.. One kit, 20 cards, 5 of each of 4 designs. Check it out!
HOST CODE
IF you are placing an order (you know you want to do so) over $150, please contact me so you can earn all the Host Rewards for which you are entitled. If your order is less than $150, please use YYX6FBEC for the host code.
Wednesday was a HUGE day for Stampin’ Up! Not only did the Holiday Catalog go live for customers, the Buy 3, get 1 Free DSP sale from the annual catalog starts! I already have my FOUR sets of DSP picked out! Get yours now!


To shop from the holiday catalog, available now, click on the image below:
Perfectly Plaid stamp set, item # 149418
New Wonders host stamp set, item # 149426
Wrapped in Plaid DSP, item # 149596
Come to Gather DSP, item # 150454
Shaded Spruce/gold ribbon, item # 149567
Shaded Spruce cardstock, item # 146981
Daffodil Delight blends combo, item # 144603
Crumb Cake blends combo, item # 144601
Whisper White cardstock, item # 100730
Cherry Cobbler Stampin’ Pad, item # 126966
Momento Tuxedo Black stamp pad, item # 132708
Clear Wink of Stella, item # 141897
Stampin’ Dimensionals, item # 104430
Mini-Stampin Dimensionals, item # 144108
Tombow Multipurpose Liquid Glue, item # 110755
Sep 8, 2019 | Color Throwdown |
Free as a Bird, Short and Sweet
This is my second card using this beautiful bundle consisting of the Free as a Bird stamp set and Stitched Nested Labels die set. You can see the first card here.
I always enjoy the Color Throwdown challenges, and sometimes they really are a challenge. After thinking about this one for a few days, all of a sudden it dawned on me what I would create.
Here’s the banner for CTD#599:

Here’s the card I created:

And here’s the inside:

When Inspiration Strikes
During one of the Pinterest browsing scrolling, a card I saw reminded me that I hadn’t used the double time technique lately. One thought led to another, and that’s when the whole card came together in my mind.
I used Very Vanilla/cream for the base, and the top label for the bird and the greeting.
After cropping the labels to the sizes I wanted, I lined them up and stamped the single and double flowers from the Free as a Bird stamp set. Then I carefully lined up the Calypso Coral layer on the Very Vanilla background and stamped another layer of the flowers. I had to very carefully line all three layers together to fill in the outlines for the stamps.
I now had the Calypso Coral color I needed, and added the Night of Navy as the base, Very Vanilla/Cream was covered with the background and the label. The only color I needed to incorporate was mustard. In order to accomplish a mustard looking color, I used the Crumb Cake and Daffodil Delight blends combos. I also used the Crushed Curry Stamping Write marker on top of the blends. The bird’s beak is Calypso Coral.
I colored the flowers by laying all the layers flat and used the Calypso Coral blends combo to color them. I used the Calypso Coral Stamping Write marker to add details to the center of the flowers.
Finishing Touches
Dimensionals pop up each layer of the labels, which I carefully realigned before adhering the layers together.
I really felt that something was needed to tie all the elements together. Therefore, I used my Night of Navy dark blend to color three of the largest Pearl Basic Jewels. Turns out that I am really, really pleased with the pop of Night of Navy jewels on the Very Vanilla background. I now had some weight with the colored flowers, and the added weight with the Night of Navy jewels. Those two elements dictated the general area where I needed to place the Calypso Coral pearl in order to create a triangle of the three elements, which is very pleasing to the eye.
As always, I finished with the envelope. I used a piece of the coordinating DSP for the envelope flap. Finally, I stamped and colored another bird on the bottom, right corner on the front of the envelope.
Ta-Da! Success
Thank you for stopping by today.
Have a Peachy day!
Sue
You Know You Want to…….
If you would like to order the bundle, stamp set, and/or punches, and live in the U.S., please use the icon above to be connected to my store. With just a few simple supplies, you, too, can create fabulous cards. I would be honored to help you do so. For example, check out this all-inclusive kit: Notes of Kindness Card Kit, item # 148266 ($35.00). The only thing you need to add is a Momento Tuxedo Black ink pad (item # 132708, $6.00) and some Tombow liquid adhesive (item # 110755, $4.00). One kit, 20 cards, 5 of each of 4 designs. Check it out!
HOST CODE
IF you are placing an order (you know you want to do so) over $150, please contact me so you can earn all the Host Rewards for which you are entitled. If your order is less than $150, please use YYX6FBEC for the host code.
Wednesday was a HUGE day for Stampin’ Up! Not only did the Holiday Catalog go live for customers, the Buy 3, get 1 Free DSP sale from the annual catalog starts! I already have my FOUR sets of DSP picked out! Get yours now!
To shop from the holiday catalog, available now, click on the image below:

Supply list:
Free as a Bird bundle, item # 151123
OR
Free as a Bird stamp set, item # 149468
Stitched Nested Label dies, item # 149638
Bird Ballad DSP, item # 149592
Night of Navy cardstock, item # 100867
Very Vanilla cardstock, item # 101650
Momento Tuxedo Black ink pad, item # 132708
Calypso Coral blends combo, item # 144045
Crumb Cake blends combo, item # 144601
Daffodil Delight blends combo, item # 144603
Pearl Basic Jewels, item # 149607
Tombow Liquid Adhesive, item # 110755
Dimensionals, item # 104430
Jul 28, 2019 | Color Throwdown, Global Design Project |
Crafting Forever for Global Design Project #199 and Color Throwdown #533
Global Design Project’s theme this week is For the Love of Craft, which means I wanted to use the Crafting Forever stamp set. Then I saw the colors for Color Throwdown, pink, yellow, and orange, and I knew I could combine both challenges.
Here are the challenge banners:


Here’s the card I created:

I used Daffodil Delight, Melon Mambo, and Grapefruit Grove for the required colors. First, I stamped and colored the flower pot of art tools. The actual pot looked so bland, so I started pulling out DSP looking for something to match the colors I chose. That’s when I decided on a gingham pot. All I needed to do was to stamp the pot on a scrap of DSP and fussy cut it out.
The barrels of the tools needed some color, therefore, I used the Smoky Slate blends. Wink of Stella provided some bling on the bands of the tools as well as the blade of the knife. After stamping and cropping the sentiment using the Stitched Shapes and Layered Squares die sets. Once again, I used the marker to color the stitches in the ditch, which I also did on the white mat on top.
I knew I needed another element on the front of the card, and the Grapefruit Grove ribbon from SAB fit the bill.
New Embossing 3D Folder to the Rescue
My intention was to keep the card basically clean and simple. However, as I dry-fit the three front elements on the front, I thought the Melon Mambo mat looked too plain. I started going through my embossing folders to find something appropriate. To my surprise, my brand new Button Button folder almost jumped into my hands begging me to use it. The depth of the embossing provided just the perfect touch to tie everything together.
I have gotten to the point that every card I create needs to have a coordinating envelope. For this envelope, I stamped the scissors from the Crafting Forever stamp set on the front. I finished the envelope with a piece of Grapefruit Grove gingham DSP on the envelope flap, and that finished my challenge card and envelope.
Supplies I used:
Melon Mambo cardstock, item 115320
Whisper White cardstock, item 100730
Grapefruit Grove marker, item 150079 95 In Color Markers)
Whisper White envelopes, item 107301
Crafting Forever, item 151231
Layering Squares dies, item 141708
Stitched Shapes dies, item 145372
Button Button embossing folder, item 149581
Smoky Slate blend combo, item 147942
Memento Tuxedo Black ink pad, item 132708
Thank you so much for stopping by my blog today!
Have a Peachy day!
Sue
If you live in the U.S. and are in need of a demonstrator, please CLICK HERE to be connected to my store. I would be honored to help you create cards from beginner levels, to casual, and to avid levels. Placing an order with me would also entitle you to a free copy of the Holiday Catalog being released the first week of September.
Just a few more days to earn bonus coupons! $5 coupon for every $50 spent.


