Welcome to the Cardz 4 Galz challenge #153. Misti chose texture as the theme for the challenge starting today, August 12, 2021. I hope you will pop over to the challenge blog to see what the rest of the design team created as well. We all look forward to seeing what you create in our gallery!
Here’s my card:
This card could definitely be in the quick card category.
The Old Olive base measures 4-1/4 inches by 11 inches, scored at 5-1/2 inches to create a tent card.
The final size of the white brick and mortar background measures 4 inches by 5-1/4 inches.
The Real Red piece of cardstock measures 2 inches by 3-3/4 inches.
What I Did:
I did run the white cardstock through the cut and emboss machine using the brick and mortar 3D embossing folder. I would like to be able to say that I planned to have the grout lines raised on this card to add more texture to the card. However, I can’t say that because I made a mistake on the other side and simply turned the cardstock over. It does add more texture to the card, though.
I trimmed a piece of Real Red cardstock to 2 inches by 3-3/4 inches on purpose. My thought was to have the length of the flower stalks to fit on the cardstock, while having the sides of the flowers just peek over the edge. Thanks to the subtle embossing folder, there is just a very light texture on the red cardstock.
I used the Nature’s Harvest Bundle, found in the July – December mini-catalog for the flowers, sentiment, and dies.
The Stamparatus made stamping Daffodil Delight and Old Olive on the flowers and stalks pretty simple. First, I used the Old Olive Stampin’ Write Marker to color just the stems, then stamped them. Since the magnets held the scrap of white cardstock on the Stamparatus platform, coloring the flowers was easy-peasy. After cleaning the stamp, I used the Daffodil Delight Stampin’ Write Marker to color just the flowers. The Real Red ribbon just adds a pop of color and texture to the card.
I placed dimensionals under the flowers and stalk to adhere to the card.
I wanted the overall feel of this card to be soft. Therefore, I used Old Olive ink to stamp the sentiment. After I was sure the ink had dried, I cropped the sentiment using the label die in the bundle. The dimensionals under the end of the sentiment, and multipurpose glue on the part over the stems.
That’s it. Relatively fast. Definitely clean but full of texture, and includes the colors for the challenge. Win-win.
Thanks so much for stopping by my blog today. I’d love to hear your thoughts on this card.
One of my favorite bundles and coordinating Sale-a-Bration DSP:
156789
PENGUIN PLACE BUNDLE (ENGLISH)
BUNDLED SAVINGS
$31.50
158420
PENGUIN PLAYMATES 12″ X 12″ (30.5 X 30.5 CM) DESIGNER SERIES PAPER
SALE-A-BRATION
FREE
Do you live in the U.S. and need a demonstrator? If so, I’d love to talk to you!
Do You Want to Place an Order?
Of course you do!
If you are ordering less than $150.00, please use the host code shown. If you are ordering more than $150.00, please contact me first so you can get your stamping rewards! Any order over $50 will earn a little surprise from me.
The HOST CODE through August 31, 2021 is CJQW69XN.
Again, thank you for stopping by my blog today! I appreciate your comments and your time.
Welcome to the Cardz 4 Galz challenge #152.Helen chose using dies &/or punches theme for the challenge starting today, July 29, 2021. I hope you will pop over to the challenge blog to see what the rest of the design team created as well. We all look forward to seeing what you create in our gallery! I used both dies and punches for my card.
Here’s my card:
Measurements:
The Crumb Cake base measures 8-1/2 by 5-1/2 inches, scored at 4-1/4 inches.
I used Calypso Coral as an accent color. The mat measures 4-1/8 by 5-3/8 inches.
I dry embossed the white cardstock layer before trimming it down to 4 inches by 5-1/4 inches. There’s a white panel for the inside that’s the same size as the outside white panel.
The Crumb Cake and Early Espresso cardstock elements are all from my scraps.
The faux suede ribbon wraps around the Calypso Coral mat and I tied it in a square knot.
Putting It Together:
I used multipurpose glue to attached the embossed white panel to the Calypso Coral mat.
All three sentiments are from the Nothing’s Better Than stamp set. I just love this set with the coordinating dies and haven’t used it nearly as often as I should. The sentiments and cookies are stamped in Early Espresso on Crumb Cake cardstock.
After stamping the cookies, I cropped them using the cookie die.
I’ve been using the foam adhesive sheets very frugally. However, I used it the way the directions describe. Therefore, I cut a piece of Early Espresso just a tad larger than the die. I placed the Early Espresso cardstock on top of one side of the adhesive sheet. Then, I cropped “cookies” with the coordinating die set.
The Classic Label punch retired when the 2021 – 2022 annual catalog went live. However, I thought it would be perfect over and under “cookies”.
Next, I trimmed the bottom sentiment to 2-7/8 inches by 1-1/8 inches.
Then I outlined all three sentiments using the Calypso Coral Stampin’ Right marker.
Finally, I randomly stamped cookies on the envelope flap and put one on the bottom left-hand corner on the front.
The sentiment on the inside of the card says “because adulting is hard”. I stamped three more cookies along the bottom of the inside white cardstock panel.
That’s it. While the card might look complicated, the coordinating stamp set and dies make it less complicated.
Thank you very much for stopping by my blog. I appreciate every visit and comment.
BEAUTY OF THE EARTH 12″ X 12″ (30.5 X 30.5 CM) DESIGNER SERIES PAPER
$11.50 USD | 15.75 $ CAD $9.78 USD | 13.39 $ CAD
155696
131
BLOOM WHERE YOU’RE PLANTED 12″ X 12″ (30.5 X 30.5 CM) DESIGNER SERIES PAPER
$11.50 USD | 15.75 $ CAD $9.78 USD | 13.39 $ CAD
155499
131
HAND-PENNED 12″ X 12″ (30.5 X 30.5 CM) DESIGNER SERIES PAPER
$11.50 USD | 15.75 $ CAD $9.78 USD | 13.39 $ CAD
152494
132
IN GOOD TASTE 12″ X 12″ (30.5 X 30.5 CM) DESIGNER SERIES PAPER
$21.00 USD | 29.00 $ CAD $17.85 USD | 24.65 $ CAD
155817
132
IN THE WILD 12″ X 12″ (30.5 X 30.5 CM) DESIGNER SERIES PAPER
$11.50 USD | 15.75 $ CAD $9.78 USD | 13.39 $ CAD
155807
132
PANSY PETALS 12″ X 12″ (30.5 X 30.5 CM) DESIGNER SERIES PAPER
$11.50 USD | 15.75 $ CAD $9.78 USD | 13.39 $ CAD
155605
133
SWEET SYMMETRY 12″ X 12″ (30.5 X 30.5 CM) DESIGNER SERIES PAPER
$11.50 USD | 15.75 $ CAD $9.78 USD | 13.39 $ CAD
155718
133
TIDINGS OF CHRISTMAS 6″ X 6″ (15.2 X 15.2 CM) DESIGNER SERIES PAPER
$11.50 USD | 15.75 $ CAD $9.78 USD | 13.39 $ CAD
155686
134
YOU’RE A PEACH 12″ X 12″ (30.5 X 30.5 CM) DESIGNER SERIES PAPER
$11.50 USD | 15.75 $ CAD $9.78 USD | 13.39 $ CAD
It’s Almost Time for the Mini-Catalog and Sale-a-Bration launch!
I can’t begin to tell you how excited I was to see the new Mini-Catalog and Sale-a-Bration catalogs! Both catalogs go live on Tuesday, August 3rd! While I can’t show you the inside pages YET, I can share a card I made for a future blog post!
How stinking cute are those sheep?!? The Counting Sheep stamp set is FREE with a $50 purchase. The Sheep die set, including all the cropped shapes on the front (with the exception of the stitched rectangle die for the sentiment) is also FREE with a $50 purchase. That means, for a $100 total purchase, you can earn the stamp set AND the die set. Score! Contact me to find out how! [email protected]
Do you live in the U.S. and need a demonstrator? If so, I’d love to talk to you!
Do You Want to Place an Order?
Of course you do!
If you are ordering less than $150.00, please use the host code shown. If you are ordering more than $150.00, please contact me first so you can get your stamping rewards! Any order over $50 will earn a little surprise from me.
The HOST CODE through July 30, 2021 is 2TJSU2RQ.
Again, thank you for stopping by my blog today! I appreciate your comments and your time.
Welcome to the Cardz 4 Galz challenge #151. Shell chose the Christmas in July theme for the challenge starting today, July 15, 2021. I hope you will pop over to the challenge blog to see what the rest of the design team created as well. We all look forward to seeing what you create in our gallery!
Here’s my card:
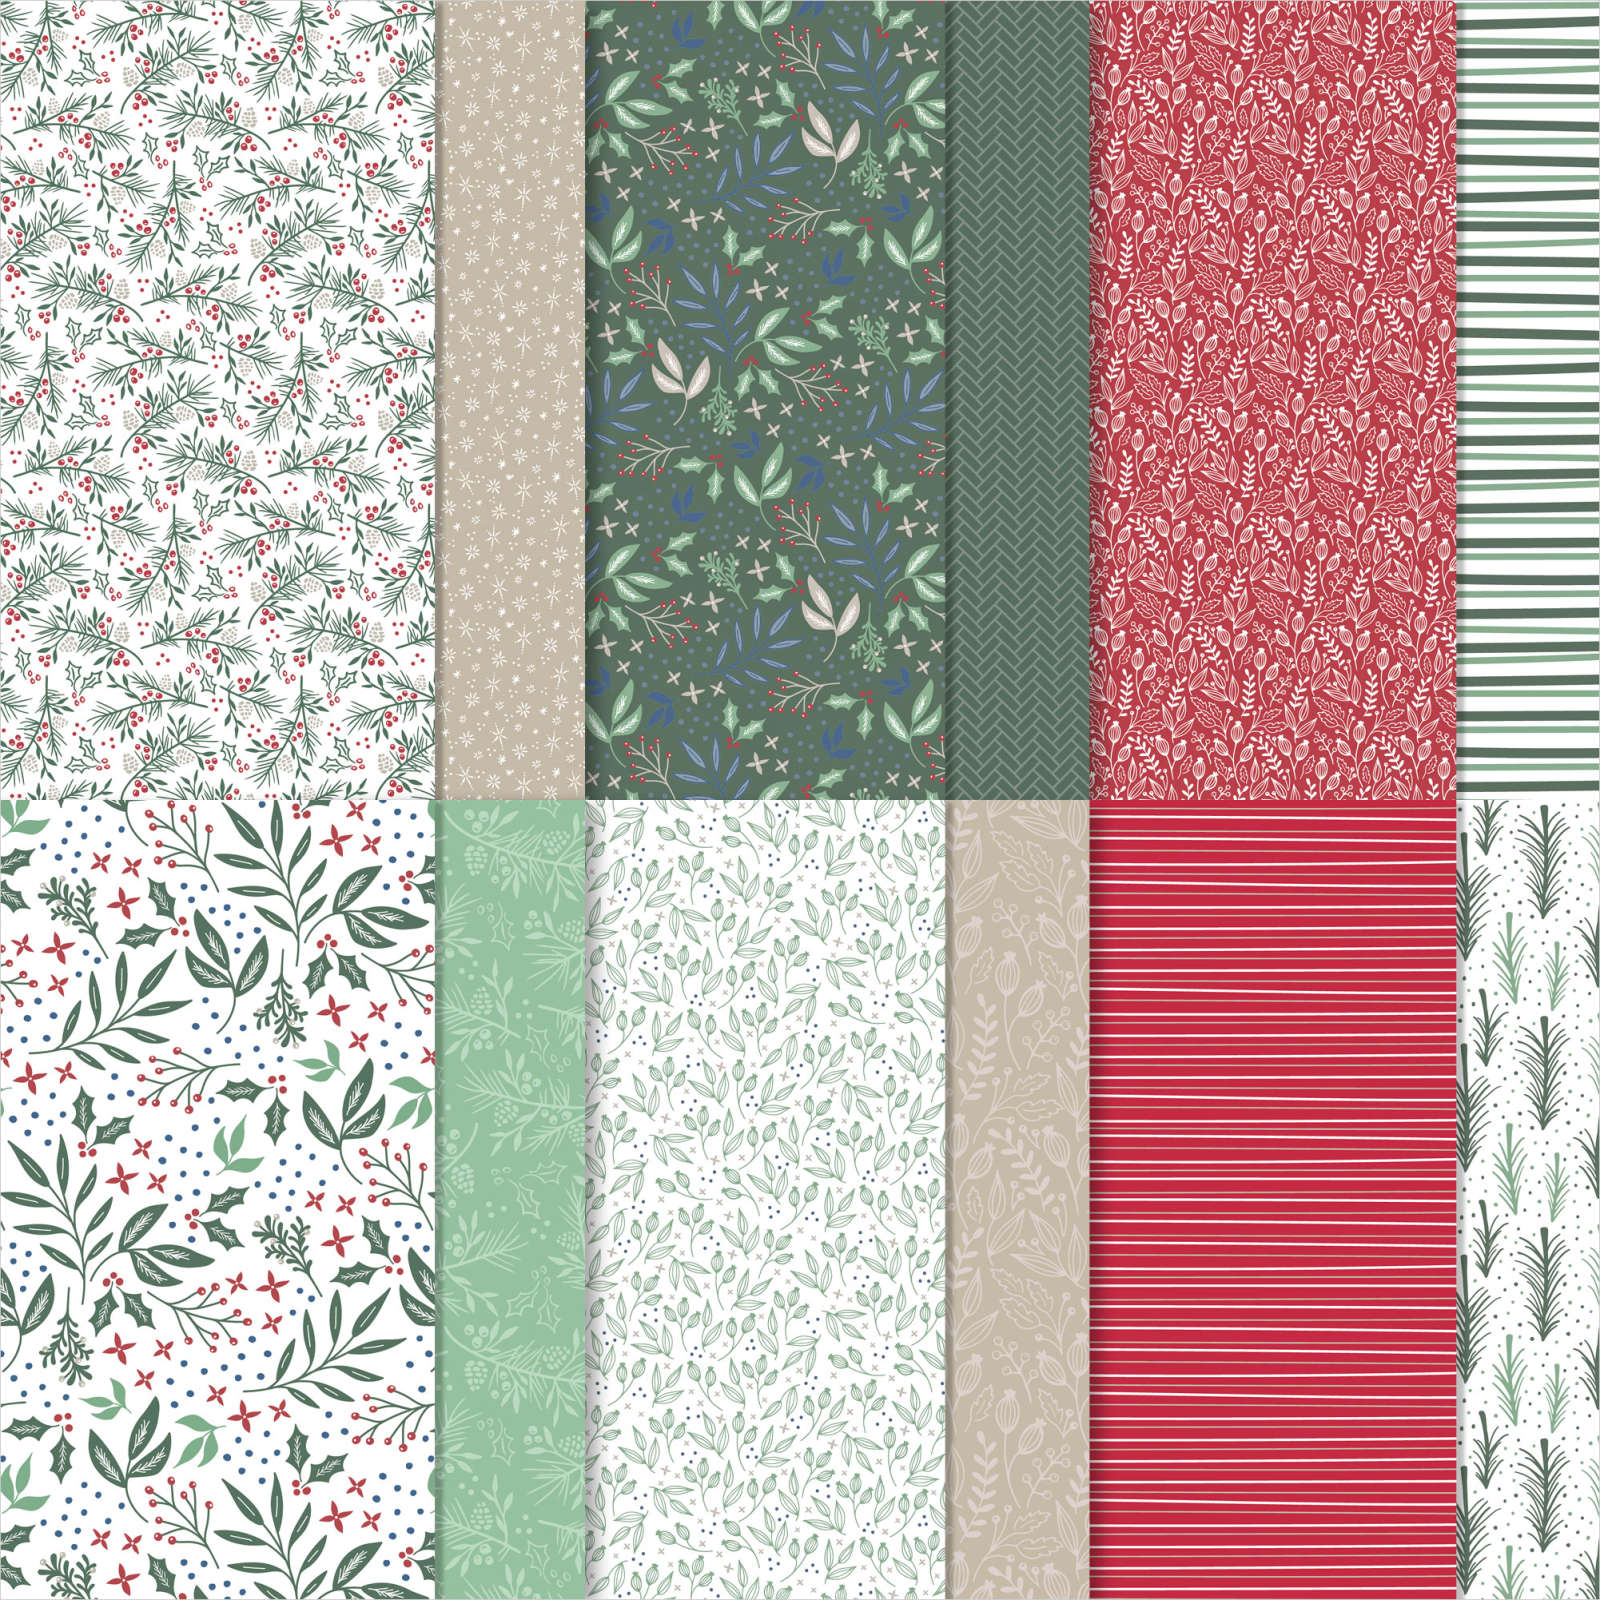
I really enjoy non-traditional Christmas colors, so this DSP (designer series paper), available in the annual catalog, seemed to be calling my name. Take a look at the patterns and colors found in this Tidings of Christmas DSP pack:
As you can see, the Cherry Cobbler red and Evening Evergreen green are in the paper. However, is also has Misty Moonlight, Soft Succulent, and Sahara Sand in the patterns. The possibilities for non-traditional accents and colored cards are endless. I chose to highlight the Misty Moonlight color for my card.
What I Did:
The Evening Evergreen base of the card measures 5-1/2 by 8-1/2, scored at 4-1/4 inches.
I used Cherry Cobbler for a mat, and it measures 4-1/8 by 5-3/8 inches. The Cherry Cobbler background for the trees and sentiment I already had on hand. Since I like to crop out the center of cardstock layers that won’t be seen, this piece was already cropped and ready to be embossed. I used the Tasteful Texture 3D embossing folder for the Cherry Cobbler cardstock. (Can I just say how much I miss my Subtle embossing folder?)
Next, I trimmed a piece of the Tidings of Christmas DSP to 4 inches by 5-1/4 inches.
I also had the Misty Moonlight piece of cardstock for the sentiment in my stash. There are a few reasons why I like cropping the middle out of cardstock that won’t be seen. One of the reasons is because I use the stitched rectangle dies to do so. This means that I have cropped rectangles in a variety of sizes in my scraps storage for each color.
The white cardstock for the inside panel of the card measures 4 inches by 5-1/4 inches, as always.
Next, I used the pine tree punch and punched out three trees from scraps of the Misty Moonlight 6 x 6 inch DSP.
Finally, I trimmed a piece of the Evening Evergreen 6 x 6 DSP to 6 inches by 2-1/2 inches for the envelope flap.
Assembly:
The first thing I did was adhere the top layer of DSP to the Cherry Cobbler mat using multipurpose liquid glue.
Next, I dry-fit both the red and blue sentiment blocks in place. I added the trees on top to find where I needed to place the ribbon and bow.
Once I had everything dry-fit, I knew I could stamp my sentiment from the Perfectly Plaid stamp set. Since this would be embossed, I needed to wipe down the cardstock using my embossing buddy to eliminate fingerprints. Using my Stamparatus, I was able to stamp two layers of VersaMark on the blue cardstock.
HINT: I’ve found it a bit easier to see if I have enough Versamark by looking at the paper from the side. This allows me to use the lighting on my desk to make sure I have the whole sentiment stamped.
Then, I covered the sentiment in white embossing powder and flicked off excess powder from the back of the cardstock. Finally, I heat set the sentiment using my heat tool.
HINT: I have a tall, large OttLite in my “blue (craft) room. Actually, I have four OttLites on my 3 desk areas. While heat setting the powder, I keep the cardstock under the light so I can see when it’s done. Since it’s possible to burn the embossing powder, stopping the heat at the right time is important.
Everything on the front of the card was adhered using multipurpose liquid glue except for the two trees and ribbon. I placed dimensionals under the trees and staggered the placement on the card.
After tying my bow, I placed a glue dot behind the bow to keep it in place and secure.
Finishing Touches:
The DSP is a pretty busy pattern and I didn’t want to add any more elements to the front. However, I did want to highlight the Misty Moonlight in the DSP pattern. Therefore, I used the fine tip glue pen to put little drops of glue on each of the Misty Moonlight dots. If you do this at home, make sure you let the dots completely dry before moving the DSP. Now the front of the card looks like it has a bunch of epoxy dots on it. Since it’s all part of the pattern, it works without adding anything extra to the card.
I stamped the inside sentiment from the Perfectly Plaid stamp set in Cherry Cobbler. Then I adhered the third punched out tree to the right-hand, bottom corner. Finally, I adhered the inside panel to the inside of the card.
After trimming the DSP on the envelope flap, I’d finished this card/envelope coordinated set.
Thanks so much for stopping by my blog today!
I’d love to hear what you think, and greatly appreciate every comment.
BEAUTY OF THE EARTH 12″ X 12″ (30.5 X 30.5 CM) DESIGNER SERIES PAPER
$11.50 USD | 15.75 $ CAD $9.78 USD | 13.39 $ CAD
155696
131
BLOOM WHERE YOU’RE PLANTED 12″ X 12″ (30.5 X 30.5 CM) DESIGNER SERIES PAPER
$11.50 USD | 15.75 $ CAD $9.78 USD | 13.39 $ CAD
155499
131
HAND-PENNED 12″ X 12″ (30.5 X 30.5 CM) DESIGNER SERIES PAPER
$11.50 USD | 15.75 $ CAD $9.78 USD | 13.39 $ CAD
152494
132
IN GOOD TASTE 12″ X 12″ (30.5 X 30.5 CM) DESIGNER SERIES PAPER
$21.00 USD | 29.00 $ CAD $17.85 USD | 24.65 $ CAD
155817
132
IN THE WILD 12″ X 12″ (30.5 X 30.5 CM) DESIGNER SERIES PAPER
$11.50 USD | 15.75 $ CAD $9.78 USD | 13.39 $ CAD
155807
132
PANSY PETALS 12″ X 12″ (30.5 X 30.5 CM) DESIGNER SERIES PAPER
$11.50 USD | 15.75 $ CAD $9.78 USD | 13.39 $ CAD
155605
133
SWEET SYMMETRY 12″ X 12″ (30.5 X 30.5 CM) DESIGNER SERIES PAPER
$11.50 USD | 15.75 $ CAD $9.78 USD | 13.39 $ CAD
155718
133
TIDINGS OF CHRISTMAS 6″ X 6″ (15.2 X 15.2 CM) DESIGNER SERIES PAPER
$11.50 USD | 15.75 $ CAD $9.78 USD | 13.39 $ CAD
155686
134
YOU’RE A PEACH 12″ X 12″ (30.5 X 30.5 CM) DESIGNER SERIES PAPER
$11.50 USD | 15.75 $ CAD $9.78 USD | 13.39 $ CAD
What’s Your Favorite DSP?
Do you live in the U.S. and need a demonstrator? If so, I’d love to talk to you!
Do You Want to Place an Order?
Of course you do!
If you are ordering less than $150.00, please use the host code shown. If you are ordering more than $150.00, please contact me first so you can get your stamping rewards! Any order over $50 will earn a little surprise from me.
The HOST CODE through July 30, 2021 is 2TJSU2RQ.
Again, thank you for stopping by my blog today! I appreciate your comments and your time.
Welcome to Cardz 4 Galz #150. Shell B. chose the theme of “Get Inky,” so take a look at the cards from the design team. I hope you find inspiration and look forward to seeing what you create!
Here’s my truly quick and easy card:
Measurements:
The Daffodil Delight card base measures 8-1/2 inches by 5-1/2 inches, scored at 4-1/4 inches.
I paired the Daffodil Delight with Gorgeous Grape, and the mat measures 4-1/8 inches by 5-3/8 inches.
Believe it or not, the front panel of this card uses white cardstock. Since I needed a piece for the inside panel as well, I trimmed two pieces of white cardstock to 4 inches by 5-1/4 inches.
I am still using up the last of the 2020-2021 brights 6 x 6 inch DSP. The piece on the bottom of the front of the card measures 1-3/4 inches by 4 inches.
At this point, I also trimmed another piece of the Gorgeous Grape DSP to 6 inches by 2-1/2 inches for the envelope flap. I adhered it immediately so I wouldn’t put it away, as I’ve been known to do.
That’s all the measuring.
What I Did:
Make sure you have grid paper, or something down to protect your work space before you begin. This will get a little bit messy when you start to splatter.
I used the blotch stamp from Artistically Inked and Daffodil Delight to randomly stamp all over one of the piece of white cardstock. Since this stamp is a Distinkive stamp, it automatically creates the texture and depth of color. Yeah! Score!
Let’s Get a Little Bit Messy
Now comes the messy part, but it’s so much fun! I used what I thought was my clear Wink of Stella, but now I think it might have been more of a rose gold color. It really doesn’t matter because it’s gorgeous!
Since my Wink of Stella pen was brand new, I gently squeezed it over my grid paper until I had a few drops on the grid.
I dipped the brush end into the ink, and then tapped it on the cap all over the white cardstock. All over it. I wound up with some larger spots and little tiny spots. I just kept dipping and tapping until I thought I’d had enough.
Here’s a close-up of some of my splatters:
Before going any further, I adhered the Gorgeous Grape DSP to the bottom of the front panel of the card using my fav multipurpose liquid adhesive.
Next, I stamped the sentiments, from the Biggest Wish photopolymer stamp set, in Gorgeous Grape.
I found out after I stamped “HAPPY” that the Wink of Stella makes a difference in the ink of the sentiment. However, I kind of like the results, so I stamped “birthday”.
The Gorgeous Grape ribbon goes around the white cardstock. Thankfully, I was able to create a pretty decent bunny ears bow. By placing it off-center on the left side of the front, I created a triangle of sorts of Gorgeous Grape.
Finishing Up
The Wink of Stella provides enough bling to the front of the card, but I thought it needed something else. After playing around in my embellishments, I decided to use three large yellow dots from the Playing with Patterns resin dots. The dots are Crushed Curry, but it just looks like the dark parts of the stamped front.
In order to create some height and interest, I put dimensionals under the purple front panel.
There’s a glue dot under the center part of the bow on the front of the card. The ribbon straddles where the two pieces of paper come together on the front.
Next, I trimmed the DSP on the envelope flap. I also punched a purple DSP circle for the envelope seal. After running it through the XYRON create-a-sticker machine, I’d finished this card/envelope/seal coordinated set.
It took me longer to type this post than it did to create the card.
Thanks so much for stopping by my blog today!
I’d love to hear what you think, and greatly appreciate every comment.
BEAUTY OF THE EARTH 12″ X 12″ (30.5 X 30.5 CM) DESIGNER SERIES PAPER
$11.50 USD | 15.75 $ CAD $9.78 USD | 13.39 $ CAD
155696
131
BLOOM WHERE YOU’RE PLANTED 12″ X 12″ (30.5 X 30.5 CM) DESIGNER SERIES PAPER
$11.50 USD | 15.75 $ CAD $9.78 USD | 13.39 $ CAD
155499
131
HAND-PENNED 12″ X 12″ (30.5 X 30.5 CM) DESIGNER SERIES PAPER
$11.50 USD | 15.75 $ CAD $9.78 USD | 13.39 $ CAD
152494
132
IN GOOD TASTE 12″ X 12″ (30.5 X 30.5 CM) DESIGNER SERIES PAPER
$21.00 USD | 29.00 $ CAD $17.85 USD | 24.65 $ CAD
155817
132
IN THE WILD 12″ X 12″ (30.5 X 30.5 CM) DESIGNER SERIES PAPER
$11.50 USD | 15.75 $ CAD $9.78 USD | 13.39 $ CAD
155807
132
PANSY PETALS 12″ X 12″ (30.5 X 30.5 CM) DESIGNER SERIES PAPER
$11.50 USD | 15.75 $ CAD $9.78 USD | 13.39 $ CAD
155605
133
SWEET SYMMETRY 12″ X 12″ (30.5 X 30.5 CM) DESIGNER SERIES PAPER
$11.50 USD | 15.75 $ CAD $9.78 USD | 13.39 $ CAD
155718
133
TIDINGS OF CHRISTMAS 6″ X 6″ (15.2 X 15.2 CM) DESIGNER SERIES PAPER
$11.50 USD | 15.75 $ CAD $9.78 USD | 13.39 $ CAD
155686
134
YOU’RE A PEACH 12″ X 12″ (30.5 X 30.5 CM) DESIGNER SERIES PAPER
$11.50 USD | 15.75 $ CAD $9.78 USD | 13.39 $ CAD
What’s Your Favorite?
There’s FOUR 12 x 12 DSP packs on my order now!
Do you live in the U.S. and need a demonstrator? If so, I’d love to talk to you!
Do You Want to Place an Order?
Of course you do!
If you are ordering less than $150.00, please use the host code shown. If you are ordering more than $150.00, please contact me first so you can get your stamping rewards! Any order over $50 will earn a little surprise from me.
The HOST CODE through July 30, 2021 is 2TJSU2RQ.
Again, thank you for stopping by my blog today! I appreciate your comments and your time.
Welcomes to Cardz 4 Galz challenge, # 149! I’m excited to share my first card with you as a design team member! I can’t tell you how happy it made me to see that my first contribution included purple and circles. This challenge allowed me to use two of my new Stampin’ Up! products, and I thoroughly enjoyed myself!
Here’s my card:
I just happened to have one piece of the dotted 6 x 6 inch DSP (designer series paper) left from last year, and it totally fit my fun card.
While the cutout circles looks like I spent a bunch of time deciding on the size and placement of the circles, I didn’t! The new Picture This die set comes with a circular die, used here, and a rectangular die that crops out 3 stitched rectangles. Awesome dies!
Theses puffins and fish, from the new Party Puffins stamp set, are just so stinking cute!! I used three of the five sentiments found in this stamp set. There’s also a dancing puffin and individual candles. If you want to see for yourself, check out the SUPPLIES USED section below, or page 67 of the Stampin’ Up! 2021 – 2022 annual catalog.
Measurements
The Concord Grape base measures 4-1/4 inches by 11 inches, scored at 5-1/2 inches to create a tent fold card.
Two 5-1/4 inches by 4 inches pieces of white cardstock are needed. One goes on the outside under the DSP, and the other goes on the inside.
The piece of the Highland Heather DSP measures 4 inches by 5-1/4 inches.
I used scraps of white for the outside sentiment banner and for the large party animal puffin.
The last piece of the striped Highland Heather DSP for the envelope flap measures 2-1/2 inches by 6 inches. Since I tend to put the envelope flap pieces away, I am now adhering them to the flap of the medium white envelopes as soon as its cut down.
Using the Picture This Die:
Before using the die, I needed to make sure I knew what stamp would be used in each circle. I also needed to decide if I wanted to use the die the way I did or upside down. Not that there’s a right way or wrong way to use the die. It just depends on where you want your characters to wind up living. Since the large puffin faces to the right, he really needed to be on the left side of the card. Decision made. Next, I cropped the DSP with the die.
First, I traced the circles for the dies onto my grid paper on my desk. That allowed me to play around with the stamps to see what stamp would fit in each circle.
Once I felt happy with my placement, I used a pencil and very, very lightly traced the open circles onto the white cardstock.
Stamping
Next, I stamped the fish, cake, and small puffin directly onto the white background cardstock. I stamped the party puffin onto the scrap white paper and fussy cut him out.
The blends I used to color everything in were the light and dark Highland Heather, and Pumpkin Pie blends. I also used the Gorgeous Grape marker to color the candles.
Even though the puffins stamp a solid body color, I used the light Smoky Slate blend to color in their bodies.
You can’t have a party without bling! Therefore, I added Wink of Stella to the bows on the fish, the dark purple parts of the party hat, and the light and dark parts of the cake. However, I still thought the cake needed something else.
I used the Fine-tip glue pen to color in the white parts of the cake and the candles. I did use a couple of layers on each. It really gives dimension to the cake. However, after you color with the fine-tip glue pen, you really need to let it lay flat and dry completely.
Next, I popped the dotted DSP up by using dimensionals underneath it. I lost track of how many regular size and mini ones I used, but nothing will get smushed.
I stamped the sentiment on a piece of scrap cardstock. Then I used the Banners Pick a Punch to indent the ends. I didn’t want to have a mat underneath the sentiment, but did want it to stand out. So, I used my Pumpkin Pie Stampin’ Write Marker to outline the sentiment banner. It’s adhered to the dotted DSP using multipurpose glue.
Then, I stamped the inside sentiment and puffin on the white panel and adhered it to the base of the card.
A Coloring Tip and Finishing Up
If you go outside of the lines with a blend, you can carefully use the color lifter blend to lighten the mistake. I’ve never really been pleased when using the color lifter and I finally figured out why! I am much happier with the results on the party puffin because I dotted the color lifter. I’m sure I heard that somewhere along the line, but completely forgot. Anyway, this time it worked.
Finally, I trimmed down the DSP on the envelope flap. Since I had the circles already ready cropped out, I used one for the envelope seal. I picked one of the medium ones and ran it through my XYRON create a sticker machine. The seal then lives inside the envelope until it’s time to use the card.
With that, I’d finished this card/envelope/seal coordinating set. What a cute card!
I’d love to hear what you think, and greatly appreciate every comment.
What’s New? Since you asked, it’s The Kits Collection!
Take a look at this video explaining what you get with your kit! Remember, the kits are all inclusive! Just add some of your own crafting basic tools, and you are good to go!
Do you live in the U.S. and need a demonstrator? If so, I’d love to talk to you!
Do You Want to Place an Order?
Of course you do!
If you are ordering less than $150.00, please use the host code shown. If you are ordering more than $150.00, please contact me first so you can get your stamping rewards! Any order over $50 will earn a little surprise from me.
The HOST CODE through June, 2021 is 26AD7SA3.
Again, thank you for stopping by my blog today! I appreciate your comments and your time.
Welcome to Just Peachy Stamping by Sue Jackson: an independent Stampin' Up demonstrator.
Through Stampin' Up!, I happily share my love of papercrafting through sales, classes, small stamping group meet-ups and workshops. I think that being a teacher in my "real life", I have a unique approach to sharing my fantastic hobby. I look forward to connecting with you!